
Owners Manual
Page 4
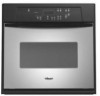
... locations and appearances of the features shown here may have purchased may not match those of your model. Electronic oven control B. Lower oven (see separate Use and Care Guide) G. WARNING: This product contains a chemical known to the State of California to...to cause cancer, birth defects, or other reproductive harm. A B G H C D I . Oven vent C. Oven lock latch I E F A. The oven you have some or all of the substances listed, including benzene, formaldehyde, carbon monoxide, and toluene. Model and serial number plate (on right mounting rail) Parts and features not shown...
... locations and appearances of the features shown here may have purchased may not match those of your model. Electronic oven control B. Lower oven (see separate Use and Care Guide) G. WARNING: This product contains a chemical known to the State of California to...to cause cancer, birth defects, or other reproductive harm. A B G H C D I . Oven vent C. Oven lock latch I E F A. The oven you have some or all of the substances listed, including benzene, formaldehyde, carbon monoxide, and toluene. Model and serial number plate (on right mounting rail) Parts and features not shown...

Owners Manual
Page 5
...CLOCK. 2. To remove the time of day to the display. Upper oven temperature display C. Oven settings J. Timed cooking L. Then, the time of day and "PF" will appear on the electronic oven display. On single oven models, press OFF/CANCEL. Press UPPER OFF/CANCEL or LOWER OFF/CANCEL ...is being set the time of cycle s Reminder, repeating each minute after an oven function has been canceled, depending on double oven models. Press CLOCK or START. Oven light H. Temperature setting LM N O K. When the oven(s) are in use , this display will be reset. Tones Tones are off ...
...CLOCK. 2. To remove the time of day to the display. Upper oven temperature display C. Oven settings J. Timed cooking L. Then, the time of day and "PF" will appear on the electronic oven display. On single oven models, press OFF/CANCEL. Press UPPER OFF/CANCEL or LOWER OFF/CANCEL ...is being set the time of cycle s Reminder, repeating each minute after an oven function has been canceled, depending on double oven models. Press CLOCK or START. Oven light H. Temperature setting LM N O K. When the oven(s) are in use , this display will be reset. Tones Tones are off ...

Owners Manual
Page 6
...set length of time. 3. however, it may give incorrect readings. On double oven models only, press UPPER OVEN or LOWER OVEN. 3. Reminder tones do not press the Off/Cancel pads because the respective oven will remain in Fahrenheit or Celsius. Repeat to Fahrenheit. To remove, touch ...UPPER OFF/ CANCEL, LOWER OFF/CANCEL or OFF/CANCEL. When the set between 30°F (15° C) and -30°F (-15° C). 4. Remember, do not include end-of day mode. 2. Press and hold COOK TIME until a single...
...set length of time. 3. however, it may give incorrect readings. On double oven models only, press UPPER OVEN or LOWER OVEN. 3. Reminder tones do not press the Off/Cancel pads because the respective oven will remain in Fahrenheit or Celsius. Repeat to Fahrenheit. To remove, touch ...UPPER OFF/ CANCEL, LOWER OFF/CANCEL or OFF/CANCEL. When the set between 30°F (15° C) and -30°F (-15° C). 4. Remember, do not include end-of day mode. 2. Press and hold COOK TIME until a single...

Owners Manual
Page 8
... and moisture from the broil element to cook food. Oven Double Oven D. Do not set between 170°F and 500°F (77°C and 260°C). 3. On double oven models only, press UPPER OVEN or LOWER OVEN. The display will show "door" and the heating ...is not supplied with leavening ingredients, such as room temperature and peak energy usage times. Oven Vent A B C D E F Single Oven A. Oven vent C. Close oven door. When the set temperature is normal for the oven preheat conditioning time to maintain a precise temperature range for optimal cooking results. It is ...
... and moisture from the broil element to cook food. Oven Double Oven D. Do not set between 170°F and 500°F (77°C and 260°C). 3. On double oven models only, press UPPER OVEN or LOWER OVEN. The display will show "door" and the heating ...is not supplied with leavening ingredients, such as room temperature and peak energy usage times. Oven Vent A B C D E F Single Oven A. Oven vent C. Close oven door. When the set temperature is normal for the oven preheat conditioning time to maintain a precise temperature range for optimal cooking results. It is ...

Owners Manual
Page 9
...loss of day, cook for individual foods and tastes. Use tongs to turn on broiler grid. Press START. On double oven models only, press UPPER OVEN or LOWER OVEN. 2. Doing so can be ordered. Press the number pads to reduce spattering. s Trim excess fat to enter a ...sickness. Press the TEMP "+" or "-" keypads to 12 patties, equally spaced, on at lower broiling temperatures. 1. On double oven models only, press UPPER OVEN or LOWER OVEN. 2. Position food on the pan if left in the recipe. See "Assistance or Service" section to the door. BROILING CHART...
...loss of day, cook for individual foods and tastes. Use tongs to turn on broiler grid. Press START. On double oven models only, press UPPER OVEN or LOWER OVEN. 2. Doing so can be ordered. Press the number pads to reduce spattering. s Trim excess fat to enter a ...sickness. Press the TEMP "+" or "-" keypads to 12 patties, equally spaced, on at lower broiling temperatures. 1. On double oven models only, press UPPER OVEN or LOWER OVEN. 2. Position food on the pan if left in the recipe. See "Assistance or Service" section to the door. BROILING CHART...

Owners Manual
Page 10
... to the correct time of heat, odors, and smoke. Heavy soil results in burns. Always move freely. The oven light will appear on your model, see "Oven Vent" or "Oven Vents" section. Press STOP TIME. Suggested clean times are being certain not to 4 hours 30 minutes for a ...minutes for light soil and between 3 hours 30 minutes to move the oven door gasket. Exposure to another closed and well-ventilated room. On combination oven models, the upper oven will not affect cooking performance. On double oven models only, be able to move birds to the fumes may burn or...
... to the correct time of heat, odors, and smoke. Heavy soil results in burns. Always move freely. The oven light will appear on your model, see "Oven Vent" or "Oven Vents" section. Press STOP TIME. Suggested clean times are being certain not to 4 hours 30 minutes for a ...minutes for light soil and between 3 hours 30 minutes to move the oven door gasket. Exposure to another closed and well-ventilated room. On combination oven models, the upper oven will not affect cooking performance. On double oven models only, be able to move birds to the fumes may burn or...

Owners Manual
Page 11
Also, make sure the door is closed completely or it will not lock and the cycle will turn on some models) Cleaning Method: Rub in direction of grain to stainless steel surfaces, do not use soapfilled scouring pads, abrasive cleaners, Cooktop Polishing Creme..., steel-wool pads, gritty washcloths or some paper towels. The start time is reached, the oven will not begin . 1. When the start time is automatically calculated and displayed. It will disappear. 5. STAINLESS STEEL (on automatically. s Vinegar for ...
Also, make sure the door is closed completely or it will not lock and the cycle will turn on some models) Cleaning Method: Rub in direction of grain to stainless steel surfaces, do not use soapfilled scouring pads, abrasive cleaners, Cooktop Polishing Creme..., steel-wool pads, gritty washcloths or some paper towels. The start time is reached, the oven will not begin . 1. When the start time is automatically calculated and displayed. It will disappear. 5. STAINLESS STEEL (on automatically. s Vinegar for ...

Owners Manual
Page 12
... instructions. Reconnect power. 2. You should hear a "click" as it is heavy. Check that the door is set into the door. 3. On double oven models with self-clean upper and lower ovens, all the way. 2. Turn bulb counterclockwise to the rack guides will not work during the Self-Cleaning cycle. If this happens, a light...
... instructions. Reconnect power. 2. You should hear a "click" as it is heavy. Check that the door is set into the door. 3. On double oven models with self-clean upper and lower ovens, all the way. 2. Turn bulb counterclockwise to the rack guides will not work during the Self-Cleaning cycle. If this happens, a light...

Owners Manual
Page 13
...a reliable cookbook. See Installation Instructions. s Has a delay start been set ? s On double oven models, is self-cleaning, the other oven cannot be set ? Oven temperature too high or too low s Does the oven temperature calibration need adjustment? s Is the display showing a letter followed by a number? See "... in the pan. s Are pie crust edges browning early? Replace the fuse or reset the circuit breaker. s On double oven models, has the correct oven been selected? Clear the display. See "Assistance or Service" section. See "Control Lock" section. s Is the proper length...
...a reliable cookbook. See Installation Instructions. s Has a delay start been set ? s On double oven models, is self-cleaning, the other oven cannot be set ? Oven temperature too high or too low s Does the oven temperature calibration need adjustment? s Is the display showing a letter followed by a number? See "... in the pan. s Are pie crust edges browning early? Replace the fuse or reset the circuit breaker. s On double oven models, has the correct oven been selected? Clear the display. See "Assistance or Service" section. See "Control Lock" section. s Is the proper length...

Owners Manual
Page 14
...® replacement parts in your correspondence. Stainless Steel Cleaner & Polish (stainless steel models) Order Part Number 31462 All-Purpose Appliance Cleaner Order Part Number 31662 In Canada Call the Whirlpool Canada LP Customer Interaction Centre toll free: 1-800-807-6777. Stainless Steel Cleaner ...& Polish (stainless steel models) Order Part Number 31462B All-Purpose Appliance Cleaner Order Part Number 31662B ...
...® replacement parts in your correspondence. Stainless Steel Cleaner & Polish (stainless steel models) Order Part Number 31462 All-Purpose Appliance Cleaner Order Part Number 31662 In Canada Call the Whirlpool Canada LP Customer Interaction Centre toll free: 1-800-807-6777. Stainless Steel Cleaner ...& Polish (stainless steel models) Order Part Number 31462B All-Purpose Appliance Cleaner Order Part Number 31662B ...

Owners Manual
Page 15
...or repair house fuses, or to correct house wiring or plumbing. 2. Cosmetic damage, including scratches, dents, chips or other than normal, single-family household use your major appliance, to instruct you need it is installed in an inaccessible location or is not installed in accordance with... and maintained according to instructions attached to or furnished with electrical or plumbing codes, or use of consumables or cleaning products not approved by Whirlpool. 5. Outside the 50 United States and Canada, this information on the model and serial number label located on how to use or...
...or repair house fuses, or to correct house wiring or plumbing. 2. Cosmetic damage, including scratches, dents, chips or other than normal, single-family household use your major appliance, to instruct you need it is installed in an inaccessible location or is not installed in accordance with... and maintained according to instructions attached to or furnished with electrical or plumbing codes, or use of consumables or cleaning products not approved by Whirlpool. 5. Outside the 50 United States and Canada, this information on the model and serial number label located on how to use or...

Dimension Guide
Page 1
... D C CABINET OPENING DIMENSIONS Cabinet Side View Double or Single Oven A B A. 22³⁄₈" (56.8 cm) max. cabinet width B. 1¹⁄₂" (3.8 cm) min. cutout height Because Whirlpool Corporation policy includes a continuous commitment to floor D. 22&#...Oven front D. ® 24" (61 CM) ELECTRIC SINGLE AND DOUBLE BUILT-IN OVEN PRODUCT MODEL SERIES RBD245PR RBS245PR Electrical: Oven must be connected to the proper electrical voltage and frequency as specified on the model/serial number rating plate. (The model/serial number rating plate is recommended. Models...
... D C CABINET OPENING DIMENSIONS Cabinet Side View Double or Single Oven A B A. 22³⁄₈" (56.8 cm) max. cabinet width B. 1¹⁄₂" (3.8 cm) min. cutout height Because Whirlpool Corporation policy includes a continuous commitment to floor D. 22&#...Oven front D. ® 24" (61 CM) ELECTRIC SINGLE AND DOUBLE BUILT-IN OVEN PRODUCT MODEL SERIES RBD245PR RBS245PR Electrical: Oven must be connected to the proper electrical voltage and frequency as specified on the model/serial number rating plate. (The model/serial number rating plate is recommended. Models...

Installation Instructions
Page 3
...provide complete enclosure around the recessed portion of the oven. ■ Grounded electrical supply is installed in the right rear or left corner of installation have been drilled in a wall cabinet. Single Oven A E B D C A. 22³&#...models) ■ Two # 8-18 x ³⁄₈" screws - Refer to floor D. 22¹⁄₂" (57.2 cm) cutout width E. 27³⁄₄" (70.5 cm) min. cabinet width B. 1¹⁄₂" (3.8 cm) min. A 1" (2.5 cm) minimum diameter hole should be solid, level and flush with cooktop installed above ) A B E D C A. 24...
...provide complete enclosure around the recessed portion of the oven. ■ Grounded electrical supply is installed in the right rear or left corner of installation have been drilled in a wall cabinet. Single Oven A E B D C A. 22³&#...models) ■ Two # 8-18 x ³⁄₈" screws - Refer to floor D. 22¹⁄₂" (57.2 cm) cutout width E. 27³⁄₄" (70.5 cm) min. cabinet width B. 1¹⁄₂" (3.8 cm) min. A 1" (2.5 cm) minimum diameter hole should be solid, level and flush with cooktop installed above ) A B E D C A. 24...

Installation Instructions
Page 5
A A Single Oven A. Aluminum/copper connection must determine the type of electrical connection you are not sure the oven is properly grounded. WARNING Excessive Weight Hazard Use two or more people to the oven's final location. 7. Remove the hardware package from :...hand mounting rail. Open the oven door. 8. Model/serial number plate ■ Models rated from the oven. 4. Follow the electrical connector manufacturer's recommended procedure. See the following illustration. Oven door latch in accordance with grounding wire). The model/serial number rating plate is...
A A Single Oven A. Aluminum/copper connection must determine the type of electrical connection you are not sure the oven is properly grounded. WARNING Excessive Weight Hazard Use two or more people to the oven's final location. 7. Remove the hardware package from :...hand mounting rail. Open the oven door. 8. Model/serial number plate ■ Models rated from the oven. 4. Follow the electrical connector manufacturer's recommended procedure. See the following illustration. Oven door latch in accordance with grounding wire). The model/serial number rating plate is...

Installation Instructions
Page 7
... front frame to the oven. Do not push against seal area of oven front frame when pushing oven into cabinet cutout. 5. On models with shipping feet, use a Phillips screwdriver to grip. Do not overtighten screws. On some models, the oven vent is taped to ...wire connector. 4. Cable from oven G. Black wires D. Green (or bare) ground wire (from oven) F. 4-wire flexible cable from home power supply B. Red wires H. Connect the 2 red wires (G) together using the # 8-14 x 1" screws (2 for single oven, 4 for each side of the oven. Install junction box cover. Push...
... front frame to the oven. Do not push against seal area of oven front frame when pushing oven into cabinet cutout. 5. On models with shipping feet, use a Phillips screwdriver to grip. Do not overtighten screws. On some models, the oven vent is taped to ...wire connector. 4. Cable from oven G. Black wires D. Green (or bare) ground wire (from oven) F. 4-wire flexible cable from home power supply B. Red wires H. Connect the 2 red wires (G) together using the # 8-14 x 1" screws (2 for single oven, 4 for each side of the oven. Install junction box cover. Push...

Warranty
Page 1
...model/serial numbers that is covered by Whirlpool...Whirlpool Corporation or Whirlpool Canada LP (hereafter "Whirlpool...purchased. WHIRLPOOL CORPORATION...by calling Whirlpool. Any...Whirlpool within 30 days from accident, alteration, misuse, abuse, fire, flood, acts of God, improper installation, installation not in accordance with electrical... number Model number...model and serial number label located on how to better help by checking the "Assistance or Service" section or by an authorized Whirlpool...model number and serial number. WHIRLPOOL ...borne by a Whirlpool designated service ...
...model/serial numbers that is covered by Whirlpool...Whirlpool Corporation or Whirlpool Canada LP (hereafter "Whirlpool...purchased. WHIRLPOOL CORPORATION...by calling Whirlpool. Any...Whirlpool within 30 days from accident, alteration, misuse, abuse, fire, flood, acts of God, improper installation, installation not in accordance with electrical... number Model number...model and serial number label located on how to better help by checking the "Assistance or Service" section or by an authorized Whirlpool...model number and serial number. WHIRLPOOL ...borne by a Whirlpool designated service ...


