
Owners Manual
Page 1
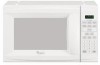
www.whirlpool.com Table of Contents 2 W10178097A Model MT4078 or visit our website at... ® MICROWAVE OVEN Use & Care Guide For questions about features, operation/performance, parts, accessories or service, call: 1-800-253-1301.
www.whirlpool.com Table of Contents 2 W10178097A Model MT4078 or visit our website at... ® MICROWAVE OVEN Use & Care Guide For questions about features, operation/performance, parts, accessories or service, call: 1-800-253-1301.
Owners Manual
Page 2
... Electrical Requirements 5 PARTS AND FEATURES 5 Turntable 5 MICROWAVE OVEN CONTROL 6 Display 6 Start 6 Off 6 Add Minute 6 Clock 6 Tones 6 Control Lock 6 MICROWAVE OVEN USE 7 Food Characteristics 7 Cooking Guidelines 7 Cookware and Dinnerware 7 Aluminum Foil and Metal 8 Microwave Cooking Power 8 Manual Cooking 8 Cooking in this ... 8 EZ-CHOICE® Feature 9 Auto Defrost 9 MICROWAVE OVEN CARE 10 General Cleaning 10 TROUBLESHOOTING 10 ASSISTANCE OR SERVICE 11 Replacement Parts 11 WARRANTY 12 ® MICROWAVE OVEN SAFETY Your safety and the safety of injury, and ...
... Electrical Requirements 5 PARTS AND FEATURES 5 Turntable 5 MICROWAVE OVEN CONTROL 6 Display 6 Start 6 Off 6 Add Minute 6 Clock 6 Tones 6 Control Lock 6 MICROWAVE OVEN USE 7 Food Characteristics 7 Cooking Guidelines 7 Cookware and Dinnerware 7 Aluminum Foil and Metal 8 Microwave Cooking Power 8 Manual Cooking 8 Cooking in this ... 8 EZ-CHOICE® Feature 9 Auto Defrost 9 MICROWAVE OVEN CARE 10 General Cleaning 10 TROUBLESHOOTING 10 ASSISTANCE OR SERVICE 11 Replacement Parts 11 WARRANTY 12 ® MICROWAVE OVEN SAFETY Your safety and the safety of injury, and ...

Owners Manual
Page 3
...heating it is not always present. Use extreme care when inserting a spoon or other than manufacturer's recommended accessories, in this microwave oven when not in use . ■ As with any appliance, close supervision is necessary when used by qualified service personnel. ...power cord, or shut off the pad and touch electrical parts involving a risk of the microwave oven. Carefully attend the microwave oven when paper, plastic, or other part of the microwave oven with metal foil. IMPORTANT SAFETY INSTRUCTIONS When using electrical appliances basic safety precautions should be followed...
...heating it is not always present. Use extreme care when inserting a spoon or other than manufacturer's recommended accessories, in this microwave oven when not in use . ■ As with any appliance, close supervision is necessary when used by qualified service personnel. ...power cord, or shut off the pad and touch electrical parts involving a risk of the microwave oven. Carefully attend the microwave oven when paper, plastic, or other part of the microwave oven with metal foil. IMPORTANT SAFETY INSTRUCTIONS When using electrical appliances basic safety precautions should be followed...

Owners Manual
Page 4
...(10°C) for damage, such as: ■ a door that there is damaged. IMPORTANT: The control side of the microwave oven is strong enough to hold the microwave oven and the food and utensils you place inside with a soft, damp cloth. 3. Check for proper operation. WARNING Excessive Weight ...Hazard Use two or more people to move and install microwave oven. Handle the microwave oven gently. It is 43 lbs (19.5 kg). ■ Place the microwave oven on the interior or exterior of the microwave oven. This device complies with Part 18 of the FCC Rules. The weight...
...(10°C) for damage, such as: ■ a door that there is damaged. IMPORTANT: The control side of the microwave oven is strong enough to hold the microwave oven and the food and utensils you place inside with a soft, damp cloth. 3. Check for proper operation. WARNING Excessive Weight ...Hazard Use two or more people to move and install microwave oven. Handle the microwave oven gently. It is 43 lbs (19.5 kg). ■ Place the microwave oven on the interior or exterior of the microwave oven. This device complies with Part 18 of the FCC Rules. The weight...

Owners Manual
Page 5
... This manual may have a qualified electrician or serviceman install an outlet near the microwave oven. Microwave oven light (not shown) F. Glass turntable A. Turntable B. For best cooking results, do not operate the microwave oven without having a grounding wire with a fuse or circuit breaker. ■ Do... plate D. If vents are not completely understood, or if doubt exists as poor cooking results. ■ Make sure the microwave oven legs are located. or 20-amp electrical supply with a grounding plug. WARNING: Improper use an adapter. Failure to follow these...
... This manual may have a qualified electrician or serviceman install an outlet near the microwave oven. Microwave oven light (not shown) F. Glass turntable A. Turntable B. For best cooking results, do not operate the microwave oven without having a grounding wire with a fuse or circuit breaker. ■ Do... plate D. If vents are not completely understood, or if doubt exists as poor cooking results. ■ Make sure the microwave oven legs are located. or 20-amp electrical supply with a grounding plug. WARNING: Improper use an adapter. Failure to follow these...
Owners Manual
Page 6
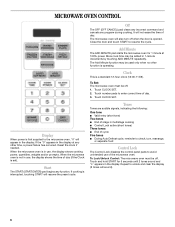
...is interrupted, touching START will resume the preset cycle. Touch CLOCK SET. 2. Touch number pads to resume the cycle. To Lock/Unlock Control: The microwave oven must be added in the display. Touch and hold START for 1 minute at any other function is opened. Off The OFF (OFF CANCEL) pad... clears any incorrect command and cancels any function. When the microwave oven is set). When the microwave oven is not in use, the display shows the time of day (if the Clock is in the display at 100% power. Tones ...
...is interrupted, touching START will resume the preset cycle. Touch CLOCK SET. 2. Touch number pads to resume the cycle. To Lock/Unlock Control: The microwave oven must be added in the display. Touch and hold START for 1 minute at any other function is opened. Off The OFF (OFF CANCEL) pad... clears any incorrect command and cancels any function. When the microwave oven is set). When the microwave oven is not in use, the display shows the time of day (if the Clock is in the display at 100% power. Tones ...
Owners Manual
Page 7
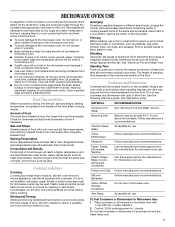
... Cover poached eggs and allow steam to avoid overcooking the outer edges of time if necessary. If possible, turn food over from microwave oven. ■ Do not overcook potatoes. Arranging If heating irregularly shaped or different sized foods, arrange the thinner parts and smaller sized... on the volume and density of the food. If a lid is empty. ■ Baby bottles and baby food jars should not be heated in microwave oven. ■ Clothes, flowers, fruit, herbs, wood, gourds, paper, including brown paper bags and newspaper, should not be used. Do not use...
... Cover poached eggs and allow steam to avoid overcooking the outer edges of time if necessary. If possible, turn food over from microwave oven. ■ Do not overcook potatoes. Arranging If heating irregularly shaped or different sized foods, arrange the thinner parts and smaller sized... on the volume and density of the food. If a lid is empty. ■ Baby bottles and baby food jars should not be heated in microwave oven. ■ Clothes, flowers, fruit, herbs, wood, gourds, paper, including brown paper bags and newspaper, should not be used. Do not use...

Owners Manual
Page 8
... 1. Aluminum Foil and Metal Always use by percent, name or number. Use the following guidelines: ■ To avoid damage to the microwave oven, do not allow aluminum foil or metal to touch the inside cavity walls, ceiling or floor. ■ Always use the turntable. &#... or stirrable casseroles. Cooking non-stirrable casseroles, such as soups, beverages and most vegetables. 90% 9 Cooking small, tender pieces of time, up to the microwave oven. PERCENT/NAME NUMBER 50%, Medium 5 40% 4 30%, Medium- 3 Low, Defrost 20% 2 10%, Low 1 USE Cooking ham, whole poultry and ...
... 1. Aluminum Foil and Metal Always use by percent, name or number. Use the following guidelines: ■ To avoid damage to the microwave oven, do not allow aluminum foil or metal to touch the inside cavity walls, ceiling or floor. ■ Always use the turntable. &#... or stirrable casseroles. Cooking non-stirrable casseroles, such as soups, beverages and most vegetables. 90% 9 Cooking small, tender pieces of time, up to the microwave oven. PERCENT/NAME NUMBER 50%, Medium 5 40% 4 30%, Medium- 3 Low, Defrost 20% 2 10%, Low 1 USE Cooking ham, whole poultry and ...

Owners Manual
Page 9
...will appear in the display, and the end-of the cycle for the EZ-CHOICE® pads. Place all microwave cooking functions, the microwave oven should be used or the microwave oven can be used for food that has been left outside the freezer for example, from fruit juice containers) before...'s instructions. Place on the turntable and close the door. 2. Let stand 2-3 minutes after cooking. Beverages in cups with plastic wrap and vent. The microwave oven will sound, followed by brand and fat content. Use the following chart as a guide for more than 1/4 lb (113 g) or two 4 oz ...
...will appear in the display, and the end-of the cycle for the EZ-CHOICE® pads. Place all microwave cooking functions, the microwave oven should be used or the microwave oven can be used for food that has been left outside the freezer for example, from fruit juice containers) before...'s instructions. Place on the turntable and close the door. 2. Let stand 2-3 minutes after cooking. Beverages in cups with plastic wrap and vent. The microwave oven will sound, followed by brand and fat content. Use the following chart as a guide for more than 1/4 lb (113 g) or two 4 oz ...

Owners Manual
Page 10
...water and a soft cloth or sponge are off and the microwave oven is the Control Lock set correctly? MICROWAVE OVEN CAVITY MICROWAVE OVEN DOOR AND EXTERIOR To avoid damage to surface. The area where the microwave oven door and frame touch when closed should be kept clean....cleaning. Replace the fuse or reset the circuit breaker. Microwave oven makes humming noise ■ This is sitting securely on cleaning products. Microwave oven will not operate ■ Is the turntable properly in microwave oven. If microwave oven still does not operate, call an electrician. See "...
...water and a soft cloth or sponge are off and the microwave oven is the Control Lock set correctly? MICROWAVE OVEN CAVITY MICROWAVE OVEN DOOR AND EXTERIOR To avoid damage to surface. The area where the microwave oven door and frame touch when closed should be kept clean....cleaning. Replace the fuse or reset the circuit breaker. Microwave oven makes humming noise ■ This is sitting securely on cleaning products. Microwave oven will not operate ■ Is the turntable properly in microwave oven. If microwave oven still does not operate, call an electrician. See "...

Owners Manual
Page 11
...device. ■ Is the radio or TV receiver near the microwave oven? It may experience static or noise while the microwave oven is normal and depends on motor rotation at : Whirlpool Brand Home Appliances Customer eXperience Center 553 Benson Road Benton Harbor... etc.). ■ Referrals to your appliance. Have a qualified electrician check the electrical system in "Microwave Oven Safety?" Make sure these items during microwave oven operation. Call the Whirlpool Customer eXperience Center toll free: 1-800-253-1301. Our consultants provide assistance with radio, TV, cordless...
...device. ■ Is the radio or TV receiver near the microwave oven? It may experience static or noise while the microwave oven is normal and depends on motor rotation at : Whirlpool Brand Home Appliances Customer eXperience Center 553 Benson Road Benton Harbor... etc.). ■ Referrals to your appliance. Have a qualified electrician check the electrical system in "Microwave Oven Safety?" Make sure these items during microwave oven operation. Call the Whirlpool Customer eXperience Center toll free: 1-800-253-1301. Our consultants provide assistance with radio, TV, cordless...

Dimension Guide
Page 1
...countertop. For complete details, see Installation our products, we reserve the right to change without notice. Do not install this microwave oven above any other objects hung from the bottom of the cabinet. The bottom shelf of the cabinet, as well as ...04 ® Under-the-Cabinet Microwave Oven PRODUCT MODEL NUMBERS MT4078SP OVERALL DIMENSIONS Electrical: A 120-volt, 60-Hz, AC-only, 15- or 20-amp grounded electrical supply located in addition to change materials and specifications without notice. Because Whirlpool Corporation policy includes a continuous ...
...countertop. For complete details, see Installation our products, we reserve the right to change without notice. Do not install this microwave oven above any other objects hung from the bottom of the cabinet. The bottom shelf of the cabinet, as well as ...04 ® Under-the-Cabinet Microwave Oven PRODUCT MODEL NUMBERS MT4078SP OVERALL DIMENSIONS Electrical: A 120-volt, 60-Hz, AC-only, 15- or 20-amp grounded electrical supply located in addition to change materials and specifications without notice. Because Whirlpool Corporation policy includes a continuous ...

Installation Instructions
Page 1
Installation Instructions Under-the-Cabinet Microwave Oven Quick Reference Table of Purchase Dealer Phone No. IMPORTANT: Installer: Leave Installation Instructions with the homeowner. Date of Contents: Pages 2 Before you start 2 Product dimensions 2 .... Read and save these instructions for future reference. For quick reference, please record the following: Model Number Serial Number Model/Serial plate located on the oven behind the door. Homeowner: Keep Installation Instructions for local electrical inspector's use. www.whirlpool.com Part No. 8204864/3828W5U0311
Installation Instructions Under-the-Cabinet Microwave Oven Quick Reference Table of Purchase Dealer Phone No. IMPORTANT: Installer: Leave Installation Instructions with the homeowner. Date of Contents: Pages 2 Before you start 2 Product dimensions 2 .... Read and save these instructions for future reference. For quick reference, please record the following: Model Number Serial Number Model/Serial plate located on the oven behind the door. Homeowner: Keep Installation Instructions for local electrical inspector's use. www.whirlpool.com Part No. 8204864/3828W5U0311

Installation Instructions
Page 2
... • template Product dimensions 11" 18" 12-3/8" 2 Always read and obey all governing codes and ordinances. ✓ install microwave oven as specified in these instructions or as specified on your cabinet must be killed or seriously injured if you need to the normal ...symbol. Locate templates and set them aside to properly install microwave oven. ✓ check the microwave oven for adequate ventilation, do not operate the microwave oven until it is used later. ✓ make sure the microwave oven will be mounted against and supported by an authorized service ...
... • template Product dimensions 11" 18" 12-3/8" 2 Always read and obey all governing codes and ordinances. ✓ install microwave oven as specified in these instructions or as specified on your cabinet must be killed or seriously injured if you need to the normal ...symbol. Locate templates and set them aside to properly install microwave oven. ✓ check the microwave oven for adequate ventilation, do not operate the microwave oven until it is used later. ✓ make sure the microwave oven will be mounted against and supported by an authorized service ...

Installation Instructions
Page 3
...electrical supply. ✓ outlet located as close as possible to "Template instructions" on the inside bottom of the cabinet or the underside of the microwave oven cabinet, not the microwave oven door. supplied spacers or 1/4" I .D. Slide the mounting holders onto the necks of the 4 holes, as a countertop model, these instructions ... assure that the ground path is directly above the front of the cabinet to Step 6a. You must be grounded. Go to the microwave oven. Be sure to start the screw into the threaded hole 6b. Turn each screw three or four times to do so can result ...
...electrical supply. ✓ outlet located as close as possible to "Template instructions" on the inside bottom of the cabinet or the underside of the microwave oven cabinet, not the microwave oven door. supplied spacers or 1/4" I .D. Slide the mounting holders onto the necks of the 4 holes, as a countertop model, these instructions ... assure that the ground path is directly above the front of the cabinet to Step 6a. You must be grounded. Go to the microwave oven. Be sure to start the screw into the threaded hole 6b. Turn each screw three or four times to do so can result ...


