

Installation Instructions
Page 1
... have provided many important safety messages in this manual and on your particular model may differ slightly from the illustration in Rear Wall 7 Attach Mounting Plate to and including 36" (91.4 cm) wide. This is the safety alert symbol. ...
... have provided many important safety messages in this manual and on your particular model may differ slightly from the illustration in Rear Wall 7 Attach Mounting Plate to and including 36" (91.4 cm) wide. This is the safety alert symbol. ...

Installation Instructions
Page 2
...No. 3 Phillips screwdriver for wall or roof venting. Toggle nuts (2) D. 1/4" x 2" lag screws (2) E. See User Instructions.) NOTE: Depending on model, charcoal filters may be installed. The piece inside upper cabinet. NOTES: ■ If installing the microwave oven near a left sidewall, make sure that... "Rectangular to it during the "Mark Rear Wall" part of microwave oven) Aluminum grease filters Charcoal filters (Depending on model, aluminum grease filter and charcoal filter may not be included. INSTALLATION REQUIREMENTS Tools and Parts Tools Needed Gather the required tools...
...No. 3 Phillips screwdriver for wall or roof venting. Toggle nuts (2) D. 1/4" x 2" lag screws (2) E. See User Instructions.) NOTE: Depending on model, charcoal filters may be installed. The piece inside upper cabinet. NOTES: ■ If installing the microwave oven near a left sidewall, make sure that... "Rectangular to it during the "Mark Rear Wall" part of microwave oven) Aluminum grease filters Charcoal filters (Depending on model, aluminum grease filter and charcoal filter may not be included. INSTALLATION REQUIREMENTS Tools and Parts Tools Needed Gather the required tools...
Installation Instructions
Page 12
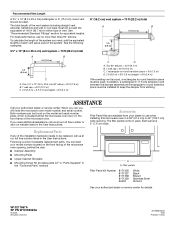
...;" x 10" (8.3 x 25.4 cm) rectangular or 6" (15.2 cm) round vent should be replaced, call , you will need the microwave oven model number and serial number. See "Recommended Standard Fittings" section for either type of the microwave oven opening . To calculate the length of each vent piece... In addition, a rectangular 3" (7.6 cm) extension vent between the damper assembly and rectangular to round transition piece must be found on the model and serial number plate, which is 3" (7.6 cm) wide. ASSISTANCE Call your authorized dealer or service center for details. Both numbers can be...
...;" x 10" (8.3 x 25.4 cm) rectangular or 6" (15.2 cm) round vent should be replaced, call , you will need the microwave oven model number and serial number. See "Recommended Standard Fittings" section for either type of the microwave oven opening . To calculate the length of each vent piece... In addition, a rectangular 3" (7.6 cm) extension vent between the damper assembly and rectangular to round transition piece must be found on the model and serial number plate, which is 3" (7.6 cm) wide. ASSISTANCE Call your authorized dealer or service center for details. Both numbers can be...

Use and Care Manual
Page 1
www.whirlpool.com Table of Contents 2 8205959/4619-652-64152 Model MH3184XP MICROWAVEHOOD COMBINATION For questions about features, operation/performance parts, accessories or service, call: 1-800-253-1301. or visit our website at...
www.whirlpool.com Table of Contents 2 8205959/4619-652-64152 Model MH3184XP MICROWAVEHOOD COMBINATION For questions about features, operation/performance parts, accessories or service, call: 1-800-253-1301. or visit our website at...
Use and Care Manual
Page 4
... cooking equipment. [] Do not store this oven with maximum width of 36 inches. [] Do not immerse cord or plug in the "PAN BROWN" mode (on models with metal scouring pads. Do not use straight-sided containers with metal foil. This will cause overheating of the oven. THiS COULD RESULT IN VERY...
... cooking equipment. [] Do not store this oven with maximum width of 36 inches. [] Do not immerse cord or plug in the "PAN BROWN" mode (on models with metal scouring pads. Do not use straight-sided containers with metal foil. This will cause overheating of the oven. THiS COULD RESULT IN VERY...
Use and Care Manual
Page 5
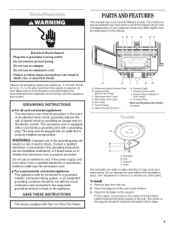
... G. Support D. Remove tape from the illustrations in death, fire, or electrical shock. Place the turntable on the oven cavity bottom. 3. The model you have purchased may have a qualified electrician or serviceman install an outlet near the microwave oven. [] For a permanently connected appliance: This appliance ...here. The appearance of the hub. Do not remove ground prong. To Install: 1. The plug must be provided. I J KH H. Model and Serial Number Plate B. Place the support on the support. In the event of an electrical short circuit, grounding reduces the risk of ...
... G. Support D. Remove tape from the illustrations in death, fire, or electrical shock. Place the turntable on the oven cavity bottom. 3. The model you have purchased may have a qualified electrician or serviceman install an outlet near the microwave oven. [] For a permanently connected appliance: This appliance ...here. The appearance of the hub. Do not remove ground prong. To Install: 1. The plug must be provided. I J KH H. Model and Serial Number Plate B. Place the support on the support. In the event of an electrical short circuit, grounding reduces the risk of ...

Use and Care Manual
Page 9
Always use in the oven. Aluminum foil and some models), aluminum foil for shielding, and approved meat thermometers may be used with the following chart as cheese and egg dishes, pudding and custards. Do Not ...
Always use in the oven. Aluminum foil and some models), aluminum foil for shielding, and approved meat thermometers may be used with the following chart as cheese and egg dishes, pudding and custards. Do Not ...
Use and Care Manual
Page 14
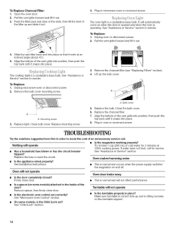
... (on when the door is opened and when the oven is correct side up and slide it rests at 100% cooking power. On some models} attached to avoid the cost of the door? Turntable will not operate • Is the door completely closed? Make sure turntable is operating..... Pull the vent grille forward and lift it out. 3. Align the bottom of the filter up and is normal and will automatically come on some models, is a candelabra base bulb. See "Assistance or Service" section to reorder. Lift up the bulb cover. Mounting screw 3. Replace light. A. Bulb cover ...
... (on when the door is opened and when the oven is correct side up and slide it rests at 100% cooking power. On some models} attached to avoid the cost of the door? Turntable will not operate • Is the door completely closed? Make sure turntable is operating..... Pull the vent grille forward and lift it out. 3. Align the bottom of the filter up and is normal and will automatically come on some models, is a candelabra base bulb. See "Assistance or Service" section to reorder. Lift up the bulb cover. Mounting screw 3. Replace light. A. Bulb cover ...
Use and Care Manual
Page 15
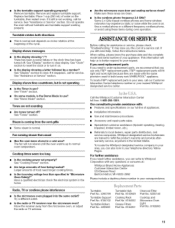
..." section. See "Display" section to clear display. See "Assistance or Service" section. See "Timer" section. • On some models, is on the turntable, then restart oven. Steam is coming from the microwave oven, or adjust the radio or TV antenna. Larger ...Make sure these items during oven operation. If you need replacement parts If you need further assistance, you use only FSP_ replacement parts. Whirlpool designated service technicians are clean. Is the turntable support operating properly? See "Cooking Power" section. Are large amounts of appliances. •...
..." section. See "Display" section to clear display. See "Assistance or Service" section. See "Timer" section. • On some models, is on the turntable, then restart oven. Steam is coming from the microwave oven, or adjust the radio or TV antenna. Larger ...Make sure these items during oven operation. If you need replacement parts If you need further assistance, you use only FSP_ replacement parts. Whirlpool designated service technicians are clean. Is the turntable support operating properly? See "Cooking Power" section. Are large amounts of appliances. •...

Use and Care Manual
Page 16
...you how to parts or systems resulting from warranty coverage. 3. Dealer name Address Phone number Model number Serial number Purchase date 8205959/4619-652-64152 © 2005 Whirlpool Corporation. Service calls to correct the installation of the Use & Care Guide. DISCLAIMER OF IMPLIED... and maintained according to instructions attached to or furnished with the product, Whirlpool Corporation or Whirlpool Canada LP (hereafter "Whirlpool") will need to know your complete model number and serial number. ITEMS WHIRLPOOL WILL NOT PAY FOR 1. If you need it is installed in an...
...you how to parts or systems resulting from warranty coverage. 3. Dealer name Address Phone number Model number Serial number Purchase date 8205959/4619-652-64152 © 2005 Whirlpool Corporation. Service calls to correct the installation of the Use & Care Guide. DISCLAIMER OF IMPLIED... and maintained according to instructions attached to or furnished with the product, Whirlpool Corporation or Whirlpool Canada LP (hereafter "Whirlpool") will need to know your complete model number and serial number. ITEMS WHIRLPOOL WILL NOT PAY FOR 1. If you need it is installed in an...


