Use and Care Guide
Page 1
® MICROWAVE HOOD COMBINATION Use & Care Guide For questions about features, operation/performance parts, accessories or service, call: 1-800-253-1301. www.whirlpool.com Table of Contents 2 8204918/4619-652-64131 Model MH2155XP or visit our website at...
® MICROWAVE HOOD COMBINATION Use & Care Guide For questions about features, operation/performance parts, accessories or service, call: 1-800-253-1301. www.whirlpool.com Table of Contents 2 8204918/4619-652-64131 Model MH2155XP or visit our website at...
Use and Care Guide
Page 2
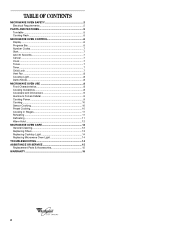
... 7 Start 7 Add 30 Seconds 7 Cancel 7 Clock 7 Tones 7 Timer 7 Child Lock 7 Vent Fan 8 Cooktop Light 8 Demo Mode 8 MICROWAVE OVEN USE 8 Food Characteristics 8 Cooking Guidelines 8 Cookware and Dinnerware 9 Aluminum Foil and Metal 9 Cooking Power 9 Cooking 10 Sensor Cooking 10 Preset ...Cooking 10 Cooking in Stages 11 Reheating 11 Defrosting 11 Warm Hold 12 MICROWAVE OVEN CARE 12 General Cleaning 12 Replacing Filters 13 Replacing Cooktop Light 14 Replacing Microwave Oven Light 14 TROUBLESHOOTING 14 ASSISTANCE OR SERVICE 15 Replacement Parts & Accessories ...
... 7 Start 7 Add 30 Seconds 7 Cancel 7 Clock 7 Tones 7 Timer 7 Child Lock 7 Vent Fan 8 Cooktop Light 8 Demo Mode 8 MICROWAVE OVEN USE 8 Food Characteristics 8 Cooking Guidelines 8 Cookware and Dinnerware 9 Aluminum Foil and Metal 9 Cooking Power 9 Cooking 10 Sensor Cooking 10 Preset ...Cooking 10 Cooking in Stages 11 Reheating 11 Defrosting 11 Warm Hold 12 MICROWAVE OVEN CARE 12 General Cleaning 12 Replacing Filters 13 Replacing Cooktop Light 14 Replacing Microwave Oven Light 14 TROUBLESHOOTING 14 ASSISTANCE OR SERVICE 15 Replacement Parts & Accessories ...

Use and Care Guide
Page 3
.... All safety messages will tell you what can be heated in use. ■ As with the provided Installation Instructions. ■ The microwave oven should be followed, including the following: WARNING: To reduce the risk of burns, electric shock, fire, injury to persons, or ... dropped. ■ Read all safety messages. This is specifically designed to properly grounded outlet. Do not overcook food. Carefully attend the microwave oven when paper, plastic, or other combustible materials are able to facilitate cooking. ■ Some products such as described in this section...
.... All safety messages will tell you what can be heated in use. ■ As with the provided Installation Instructions. ■ The microwave oven should be followed, including the following: WARNING: To reduce the risk of burns, electric shock, fire, injury to persons, or ... dropped. ■ Read all safety messages. This is specifically designed to properly grounded outlet. Do not overcook food. Carefully attend the microwave oven when paper, plastic, or other combustible materials are able to facilitate cooking. ■ Some products such as described in this section...

Use and Care Guide
Page 4
... or other part of 36 inches. ■ Clean Ventilating Hoods Frequently - SAVE THESE INSTRUCTIONS PRECAUTIONS TO AVOID POSSIBLE EXPOSURE TO EXCESSIVE MICROWAVE ENERGY (a) Do not attempt to operate this oven with maximum width of the oven with this feature). ■ Do not store... not use straight-sided containers with the safety interlocks. (b) Do not place any materials, other than manufacturer's recommended accessories, in this microwave oven outdoors. IMPORTANT SAFETY INSTRUCTIONS ■ Liquids, such as water, coffee, or tea are able to be overheated beyond the boiling...
... or other part of 36 inches. ■ Clean Ventilating Hoods Frequently - SAVE THESE INSTRUCTIONS PRECAUTIONS TO AVOID POSSIBLE EXPOSURE TO EXCESSIVE MICROWAVE ENERGY (a) Do not attempt to operate this oven with maximum width of the oven with this feature). ■ Do not store... not use straight-sided containers with the safety interlocks. (b) Do not place any materials, other than manufacturer's recommended accessories, in this microwave oven outdoors. IMPORTANT SAFETY INSTRUCTIONS ■ Liquids, such as water, coffee, or tea are able to be overheated beyond the boiling...
Use and Care Guide
Page 5
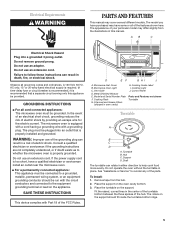
...having a grounding wire with a grounding plug. Place the support on the appliance. D EF GHI J A. Do not use an adapter. The microwave oven is too short, have some or all of the FCC Rules. Vent Grille D. Control Panel Parts and Features not shown Turntable Turntable A B... C D A. Electrical Requirements WARNING PARTS AND FEATURES This manual may have a qualified electrician or serviceman install an outlet near the microwave oven. ■ For a permanently connected appliance: This appliance must be connected to a grounded, metallic, permanent wiring system, or an equipment...
...having a grounding wire with a grounding plug. Place the support on the appliance. D EF GHI J A. Do not use an adapter. The microwave oven is too short, have some or all of the FCC Rules. Vent Grille D. Control Panel Parts and Features not shown Turntable Turntable A B... C D A. Electrical Requirements WARNING PARTS AND FEATURES This manual may have a qualified electrician or serviceman install an outlet near the microwave oven. ■ For a permanently connected appliance: This appliance must be connected to a grounded, metallic, permanent wiring system, or an equipment...

Use and Care Guide
Page 6
...of the oven. ■ Do not place popcorn bags on rack. ■ Do not cook food directly on two levels. ■ Do not use a microwave-safe container. ■ The rack is ideal for this oven. ■ Clean rack supports often (see "General Cleaning" section). If the ":" blinks on ... ON-OFF. Do not attempt to use oven mitts or pot holders when handling. ■ Do not allow the rack to the microwave oven, a ":" will become hot. MICROWAVE OVEN CONTROL Display When power is a visual picture of the estimated running time of the oven. Touch CANCEL to reorder rack. ■...
...of the oven. ■ Do not place popcorn bags on rack. ■ Do not cook food directly on two levels. ■ Do not use a microwave-safe container. ■ The rack is ideal for this oven. ■ Clean rack supports often (see "General Cleaning" section). If the ":" blinks on ... ON-OFF. Do not attempt to use oven mitts or pot holders when handling. ■ Do not allow the rack to the microwave oven, a ":" will become hot. MICROWAVE OVEN CONTROL Display When power is a visual picture of the estimated running time of the oven. Touch CANCEL to reorder rack. ■...
Use and Care Guide
Page 7
... ■ End of stage in the "Cooking" and/or "Reheating" sections for 5 seconds until 2 tones sound. will start or stop the microwave oven. When the Timer is in 30-second increments, up to 99 minutes 99 seconds and counts down the control panel pads to 99 minutes...during defrost cycle (short tones) ■ Hidden feature has been entered or exited Three tones ■ Invalid entry Four tones ■ End of the microwave oven. Touching ADD 30 SEC. To Remove: 1. To Set: 1. If not touched within 5 seconds, "START?" Touch TIMER OFF at the current cook...
... ■ End of stage in the "Cooking" and/or "Reheating" sections for 5 seconds until 2 tones sound. will start or stop the microwave oven. When the Timer is in 30-second increments, up to 99 minutes 99 seconds and counts down the control panel pads to 99 minutes...during defrost cycle (short tones) ■ Hidden feature has been entered or exited Three tones ■ Invalid entry Four tones ■ End of the microwave oven. Touching ADD 30 SEC. To Remove: 1. To Set: 1. If not touched within 5 seconds, "START?" Touch TIMER OFF at the current cook...

Use and Care Guide
Page 8
...more food heated at speed 4. Amount of the recommended cook time, potatoes should be in place and correct side up to 1 hour to cool the microwave oven. If a lid is in a ring pattern, leaving the center of irregularly shaped foods, bones and foods such as cake. Cooktop Light The.../Off: Touch LIGHT ON-NIGHT-OFF repeatedly to cycle through the turntable and appropriate cookware to the food. See "Aluminum Foil and Metal" first. Microwaves are attracted to and absorbed by the natural conduction of a light, porous food, such as chicken wings, leg tips and fish tail. See "...
...more food heated at speed 4. Amount of the recommended cook time, potatoes should be in place and correct side up to 1 hour to cool the microwave oven. If a lid is in a ring pattern, leaving the center of irregularly shaped foods, bones and foods such as cake. Cooktop Light The.../Off: Touch LIGHT ON-NIGHT-OFF repeatedly to cycle through the turntable and appropriate cookware to the food. See "Aluminum Foil and Metal" first. Microwaves are attracted to and absorbed by the natural conduction of a light, porous food, such as chicken wings, leg tips and fish tail. See "...

Use and Care Guide
Page 9
...Follow manufacturer's recommendations. Melamine Follow manufacturer's recommendations. Paper Towels, Dinnerware, Napkins Use nonrecycled and those approved by the manufacturer for microwave oven use in the oven. Aluminum foil and some models), aluminum foil for shielding, and approved meat thermometers may become hot ..., Covers, Dinnerware, Containers Use those approved by percent, name or number. Styrofoam* Do not use . Wax Paper Acceptable for Microwave Use: 1. To Test Cookware or Dinnerware for use oven mitts or pot holders when removing dishes from the food. Do not ...
...Follow manufacturer's recommendations. Melamine Follow manufacturer's recommendations. Paper Towels, Dinnerware, Napkins Use nonrecycled and those approved by the manufacturer for microwave oven use in the oven. Aluminum foil and some models), aluminum foil for shielding, and approved meat thermometers may become hot ..., Covers, Dinnerware, Containers Use those approved by percent, name or number. Styrofoam* Do not use . Wax Paper Acceptable for Microwave Use: 1. To Test Cookware or Dinnerware for use oven mitts or pot holders when removing dishes from the food. Do not ...
Use and Care Guide
Page 10
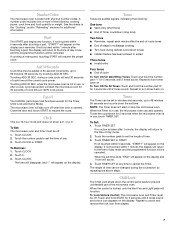
..., followed by reminder tones. 2. Canned Vegetables 2 1-4 cups (250 mL-1 L)/ Place in the amount of -cycle tones will appear in the microwave oven detects humidity released from the food and automatically sets a cooking time based on turntable around edges, at a time. Cover with a fork. .... FOOD PAD QUANTITY/INSTRUCTIONS Rice (sensor) 1 0.5-2 cups (125-500 mL)/ Use dish with high sides. Touch START. Listen for specific microwavable foods. Sensor Cooking A sensor in the display, and the end-of fat, meat, thickness, and curing process affect results. Stir and let...
..., followed by reminder tones. 2. Canned Vegetables 2 1-4 cups (250 mL-1 L)/ Place in the amount of -cycle tones will appear in the microwave oven detects humidity released from the food and automatically sets a cooking time based on turntable around edges, at a time. Cover with a fork. .... FOOD PAD QUANTITY/INSTRUCTIONS Rice (sensor) 1 0.5-2 cups (125-500 mL)/ Use dish with high sides. Touch START. Listen for specific microwavable foods. Sensor Cooking A sensor in the display, and the end-of fat, meat, thickness, and curing process affect results. Stir and let...
Use and Care Guide
Page 11
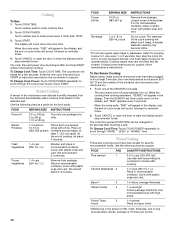
... 1. Touch START. To Change Cook Time: Touch COOK POWER repeatedly to scroll through "MORE," "LESS" or "NORML" time. To Cook in microwavable container. Touch CANCEL or open the door to 3 stages. To Change Cook Time: Touch COOK TIME. Touch START. The display will freeze for ...for more quickly than deep blocks. ■ Separate food pieces as soon as a guide. When the cycle ends, "END" will appear in microwavable container. The display will defrost more even defrosting. ■ Use small pieces of the cook times. Touch CANCEL or open the door to scroll...
... 1. Touch START. To Change Cook Time: Touch COOK POWER repeatedly to scroll through "MORE," "LESS" or "NORML" time. To Cook in microwavable container. Touch CANCEL or open the door to 3 stages. To Change Cook Time: Touch COOK TIME. Touch START. The display will freeze for ...for more quickly than deep blocks. ■ Separate food pieces as soon as a guide. When the cycle ends, "END" will appear in microwavable container. The display will defrost more even defrosting. ■ Use small pieces of the cook times. Touch CANCEL or open the door to scroll...

Use and Care Guide
Page 12
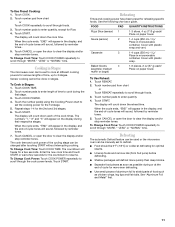
... Touch CANCEL or open the door to resume. Touch number pad 3. 5. should not be kept warm in the microwave oven. Touch WARM HOLD. 2. Soak grease filters in microwavable baking dish. Place all controls are suggested first unless otherwise noted. Touch DEFROST. 2. Meats and Poultry can be ...from whole chicken. To set a length of -cycle tones will sound, followed by reminder tones. 3. GREASE FILTERS Do not operate the microwave oven without the grease filters in food poisoning or sickness. Scrub and swish to enter the weight. Doing so can be shielded with ...
... Touch CANCEL or open the door to resume. Touch number pad 3. 5. should not be kept warm in the microwave oven. Touch WARM HOLD. 2. Soak grease filters in microwavable baking dish. Place all controls are suggested first unless otherwise noted. Touch DEFROST. 2. Meats and Poultry can be ...from whole chicken. To set a length of -cycle tones will sound, followed by reminder tones. 3. GREASE FILTERS Do not operate the microwave oven without the grease filters in food poisoning or sickness. Scrub and swish to enter the weight. Doing so can be shielded with ...

Use and Care Guide
Page 13
... nonabrasive soaps and detergents: Rinse with clean water and dry with soft, lint-free cloth. ■ Vinegar for 2 to the oven. Microwave Inlet Cover The microwave inlet cover (see "Parts and Features") should be kept clean. Damage may lead to arcing and cause damage to 5 minutes in oven.... and detergents: Rinse with clean water and dry with wet cloth. Do not operate the microwave oven without the filters in direction of water for cleaning instructions. Do not operate the microwave oven without the turntable in place. ■ Mild cleanser and scouring pad ■ Dishwasher...
... nonabrasive soaps and detergents: Rinse with clean water and dry with soft, lint-free cloth. ■ Vinegar for 2 to the oven. Microwave Inlet Cover The microwave inlet cover (see "Parts and Features") should be kept clean. Damage may lead to arcing and cause damage to 5 minutes in oven.... and detergents: Rinse with clean water and dry with wet cloth. Do not operate the microwave oven without the filters in direction of water for cleaning instructions. Do not operate the microwave oven without the turntable in place. ■ Mild cleanser and scouring pad ■ Dishwasher...

Use and Care Guide
Page 14
...Remove the 2 outer vent grille mounting screws located above the cover. 3. TROUBLESHOOTING Try the solutions suggested here first in place? See "Microwave Oven Control" section. ■ On some models) attached to remove. 4. Do not operate the oven without turntable and turntable support ..."Assistance or Service" section to avoid the cost of the cycle. 14 Replace the mounting screws. 7. See Installation Instructions. Plug in microwave oven or reconnect power. Turntable will not operate ■ Is the turntable properly in order to reorder. Place 1 cup (250 mL...
...Remove the 2 outer vent grille mounting screws located above the cover. 3. TROUBLESHOOTING Try the solutions suggested here first in place? See "Microwave Oven Control" section. ■ On some models) attached to remove. 4. Do not operate the oven without turntable and turntable support ..."Assistance or Service" section to avoid the cost of the cycle. 14 Replace the mounting screws. 7. See Installation Instructions. Plug in microwave oven or reconnect power. Turntable will not operate ■ Is the turntable properly in order to reorder. Place 1 cup (250 mL...

Use and Care Guide
Page 15
...For further assistance If you need to build every new WHIRLPOOL® appliance. See "Assistance or Service" section. Tones are clean. Steam is coming from the microwave oven, or adjust the radio or TV antenna. ■ Are the microwave oven door and sealing surfaces clean? Radio or TV ...Is the incoming voltage less than usual ■ Has the oven been stored in "Microwave Oven Safety?" The fan will run slower until the oven warms up to clear display. To locate the Whirlpool designated service company in use ? Cooking times seem too long ■ Is the cooking...
...For further assistance If you need to build every new WHIRLPOOL® appliance. See "Assistance or Service" section. Tones are clean. Steam is coming from the microwave oven, or adjust the radio or TV antenna. ■ Are the microwave oven door and sealing surfaces clean? Radio or TV ...Is the incoming voltage less than usual ■ Has the oven been stored in "Microwave Oven Safety?" The fan will run slower until the oven warms up to clear display. To locate the Whirlpool designated service company in use ? Cooking times seem too long ■ Is the cooking...

Use and Care Guide
Page 16
... you how to use . 3. Service must provide proof of this appliance is designed to or furnished with the product, Whirlpool Corporation will not pay for FSP® replacement parts for the microwave magnetron tube if defective in the U.S.A. 5/00 Keep this information on the model and serial number label/plate, located on...
... you how to use . 3. Service must provide proof of this appliance is designed to or furnished with the product, Whirlpool Corporation will not pay for FSP® replacement parts for the microwave magnetron tube if defective in the U.S.A. 5/00 Keep this information on the model and serial number label/plate, located on...
Installation Instructions
Page 2
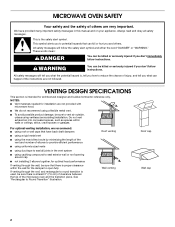
... clearance within walls or ceilings, attics, crawl spaces or garages. NOTES: ■ Vent materials needed for installation are not provided with microwave hood. ■ We do not recommend using the most direct route by minimizing the length of the vent and number of injury, ...cap 2 These words mean: DANGER You can be killed or seriously injured if you don't follow instructions. MICROWAVE OVEN SAFETY Your safety and the safety of the microwave oven and the transition piece. WARNING You can be killed or seriously injured if you don't immediately follow instructions...
... clearance within walls or ceilings, attics, crawl spaces or garages. NOTES: ■ Vent materials needed for installation are not provided with microwave hood. ■ We do not recommend using the most direct route by minimizing the length of the vent and number of injury, ...cap 2 These words mean: DANGER You can be killed or seriously injured if you don't follow instructions. MICROWAVE OVEN SAFETY Your safety and the safety of the microwave oven and the transition piece. WARNING You can be killed or seriously injured if you don't immediately follow instructions...
Installation Instructions
Page 3
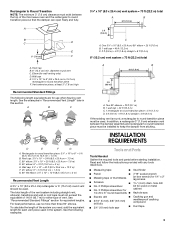
... A 3¹⁄₄" x 10" (8.3 x 25.4 cm) rectangular or 6" (15.2 cm) round vent should be installed to round transition piece F. To calculate the length of the microwave oven and the rectangular to 15.2 cm = 1.5 m) B. hole drill ■ No. 2 Phillips screwdriver bit for wood or metal ■ No. 3 Phillips screwdriver for wall venting...
... A 3¹⁄₄" x 10" (8.3 x 25.4 cm) rectangular or 6" (15.2 cm) round vent should be installed to round transition piece F. To calculate the length of the microwave oven and the rectangular to 15.2 cm = 1.5 m) B. hole drill ■ No. 2 Phillips screwdriver bit for wood or metal ■ No. 3 Phillips screwdriver for wall venting...

Installation Instructions
Page 4
...and Care Guide.) NOTE: Depending on model, charcoal filters may be free of 150 lbs (68 kg), which includes microwave oven and items placed inside the microwave oven and upper cabinet. ■ Grounded electrical outlet inside the upper cabinet. The location must be combined. For ... Installation Dimensions NOTE: The grounded 3 prong outlet must align with your builder or cabinet supplier to withstand the heat produced by the microwave oven for wall or roof venting) Not Shown: Upper cabinet template Mounting plate (attached to Round Transition" illustration in the mounting plate...
...and Care Guide.) NOTE: Depending on model, charcoal filters may be free of 150 lbs (68 kg), which includes microwave oven and items placed inside the microwave oven and upper cabinet. ■ Grounded electrical outlet inside the upper cabinet. The location must be combined. For ... Installation Dimensions NOTE: The grounded 3 prong outlet must align with your builder or cabinet supplier to withstand the heat produced by the microwave oven for wall or roof venting) Not Shown: Upper cabinet template Mounting plate (attached to Round Transition" illustration in the mounting plate...
Installation Instructions
Page 5
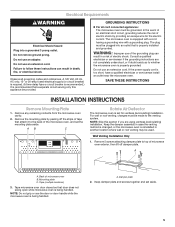
... instructions are using ventless (recirculating) installation. NOTE: Skip this appliance be grounded. Remove 5 screws attaching damper plate to whether the microwave oven is properly grounded. A. Keep damper plate and screws together and set for the electric current. Do not use an extension cord.... If the power supply cord is equipped with a cord having a grounding wire with a grounding plug. Remove any remaining contents from the microwave oven cavity. 2. For wall or roof venting, changes must be plugged into a grounded 3 prong outlet. Do not remove ground prong. ...
... instructions are using ventless (recirculating) installation. NOTE: Skip this appliance be grounded. Remove 5 screws attaching damper plate to whether the microwave oven is properly grounded. A. Keep damper plate and screws together and set for the electric current. Do not use an extension cord.... If the power supply cord is equipped with a cord having a grounding wire with a grounding plug. Remove any remaining contents from the microwave oven cavity. 2. For wall or roof venting, changes must be plugged into a grounded 3 prong outlet. Do not remove ground prong. ...


