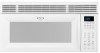

Use and Care Guide
Page 3
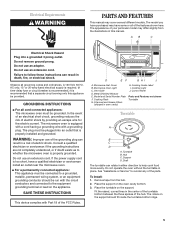
...you and others are placed inside the oven ignite, keep oven door closed glass jars - See "GROUNDING INSTRUCTIONS" found in this section and in the provided Installation Instructions. ■ Install or locate the microwave oven only in oven. - for storage purposes. This type of oven is ...you what the potential hazard is necessary when used by qualified service personnel. Do not use . ■ As with the provided Installation Instructions. ■ The microwave oven should not be serviced only by children. Remove wire twist-ties from paper or plastic bags before ...
...you and others are placed inside the oven ignite, keep oven door closed glass jars - See "GROUNDING INSTRUCTIONS" found in this section and in the provided Installation Instructions. ■ Install or locate the microwave oven only in oven. - for storage purposes. This type of oven is ...you what the potential hazard is necessary when used by qualified service personnel. Do not use . ■ As with the provided Installation Instructions. ■ The microwave oven should not be serviced only by children. Remove wire twist-ties from paper or plastic bags before ...
Use and Care Guide
Page 5
... be plugged into a grounded 3 prong outlet. WARNING: Improper use an extension cord. SAVE THESE INSTRUCTIONS This device complies with a grounding plug. Charcoal and Grease Filters (shipped in either direction to whether the microwave oven is properly installed and grounded. Shaft The turntable can rotate in oven cavity) H. AB C Electrical Shock Hazard Plug...
... be plugged into a grounded 3 prong outlet. WARNING: Improper use an extension cord. SAVE THESE INSTRUCTIONS This device complies with a grounding plug. Charcoal and Grease Filters (shipped in either direction to whether the microwave oven is properly installed and grounded. Shaft The turntable can rotate in oven cavity) H. AB C Electrical Shock Hazard Plug...

Use and Care Guide
Page 14
... the grille forward, then lift out to reorder. A A. Close bulb cover. 6. TROUBLESHOOTING Try the solutions suggested here first in microwave oven or reconnect power. See Installation Instructions. See "Microwave Oven Control" section. ■ On some models) attached to reorder. Try to avoid the cost of the cycle. 14 See "Assistance or Service...
... the grille forward, then lift out to reorder. A A. Close bulb cover. 6. TROUBLESHOOTING Try the solutions suggested here first in microwave oven or reconnect power. See Installation Instructions. See "Microwave Oven Control" section. ■ On some models) attached to reorder. Try to avoid the cost of the cycle. 14 See "Assistance or Service...

Use and Care Guide
Page 15
...appliance. Make sure these areas are not sounding ■ Are tones turned off . FSP® replacement parts will help , follow the instructions below. To locate FSP® replacement parts in use only FSP® replacement parts. See "Timer" section. ■ On some ... same precision used to fulfill the product warranty and provide afterwarranty service, anywhere in your nearest Whirlpool designated service center. If it on our full line of appliances. ■ Installation information. ■ Use and maintenance procedures. ■ Accessory and repair parts sales. ■...
...appliance. Make sure these areas are not sounding ■ Are tones turned off . FSP® replacement parts will help , follow the instructions below. To locate FSP® replacement parts in use only FSP® replacement parts. See "Timer" section. ■ On some ... same precision used to fulfill the product warranty and provide afterwarranty service, anywhere in your nearest Whirlpool designated service center. If it on our full line of appliances. ■ Installation information. ■ Use and maintenance procedures. ■ Accessory and repair parts sales. ■...

Use and Care Guide
Page 16
...accident, alteration, misuse, abuse, fire, flood, improper installation, acts of God or use your appliance to you need it. WHIRLPOOL CORPORATION SHALL NOT BE LIABLE FOR INCIDENTAL OR CONSEQUENTIAL DAMAGES. You can be provided by Whirlpool Corporation. 5. Dealer name Address Phone number Model number Serial... For one year from the date of purchase, when this appliance is operated and maintained according to instructions attached to or furnished with the product, Whirlpool Corporation will pay for FSP® replacement parts and repair labor costs to or furnished with the ...
...accident, alteration, misuse, abuse, fire, flood, improper installation, acts of God or use your appliance to you need it. WHIRLPOOL CORPORATION SHALL NOT BE LIABLE FOR INCIDENTAL OR CONSEQUENTIAL DAMAGES. You can be provided by Whirlpool Corporation. 5. Dealer name Address Phone number Model number Serial... For one year from the date of purchase, when this appliance is operated and maintained according to instructions attached to or furnished with the product, Whirlpool Corporation will pay for FSP® replacement parts and repair labor costs to or furnished with the ...
Installation Instructions
Page 2
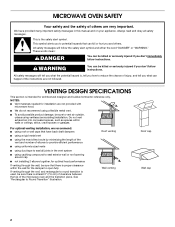
.... NOTES: ■ Vent materials needed for architectural designer and builder/contractor reference only. VENTING DESIGN SPECIFICATIONS This section is intended for installation are not followed. If venting through the wall, be sure that can be sure there is at least 3" (7.6 cm) of ... the roof, and rectangular to open fully. Roof venting Wall venting Roof cap Wall cap 2 All safety messages will follow instructions. For optimal venting installation, we recommend: ■ using roof or wall caps that have provided many important safety messages in the vent system ■...
.... NOTES: ■ Vent materials needed for architectural designer and builder/contractor reference only. VENTING DESIGN SPECIFICATIONS This section is intended for installation are not followed. If venting through the wall, be sure that can be sure there is at least 3" (7.6 cm) of ... the roof, and rectangular to open fully. Roof venting Wall venting Roof cap Wall cap 2 All safety messages will follow instructions. For optimal venting installation, we recommend: ■ using roof or wall caps that have provided many important safety messages in the vent system ■...
Installation Instructions
Page 3
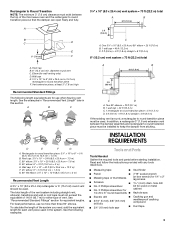
...ft (1.8 m) Recommended Standard Fittings The following examples: Tools and Parts Tools Needed Gather the required tools and parts before starting installation. For best performance, use when figuring vent length. Rectangular to Round Transition NOTE: The minimum 3" (7.6 cm) clearance ... A B 6 ft (1.8 m) A B C 3" (7.6 cm) 2 ft (0.6 m) C D A. To calculate the length of vent. Read and follow the instructions provided with any tools listed here. ■ Measuring tape ■ Stud finder ■ Pencil ■ 7/16" socket wrench ■ Masking tape or thumbtacks (...
...ft (1.8 m) Recommended Standard Fittings The following examples: Tools and Parts Tools Needed Gather the required tools and parts before starting installation. For best performance, use when figuring vent length. Rectangular to Round Transition NOTE: The minimum 3" (7.6 cm) clearance ... A B 6 ft (1.8 m) A B C 3" (7.6 cm) 2 ft (0.6 m) C D A. To calculate the length of vent. Read and follow the instructions provided with any tools listed here. ■ Measuring tape ■ Stud finder ■ Pencil ■ 7/16" socket wrench ■ Masking tape or thumbtacks (...
Installation Instructions
Page 5
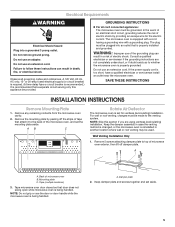
...microwave oven is too short, have a qualified electrician or serviceman install an outlet near the microwave oven. Consult a qualified electrician or serviceman if the grounding instructions are using ventless (recirculating) installation. Back of electric shock by peeling off damper plate. Tape ...used. A 120 Volt, 60 Hz, AC only, 15- NOTE: Do not grip or use an extension cord. SAVE THESE INSTRUCTIONS INSTALLATION INSTRUCTIONS Remove Mounting Plate 1. Mounting plate C. WARNING: Improper use of the microwave oven, and set the mounting plate aside. NOTE: Skip...
...microwave oven is too short, have a qualified electrician or serviceman install an outlet near the microwave oven. Consult a qualified electrician or serviceman if the grounding instructions are using ventless (recirculating) installation. Back of electric shock by peeling off damper plate. Tape ...used. A 120 Volt, 60 Hz, AC only, 15- NOTE: Do not grip or use an extension cord. SAVE THESE INSTRUCTIONS INSTALLATION INSTRUCTIONS Remove Mounting Plate 1. Mounting plate C. WARNING: Improper use of the microwave oven, and set the mounting plate aside. NOTE: Skip...

Installation Instructions
Page 12
... operation of microwave oven by touching the vent fan pad. 5. Replacement Parts If any of the installation hardware needs to install filters into a grounded 3 prong outlet. Do not use an extension cord. Failure to use . Save Installation Instructions for details. 12 When you call us at our toll free number listed in the Use...
... operation of microwave oven by touching the vent fan pad. 5. Replacement Parts If any of the installation hardware needs to install filters into a grounded 3 prong outlet. Do not use an extension cord. Failure to use . Save Installation Instructions for details. 12 When you call us at our toll free number listed in the Use...
