
User Instructions
Page 1
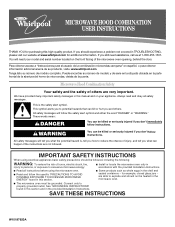
... microondas, detrás de la puerta. Connect only to excessive microwave energy: ■ Install or locate the microwave oven only in the provided Installation Instructions. SAVE THESE INSTRUCTIONS W10197620A We have provided many important safety messages in this section and in accordance with the ... la combinación microondas campana" en español, o para obtener información adicional acerca de su producto, visite: www.whirlpool.com Tenga listo su número de modelo completo. This is , tell you how to potential hazards that can be followed, including...
... microondas, detrás de la puerta. Connect only to excessive microwave energy: ■ Install or locate the microwave oven only in the provided Installation Instructions. SAVE THESE INSTRUCTIONS W10197620A We have provided many important safety messages in this section and in accordance with the ... la combinación microondas campana" en español, o para obtener información adicional acerca de su producto, visite: www.whirlpool.com Tenga listo su número de modelo completo. This is , tell you how to potential hazards that can be followed, including...
User Instructions
Page 3
Failure to follow these instructions can be turned off during preset or sensor (on some models) functions. 3 Recommended: ■ A time-delay fuse or time-delay circuit breaker. ■ A separate circuit serving only this microwave oven. The microwave oven is properly installed and grounded. WARNING: Improper use an adapter. To Set Clock: 1. Touch CLOCK...
Failure to follow these instructions can be turned off during preset or sensor (on some models) functions. 3 Recommended: ■ A time-delay fuse or time-delay circuit breaker. ■ A separate circuit serving only this microwave oven. The microwave oven is properly installed and grounded. WARNING: Improper use an adapter. To Set Clock: 1. Touch CLOCK...
User Instructions
Page 6
... OR PROVINCE TO PROVINCE. Costs associated with the removal from unauthorized modifications made to Whirlpool with published installation instructions. 11. W10197620A SP PN W10197619A © 2008 Whirlpool Corporation. Service must be borne by a Whirlpool designated service company. Service calls to correct the installation of your major appliance. If you need assistance using your product, you may...
... OR PROVINCE TO PROVINCE. Costs associated with the removal from unauthorized modifications made to Whirlpool with published installation instructions. 11. W10197620A SP PN W10197619A © 2008 Whirlpool Corporation. Service must be borne by a Whirlpool designated service company. Service calls to correct the installation of your major appliance. If you need assistance using your product, you may...
Installation Instructions
Page 1
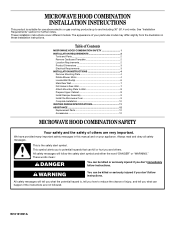
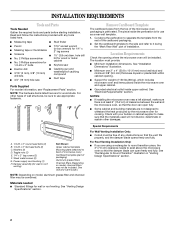
...the word "DANGER" or "WARNING." Table of Contents MICROWAVE HOOD COMBINATION SAFETY 1 INSTALLATION REQUIREMENTS 2 Tools and Parts 2 Remove Cardboard Template 2 Location Requirements 2 Product Dimensions 3 Electrical Requirements 3 INSTALLATION INSTRUCTIONS 4 Remove Mounting Plate 4 Rotate Blower Motor 4 Locate Wall Stud(s 6 Mark Rear...Plate to and including 36" (91.4 cm) wide. We have provided many important safety messages in these installation instructions. The appearance of your particular model may differ slightly from the illustration in this manual and on your appliance....
...the word "DANGER" or "WARNING." Table of Contents MICROWAVE HOOD COMBINATION SAFETY 1 INSTALLATION REQUIREMENTS 2 Tools and Parts 2 Remove Cardboard Template 2 Location Requirements 2 Product Dimensions 3 Electrical Requirements 3 INSTALLATION INSTRUCTIONS 4 Remove Mounting Plate 4 Rotate Blower Motor 4 Locate Wall Stud(s 6 Mark Rear...Plate to and including 36" (91.4 cm) wide. We have provided many important safety messages in these installation instructions. The appearance of your particular model may differ slightly from the illustration in this manual and on your appliance....
Installation Instructions
Page 2
Read and follow the instructions provided with your builder or cabinet supplier to ...microwave oven and upper cabinet. ■ Grounded electrical outlet inside the perforation is perforated. The location must be included. See "Installation Dimensions" illustration. ■ Minimum one 2" x 4" (50.8 x 101.6 mm) wood wall stud and minimum 3/8" ...a rear wall template. 1. See "Electrical Requirements" section. Check with any obstructions so that the materials used will be installed. For other damages. Toggle nuts (2) E. 1/4" x 2" lag screws (2) F. Cut along the perforation to separate the ...
Read and follow the instructions provided with your builder or cabinet supplier to ...microwave oven and upper cabinet. ■ Grounded electrical outlet inside the perforation is perforated. The location must be included. See "Installation Dimensions" illustration. ■ Minimum one 2" x 4" (50.8 x 101.6 mm) wood wall stud and minimum 3/8" ...a rear wall template. 1. See "Electrical Requirements" section. Check with any obstructions so that the materials used will be installed. For other damages. Toggle nuts (2) E. 1/4" x 2" lag screws (2) F. Cut along the perforation to separate the ...
Installation Instructions
Page 3
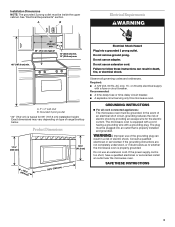
... electric shock by providing an escape wire for 66" (167.6 cm) installation height. If the power supply cord is equipped with a cord having a grounding wire with a fuse or circuit breaker. SAVE THESE INSTRUCTIONS 3 Recommended: ■ A time-delay fuse or time-delay circuit breaker... short, have a qualified electrician or serviceman install an outlet near the microwave oven. Consult a qualified electrician or serviceman if the grounding instructions are not completely understood, or if doubt exists as to follow these instructions can result in death, fire, or electrical...
... electric shock by providing an escape wire for 66" (167.6 cm) installation height. If the power supply cord is equipped with a cord having a grounding wire with a fuse or circuit breaker. SAVE THESE INSTRUCTIONS 3 Recommended: ■ A time-delay fuse or time-delay circuit breaker... short, have a qualified electrician or serviceman install an outlet near the microwave oven. Consult a qualified electrician or serviceman if the grounding instructions are not completely understood, or if doubt exists as to follow these instructions can result in death, fire, or electrical...
Installation Instructions
Page 4
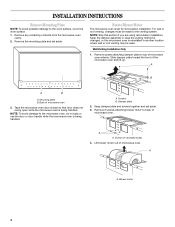
INSTALLATION INSTRUCTIONS Remove Mounting Plate NOTE: To avoid possible damage to the venting system. Rotate Blower Motor The microwave oven is being handled. For wall or roof ... oven and lift up. A B A B A. Tape the microwave oven door closed so that door does not swing open while the microwave oven is set for recirculation installation. A Screws B. A A. Back of microwave oven exterior. Remove 2 screws attaching blower motor to top of microwave oven 3. Screws (in case the venting method is changed, or...
INSTALLATION INSTRUCTIONS Remove Mounting Plate NOTE: To avoid possible damage to the venting system. Rotate Blower Motor The microwave oven is being handled. For wall or roof ... oven and lift up. A B A B A. Tape the microwave oven door closed so that door does not swing open while the microwave oven is set for recirculation installation. A Screws B. A A. Back of microwave oven exterior. Remove 2 screws attaching blower motor to top of microwave oven 3. Screws (in case the venting method is changed, or...
Installation Instructions
Page 10
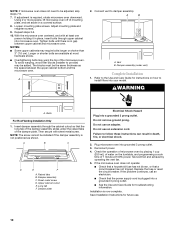
...oven does not operate: ■ Check that a household fuse has not blown, or that the long tab of the damper plate. Save Installation Instructions for future use an extension cord. NOTE: If microwave oven does not need to damper assembly. Damper assembly (under the raised tabs of the... 1 cup (250 mL) of 1 minute at 100% power. To avoid warping, wood filler blocks (installer to install filters into a grounded 3 prong outlet. ■ See the Use and Care Guide for instructions on how to provide) may be adjusted, skip steps 7-9. 7. Longer or shorter bolts are available at ...
...oven does not operate: ■ Check that a household fuse has not blown, or that the long tab of the damper plate. Save Installation Instructions for future use an extension cord. NOTE: If microwave oven does not need to damper assembly. Damper assembly (under the raised tabs of the... 1 cup (250 mL) of 1 minute at 100% power. To avoid warping, wood filler blocks (installer to install filters into a grounded 3 prong outlet. ■ See the Use and Care Guide for instructions on how to provide) may be adjusted, skip steps 7-9. 7. Longer or shorter bolts are available at ...
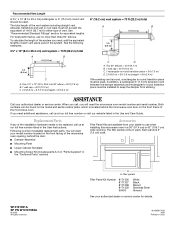
Installation Instructions
Page 12
...not exceed the equivalent of 140 ft (42.7 m) for either type of each vent piece used in the system. For best performance, use when installing this microwave oven in the "Tools and Parts" section) Accessories Filler Panel Kits are available from sticking. One 3¹⁄₄" x 10" (8.3...need , add the equivalent lengths of vent. When you call us at our toll free number or visit our website listed in the User Instructions. Replacement Parts If any of the microwave oven. Both numbers can be used . See "Recommended Standard Fittings" section for details. 461965617426 4/...
...not exceed the equivalent of 140 ft (42.7 m) for either type of each vent piece used in the system. For best performance, use when installing this microwave oven in the "Tools and Parts" section) Accessories Filler Panel Kits are available from sticking. One 3¹⁄₄" x 10" (8.3...need , add the equivalent lengths of vent. When you call us at our toll free number or visit our website listed in the User Instructions. Replacement Parts If any of the microwave oven. Both numbers can be used . See "Recommended Standard Fittings" section for details. 461965617426 4/...
