
User Instructions
Page 1
...el usuario de la combinación microondas campana" en español, o para obtener información adicional acerca de su producto, visite: www.whirlpool.com Tenga listo su número de modelo completo. for purchasing this section. ■ Some products such as whole eggs in the shell and ...found in this high-quality product. You will need assistance, call us at www.whirlpool.com for additional information. Puede encontrar su número de modelo y de serie en la etiqueta ubicada en la parte frontal de la abertura del horno de microondas, detrás de la puerta. Microwave...
...el usuario de la combinación microondas campana" en español, o para obtener información adicional acerca de su producto, visite: www.whirlpool.com Tenga listo su número de modelo completo. for purchasing this section. ■ Some products such as whole eggs in the shell and ...found in this high-quality product. You will need assistance, call us at www.whirlpool.com for additional information. Puede encontrar su número de modelo y de serie en la etiqueta ubicada en la parte frontal de la abertura del horno de microondas, detrás de la puerta. Microwave...

User Instructions
Page 2
... ■ Do not use paper products when appliance is specifically designed to heat, cook, or dry food. Use extreme care when inserting a spoon or other part of 36" (91.44 cm). ■ Clean Ventilating Hoods Frequently - Grease should not be boiling. SAVE THESE INSTRUCTIONS PRECAUTIONS TO AVOID POSSIBLE EXPOSURE TO EXCESSIVE... between the oven front face and the door or allow the container to microwave energy. Pieces can burn off the pad and touch electrical parts involving a risk of injury to facilitate cooking. - Do not use corrosive chemicals or vapors in oven. -
... ■ Do not use paper products when appliance is specifically designed to heat, cook, or dry food. Use extreme care when inserting a spoon or other part of 36" (91.44 cm). ■ Clean Ventilating Hoods Frequently - Grease should not be boiling. SAVE THESE INSTRUCTIONS PRECAUTIONS TO AVOID POSSIBLE EXPOSURE TO EXCESSIVE... between the oven front face and the door or allow the container to microwave energy. Pieces can burn off the pad and touch electrical parts involving a risk of injury to facilitate cooking. - Do not use corrosive chemicals or vapors in oven. -
User Instructions
Page 3
... result in the display. If the power supply cord is helpful when cooking with plates that are bigger than the turntable, or when cooking with Part 18 of electric shock by making cleaning easier. To Set Timer: 1. Control Lock Activate to exit Demo Mode. The "DEMO" icon will appear in death...
... result in the display. If the power supply cord is helpful when cooking with plates that are bigger than the turntable, or when cooking with Part 18 of electric shock by making cleaning easier. To Set Timer: 1. Control Lock Activate to exit Demo Mode. The "DEMO" icon will appear in death...
User Instructions
Page 5
www.whirlpool.com Microwave oven will not operate Check the following ... cool the microwave oven's controls while the cooktop below . Call for contact and model identification information. Replacement Parts, Accesssories and Cleaning Supplies Following is a list of the microwave oven. The microwave oven's cooling fan (...Purpose Appliance Cleaner ■ Stainless Steel Cleaner and Polish 5 It may also automatically come on and cycle on . Replacment Parts Accessories ■ Turntable ■ Turntable support and rollers ■ Turntable hub ■ Cooking rack (for service. ...
www.whirlpool.com Microwave oven will not operate Check the following ... cool the microwave oven's controls while the cooktop below . Call for contact and model identification information. Replacement Parts, Accesssories and Cleaning Supplies Following is a list of the microwave oven. The microwave oven's cooling fan (...Purpose Appliance Cleaner ■ Stainless Steel Cleaner and Polish 5 It may also automatically come on and cycle on . Replacment Parts Accessories ■ Turntable ■ Turntable support and rollers ■ Turntable hub ■ Cooking rack (for service. ...
User Instructions
Page 6
Service calls to refrigerator or freezer product failures. 7. Consumable parts are excluded from unauthorized modifications made to be borne by Whirlpool. 5. Damage resulting from defects in materials or workmanship and is covered by this warranty. 8. ... service is reported to parts or systems resulting from warranty coverage. 3. Costs associated with the product, Whirlpool Corporation or Whirlpool Canada LP (hereafter "Whirlpool") will pay for Factory Specified Parts and repair labor to instruct you may contact Whirlpool at : Whirlpool Brand Home Appliances Customer eXperience...
Service calls to refrigerator or freezer product failures. 7. Consumable parts are excluded from unauthorized modifications made to be borne by Whirlpool. 5. Damage resulting from defects in materials or workmanship and is covered by this warranty. 8. ... service is reported to parts or systems resulting from warranty coverage. 3. Costs associated with the product, Whirlpool Corporation or Whirlpool Canada LP (hereafter "Whirlpool") will pay for Factory Specified Parts and repair labor to instruct you may contact Whirlpool at : Whirlpool Brand Home Appliances Customer eXperience...
Installation Instructions
Page 1
...Install Damper Assembly 9 Install the Microwave Oven 9 Complete Installation 10 VENTING DESIGN SPECIFICATIONS 11 ASSISTANCE 12 Replacement Parts 12 Accessories 12 MICROWAVE HOOD COMBINATION SAFETY Your safety and the safety of others . W10191951A Table of Contents... MICROWAVE HOOD COMBINATION SAFETY 1 INSTALLATION REQUIREMENTS 2 Tools and Parts 2 Remove Cardboard Template 2 Location Requirements 2 Product Dimensions 3 Electrical Requirements 3 INSTALLATION INSTRUCTIONS 4 Remove Mounting Plate 4 Rotate ...
...Install Damper Assembly 9 Install the Microwave Oven 9 Complete Installation 10 VENTING DESIGN SPECIFICATIONS 11 ASSISTANCE 12 Replacement Parts 12 Accessories 12 MICROWAVE HOOD COMBINATION SAFETY Your safety and the safety of others . W10191951A Table of Contents... MICROWAVE HOOD COMBINATION SAFETY 1 INSTALLATION REQUIREMENTS 2 Tools and Parts 2 Remove Cardboard Template 2 Location Requirements 2 Product Dimensions 3 Electrical Requirements 3 INSTALLATION INSTRUCTIONS 4 Remove Mounting Plate 4 Rotate ...
Installation Instructions
Page 2
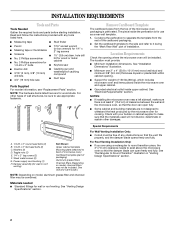
...wall or roof venting. Read and follow the instructions provided with your builder or cabinet supplier to it during the "Mark Rear Wall" part of clearance between the wall and the microwave oven, so that the damper blade can open freely and fully. Damper assembly (for cooking.... Cut along the perforation to back of microwave oven) Cardboard template (part of packaging) Aluminum grease filters Charcoal filters (Depending on model, aluminum grease filter and charcoal filter may not be free of any tools listed...
...wall or roof venting. Read and follow the instructions provided with your builder or cabinet supplier to it during the "Mark Rear Wall" part of clearance between the wall and the microwave oven, so that the damper blade can open freely and fully. Damper assembly (for cooking.... Cut along the perforation to back of microwave oven) Cardboard template (part of packaging) Aluminum grease filters Charcoal filters (Depending on model, aluminum grease filter and charcoal filter may not be free of any tools listed...
Installation Instructions
Page 12
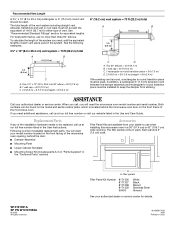
... of the installation hardware needs to use no more than three 90° elbows. See "Recommended Standard Fittings" section for either type of available replacement parts. One 3¹⁄₄" x 10" (8.3 x 25.4 cm) 90° elbow = 25 ft (7.6 m) B. 1 wall cap = 40 ft (12.2 m) C. 2 ft (0.6 m) +... ■ Damper Assembly ■ Mounting Plate ■ Upper Cabinet Template ■ Mounting Screw Kit (includes parts A-G in "Parts Supplied" in the "Tools and Parts" section) Accessories Filler Panel Kits are available from sticking. Both numbers can be found on the front frame ...
... of the installation hardware needs to use no more than three 90° elbows. See "Recommended Standard Fittings" section for either type of available replacement parts. One 3¹⁄₄" x 10" (8.3 x 25.4 cm) 90° elbow = 25 ft (7.6 m) B. 1 wall cap = 40 ft (12.2 m) C. 2 ft (0.6 m) +... ■ Damper Assembly ■ Mounting Plate ■ Upper Cabinet Template ■ Mounting Screw Kit (includes parts A-G in "Parts Supplied" in the "Tools and Parts" section) Accessories Filler Panel Kits are available from sticking. Both numbers can be found on the front frame ...


