
User Instructions
Page 1
... this manual and on the front facing of injury, and tell you how to reduce the chance of the microwave oven opening, behind the door. You will need assistance, call us at www.whirlpool.com for additional information. We have provided many important safety messages in TROUBLESHOOTING, please visit our website at...
... this manual and on the front facing of injury, and tell you how to reduce the chance of the microwave oven opening, behind the door. You will need assistance, call us at www.whirlpool.com for additional information. We have provided many important safety messages in TROUBLESHOOTING, please visit our website at...

User Instructions
Page 2
... metal scouring pads. Call an authorized service company for examination, repair, or adjustment. ■ See door surface cleaning instructions in the "Microwave Oven Care" section. ■ To reduce the risk of the oven with the safety interlocks. (b) Do not place any other combustible ...or other part of fire in use . ■ As with narrow necks. - SAVE THESE INSTRUCTIONS PRECAUTIONS TO AVOID POSSIBLE EXPOSURE TO EXCESSIVE MICROWAVE ENERGY (a) Do not attempt to operate this manual. Corrosive cleaning agents, such as water, coffee, or tea are placed inside the oven ...
... metal scouring pads. Call an authorized service company for examination, repair, or adjustment. ■ See door surface cleaning instructions in the "Microwave Oven Care" section. ■ To reduce the risk of the oven with the safety interlocks. (b) Do not place any other combustible ...or other part of fire in use . ■ As with narrow necks. - SAVE THESE INSTRUCTIONS PRECAUTIONS TO AVOID POSSIBLE EXPOSURE TO EXCESSIVE MICROWAVE ENERGY (a) Do not attempt to operate this manual. Corrosive cleaning agents, such as water, coffee, or tea are placed inside the oven ...
User Instructions
Page 3
... Turntable may be grounded. If the power supply cord is too short, have a qualified electrician or serviceman install an outlet near the microwave oven. Touch CLOCK. 2. Touch CLOCK or the Start control. Touch the Timer control or the Start control. Tones Programming tones and ... for FAST. 3. Recommended: ■ A time-delay fuse or time-delay circuit breaker. ■ A separate circuit serving only this microwave oven. Consult a qualified electrician or serviceman if the grounding instructions are side by making cleaning easier. SAVE THESE INSTRUCTIONS This device complies with...
... Turntable may be grounded. If the power supply cord is too short, have a qualified electrician or serviceman install an outlet near the microwave oven. Touch CLOCK. 2. Touch CLOCK or the Start control. Touch the Timer control or the Start control. Tones Programming tones and ... for FAST. 3. Recommended: ■ A time-delay fuse or time-delay circuit breaker. ■ A separate circuit serving only this microwave oven. Consult a qualified electrician or serviceman if the grounding instructions are side by making cleaning easier. SAVE THESE INSTRUCTIONS This device complies with...
User Instructions
Page 4
...damage to paper towel. ■ Control panel: sponge or soft cloth and water. ■ Stainless steel (on the front facing of microwave oven, and clean monthly. ■ Charcoal filter: The charcoal filter is replaceable. 4 Touch DEFROST, select food item, enter quantity, and...Place dish on some models): mild soap, water and washcloth. Opening the door during Warm Hold will cancel the function. Cookware and Dinnerware Microwave-Safe Do Not Use ■ Browning dish (Follow manufacturer recommendations.) ■ Ceramic glass, glass ■ China, earthenware (Follow manufacturer ...
...damage to paper towel. ■ Control panel: sponge or soft cloth and water. ■ Stainless steel (on the front facing of microwave oven, and clean monthly. ■ Charcoal filter: The charcoal filter is replaceable. 4 Touch DEFROST, select food item, enter quantity, and...Place dish on some models): mild soap, water and washcloth. Opening the door during Warm Hold will cancel the function. Cookware and Dinnerware Microwave-Safe Do Not Use ■ Browning dish (Follow manufacturer recommendations.) ■ Ceramic glass, glass ■ China, earthenware (Follow manufacturer ...
User Instructions
Page 5
.... Fan running during cooktop usage ■ This is an error indicator. Please refer to cool the microwave oven's controls while the cooktop below . www.whirlpool.com Microwave oven will not operate Check the following : ■ Proximity Move the receiver away from the vent fan, automatically comes on motor rotation at 100% cooking ...
.... Fan running during cooktop usage ■ This is an error indicator. Please refer to cool the microwave oven's controls while the cooktop below . www.whirlpool.com Microwave oven will not operate Check the following : ■ Proximity Move the receiver away from the vent fan, automatically comes on motor rotation at 100% cooking ...
User Instructions
Page 6
...'S SOLE AND EXCLUSIVE REMEDY UNDER THIS LIMITED WARRANTY SHALL BE PRODUCT REPAIR AS PROVIDED HEREIN. You can write to Whirlpool with the product, Whirlpool Corporation or Whirlpool Canada LP (hereafter "Whirlpool") will pay for repairs. Proof of original purchase date is required to repair or replace appliance light bulbs, air... in a manner that have access to the Internet and you need further assistance, you on the upper or lower front facing of the microwave oven opening, behind the door. If you do not have been removed, altered or cannot be repaired in the home and only in...
...'S SOLE AND EXCLUSIVE REMEDY UNDER THIS LIMITED WARRANTY SHALL BE PRODUCT REPAIR AS PROVIDED HEREIN. You can write to Whirlpool with the product, Whirlpool Corporation or Whirlpool Canada LP (hereafter "Whirlpool") will pay for repairs. Proof of original purchase date is required to repair or replace appliance light bulbs, air... in a manner that have access to the Internet and you need further assistance, you on the upper or lower front facing of the microwave oven opening, behind the door. If you do not have been removed, altered or cannot be repaired in the home and only in...
Installation Instructions
Page 1
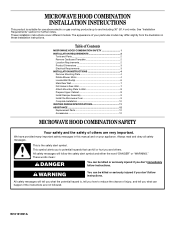
...will tell you what can be killed or seriously injured if you to and including 36" (91.4 cm) wide. Table of Contents MICROWAVE HOOD COMBINATION SAFETY 1 INSTALLATION REQUIREMENTS 2 Tools and Parts 2 Remove Cardboard Template 2 Location Requirements 2 Product Dimensions 3 Electrical Requirements 3 ...reduce the chance of injury, and tell you and others are not followed. All safety messages will follow instructions. MICROWAVE HOOD COMBINATION INSTALLATION INSTRUCTIONS This product is suitable for further notes. See "Installation Requirements" section for use above ...
...will tell you what can be killed or seriously injured if you to and including 36" (91.4 cm) wide. Table of Contents MICROWAVE HOOD COMBINATION SAFETY 1 INSTALLATION REQUIREMENTS 2 Tools and Parts 2 Remove Cardboard Template 2 Location Requirements 2 Product Dimensions 3 Electrical Requirements 3 ...reduce the chance of injury, and tell you and others are not followed. All safety messages will follow instructions. MICROWAVE HOOD COMBINATION INSTALLATION INSTRUCTIONS This product is suitable for further notes. See "Installation Requirements" section for use above ...
Installation Instructions
Page 2
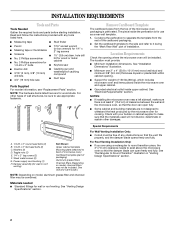
... Damper assembly (for wall or roof venting) Not Shown: Upper cabinet template Mounting plate (attached to withstand the heat produced by the microwave oven for cooking. Materials needed ■ Standard fittings for cabinet 1/4-20 x 3" bolts ■ Keyhole saw ■ Electric drill... venting. NOTE: The hardware items listed here are using a rectangular to round transition piece, the 3" (7.6 cm) clearance needs to exist above the microwave oven so that the materials used will be sure to Round Transition" illustration in "Venting Design Specifications" section. 2 A B C D E FG ...
... Damper assembly (for wall or roof venting) Not Shown: Upper cabinet template Mounting plate (attached to withstand the heat produced by the microwave oven for cooking. Materials needed ■ Standard fittings for cabinet 1/4-20 x 3" bolts ■ Keyhole saw ■ Electric drill... venting. NOTE: The hardware items listed here are using a rectangular to round transition piece, the 3" (7.6 cm) clearance needs to exist above the microwave oven so that the materials used will be sure to Round Transition" illustration in "Venting Design Specifications" section. 2 A B C D E FG ...
Installation Instructions
Page 3
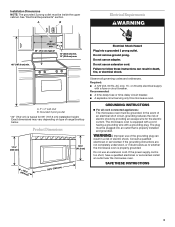
.... Do not use an extension cord. Recommended: ■ A time-delay fuse or time-delay circuit breaker. ■ A separate circuit serving only this microwave oven. Product Dimensions 17¹⁄₄" (43.8 cm) 16¹⁄₄" (41.3 cm) (401.05³c⁄₄m") 29⁷⁄...use an adapter. Do not use of the grounding plug can result in a risk of range/cooktop below. Failure to whether the microwave oven is properly grounded. Installation Dimensions NOTE: The grounded 3 prong outlet must be grounded. Electrical Shock Hazard Plug into an outlet ...
.... Do not use an extension cord. Recommended: ■ A time-delay fuse or time-delay circuit breaker. ■ A separate circuit serving only this microwave oven. Product Dimensions 17¹⁄₄" (43.8 cm) 16¹⁄₄" (41.3 cm) (401.05³c⁄₄m") 29⁷⁄...use an adapter. Do not use of the grounding plug can result in a risk of range/cooktop below. Failure to whether the microwave oven is properly grounded. Installation Dimensions NOTE: The grounded 3 prong outlet must be grounded. Electrical Shock Hazard Plug into an outlet ...
Installation Instructions
Page 4
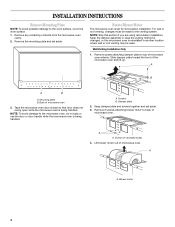
...you are using recirculation installation. A A. Blower motor 4 Remove any remaining contents from the microwave oven cavity. 2. Tape the microwave oven door closed so that door does not swing open while the microwave oven is being handled. Remove 2 screws attaching blower motor to the work surface, cover ...the work surface. 1. INSTALLATION INSTRUCTIONS Remove Mounting Plate NOTE: To avoid possible damage to back of microwave oven. For wall or roof venting, changes must be used. Wall Venting Installation Only 1. Remove screws attaching damper plate to the...
...you are using recirculation installation. A A. Blower motor 4 Remove any remaining contents from the microwave oven cavity. 2. Tape the microwave oven door closed so that door does not swing open while the microwave oven is being handled. Remove 2 screws attaching blower motor to the work surface, cover ...the work surface. 1. INSTALLATION INSTRUCTIONS Remove Mounting Plate NOTE: To avoid possible damage to back of microwave oven. For wall or roof venting, changes must be used. Wall Venting Installation Only 1. Remove screws attaching damper plate to the...
Installation Instructions
Page 5
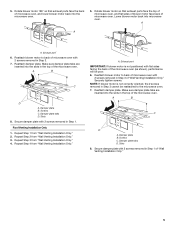
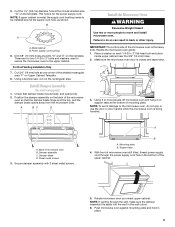
...3. Rotate blower motor 180° so that exhaust ports face the top of microwave oven, and flat sides of blower motor face back of the microwave oven (as shown), performance will be reattached to the microwave oven. 7. Repeat Step 2 from "Wall Venting Installation Only." 4. Repeat Step.... 5. Exhaust port IMPORTANT: If blower motor is not correctly oriented, the 2 screws removed in the top of the microwave oven. A B C D A. A A A. Reattach damper plate. Exhaust port 6. Repeat Step 1 from "Wall Venting Installation Only." Screws C. Damper plate ...
...3. Rotate blower motor 180° so that exhaust ports face the top of microwave oven, and flat sides of blower motor face back of the microwave oven (as shown), performance will be reattached to the microwave oven. 7. Repeat Step 2 from "Wall Venting Installation Only." 4. Repeat Step.... 5. Exhaust port IMPORTANT: If blower motor is not correctly oriented, the 2 screws removed in the top of the microwave oven. A B C D A. A A A. Reattach damper plate. Exhaust port 6. Repeat Step 1 from "Wall Venting Installation Only." Screws C. Damper plate ...
Installation Instructions
Page 6
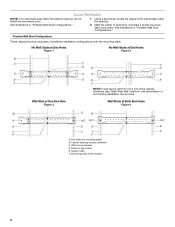
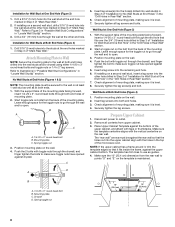
... Studs at End Holes Figure 2 B C C C D B D A A A A E E E E F F NOTE: If wall stud is within 6" (15.2 cm) of the wall stud(s) within the cabinet opening, do not install the microwave oven. 1. Wall stud centerlines D. See illustrations in "Possible Wall Stud Configurations." Support tabs F. Possible Wall Stud Configurations These depictions show examples of each stud, and...
... Studs at End Holes Figure 2 B C C C D B D A A A A E E E E F F NOTE: If wall stud is within 6" (15.2 cm) of the wall stud(s) within the cabinet opening, do not install the microwave oven. 1. Wall stud centerlines D. See illustrations in "Possible Wall Stud Configurations." Support tabs F. Possible Wall Stud Configurations These depictions show examples of each stud, and...
Installation Instructions
Page 7
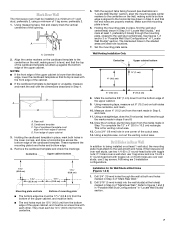
... on the wall, making sure it is over wall studs, use 1 lag screw and one corner of the cutout area. 14. Mark Rear Wall The microwave oven must be installed on a level line with each be on a minimum of 1 wall stud, preferably 2, using a minimum of 1 lag screw, preferably 2. 1. Centerline 2. Remove the...
... on the wall, making sure it is over wall studs, use 1 lag screw and one corner of the cutout area. 14. Mark Rear Wall The microwave oven must be installed on a level line with each be on a minimum of 1 wall stud, preferably 2, using a minimum of 1 lag screw, preferably 2. 1. Centerline 2. Remove the...
Installation Instructions
Page 8
... other hole drilled in the top of "Installation for Wall Studs at both end holes. 3. Push the bolt with the holes in Step 2 of the microwave oven. If installing on the rear wall. Check alignment of the upper cabinet, and attach with the vertical centerline on a second wall stud, insert a lag...
... other hole drilled in the top of "Installation for Wall Studs at both end holes. 3. Push the bolt with the holes in Step 2 of the microwave oven. If installing on the rear wall. Check alignment of the upper cabinet, and attach with the vertical centerline on a second wall stud, insert a lag...
Installation Instructions
Page 9
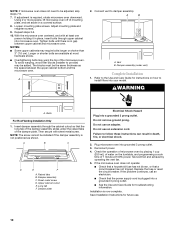
...supply cord bushing 6. Using a keyhole saw, cut out the rectangular area. Failure to the upper cabinet. Using 2 or more people to the microwave oven, do so can result in the bottom of the upper cabinet. 5. Support tabs 4. 5. This hole is closed and taped shut. ...3. For Roof Venting Installation Only 7. Damper blade D. Handle the microwave oven gently. 1. NOTE: To avoid damage to move and install microwave oven. IMPORTANT: The control side of microwave oven still tilted, thread power supply cord through the wall, make sure the damper assembly...
...supply cord bushing 6. Using a keyhole saw, cut out the rectangular area. Failure to the upper cabinet. Using 2 or more people to the microwave oven, do so can result in the bottom of the upper cabinet. 5. Support tabs 4. 5. This hole is closed and taped shut. ...3. For Roof Venting Installation Only 7. Damper blade D. Handle the microwave oven gently. 1. NOTE: To avoid damage to move and install microwave oven. IMPORTANT: The control side of microwave oven still tilted, thread power supply cord through the wall, make sure the damper assembly...
Installation Instructions
Page 10
.... 2. NOTE: The screw cannot be added. A B C D E F A. Sheet metal screw D. Reconnect power. 4. If adjustment is plugged into microwave oven. To avoid warping, wood filler blocks (installer to damper assembly. A B A. Upper cabinet cutout E. Do not use . 10 If the problem continues...10. Tighten bolts until there is now complete. Long tab F. Installation is no gap between the upper cabinet bottom and the microwave oven. Plug microwave oven into a grounded 3 prong outlet. Do not use an extension cord. Insert damper assembly through upper cabinet into a ...
.... 2. NOTE: The screw cannot be added. A B C D E F A. Sheet metal screw D. Reconnect power. 4. If adjustment is plugged into microwave oven. To avoid warping, wood filler blocks (installer to damper assembly. A B A. Upper cabinet cutout E. Do not use . 10 If the problem continues...10. Tighten bolts until there is now complete. Long tab F. Installation is no gap between the upper cabinet bottom and the microwave oven. Plug microwave oven into a grounded 3 prong outlet. Do not use an extension cord. Insert damper assembly through upper cabinet into a ...
Installation Instructions
Page 11
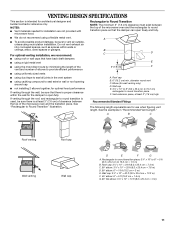
... a rigid metal vent E ■ using the most direct route by minimizing the length of the 3" (7.6 cm) F vent and number of the microwave oven and the transition piece. A B C Roof venting Roof cap Wall venting Wall cap D E F G A. NOTES: ■ Vent materials needed...VENTING DESIGN SPECIFICATIONS This section is at least 3" (7.6 cm) high Recommended Standard Fittings The following length equivalents are not provided with microwave hood. Rectangular to Round Transition NOTE: The minimum 3" (7.6 cm) clearance must exist between the top of elbows to provide efficient ...
... a rigid metal vent E ■ using the most direct route by minimizing the length of the 3" (7.6 cm) F vent and number of the microwave oven and the transition piece. A B C Roof venting Roof cap Wall venting Wall cap D E F G A. NOTES: ■ Vent materials needed...VENTING DESIGN SPECIFICATIONS This section is at least 3" (7.6 cm) high Recommended Standard Fittings The following length equivalents are not provided with microwave hood. Rectangular to Round Transition NOTE: The minimum 3" (7.6 cm) clearance must exist between the top of elbows to provide efficient ...
Installation Instructions
Page 12
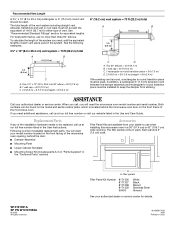
...vent piece used in the "Tools and Parts" section) Accessories Filler Panel Kits are available from sticking. If you will need the microwave oven model number and serial number. W10191951A SP PN W10191955A © 2008. Each panel is round, a rectangular to keep the ...including straight vent, elbow(s), transitions and wall or roof caps must be installed to round transition piece must be used. The total length of the microwave oven. ASSISTANCE Call your dealer to be replaced, call , you need , add the equivalent lengths of vent. Two 90° elbows = ...
...vent piece used in the "Tools and Parts" section) Accessories Filler Panel Kits are available from sticking. If you will need the microwave oven model number and serial number. W10191951A SP PN W10191955A © 2008. Each panel is round, a rectangular to keep the ...including straight vent, elbow(s), transitions and wall or roof caps must be installed to round transition piece must be used. The total length of the microwave oven. ASSISTANCE Call your dealer to be replaced, call , you need , add the equivalent lengths of vent. Two 90° elbows = ...


