

Use and Care Guide
Page 1
or visit our website at... 8205884 MICROWAVEHOOD COMBINATION For questions about features, operation/performance, parts, accessories or service, call: 1-800-253-1301. www.whirlpool.com Table of Contents 2 Model MH1170XS
or visit our website at... 8205884 MICROWAVEHOOD COMBINATION For questions about features, operation/performance, parts, accessories or service, call: 1-800-253-1301. www.whirlpool.com Table of Contents 2 Model MH1170XS

Use and Care Guide
Page 2
TABLEOF CONTENTS MICROWAVE HOOD COMBINATION SAFETY 3 Electrical Requirements 4 PARTS AND FEATURES 5 Turntable 5 Cooking Rack 5 MICROWAVE OVEN CONTROL 6 Display 6 Start 6 Cancel Off 6 Add 30 Seconds 6 Clock 6 Tones 7 Timer 7 Control Lock 7 Vent Fan 7 Cooktop Light 7 Demo ... OVEN CARE 14 General Cleaning 14 Replacing Filters 15 Replacing Cooktop Light 15 Replacing Microwave Oven Light 16 TROUBLESHOOTING 17 ASSISTANCE OR SERVICE 19 Replacement Parts 19 WARRANTY 20
TABLEOF CONTENTS MICROWAVE HOOD COMBINATION SAFETY 3 Electrical Requirements 4 PARTS AND FEATURES 5 Turntable 5 Cooking Rack 5 MICROWAVE OVEN CONTROL 6 Display 6 Start 6 Cancel Off 6 Add 30 Seconds 6 Clock 6 Tones 7 Timer 7 Control Lock 7 Vent Fan 7 Cooktop Light 7 Demo ... OVEN CARE 14 General Cleaning 14 Replacing Filters 15 Replacing Cooktop Light 15 Replacing Microwave Oven Light 16 TROUBLESHOOTING 17 ASSISTANCE OR SERVICE 19 Replacement Parts 19 WARRANTY 20
Use and Care Guide
Page 3
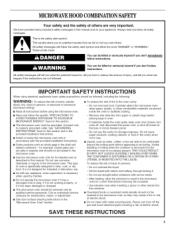
... of fire in the microwave oven for example, closed , turn oven off, and disconnect the power cord, or shut off the pad and touch electrical parts involving a risk of electric shock. Call an authorized service company for storage purposes. If materials inside the oven to be grounded. Always read and obey...
... of fire in the microwave oven for example, closed , turn oven off, and disconnect the power cord, or shut off the pad and touch electrical parts involving a risk of electric shock. Call an authorized service company for storage purposes. If materials inside the oven to be grounded. Always read and obey...
Use and Care Guide
Page 4
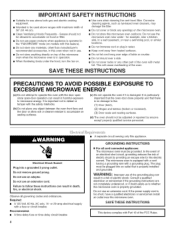
... interlocks. (b) Do not place any object between the oven front face and the door or allow soil or cleaner residue to accumulate on models with Part 18 of electric shock by anyone except properly qualified service personnel. Do not use an adapter. or 20-amp electrical supply with metal foil. Grease... are not completely understood, or if doubt exists as lye-based oven cleaners, may damage the filter. [] Do not cover or block any materials, other part of the oven.
... interlocks. (b) Do not place any object between the oven front face and the door or allow soil or cleaner residue to accumulate on models with Part 18 of electric shock by anyone except properly qualified service personnel. Do not use an adapter. or 20-amp electrical supply with metal foil. Grease... are not completely understood, or if doubt exists as lye-based oven cleaners, may damage the filter. [] Do not cover or block any materials, other part of the oven.
Use and Care Guide
Page 5
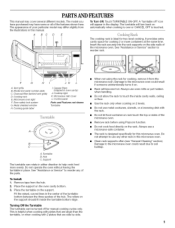
.... The cooking rack is helpful when cooking with plates that are larger than the turntable, or when cooking with the rack. HI JK L A. Control panel Parts and Features not shown Turntable A. To Install: 1. When not using Popcorn function. Remove rack before using the rack for cooking, remove it on. Do not... or Service" section to use metal cookware, utensils, or a browning dish with 2 plates that are side by side. Metal shielded window H. The appearance of the parts.
.... The cooking rack is helpful when cooking with plates that are larger than the turntable, or when cooking with the rack. HI JK L A. Control panel Parts and Features not shown Turntable A. To Install: 1. When not using Popcorn function. Remove rack before using the rack for cooking, remove it on. Do not... or Service" section to use metal cookware, utensils, or a browning dish with 2 plates that are side by side. Metal shielded window H. The appearance of the parts.
Use and Care Guide
Page 8
... paper, paper towels or plastic wrap approved for canning, sterilizing or deep frying. Arranging If heating irregularly shaped or different sized foods, arrange the thinner parts and smaller sized items toward the center. Piercing Before heating, use . See "Aluminum Foil and Metal" first. Check for 5 minutes. Composition and Density Foods high...
... paper, paper towels or plastic wrap approved for canning, sterilizing or deep frying. Arranging If heating irregularly shaped or different sized foods, arrange the thinner parts and smaller sized items toward the center. Piercing Before heating, use . See "Aluminum Foil and Metal" first. Check for 5 minutes. Composition and Density Foods high...
Use and Care Guide
Page 12
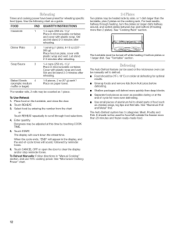
... be adjusted at the end of cycle for optimal results. • Unwrap foods and remove lids (from the chart or Touch REHEAT repeatedly to shield parts of -cycle tones will count down the reheat time. Stir and let stand 2-3 minutes after reheating. 1-6 pieces, 2 oz (57 g) each*/ Place on plate, cover with...
... be adjusted at the end of cycle for optimal results. • Unwrap foods and remove lids (from the chart or Touch REHEAT repeatedly to shield parts of -cycle tones will count down the reheat time. Stir and let stand 2-3 minutes after reheating. 1-6 pieces, 2 oz (57 g) each*/ Place on plate, cover with...
Use and Care Guide
Page 14
... the oven. Odors • Lemon juice or vinegar: Heat 1 cup (250 mL) of grain to surface. 14 Microwave Inlet Cover The microwave inlet cover (see "Parts and Features") should be kept clean. • Mild, nonabrasive soaps and detergents: Rinse with clean water and dry with soft, lint-free cloth. Soil buildup...
... the oven. Odors • Lemon juice or vinegar: Heat 1 cup (250 mL) of grain to surface. 14 Microwave Inlet Cover The microwave inlet cover (see "Parts and Features") should be kept clean. • Mild, nonabrasive soaps and detergents: Rinse with clean water and dry with soft, lint-free cloth. Soil buildup...
Use and Care Guide
Page 19
... 19 If you can also look in your area, call . If you need to local dealers, repair parts distributors and service companies. Whirlpool designated service technicians are made with any questions or concerns at: Whirlpool Brand Home Appliances Customer eXperience Center 553 Benson Road Benton Harbor, M149022-2692 Please include a daytime phone number...
... 19 If you can also look in your area, call . If you need to local dealers, repair parts distributors and service companies. Whirlpool designated service technicians are made with any questions or concerns at: Whirlpool Brand Home Appliances Customer eXperience Center 553 Benson Road Benton Harbor, M149022-2692 Please include a daytime phone number...
Use and Care Guide
Page 20
... alteration, misuse, abuse, fire, flood, acts of products not approved by a Whirlpool designated service company. Any food loss due to the appliance. 9. Pickup and delivery. Repairs to parts or systems resulting from warranty coverage. 3. Expenses for travel and transportation for in ...accordance with published installation instructions. The removal and reinstallation of Whirlpool, U.S.A. 4619-652-68351 11/05 Printed in remote...
... alteration, misuse, abuse, fire, flood, acts of products not approved by a Whirlpool designated service company. Any food loss due to the appliance. 9. Pickup and delivery. Repairs to parts or systems resulting from warranty coverage. 3. Expenses for travel and transportation for in ...accordance with published installation instructions. The removal and reinstallation of Whirlpool, U.S.A. 4619-652-68351 11/05 Printed in remote...

Installation Instructions
Page 1
... all safety messages. This symbol alerts you don't follow instructions. Location Requirements 2.. Electrical Requirements 3.. Locate Wall Stud(s 6.. All safety messages will follow instructions. Tools and Parts 2... We have provided many important safety messages in RearWall 7.. Complete Installation 1. 0 VENTING DESIGN SPECIFICATIONS 11 ASSISTANCE 1.2 Replacement Par_s 1.2 Accessories 1.2 MICROWAVE HOOD COMBINATION SAFETY Your safety...
... all safety messages. This symbol alerts you don't follow instructions. Location Requirements 2.. Electrical Requirements 3.. Locate Wall Stud(s 6.. All safety messages will follow instructions. Tools and Parts 2... We have provided many important safety messages in RearWall 7.. Complete Installation 1. 0 VENTING DESIGN SPECIFICATIONS 11 ASSISTANCE 1.2 Replacement Par_s 1.2 Accessories 1.2 MICROWAVE HOOD COMBINATION SAFETY Your safety...
Installation Instructions
Page 2
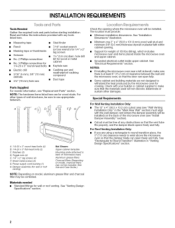
... 3/16" (5 mm), 3/8" (10 mm) drill bits • 3/4" (19 mm) hole saw Caulking gun and weatherproof caulking compound Duct tape Parts Supplied For reorder information, see "Install Damper Assembly" section). • Cutout must provide: • Minimum installation dimensions. INSTALLATIONREQUIREMENTS Tools Needed Gather the... filter and charcoal filter may not be sure to make sure there is at least 6" (15.2 cm) of the microwave oven (see "Replacement Parts" section. Ai A 1/4-20 x 3" round-head bolts (4) B. 1/4-20x3" flat-head bolts (2) C. Check with any obstructions so that the ...
... 3/16" (5 mm), 3/8" (10 mm) drill bits • 3/4" (19 mm) hole saw Caulking gun and weatherproof caulking compound Duct tape Parts Supplied For reorder information, see "Install Damper Assembly" section). • Cutout must provide: • Minimum installation dimensions. INSTALLATIONREQUIREMENTS Tools Needed Gather the... filter and charcoal filter may not be sure to make sure there is at least 6" (15.2 cm) of the microwave oven (see "Replacement Parts" section. Ai A 1/4-20 x 3" round-head bolts (4) B. 1/4-20x3" flat-head bolts (2) C. Check with any obstructions so that the ...

Installation Instructions
Page 12
...15.2 cm) round vent should be used in the system. Damper Assembly Part Number 8206556 Mounting Plate Part Number 8206315 Upper Cabinet Template Part Number 8205871 Mounting Screw Kit (includes parts A-G in "Parts Supplied" section) Part Number 8206432 Filler Panel Kits are available from sticking. For best performance,... use when installing this microwave oven in the Use and Care Guide, and reference the appropriate part number listed here. One 3 _" x !0" (8.3 x 25.4 cm) 90 ° elbow = 25 ft (7. 6 m) B. If ...
...15.2 cm) round vent should be used in the system. Damper Assembly Part Number 8206556 Mounting Plate Part Number 8206315 Upper Cabinet Template Part Number 8205871 Mounting Screw Kit (includes parts A-G in "Parts Supplied" section) Part Number 8206432 Filler Panel Kits are available from sticking. For best performance,... use when installing this microwave oven in the Use and Care Guide, and reference the appropriate part number listed here. One 3 _" x !0" (8.3 x 25.4 cm) 90 ° elbow = 25 ft (7. 6 m) B. If ...


