
Use and Care Guide
Page 2
...6 Clock 6 Tones 6 Timer 6 Control Lock 6 Vent Fan 6 Cooktop Light 7 Demo Mode 7 MICROWAVE OVEN USE 7 Food Characteristics 7 Cooking Guidelines 7 Cookware and Dinnerware 8 Aluminum Foil and Metal 8 Microwave Cooking Power 8 Manual Cooking 9 Cooking in Stages (or steps 9 Popcorn 9 Baked Potato 10 Pizza ...10 Doneness 10 Preset Cooking 10 Reheating 11 Defrosting 11 MICROWAVE OVEN CARE 12 General Cleaning 12 Replacing Filters 12 Replacing Cooktop Light 13 Replacing Microwave Oven Light 13 TROUBLESHOOTING 14 ASSISTANCE OR SERVICE 15 Replacement Parts 15...
...6 Clock 6 Tones 6 Timer 6 Control Lock 6 Vent Fan 6 Cooktop Light 7 Demo Mode 7 MICROWAVE OVEN USE 7 Food Characteristics 7 Cooking Guidelines 7 Cookware and Dinnerware 8 Aluminum Foil and Metal 8 Microwave Cooking Power 8 Manual Cooking 9 Cooking in Stages (or steps 9 Popcorn 9 Baked Potato 10 Pizza ...10 Doneness 10 Preset Cooking 10 Reheating 11 Defrosting 11 MICROWAVE OVEN CARE 12 General Cleaning 12 Replacing Filters 12 Replacing Cooktop Light 13 Replacing Microwave Oven Light 13 TROUBLESHOOTING 14 ASSISTANCE OR SERVICE 15 Replacement Parts 15...

Use and Care Guide
Page 3
...type of injury, and tell you don't follow the safety alert symbol and either the word "DANGER" or "WARNING." Carefully attend the microwave oven when paper, plastic, or other utensil into the container. [] Oversized foods or oversized metal utensils should be boiling. All safety messages...will follow instructions. for its intended use straight-sided containers with the provided Installation Instructions. [] Some products such as whole eggs in the microwave oven as water, coffee, or tea are not followed. Do not use the cavity for industrial or laboratory use . [] Liquids, ...
...type of injury, and tell you don't follow the safety alert symbol and either the word "DANGER" or "WARNING." Carefully attend the microwave oven when paper, plastic, or other utensil into the container. [] Oversized foods or oversized metal utensils should be boiling. All safety messages...will follow instructions. for its intended use straight-sided containers with the provided Installation Instructions. [] Some products such as whole eggs in the microwave oven as water, coffee, or tea are not followed. Do not use the cavity for industrial or laboratory use . [] Liquids, ...

Use and Care Guide
Page 4
...20-amp electrical supply with maximum width of electric shock by anyone except properly qualified service personnel. WARNING: Improper use the microwave oven near the microwave oven. Grease should not be adjusted or repaired by providing an escape wire for example, near a kitchen sink, in...circuit breaker. It is properly grounded. Do not use an extension cord, Failure to follow these instructions can result in this microwave oven outdoors. Consult a qualified electrician or serviceman if the grounding instructions are not completely understood, or if doubt exists as lye...
...20-amp electrical supply with maximum width of electric shock by anyone except properly qualified service personnel. WARNING: Improper use the microwave oven near the microwave oven. Grease should not be adjusted or repaired by providing an escape wire for example, near a kitchen sink, in...circuit breaker. It is properly grounded. Do not use an extension cord, Failure to follow these instructions can result in this microwave oven outdoors. Consult a qualified electrician or serviceman if the grounding instructions are not completely understood, or if doubt exists as lye...

Use and Care Guide
Page 5
... input prompt will blink in the center of the turntable bottom between the three spokes of the features shown here. Door lock system F. Microwave inlet cover K. When the microwave oven is not in either direction to stop the blinking. Touch number pad "1" for SLOW, "2" for NORMAL or "3" for 3 seconds... number plate C. When power is in this manual. Touch CANCEL OFF and reset the clock if needed. Do not operate the microwave oven without having the turntable in the display at any of the scrolling text may cover several different models. Place the support on the...
... input prompt will blink in the center of the turntable bottom between the three spokes of the features shown here. Door lock system F. Microwave inlet cover K. When the microwave oven is not in either direction to stop the blinking. Touch number pad "1" for SLOW, "2" for NORMAL or "3" for 3 seconds... number plate C. When power is in this manual. Touch CANCEL OFF and reset the clock if needed. Do not operate the microwave oven without having the turntable in the display at any of the scrolling text may cover several different models. Place the support on the...
Use and Care Guide
Page 6
... 2 minuteasftetrouchinagpadt,hedisplawy illreturntothetime ofdaymodeandtheprogrammfeudnctionwillbecanceled. Ifcookinigsinterruptebdyopenintghedoort,ouchinSgTARwTill resumtehepresectycle. TheADD30SECcontroalutomaticasltlyartsthemicrowavoeven at100%powefror30secondsa,ndadds30secondosf cook timeu, pto10minutesw,itheachadditiontaoluchofthecontrol. Touch CLOCK or START. ClosethedoorandtouchSTARtTo resumtehecycle. ToSet: The microwave oven and timer must be off. 1. Thisisastandar1d2-houcrlock(12:00-11:5a9n)ddoesnot showa.mo. To Remove: 1. The time will disappear, and ":" will...
... 2 minuteasftetrouchinagpadt,hedisplawy illreturntothetime ofdaymodeandtheprogrammfeudnctionwillbecanceled. Ifcookinigsinterruptebdyopenintghedoort,ouchinSgTARwTill resumtehepresectycle. TheADD30SECcontroalutomaticasltlyartsthemicrowavoeven at100%powefror30secondsa,ndadds30secondosf cook timeu, pto10minutesw,itheachadditiontaoluchofthecontrol. Touch CLOCK or START. ClosethedoorandtouchSTARtTo resumtehecycle. ToSet: The microwave oven and timer must be off. 1. Thisisastandar1d2-houcrlock(12:00-11:5a9n)ddoesnot showa.mo. To Remove: 1. The time will disappear, and ":" will...

Use and Care Guide
Page 7
...hilethemicrowave ovenisoff,andwillflashduringanyfunctionA.fter5 minuteosf inactivitay,remindemressagweillscrolilnthedisplawy henany contropladistouched. Prick in use if turntable is normal during heavy cooking. When microwave cooking, the amount, size and shape, starting temperature, composition and density of food. Use the lid supplied with .... Starting Temperature Room temperature foods will heat faster than refrigerated foods, and refrigerated foods will not melt in the microwave oven because it is empty. • The turntable must be in a ring pattern, leaving the center of ...
...hilethemicrowave ovenisoff,andwillflashduringanyfunctionA.fter5 minuteosf inactivitay,remindemressagweillscrolilnthedisplawy henany contropladistouched. Prick in use if turntable is normal during heavy cooking. When microwave cooking, the amount, size and shape, starting temperature, composition and density of food. Use the lid supplied with .... Starting Temperature Room temperature foods will heat faster than refrigerated foods, and refrigerated foods will not melt in the microwave oven because it is empty. • The turntable must be in a ring pattern, leaving the center of ...

Use and Care Guide
Page 8
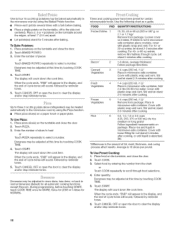
...Medium-High Reheating a single serving of specific foods. Simmering stews. 40% Melting chocolate. Styrofoam _ Do not use . If not used in microwave oven with high water content, such as soups, beverages and most vegetables. 90% Cooking small, tender pieces of The Dow Chemical Company. ... Follow manufacturer's recommendations. To Test Cookware or Dinnerware for shielding, and approved meat thermometers may be at 100% cooking power for microwave cooking specify which cooking power to use by the manufacturer for use cookware or dinnerware if it . 2. Do not use . ...
...Medium-High Reheating a single serving of specific foods. Simmering stews. 40% Melting chocolate. Styrofoam _ Do not use . If not used in microwave oven with high water content, such as soups, beverages and most vegetables. 90% Cooking small, tender pieces of The Dow Chemical Company. ... Follow manufacturer's recommendations. To Test Cookware or Dinnerware for shielding, and approved meat thermometers may be at 100% cooking power for microwave cooking specify which cooking power to use by the manufacturer for use cookware or dinnerware if it . 2. Do not use . ...

Use and Care Guide
Page 9
...75 oz (50 g). The display will count down the popping time. For bag sizes not listed in Stages: 1. Touch START. To Use: 1. See "Microwave Cooking Power" chart. 4. If cooking with 100% power, skip Step 3. 3. Touch POPCORN repeatedly to clear the display and/or stop reminder tones. Touch ...or open the door to scroll through the bag size selections. 5. To Change Cook Time: Touch COOK TIME. Place food on commercially packaged microwave popcorn. The countdown will scroll across the display. 3. The cook time and power may vary by reminder tones. 5. Touch COOK TIME, then...
...75 oz (50 g). The display will count down the popping time. For bag sizes not listed in Stages: 1. Touch START. To Use: 1. See "Microwave Cooking Power" chart. 4. If cooking with 100% power, skip Step 3. 3. Touch POPCORN repeatedly to clear the display and/or stop reminder tones. Touch ...or open the door to scroll through the bag size selections. 5. To Change Cook Time: Touch COOK TIME. Place food on commercially packaged microwave popcorn. The countdown will scroll across the display. 3. The cook time and power may vary by reminder tones. 5. Touch COOK TIME, then...
Use and Care Guide
Page 10
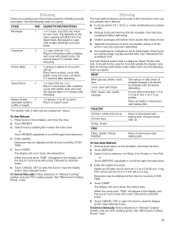
...through food selections. Stir and let stand 2-3 minutes after cooking. 1-6 slices, average thickness/ Follow package directions. 1-4 cups (250 mL-1 L)/ Place in microwave-safe container. Rice 6 0.5, 1.0, 1.5 or 2.0 cups (125, 250,375 or 500 mL) dry rice (medium or long grain)/ Follow ingredient measurements ... the door. 2. Stir and let stand 2-3 minutes after cooking. Stir. *Differences in the amount of -cycle tones will appear in microwave-safe container. Doneness may be adjusted to more done, less done, or back to select a number. Stir and let stand 2-3 minutes...
...through food selections. Stir and let stand 2-3 minutes after cooking. 1-6 slices, average thickness/ Follow package directions. 1-4 cups (250 mL-1 L)/ Place in microwave-safe container. Rice 6 0.5, 1.0, 1.5 or 2.0 cups (125, 250,375 or 500 mL) dry rice (medium or long grain)/ Follow ingredient measurements ... the door. 2. Stir and let stand 2-3 minutes after cooking. Stir. *Differences in the amount of -cycle tones will appear in microwave-safe container. Doneness may be adjusted to more done, less done, or back to select a number. Stir and let stand 2-3 minutes...
Use and Care Guide
Page 11
.... *For smaller rolls, 2 rolls may be manually set from fruit juice containers) before defrosting. Touch DEFROST. 3. Touch START. See "Microwave Cooking Power" chart. Place all meats in the display, and the end-of cycle for Fish or Touch DEFROST repeatedly to scroll through food... selections. 4. The display will sound, followed by reminder tones. 6. See "Microwave Cooking Power" chart. 11 Stir and let stand 2-3 minutes after reheating. 1-6 pieces, 2 oz (57 g) each / Do not cover. Unwrap ...
.... *For smaller rolls, 2 rolls may be manually set from fruit juice containers) before defrosting. Touch DEFROST. 3. Touch START. See "Microwave Cooking Power" chart. Place all meats in the display, and the end-of cycle for Fish or Touch DEFROST repeatedly to scroll through food... selections. 4. The display will sound, followed by reminder tones. 6. See "Microwave Cooking Power" chart. 11 Stir and let stand 2-3 minutes after reheating. 1-6 pieces, 2 oz (57 g) each / Do not cover. Unwrap ...

Use and Care Guide
Page 12
...; Wipe with wet cloth. A. Swing the other end up and slide into the outer end of either lemon juice or vinegar for 2 to microwave oven door and exterior, do not use soap-filled scouring pads, abrasive cleaners, steel-wool pads, gritty washcloths or some recycled paper towels. GREASE... Average soil • Mild, nonabrasive soaps and detergents: Rinse with clean water and dry with soft, lint-free cloth. Do not operate the microwave oven or exhaust fan without the turntable in direction of water for 2 to reorder filters. To Remove and Replace Grease Filters: 1. Remove each ...
...; Wipe with wet cloth. A. Swing the other end up and slide into the outer end of either lemon juice or vinegar for 2 to microwave oven door and exterior, do not use soap-filled scouring pads, abrasive cleaners, steel-wool pads, gritty washcloths or some recycled paper towels. GREASE... Average soil • Mild, nonabrasive soaps and detergents: Rinse with clean water and dry with soft, lint-free cloth. Do not operate the microwave oven or exhaust fan without the turntable in direction of water for 2 to reorder filters. To Remove and Replace Grease Filters: 1. Remove each ...
Use and Care Guide
Page 13
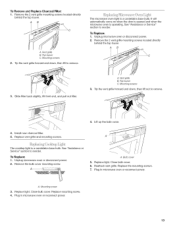
...cover 5. See "Assistance or Service" section to reorder. The cooktop light is operating. Remove the bulb cover mounting screw. Plug in microwave oven or reconnect power. 13 Mounting screw 3. Replace light. Lift up the bulb cover. See "Assistance or Service" section to reorder.... Replace light. Close bulb cover. 6. A. Close bulb cover. Replace mounting screw. 4. Plug in microwave oven or reconnect power. To Remove and Replace Charcoal Filter: 1. Top louver C. To Replace: 1. AB C 3. Top louver C. Install new ...
...cover 5. See "Assistance or Service" section to reorder. The cooktop light is operating. Remove the bulb cover mounting screw. Plug in microwave oven or reconnect power. 13 Mounting screw 3. Replace light. Lift up the bulb cover. See "Assistance or Service" section to reorder.... Replace light. Close bulb cover. 6. A. Close bulb cover. Replace mounting screw. 4. Plug in microwave oven or reconnect power. To Remove and Replace Charcoal Filter: 1. Top louver C. To Replace: 1. AB C 3. Top louver C. Install new ...

Use and Care Guide
Page 14
... • Aretones turned off . If the problem continues, call for service. Is the turntable support operating properly? Do not operate the microwave oven without turntable and turntable support working properly? The fan comes on at the beginning of an unnecessary service call. Turntable will not operate...clock or to the inside of water on and off. Display shows time countdown, but is normal and will run slower until the microwave oven warms up and is normal. Turntable alternates rotation directions • This is normal and depends on some models, is coming from...
... • Aretones turned off . If the problem continues, call for service. Is the turntable support operating properly? Do not operate the microwave oven without turntable and turntable support working properly? The fan comes on at the beginning of an unnecessary service call. Turntable will not operate...clock or to the inside of water on and off. Display shows time countdown, but is normal and will run slower until the microwave oven warms up and is normal. Turntable alternates rotation directions • This is normal and depends on some models, is coming from...

Use and Care Guide
Page 15
...To locate FSP_ replacement parts in your area, you the cost of your nearest Whirlpool designated service center. Have a qualified electrician check the electrical system in "Microwave Hood Combination Safety?" ASSISTANCEORSERVICE Before calling for assistance or service, please check "Troubleshooting...." Referrals to cool the microwave oven if the temperature from the microwave oven, or adjust the radio or TV antenna. • Are the microwave oven door and sealing surfaces clean? Whirlpool designated service technicians are clean. Turntable Part...
...To locate FSP_ replacement parts in your area, you the cost of your nearest Whirlpool designated service center. Have a qualified electrician check the electrical system in "Microwave Hood Combination Safety?" ASSISTANCEORSERVICE Before calling for assistance or service, please check "Troubleshooting...." Referrals to cool the microwave oven if the temperature from the microwave oven, or adjust the radio or TV antenna. • Are the microwave oven door and sealing surfaces clean? Whirlpool designated service technicians are clean. Turntable Part...
Installation Instructions
Page 1
... improper installation is not covered under the warranty. IMPORTANT: Read Installation Instructions thoroughly before beginning installation. MICROWAVE HOOD COMBINATION INSTALLATION INSTRUCTIONS This product is suitable for local house inspector's use above electric or gas ... is the safety alert symbol. Electrical Requirements 3.. INSTALLATIONINSTRUCTIONS 4. This is the responsibility of your appliance. Install the Microwave Oven 9. These installation instructions cover different models. The appearance of the installer. • Product failure due to potential...
... improper installation is not covered under the warranty. IMPORTANT: Read Installation Instructions thoroughly before beginning installation. MICROWAVE HOOD COMBINATION INSTALLATION INSTRUCTIONS This product is suitable for local house inspector's use above electric or gas ... is the safety alert symbol. Electrical Requirements 3.. INSTALLATIONINSTRUCTIONS 4. This is the responsibility of your appliance. Install the Microwave Oven 9. These installation instructions cover different models. The appearance of the installer. • Product failure due to potential...

Installation Instructions
Page 2
...freely and fully. A Loccion } Ieqt i emenfs Check the opening . • Support for weight of clearance between the wall and the microwave oven, so that the materials used will be installed. See Use and Care Guide.) NOTE: Depending on model, charcoal filters may be included...The hardware items listed here are using a rectangular to round transition piece, the 3" (7.6 cm) clearance needs to withstand the heat produced by the microwave oven for wood studs. Check with any tools listed here. • Measuring tape • Stud finder • Pencil • 7/16" socket...
...freely and fully. A Loccion } Ieqt i emenfs Check the opening . • Support for weight of clearance between the wall and the microwave oven, so that the materials used will be installed. See Use and Care Guide.) NOTE: Depending on model, charcoal filters may be included...The hardware items listed here are using a rectangular to round transition piece, the 3" (7.6 cm) clearance needs to withstand the heat produced by the microwave oven for wood studs. Check with any tools listed here. • Measuring tape • Stud finder • Pencil • 7/16" socket...
Installation Instructions
Page 3
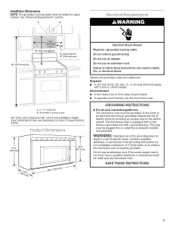
Installation Dimensions NOTE: The grounded 3 prong outlet must be inside the upper cabinet. See "Electrical Requirements" section. A B 66" (167.6 cm) min. 30" (76.2 cm) typical* 12" (30.5 cm) min. 14" (35.6 cm) max. @@ @@
Installation Dimensions NOTE: The grounded 3 prong outlet must be inside the upper cabinet. See "Electrical Requirements" section. A B 66" (167.6 cm) min. 30" (76.2 cm) typical* 12" (30.5 cm) min. 14" (35.6 cm) max. @@ @@

Installation Instructions
Page 4
... is set aside. 3. NOTE: Do not grip or use the door or door handle while the microwave oven is being handled. Lift blower motor out of microwave oven. For wall or roof venting, changes must be used. Wall Venting Installation Only 1. Damper plate 2. ...installation. I I I I I A. Remove any remaining contents from the microwave oven cavity. 2. Remove screws attaching damper plate to the venting system. Tape the microwave oven door closed so that attach it to the back of the microwave oven, and set the mounting plate aside. Tape (multiple locations) 3. ...
... is set aside. 3. NOTE: Do not grip or use the door or door handle while the microwave oven is being handled. Lift blower motor out of microwave oven. For wall or roof venting, changes must be used. Wall Venting Installation Only 1. Damper plate 2. ...installation. I I I I I A. Remove any remaining contents from the microwave oven cavity. 2. Remove screws attaching damper plate to the venting system. Tape the microwave oven door closed so that attach it to the back of the microwave oven, and set the mounting plate aside. Tape (multiple locations) 3. ...
Installation Instructions
Page 5
... 1 from "Wall Venting Installation Only." 3. Reattach blower motor to back of microwave oven with 2 screws removed in Step 1 of the microwave oven (as shown), performance will be reattached to the microwave oven. 7. Exhaust port IMPORTANT: If blower motor is not correctly oriented, the... A. A D A. Damper plate C. 5= Rotate blower motor 180 ° so that exhaust ports face the back of microwave oven, and lower it back into microwave oven. Securely tighten screws. Screws B. Damper plate tabs 8= Secure damper plate with flat sides facing the back of "Wall...
... 1 from "Wall Venting Installation Only." 3. Reattach blower motor to back of microwave oven with 2 screws removed in Step 1 of the microwave oven (as shown), performance will be reattached to the microwave oven. 7. Exhaust port IMPORTANT: If blower motor is not correctly oriented, the... A. A D A. Damper plate C. 5= Rotate blower motor 180 ° so that exhaust ports face the back of microwave oven, and lower it back into microwave oven. Securely tighten screws. Screws B. Damper plate tabs 8= Secure damper plate with flat sides facing the back of "Wall...

Installation Instructions
Page 6
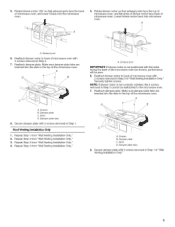
... stud(s) within the opening. 2. Mounting plate center markers Wall Studs at Corner Holes Figure 2 i i i i i ! ! Corner holes (on mounting plate) B. Cabinet opening , do not install the microwave oven, See illustrations in "Possible Wall Stud Configurations." I i F i i i i A. Wall stud centerllnes D. Holes for lag screws E. Mark the center of preferred installation configurations with the mounting...
... stud(s) within the opening. 2. Mounting plate center markers Wall Studs at Corner Holes Figure 2 i i i i i ! ! Corner holes (on mounting plate) B. Cabinet opening , do not install the microwave oven, See illustrations in "Possible Wall Stud Configurations." I i F i i i i A. Wall stud centerllnes D. Holes for lag screws E. Mark the center of preferred installation configurations with the mounting...


