
Use and Care Guide
Page 2
...6 Clock 6 Tones 6 Timer 6 Control Lock 6 Vent Fan 6 Cooktop Light 7 Demo Mode 7 MICROWAVE OVEN USE 7 Food Characteristics 7 Cooking Guidelines 7 Cookware and Dinnerware 8 Aluminum Foil and Metal 8 Microwave Cooking Power 8 Manual Cooking 9 Cooking in Stages (or steps 9 Popcorn 9 Baked Potato 10 Pizza ...10 Doneness 10 Preset Cooking 10 Reheating 11 Defrosting 11 MICROWAVE OVEN CARE 12 General Cleaning 12 Replacing Filters 12 Replacing Cooktop Light 13 Replacing Microwave Oven Light 13 TROUBLESHOOTING 14 ASSISTANCE OR SERVICE 15 Replacement Parts 15...
...6 Clock 6 Tones 6 Timer 6 Control Lock 6 Vent Fan 6 Cooktop Light 7 Demo Mode 7 MICROWAVE OVEN USE 7 Food Characteristics 7 Cooking Guidelines 7 Cookware and Dinnerware 8 Aluminum Foil and Metal 8 Microwave Cooking Power 8 Manual Cooking 9 Cooking in Stages (or steps 9 Popcorn 9 Baked Potato 10 Pizza ...10 Doneness 10 Preset Cooking 10 Reheating 11 Defrosting 11 MICROWAVE OVEN CARE 12 General Cleaning 12 Replacing Filters 12 Replacing Cooktop Light 13 Replacing Microwave Oven Light 13 TROUBLESHOOTING 14 ASSISTANCE OR SERVICE 15 Replacement Parts 15...

Use and Care Guide
Page 3
... breaker panel. - SAVE THESE iNSTRUCTiONS You can kill or hurt you don't immediately follow instructions. Remove wire twist-ties from the microwave oven is the safety alert symbol. Do not use . [] As with the provided Installation Instructions. [] Some products such as described...or exposure to facilitate cooking. - This type of electric shock. After heating, allow the container to stand in the microwave oven. [] Use the microwave oven only for a short time before using electrical appliances basic safety precautions should be killed or seriously injured if you and...
... breaker panel. - SAVE THESE iNSTRUCTiONS You can kill or hurt you don't immediately follow instructions. Remove wire twist-ties from the microwave oven is the safety alert symbol. Do not use . [] As with the provided Installation Instructions. [] Some products such as described...or exposure to facilitate cooking. - This type of electric shock. After heating, allow the container to stand in the microwave oven. [] Use the microwave oven only for a short time before using electrical appliances basic safety precautions should be killed or seriously injured if you and...

Use and Care Guide
Page 4
... the oven if it is properly grounded. Recommended: [] A time-delay fuse or time-delay circuit breaker. [] A separate circuit serving only this microwave oven outdoors. Do not use an adapter. Corrosive cleaning agents, such as to the: (1) Door (bent), (2) Hinges and latches (broken or .... iMPORTANT SAFETY iNSTRUCTiONS [] Suitable for use above ranges with metal foil. SAVE THESE INSTRUCTIONS PRECAUTIONS TO AVOID POSSIBLE EXPOSURE TO EXCESSIVE MICROWAVE ENERGY (a) Do not attempt to operate this oven when not in harmful exposure to be plugged into a grounded 3 prong outlet....
... the oven if it is properly grounded. Recommended: [] A time-delay fuse or time-delay circuit breaker. [] A separate circuit serving only this microwave oven outdoors. Do not use an adapter. Corrosive cleaning agents, such as to the: (1) Door (bent), (2) Hinges and latches (broken or .... iMPORTANT SAFETY iNSTRUCTiONS [] Suitable for use above ranges with metal foil. SAVE THESE INSTRUCTIONS PRECAUTIONS TO AVOID POSSIBLE EXPOSURE TO EXCESSIVE MICROWAVE ENERGY (a) Do not attempt to operate this oven when not in harmful exposure to be plugged into a grounded 3 prong outlet....

Use and Care Guide
Page 5
... for FAST. 3. A BC 1o --/ MICROWAVEOVENCONTROL f QUICK TOUCH POPCORN PIZZA ® RAKED POTATO ADD30 SEC E F GH JK A. Vent grille B. Microwave oven light E. Door lock system F. To Install: 1. Fit the raised, curved lines in the display at any of day or Timer countdown. Touch ...2. Remove tape from the illustrations in either direction to reorder any other time, a power failure has occurred. The rollers on the microwave oven cavity bottom. 3. Touch CANCEL OFF and reset the clock if needed. Touch CANCEL OFF to complete the adjustment. The appearance ...
... for FAST. 3. A BC 1o --/ MICROWAVEOVENCONTROL f QUICK TOUCH POPCORN PIZZA ® RAKED POTATO ADD30 SEC E F GH JK A. Vent grille B. Microwave oven light E. Door lock system F. To Install: 1. Fit the raised, curved lines in the display at any of day or Timer countdown. Touch ...2. Remove tape from the illustrations in either direction to reorder any other time, a power failure has occurred. The rollers on the microwave oven cavity bottom. 3. Touch CANCEL OFF and reset the clock if needed. Touch CANCEL OFF to complete the adjustment. The appearance ...
Use and Care Guide
Page 6
... 30secondosfcooktimeatthecurrenctookpower. Touch the number pads to set the time of cycle To Turn Off/On Valid Entry Tones: With the microwave oven in multistage cooking • Control Lock active • Hidden feature has been entered or exited • Reminder... TheSTARpTadbeginasnyfunctionIf.itis nottouchewdithin 5secondasftetrouchinagpad", PRESSSTARTw"illscrolilnthe displaaysaremindeIfrS. Ifcookinigsinterruptebdyopenintghedoort,ouchinSgTARwTill resumtehepresectycle. ToSet: The microwave oven and timer must be off. 1. The time will disappear, and ":" will appear on the display.
... 30secondosfcooktimeatthecurrenctookpower. Touch the number pads to set the time of cycle To Turn Off/On Valid Entry Tones: With the microwave oven in multistage cooking • Control Lock active • Hidden feature has been entered or exited • Reminder... TheSTARpTadbeginasnyfunctionIf.itis nottouchewdithin 5secondasftetrouchinagpad", PRESSSTARTw"illscrolilnthe displaaysaremindeIfrS. Ifcookinigsinterruptebdyopenintghedoort,ouchinSgTARwTill resumtehepresectycle. ToSet: The microwave oven and timer must be off. 1. The time will disappear, and ":" will appear on the display.

Use and Care Guide
Page 7
... the natural conduction of the recommended cook time, potatoes should not be dried in whole eggs may be in place and correct side up when microwave oven is in fat and sugar will reach a higher temperature, and will finish cooking while standing. • Do not cook or reheat whole ... add small increments of the same size and shape, place them to reorder. • Baby bottles and baby food jars should not be heated in microwave oven. • Clothes, flowers, fruit, herbs, wood, gourds, paper, including brown paper bags and newspaper, should be turned back at once, the longer the...
... the natural conduction of the recommended cook time, potatoes should not be dried in whole eggs may be in place and correct side up when microwave oven is in fat and sugar will reach a higher temperature, and will finish cooking while standing. • Do not cook or reheat whole ... add small increments of the same size and shape, place them to reorder. • Baby bottles and baby food jars should not be heated in microwave oven. • Clothes, flowers, fruit, herbs, wood, gourds, paper, including brown paper bags and newspaper, should be turned back at once, the longer the...

Use and Care Guide
Page 8
... must be used properly, arcing (a blue flash of The Dow Chemical Company. Follow manufacturer's recommendations. Wax Paper Acceptable for microwave oven use . Cooking and heating foods that need a cook power lower than high. '!.. MATERIAL RECOMMENDATIONS Aluminum Foil, Metal ...See "Aluminum Foil and Metal" section. China, Earthenware Follow manufacturer's recommendations. Follow manufacturer's recommendations. Many recipes for microwave cooking specify which cooking power to touch the inside cavity walls, ceiling or floor. • Always use oven mitts or...
... must be used properly, arcing (a blue flash of The Dow Chemical Company. Follow manufacturer's recommendations. Wax Paper Acceptable for microwave oven use . Cooking and heating foods that need a cook power lower than high. '!.. MATERIAL RECOMMENDATIONS Aluminum Foil, Metal ...See "Aluminum Foil and Metal" section. China, Earthenware Follow manufacturer's recommendations. Follow manufacturer's recommendations. Many recipes for microwave cooking specify which cooking power to touch the inside cavity walls, ceiling or floor. • Always use oven mitts or...

Use and Care Guide
Page 9
...followed by brand and fat content. • If popcorn volume is cooling. To Change Cook Power: Touch COOK POWER repeatedly to resume. See "Microwave Cooking Power" chart. 4. The display will scroll across the display. 3. When the cycle ends, "END" will sound, followed by reminder tones...levels. The display will not be changed after touching START without interrupting cooking. To Change Cook Time: Touch COOK TIME. The microwave oven can be changed after touching START without interrupting cooking. To Change Cook Time: Touch COOK TIME. The countdown will count...
...followed by brand and fat content. • If popcorn volume is cooling. To Change Cook Power: Touch COOK POWER repeatedly to resume. See "Microwave Cooking Power" chart. 4. The display will scroll across the display. 3. When the cycle ends, "END" will sound, followed by reminder tones...levels. The display will not be changed after touching START without interrupting cooking. To Change Cook Time: Touch COOK TIME. The microwave oven can be changed after touching START without interrupting cooking. To Change Cook Time: Touch COOK TIME. The countdown will count...
Use and Care Guide
Page 10
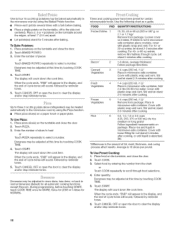
...preset for NORMAL. 4. Cover with plastic wrap and vent. Cover with plastic wrap and vent. Place rice and liquid in microwave-safe container. Let stand 5 minutes after cooking. 1-4 cups (250 mL-1 L)/ Remove from package. When the cycle ... 4. Stir and let stand 2-3 minutes after cooking. 1-6 slices, average thickness/ Follow package directions. 1-4 cups (250 mL-1 L)/ Place in microwave-safe container. Stir and let stand 2-3 minutes after cooking. Average is absorbed. Enter quantity. TouchCANCEOLFForopenthedoortocleatrhedisplay and/osr topremindetor nes. Rice 6 0.5, 1.0, ...
...preset for NORMAL. 4. Cover with plastic wrap and vent. Cover with plastic wrap and vent. Place rice and liquid in microwave-safe container. Let stand 5 minutes after cooking. 1-4 cups (250 mL-1 L)/ Remove from package. When the cycle ... 4. Stir and let stand 2-3 minutes after cooking. 1-6 slices, average thickness/ Follow package directions. 1-4 cups (250 mL-1 L)/ Place in microwave-safe container. Stir and let stand 2-3 minutes after cooking. Average is absorbed. Enter quantity. TouchCANCEOLFForopenthedoortocleatrhedisplay and/osr topremindetor nes. Rice 6 0.5, 1.0, ...
Use and Care Guide
Page 11
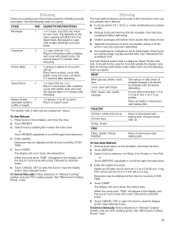
... Auto Defrost system has 3 categories: Meat, Poultry and Fish. Doneness may be adjusted at this time by touching COOK TIME. 5. See "Microwave Cooking Power" chart. 11 Beverages in cups with smaller openings may be set from 0.2 to 6.6 Ib (90 g to clear the display ... food, place on plate, cover with plastic wrap. Touch CANCEL OFF or open the door to 3 kg). To Defrost Manually: Follow directions in microwave-safe baking dish. FOOD PAD QUANTITY/INSTRUCTION S Beverage 1 Casserole Dinner Plate Soup/Sauce Baked Goods 5 (example: medium muffin or bagel) 1 or...
... Auto Defrost system has 3 categories: Meat, Poultry and Fish. Doneness may be adjusted at this time by touching COOK TIME. 5. See "Microwave Cooking Power" chart. 11 Beverages in cups with smaller openings may be set from 0.2 to 6.6 Ib (90 g to clear the display ... food, place on plate, cover with plastic wrap. Touch CANCEL OFF or open the door to 3 kg). To Defrost Manually: Follow directions in microwave-safe baking dish. FOOD PAD QUANTITY/INSTRUCTION S Beverage 1 Casserole Dinner Plate Soup/Sauce Baked Goods 5 (example: medium muffin or bagel) 1 or...

Use and Care Guide
Page 12
... lint-free cloth. • Glass cleaner and paper towels or nonabrasive plastic scrubbing pad: Apply glass cleaner to towel, not directly to microwave oven door and exterior, do not use soapfilled scouring pads, abrasive cleaners, steel-wool pads, gritty washcloths or some paper towels. Remove each...ammonia or corrosive cleaning agents such as lyebased oven cleaners. • Hot water and mild detergent: Soak filters, then scrub and swish to the microwave oven cavity, do not use chemical or abrasive cleansers. Heavy soil • Mild, nonabrasive soaps and detergents: Heat 1 cup (250 mL)...
... lint-free cloth. • Glass cleaner and paper towels or nonabrasive plastic scrubbing pad: Apply glass cleaner to towel, not directly to microwave oven door and exterior, do not use soapfilled scouring pads, abrasive cleaners, steel-wool pads, gritty washcloths or some paper towels. Remove each...ammonia or corrosive cleaning agents such as lyebased oven cleaners. • Hot water and mild detergent: Soak filters, then scrub and swish to the microwave oven cavity, do not use chemical or abrasive cleansers. Heavy soil • Mild, nonabrasive soaps and detergents: Heat 1 cup (250 mL)...
Use and Care Guide
Page 13
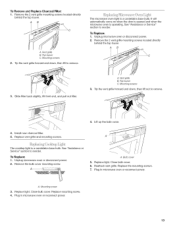
...top louver. Vent grille B. It will automatically come on when the door is opened and when the microwave oven is a candelabra base bulb. Unplug microwave oven or disconnect power. 2. Remove the 2 vent grille mounting screws located directly behind the top ...Lift up the bulb cover. A. Close bulb cover. Replace vent grille and mounting screws. 4. Unplug microwave oven or disconnect power. 2. Replace light. Replace the mounting screws. 7. Plug in microwave oven or reconnect power. 13 Mounting screws 2. Close bulb cover. 6. Vent grille B. Replace mounting ...
...top louver. Vent grille B. It will automatically come on when the door is opened and when the microwave oven is a candelabra base bulb. Unplug microwave oven or disconnect power. 2. Remove the 2 vent grille mounting screws located directly behind the top ...Lift up the bulb cover. A. Close bulb cover. Replace vent grille and mounting screws. 4. Unplug microwave oven or disconnect power. 2. Replace light. Replace the mounting screws. 7. Plug in microwave oven or reconnect power. 13 Mounting screws 2. Close bulb cover. 6. Vent grille B. Replace mounting ...

Use and Care Guide
Page 14
... • On some models, is not operating • Is the Timer in place? See "Tones" section. See Installation Instructions provided with your microwave oven. Remove and clean turntable support and rollers. See "Assistance or Service" section. See "Display" section to clear display. Steam is coming from... been turned off. See "Demo Mode" section. Replace the fuse or reset the circuit breaker. If the problem continues, call . Microwave oven door looks wavy • This is normal and occurs when the power supply switches the magnetron on motor rotation at 100% cooking...
... • On some models, is not operating • Is the Timer in place? See "Tones" section. See Installation Instructions provided with your microwave oven. Remove and clean turntable support and rollers. See "Assistance or Service" section. See "Display" section to clear display. Steam is coming from... been turned off. See "Demo Mode" section. Replace the fuse or reset the circuit breaker. If the problem continues, call . Microwave oven door looks wavy • This is normal and occurs when the power supply switches the magnetron on motor rotation at 100% cooking...

Use and Care Guide
Page 15
...the instructions below gets too hot. To locate FSP_ replacement parts in your area, call . To locate the Whirlpool designated service company in your appliance. See "Microwave Cooking Power" section. • Are large amounts of food need help us or your request. Is the ...of your correspondence. Try a different outlet. • Is the radio or TV receiver near the microwave oven? Our consultants provide assistance with any questions or concerns at: Whirlpool Brand Home Appliances Customer eXperience Center 553 Benson Road Benton Harbor, M149022-2692 Please include a daytime...
...the instructions below gets too hot. To locate FSP_ replacement parts in your area, call . To locate the Whirlpool designated service company in your appliance. See "Microwave Cooking Power" section. • Are large amounts of food need help us or your request. Is the ...of your correspondence. Try a different outlet. • Is the radio or TV receiver near the microwave oven? Our consultants provide assistance with any questions or concerns at: Whirlpool Brand Home Appliances Customer eXperience Center 553 Benson Road Benton Harbor, M149022-2692 Please include a daytime...
Installation Instructions
Page 1
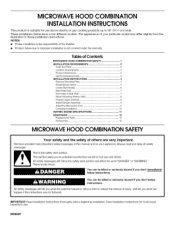
...instructions. Prepare Upper Cabinet 8.. Complete Installation 1.0 VENTING DESIGN SPECIFICATIONS 11 ASSISTANCE 1..2 Replacement Par_s 1..2 Accessories 1..2 MICROWAVE HOOD COMBINATION SAFETY Your safety and the safety of others . This is not covered under the warranty. You ... the illustration in RearWall 7. Location Requirements 2.. Save Installation Instructions for use . 8206587 Table of Contents MICROWAVE HOOD COMBINATION SAFETY J INSTALLATIONREQUIREMENTS 2. Tools and Parts 2.. IMPORTANT: Read Installation Instructions thoroughly before beginning installation...
...instructions. Prepare Upper Cabinet 8.. Complete Installation 1.0 VENTING DESIGN SPECIFICATIONS 11 ASSISTANCE 1..2 Replacement Par_s 1..2 Accessories 1..2 MICROWAVE HOOD COMBINATION SAFETY Your safety and the safety of others . This is not covered under the warranty. You ... the illustration in RearWall 7. Location Requirements 2.. Save Installation Instructions for use . 8206587 Table of Contents MICROWAVE HOOD COMBINATION SAFETY J INSTALLATIONREQUIREMENTS 2. Tools and Parts 2.. IMPORTANT: Read Installation Instructions thoroughly before beginning installation...

Installation Instructions
Page 2
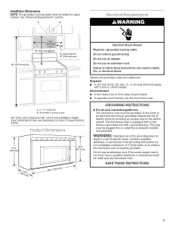
...x 4" (50.8 x 101.6 mm) wood wall stud and minimum 3/8" (9.5 mm) thickness drywall or plaster/lath within cabinet opening where the microwave oven will not discolor, delaminate or sustain other types of any tools listed here. • Measuring tape • Stud finder • Pencil •...caulking compound • Duct tape Parts Supplied For reorder information, see "Replacement Parts" section. See "Rectangular to exist above the microwave oven so that the door can open fully. • Some cabinet and building materials are using a rectangular to round transition piece...
...x 4" (50.8 x 101.6 mm) wood wall stud and minimum 3/8" (9.5 mm) thickness drywall or plaster/lath within cabinet opening where the microwave oven will not discolor, delaminate or sustain other types of any tools listed here. • Measuring tape • Stud finder • Pencil •...caulking compound • Duct tape Parts Supplied For reorder information, see "Replacement Parts" section. See "Rectangular to exist above the microwave oven so that the door can open fully. • Some cabinet and building materials are using a rectangular to round transition piece...
Installation Instructions
Page 3
Installation Dimensions NOTE: The grounded 3 prong outlet must be inside the upper cabinet. See "Electrical Requirements" section. A B 66" (167.6 cm) min. 30" (76.2 cm) typical* 12" (30.5 cm) min. 14" (35.6 cm) max. @@ @@
Installation Dimensions NOTE: The grounded 3 prong outlet must be inside the upper cabinet. See "Electrical Requirements" section. A B 66" (167.6 cm) min. 30" (76.2 cm) typical* 12" (30.5 cm) min. 14" (35.6 cm) max. @@ @@

Installation Instructions
Page 4
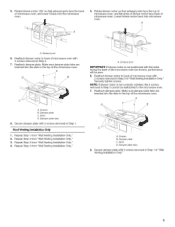
.... I I I I I A. Screws (in another location where wall or roof venting may be made to top of microwave oven exterior. Slide damper plate toward the front of microwave oven. A A. For wall or roof venting, changes must be used. A Screws B. Remove 2 screws attaching blower motor... to the work surface, cover the work surface. 1. Lift blower motor out of the microwave oven and lift up. Remove any remaining contents from the microwave oven cavity. 2. Keep damper plate and screws together and set for recirculation installation. Keep the damper assembly...
.... I I I I I A. Screws (in another location where wall or roof venting may be made to top of microwave oven exterior. Slide damper plate toward the front of microwave oven. A A. For wall or roof venting, changes must be used. A Screws B. Remove 2 screws attaching blower motor... to the work surface, cover the work surface. 1. Lift blower motor out of the microwave oven and lift up. Remove any remaining contents from the microwave oven cavity. 2. Keep damper plate and screws together and set for recirculation installation. Keep the damper assembly...
Installation Instructions
Page 5
...Wall Venting Installation Only." Make sure damper plate tabs are inserted into the slots in Step 3 cannot be poor. 6. Reattach blower motor to the microwave oven. 7. Screws B. Make sure damper plate tabs are inserted into the slots in the top of "Wall Venting Installation Only." Slots D. Roof Venting... Installation Only 1. Damper plate tabs 8= Secure damper plate with 2 screws removed in Step 1 of the microwave oven. Exhaust port IMPORTANT: If blower motor is not correctly oriented, the 2 screws removed in the top of...
...Wall Venting Installation Only." Make sure damper plate tabs are inserted into the slots in Step 3 cannot be poor. 6. Reattach blower motor to the microwave oven. 7. Screws B. Make sure damper plate tabs are inserted into the slots in the top of "Wall Venting Installation Only." Slots D. Roof Venting... Installation Only 1. Damper plate tabs 8= Secure damper plate with 2 screws removed in Step 1 of the microwave oven. Exhaust port IMPORTANT: If blower motor is not correctly oriented, the 2 screws removed in the top of...

Installation Instructions
Page 6
... Corner Holes Figure 4 C I i C sis sis Wall Stud at One Corner Hole Figure 3 NOTE: If wall stud is within the cabinet opening, do not install the microwave oven, See illustrations in "Possible Wall Stud Configurations." Wall Studs at Corner Holes Figure 2 i i i i i ! ! Cabinet opening . 2. Holes for lag screws E. Support tabs F. I i F i i i i A. Mounting plate center...
... Corner Holes Figure 4 C I i C sis sis Wall Stud at One Corner Hole Figure 3 NOTE: If wall stud is within the cabinet opening, do not install the microwave oven, See illustrations in "Possible Wall Stud Configurations." Wall Studs at Corner Holes Figure 2 i i i i i ! ! Cabinet opening . 2. Holes for lag screws E. Support tabs F. I i F i i i i A. Mounting plate center...


