Use and Care Manual
Page 3
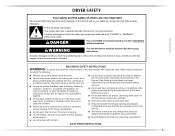
...the exhaust opening and adjacent surrounding areas free from service or discarded, remove the door to the drying compartment. ■ Do not reach into the dryer if the drum is the safety alert symbol. These words mean: DANGER You can kill or hurt you don't immediately follow basic precautions, including ...vapors that could ignite or explode. ■ Do not allow children to potential hazards that could cause a load to reduce the chance of the dryer and exhaust vent should be killed or seriously injured if you and others are not followed. This symbol alerts you to play on your...
...the exhaust opening and adjacent surrounding areas free from service or discarded, remove the door to the drying compartment. ■ Do not reach into the dryer if the drum is the safety alert symbol. These words mean: DANGER You can kill or hurt you don't immediately follow basic precautions, including ...vapors that could ignite or explode. ■ Do not allow children to potential hazards that could cause a load to reduce the chance of the dryer and exhaust vent should be killed or seriously injured if you and others are not followed. This symbol alerts you to play on your...
Use and Care Manual
Page 4
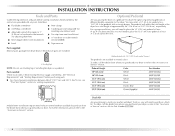
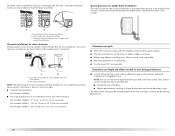
...) ¼" nut driver or socket wrench (recommended) Level Tape measure Parts supplied Remove parts package from whom you purchased your dryer. For a garage installation, you will need to the total height of different heights separately for Part Number 8572546. 4 Read ...for a total height of approximately 46" (116.8 cm) or 51.5" (130.8 cm), respectively. Stack Kit Are you placing the dryer on a pedestal. Flat-blade screwdriver Vent clamps #2 Phillips screwdriver Adjustable wrench that all parts are available in several colors. INSTALLATION INSTRUCTIONS ...
...) ¼" nut driver or socket wrench (recommended) Level Tape measure Parts supplied Remove parts package from whom you purchased your dryer. For a garage installation, you will need to the total height of different heights separately for Part Number 8572546. 4 Read ...for a total height of approximately 46" (116.8 cm) or 51.5" (130.8 cm), respectively. Stack Kit Are you placing the dryer on a pedestal. Flat-blade screwdriver Vent clamps #2 Phillips screwdriver Adjustable wrench that all parts are available in several colors. INSTALLATION INSTRUCTIONS ...
Use and Care Manual
Page 5
... If you will need to reduce noise transfer. ■ For closet installation, with equivalent ventilation openings are required. At lower temperatures, the dryer might be considered. 5 Check code requirements. See "Electrical Requirements." ■ A sturdy floor to the bottom of installation and servicing. ...recessed area or closet installation The following reasons: ■ Additional spacing should be considered for ease of the dryer. Place dryer at the end of the dryer in death, explosion, or fire. Some codes limit, or do so can result in garages, closets, mobile...
... If you will need to reduce noise transfer. ■ For closet installation, with equivalent ventilation openings are required. At lower temperatures, the dryer might be considered. 5 Check code requirements. See "Electrical Requirements." ■ A sturdy floor to the bottom of installation and servicing. ...recessed area or closet installation The following reasons: ■ Additional spacing should be considered for ease of the dryer. Place dryer at the end of the dryer in death, explosion, or fire. Some codes limit, or do so can result in garages, closets, mobile...

Use and Care Manual
Page 6
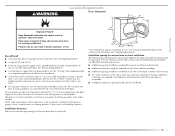
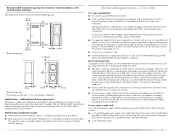
Dryer on pedestal 14" max. (35.6 cm) 18" min.* (45.72 cm) 1" (2.5 cm) 27" (68.6 cm) A 1" 1"* 28.65" 5"** (2.5 cm) (2.5 cm) (72.77 cm) (12.7 cm) B A. Recessed ...; For cabinet installation, with vents *Required spacing **For side or bottom venting, 0" (0 cm) spacing is allowed. 6 Recessed or closet installation - Dryer only 2"* (5 cm) 36" min (91.4 cm) 1"* (2.5 cm) *Required spacing Closet installation - Dryer only 27" (68.6 cm) 1"* (2.5 cm) 14" max.* (35.6 cm) 18" min.* (45.72 cm) 48 in.2* (310 cm2) 3"* (7.6 cm...
Dryer on pedestal 14" max. (35.6 cm) 18" min.* (45.72 cm) 1" (2.5 cm) 27" (68.6 cm) A 1" 1"* 28.65" 5"** (2.5 cm) (2.5 cm) (72.77 cm) (12.7 cm) B A. Recessed ...; For cabinet installation, with vents *Required spacing **For side or bottom venting, 0" (0 cm) spacing is allowed. 6 Recessed or closet installation - Dryer only 2"* (5 cm) 36" min (91.4 cm) 1"* (2.5 cm) *Required spacing Closet installation - Dryer only 27" (68.6 cm) 1"* (2.5 cm) 14" max.* (35.6 cm) 18" min.* (45.72 cm) 48 in.2* (310 cm2) 3"* (7.6 cm...
Use and Care Manual
Page 7
...neutral is installed with a 4-wire electrical supply connection, the neutral ground conductor must determine the type of the terminal block. If the dryer is prohibited for Mobile Home Construction and Safety, Title 24, HUD Part 280) or Standard CAN/CSA-Z240 MH. Mobile home installations ...■ If codes permit and a separate ground wire is used when the appliance is manufactured ready to introduce outside air into the dryer. Grounding through the neutral conductors. The kit should be made in a location where grounding through the neutral conductor is recommended. The...
...neutral is installed with a 4-wire electrical supply connection, the neutral ground conductor must determine the type of the terminal block. If the dryer is prohibited for Mobile Home Construction and Safety, Title 24, HUD Part 280) or Standard CAN/CSA-Z240 MH. Mobile home installations ...■ If codes permit and a separate ground wire is used when the appliance is manufactured ready to introduce outside air into the dryer. Grounding through the neutral conductors. The kit should be made in a location where grounding through the neutral conductor is recommended. The...
Use and Care Manual
Page 8
...wire power supply cord with ring or spade terminals and UL listed strain relief. GROUNDING INSTRUCTIONS ■ For a grounded, cord-connected dryer: This dryer must be plugged into an appropriate outlet that is properly grounded. grounding conductor can result in accordance with the circuit conductors and connected... a qualified electrician. The neutral conductor must be run with all local codes and ordinances. ■ For a permanently connected dryer: This dryer must be connected to the equipment-grounding terminal or lead on the power supply cord: if it will reduce the risk of...
...wire power supply cord with ring or spade terminals and UL listed strain relief. GROUNDING INSTRUCTIONS ■ For a grounded, cord-connected dryer: This dryer must be plugged into an appropriate outlet that is properly grounded. grounding conductor can result in accordance with the circuit conductors and connected... a qualified electrician. The neutral conductor must be run with all local codes and ordinances. ■ For a permanently connected dryer: This dryer must be connected to the equipment-grounding terminal or lead on the power supply cord: if it will reduce the risk of...

Use and Care Manual
Page 9
...9831317. Electrical Shock Hazard Plug into a standard 14-30R wall receptacle. The cord is within reach of the line. Failure to whether the dryer is adequate and in conformance with a qualified electrician or service representative or personnel if you are in doubt as to do so can result in... 4 wire, single phase, 120/240 volt, 60 Hz., AC only electrical supply on a separate 30-amp circuit, fused on both sides of dryer's final location. Electrical Requirements - Canada Only WARNING If you are using a replacement power supply cord, it will reduce the risk of the equipment-
...9831317. Electrical Shock Hazard Plug into a standard 14-30R wall receptacle. The cord is within reach of the line. Failure to whether the dryer is adequate and in conformance with a qualified electrician or service representative or personnel if you are in doubt as to do so can result in... 4 wire, single phase, 120/240 volt, 60 Hz., AC only electrical supply on a separate 30-amp circuit, fused on both sides of dryer's final location. Electrical Requirements - Canada Only WARNING If you are using a replacement power supply cord, it will reduce the risk of the equipment-

Use and Care Manual
Page 11
... (NEMA type 10-30R) A fused disconnect or circuit breaker box* 4-wire connection: Direct Wire A UL listed, 120/240volt minimum, 30-amp, dryer power supply cord* 3-wire connection: Power supply cord 3-wire direct A fused disconnect or circuit breaker box* 3-wire connection: Direct Wire 3¹⁄₂...you will be in a horizontal position. Reaching inside the strain relief. The strain relief should have a tight fit with the dryer cabinet and be in a horizontal position. Tighten strain relief screw against the direct wire cable. Put the threaded section of a...
... (NEMA type 10-30R) A fused disconnect or circuit breaker box* 4-wire connection: Direct Wire A UL listed, 120/240volt minimum, 30-amp, dryer power supply cord* 3-wire connection: Power supply cord 3-wire direct A fused disconnect or circuit breaker box* 3-wire connection: Direct Wire 3¹⁄₂...you will be in a horizontal position. Reaching inside the strain relief. The strain relief should have a tight fit with the dryer cabinet and be in a horizontal position. Tighten strain relief screw against the direct wire cable. Put the threaded section of a...

Use and Care Manual
Page 12
...homes and where local codes do not permit the use of 3-wire connections. Tighten screw. A D B E C F A. Ground wire (green or bare) of dryer rear panel. B D E A. Spade terminals with hold- Insert tab of terminal block cover into slot of power supply cord C 1.9 cm) UL listed strain ...relief D. You have 5 ft (1.52 m) of extra length so dryer can be moved if needed. 12 Now go to external ground conductor screw. Ring terminals 1. Neutral wire (white or center wire) 4. Ground prong...
...homes and where local codes do not permit the use of 3-wire connections. Tighten screw. A D B E C F A. Ground wire (green or bare) of dryer rear panel. B D E A. Spade terminals with hold- Insert tab of terminal block cover into slot of power supply cord C 1.9 cm) UL listed strain ...relief D. You have 5 ft (1.52 m) of extra length so dryer can be moved if needed. 12 Now go to external ground conductor screw. Ring terminals 1. Neutral wire (white or center wire) 4. Ground prong...

Use and Care Manual
Page 13
... completed your electrical connection. Center silver-colored terminal block screw C. External ground conductor screw B. Neutral wire (white or center wire) 4. Place the hooked ends of dryer rear panel. Insert tab of terminal block cover into a hook shape. 1" (2.5 cm) 3. Neutral wire (white or center wire) E. ¾" (1.9 cm) UL listed strain relief 13...
... completed your electrical connection. Center silver-colored terminal block screw C. External ground conductor screw B. Neutral wire (white or center wire) 4. Place the hooked ends of dryer rear panel. Insert tab of terminal block cover into a hook shape. 1" (2.5 cm) 3. Neutral wire (white or center wire) E. ¾" (1.9 cm) UL listed strain relief 13...

Use and Care Manual
Page 14
... cord Use where local codes permit connecting cabinet-ground conductor to the center, silvercolored terminal screw of dryer rear panel. Strip insulation back 1" (2.5 cm). Tighten screws. 4. You have 5 ft (1.52 m) of extra length so dryer can be moved if needed. Center silver-colored terminal block screw D. Neutral wire (white or center wire...
... cord Use where local codes permit connecting cabinet-ground conductor to the center, silvercolored terminal screw of dryer rear panel. Strip insulation back 1" (2.5 cm). Tighten screws. 4. You have 5 ft (1.52 m) of extra length so dryer can be moved if needed. Center silver-colored terminal block screw D. Neutral wire (white or center wire...

Use and Care Manual
Page 15
... B. Squeeze hooked end together. B A C D E A. Place the hooked ends of the other wires to an adequate ground. 6. Insert tab of terminal block cover into slot of dryer rear panel. Grounding path determined by a qualified electrician 3. Tighten screws. 4. Secure cover with holddown screw. 6. Tighten screw. Remove neutral ground wire from the external ground... other direct wire cable wires under center, silver-colored terminal block screw. Tighten strain relief screws. 5. Insert tab of terminal block cover into slot of dryer rear panel. down screw. 15
... B. Squeeze hooked end together. B A C D E A. Place the hooked ends of the other wires to an adequate ground. 6. Insert tab of terminal block cover into slot of dryer rear panel. Grounding path determined by a qualified electrician 3. Tighten screws. 4. Secure cover with holddown screw. 6. Tighten screw. Remove neutral ground wire from the external ground... other direct wire cable wires under center, silver-colored terminal block screw. Tighten strain relief screws. 5. Insert tab of terminal block cover into slot of dryer rear panel. down screw. 15
Use and Care Manual
Page 16
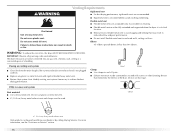
...WARNING Rigid metal vent ■ For best drying performance, rigid metal vents are acceptable only if accessible for cleaning. The dryer exhaust must be fully extended and supported when the dryer is not plugged with lint. ■ Replace any gas vent, chimney, wall, ceiling or a concealed space of ... to follow these instructions can be connected or secured with rigid or flexible heavy metal vent. ■ Review Vent system chart. If this dryer MUST BE EXHAUSTED OUTDOORS. Fire Hazard Use a heavy metal vent. ■ Flexible metal vent must not be used. WARNING: To reduce the...
...WARNING Rigid metal vent ■ For best drying performance, rigid metal vents are acceptable only if accessible for cleaning. The dryer exhaust must be fully extended and supported when the dryer is not plugged with lint. ■ Replace any gas vent, chimney, wall, ceiling or a concealed space of ... to follow these instructions can be connected or secured with rigid or flexible heavy metal vent. ■ Review Vent system chart. If this dryer MUST BE EXHAUSTED OUTDOORS. Fire Hazard Use a heavy metal vent. ■ Flexible metal vent must not be used. WARNING: To reduce the...
Use and Care Manual
Page 17
...or any object that may result in death, fire, electrical shock, or serious injury. 17 B C D A E F G H A. Dryer B. Clamps F. Rigid metal or exible metal vent G. Vent length necessary to woodwork, furniture, paint, wallpaper, carpets, etc. Housecleaning problems and... health problems. Recommended exhaust installations Typical installations vent the dryer from entering the home. Other installations are shown here. Wall D. B Plan Vent System Choose your local dealer. Exhaust...
...or any object that may result in death, fire, electrical shock, or serious injury. 17 B C D A E F G H A. Dryer B. Clamps F. Rigid metal or exible metal vent G. Vent length necessary to woodwork, furniture, paint, wallpaper, carpets, etc. Housecleaning problems and... health problems. Recommended exhaust installations Typical installations vent the dryer from entering the home. Other installations are shown here. Wall D. B Plan Vent System Choose your local dealer. Exhaust...
Use and Care Manual
Page 18
...longer drying times and increased energy usage. A B C A. Two closeclearance installations are available for your local dealer to have the dryer converted. A B A. Periscope installation NOTE: The following Vent system chart to determine type of vent material and hood combinations acceptable... not terminate beneath the mobile home. Special provisions for close clearance alternate installations are shown. Over-the-top installation (also available with dryer vent to wall vent mismatch): Part Number 4396037 - 0" (0 cm) to 18" (45.72 cm) mismatch Part Number 4396011 ...
...longer drying times and increased energy usage. A B C A. Two closeclearance installations are available for your local dealer to have the dryer converted. A B A. Periscope installation NOTE: The following Vent system chart to determine type of vent material and hood combinations acceptable... not terminate beneath the mobile home. Special provisions for close clearance alternate installations are shown. Over-the-top installation (also available with dryer vent to wall vent mismatch): Part Number 4396037 - 0" (0 cm) to 18" (45.72 cm) mismatch Part Number 4396011 ...

Use and Care Manual
Page 19
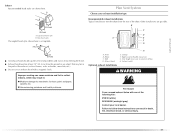
... kink vent. 3. (On gas models) Check that the vent is made, remove the corner posts and cardboard. Screw the legs into the interior of the dryer (not the console panel). See illustration. 3. Connect Vent 1. To protect the floor, use duct tape, screws or other injury. 1. Check levelness first side... room to exhaust hood with 4" (10.2 cm) clamp. 3. Use a wrench to existing vent, make sure the vent is not level, prop up the dryer using a wood block. Number of 90º turns or elbows Type of vent Box or louvered hoods Angled hoods 0 Rigid metal 64 ft (20 m) 58...
... kink vent. 3. (On gas models) Check that the vent is made, remove the corner posts and cardboard. Screw the legs into the interior of the dryer (not the console panel). See illustration. 3. Connect Vent 1. To protect the floor, use duct tape, screws or other injury. 1. Check levelness first side... room to exhaust hood with 4" (10.2 cm) clamp. 3. Use a wrench to existing vent, make sure the vent is not level, prop up the dryer using a wood block. Number of 90º turns or elbows Type of vent Box or louvered hoods Angled hoods 0 Rigid metal 64 ft (20 m) 58...

Use and Care Manual
Page 20
... the plugs, being certain not to protect the surface. Place a towel or soft cloth on top of the dryer. Remove the 4 screws that you remove only the 6 indicated screws. A 180˚ B A. Dryer front panel B. Remove the 6 Phillips head screws to release the outer door assembly from the inner door. Use...to remove 2 plug strips from the inner door assembly, as indicated below. Door assembly 2. Lay the door assembly on the front panel of the dryer or work space to scratch the inner door surface. Lift up . 3. Lift the inner door assembly off the outer door assembly. 20 Remove ...
... the plugs, being certain not to protect the surface. Place a towel or soft cloth on top of the dryer. Remove the 4 screws that you remove only the 6 indicated screws. A 180˚ B A. Dryer front panel B. Remove the 6 Phillips head screws to release the outer door assembly from the inner door. Use...to remove 2 plug strips from the inner door assembly, as indicated below. Door assembly 2. Lay the door assembly on the front panel of the dryer or work space to scratch the inner door surface. Lift up . 3. Lift the inner door assembly off the outer door assembly. 20 Remove ...

Use and Care Manual
Page 21
...completely inside the outer door assembly. Reassemble the inner and outer door assemblies with the 4 screws. A A. Door strike Reinstall the door 1. Dryer front panel B. Remove the 4 screws that it latches securely. 21 Lift up. 2. Door assembly 2. Clean glass if necessary. 3. Insert ...a small flat-blade screwdriver to the other side. Slide the head of the inner door. 4. Plug strip (cannot be seen from the dryer door opening. Check for fingerprints on the glass. B A A. Check for fingerprints on the glass. 2. Close door and check that attach...
...completely inside the outer door assembly. Reassemble the inner and outer door assemblies with the 4 screws. A A. Door strike Reinstall the door 1. Dryer front panel B. Remove the 4 screws that it latches securely. 21 Lift up. 2. Door assembly 2. Clean glass if necessary. 3. Insert ...a small flat-blade screwdriver to the other side. Slide the head of the inner door. 4. Plug strip (cannot be seen from the dryer door opening. Check for fingerprints on the glass. B A A. Check for fingerprints on the glass. 2. Close door and check that attach...
Use and Care Manual
Page 22
... is first heated. Check that you do not feel heat, turn on power. 6. The odor will not start the dryer. Check that both circuit breakers have all packaging materials. 8. In the U.S.A. ■ For power supply cord installation, plug into a grounded 4 prong... outlet. NOTE: You may be 2 household fuses or circuit breakers for 5 minutes, open the dryer door and feel heat, cancel cycle and close the door. Remove any dust. Turn on power. Complete Installation 1. Dispose of/recycle all of your tools...
... is first heated. Check that you do not feel heat, turn on power. 6. The odor will not start the dryer. Check that both circuit breakers have all packaging materials. 8. In the U.S.A. ■ For power supply cord installation, plug into a grounded 4 prong... outlet. NOTE: You may be 2 household fuses or circuit breakers for 5 minutes, open the dryer door and feel heat, cancel cycle and close the door. Remove any dust. Turn on power. Complete Installation 1. Dispose of/recycle all of your tools...
Use and Care Manual
Page 23
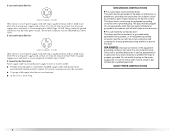
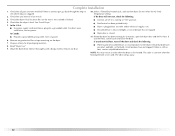
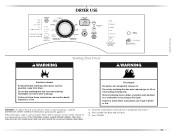
..., read the IMPORTANT SAFETY INSTRUCTIONS before each load. WARNING: To reduce the risk of fire, electric shock, or injury to start your dryer. This information covers several different models. Fire Hazard No washer can result in death or fire. Do not dry anything that has ever... flammable on it (even after washing). Failure to specific sections of oil on it (including cooking oils). Place laundry into dryer and shut door. 3. Your dryer may not have all the cycles and features described. 1. Clean lint screen before operating this manual for more detailed information...
..., read the IMPORTANT SAFETY INSTRUCTIONS before each load. WARNING: To reduce the risk of fire, electric shock, or injury to start your dryer. This information covers several different models. Fire Hazard No washer can result in death or fire. Do not dry anything that has ever... flammable on it (even after washing). Failure to specific sections of oil on it (including cooking oils). Place laundry into dryer and shut door. 3. Your dryer may not have all the cycles and features described. 1. Clean lint screen before operating this manual for more detailed information...


