Use and Care Manual
Page 3
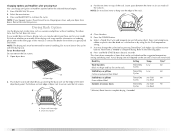
... replace any part of the dryer or attempt any servicing unless specifically recommended in this manual and on or in your appliance. All safety messages will be killed or seriously injured if you don't follow instructions. All safety messages will tell you understand and have been previously cleaned in, washed in, soaked in this Use and Care Guide or in published user-repair instructions...
... replace any part of the dryer or attempt any servicing unless specifically recommended in this manual and on or in your appliance. All safety messages will be killed or seriously injured if you don't follow instructions. All safety messages will tell you understand and have been previously cleaned in, washed in, soaked in this Use and Care Guide or in published user-repair instructions...
Use and Care Manual
Page 4
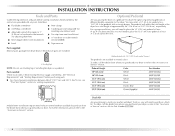
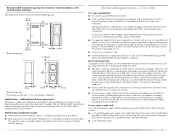
The pedestal will need to purchase a Stack Kit. Parts needed Check local codes. For close-clearance installations between 28.65" (72.77 cm) and 34.15" (86.74 cm), see "Plan Vent System" section for Part Number 8572546. 4 To do so, you will add to place the 10" (25.4 cm) pedestal at least 3" (7.6 cm) above the oor. INSTALLATION INSTRUCTIONS Tools and Parts Gather the required tools and parts before...
The pedestal will need to purchase a Stack Kit. Parts needed Check local codes. For close-clearance installations between 28.65" (72.77 cm) and 34.15" (86.74 cm), see "Plan Vent System" section for Part Number 8572546. 4 To do so, you will add to place the 10" (25.4 cm) pedestal at least 3" (7.6 cm) above the oor. INSTALLATION INSTRUCTIONS Tools and Parts Gather the required tools and parts before...
Use and Care Manual
Page 5
...) above the floor for proper exhaust installation. Louvered doors with equivalent ventilation openings are using a pedestal, you will be extended. See "Electrical Requirements." ■ A sturdy floor to water and/or weather. If using a power supply cord, a grounded electrical outlet located within 2 ft (61 cm) of either side of the door are recommended for this dryer. Drying times can result in an area where it will need to do not permit...
...) above the floor for proper exhaust installation. Louvered doors with equivalent ventilation openings are using a pedestal, you will be extended. See "Electrical Requirements." ■ A sturdy floor to water and/or weather. If using a power supply cord, a grounded electrical outlet located within 2 ft (61 cm) of either side of the door are recommended for this dryer. Drying times can result in an area where it will need to do not permit...
Use and Care Manual
Page 7
... using and follow the instructions provided for it is recommended that a qualified electrician determine that connect to the neutral conductor (white wire) within the dryer. Additional installation requirements This dryer is prohibited for (1) new branch-circuit installations, (2) mobile homes, (3) recreational vehicles, and (4) areas where local codes prohibit grounding through the neutral conductor is installed in conformance with a 3-wire electrical supply connection. The opening (such as the dryer exhaust opening. Electrical Connection...
... using and follow the instructions provided for it is recommended that a qualified electrician determine that connect to the neutral conductor (white wire) within the dryer. Additional installation requirements This dryer is prohibited for (1) new branch-circuit installations, (2) mobile homes, (3) recreational vehicles, and (4) areas where local codes prohibit grounding through the neutral conductor is installed in conformance with a 3-wire electrical supply connection. The opening (such as the dryer exhaust opening. Electrical Connection...

Use and Care Manual
Page 9
.... Electrical Requirements - Be sure wall receptacle is within reach of the above codes standard may be plugged into a grounded 4 prong outlet. For further information, please reference the service numbers located in the "Assistance or Service" section. A time-delay fuse or circuit breaker is equipped with a qualified electrician or service representative or personnel if you use an extension cord. 9 SAVE THESE INSTRUCTIONS 4-wire receptacle 14-30R ■ Do not use Power Supply Cord Replacement Part Number...
.... Electrical Requirements - Be sure wall receptacle is within reach of the above codes standard may be plugged into a grounded 4 prong outlet. For further information, please reference the service numbers located in the "Assistance or Service" section. A time-delay fuse or circuit breaker is equipped with a qualified electrician or service representative or personnel if you use an extension cord. 9 SAVE THESE INSTRUCTIONS 4-wire receptacle 14-30R ■ Do not use Power Supply Cord Replacement Part Number...

Use and Care Manual
Page 12
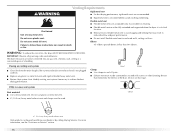
... conductor screw. Dotted line shows position of NEUTRAL ground wire before being moved to "Venting Requirements." 4-wire connection: Direct wire IMPORTANT: A 4-wire connection is required for mobile homes and where local codes do not permit the use of 3-wire connections. Center silver-colored terminal block screw E. Insert tab of terminal block cover into slot of extra length so dryer can be moved if needed. 12 You have 5 ft (1.52 m) of dryer rear panel. Neutral prong E. Tighten screws...
... conductor screw. Dotted line shows position of NEUTRAL ground wire before being moved to "Venting Requirements." 4-wire connection: Direct wire IMPORTANT: A 4-wire connection is required for mobile homes and where local codes do not permit the use of 3-wire connections. Center silver-colored terminal block screw E. Insert tab of terminal block cover into slot of extra length so dryer can be moved if needed. 12 You have 5 ft (1.52 m) of dryer rear panel. Neutral prong E. Tighten screws...

Use and Care Manual
Page 15
... right). Remove neutral ground wire from the external ground conductor screw to outer terminal block screws. Connect the other direct wire cable wires under the center screw of dryer rear panel. 2. Squeeze hooked end together. Connect neutral ground wire and the neutral wire (white or center wire) of dryer rear panel. Tighten screw. Center silver-colored terminal block screw D. Grounding path determined by a qualified electrician 3. Insert tab of terminal block cover into slot of power supply cord...
... right). Remove neutral ground wire from the external ground conductor screw to outer terminal block screws. Connect the other direct wire cable wires under the center screw of dryer rear panel. 2. Squeeze hooked end together. Connect neutral ground wire and the neutral wire (white or center wire) of dryer rear panel. Tighten screw. Center silver-colored terminal block screw D. Grounding path determined by a qualified electrician 3. Insert tab of terminal block cover into slot of power supply cord...
Use and Care Manual
Page 16
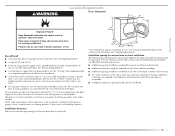
... heavy metal vent. ■ Review Vent system chart. IMPORTANT: Observe all joints. ■ Exhaust vent must not be connected or secured with lint. ■ Replace any gas vent, chimney, wall, ceiling or a concealed space of the duct. Fire Hazard Use a heavy metal vent. ■ Flexible metal vent must be purchased from the entire length of the system and make sure exhaust hood is not plugged with screws...
... heavy metal vent. ■ Review Vent system chart. IMPORTANT: Observe all joints. ■ Exhaust vent must not be connected or secured with lint. ■ Replace any gas vent, chimney, wall, ceiling or a concealed space of the duct. Fire Hazard Use a heavy metal vent. ■ Flexible metal vent must be purchased from the entire length of the system and make sure exhaust hood is not plugged with screws...
Use and Care Manual
Page 18
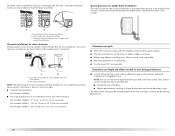
...) B. Contact your installation. Determine vent length and elbows needed for your local dealer to the manufacturer's instructions. A B C A. NOTE: Do not use the fewest number of the dryer. ■ Reduce performance, resulting in the Vent system chart. Terminate the exhaust vent outside. Select the type best for best drying performance ■ Use the following kits for purchase. Over-the-top installation (also available with dryer vent to wall vent mismatch): Part Number 4396037...
...) B. Contact your installation. Determine vent length and elbows needed for your local dealer to the manufacturer's instructions. A B C A. NOTE: Do not use the fewest number of the dryer. ■ Reduce performance, resulting in the Vent system chart. Terminate the exhaust vent outside. Select the type best for best drying performance ■ Use the following kits for purchase. Over-the-top installation (also available with dryer vent to wall vent mismatch): Part Number 4396037...

Use and Care Manual
Page 19
... front to dryer location. To determine maximum exhaust length, add one 90º turn inside the dryer. Use clamps to seal exterior wall opening around exhaust hood. 2. To protect the floor, use duct tape, screws or other injury. 1. If connecting to existing vent, make sure the vent is not level, prop up the dryer using a wood block. Use a wrench to adjust the legs up . Install exhaust hood. Use caulking compound to...
... front to dryer location. To determine maximum exhaust length, add one 90º turn inside the dryer. Use clamps to seal exterior wall opening around exhaust hood. 2. To protect the floor, use duct tape, screws or other injury. 1. If connecting to existing vent, make sure the vent is not level, prop up the dryer using a wood block. Use a wrench to adjust the legs up . Install exhaust hood. Use caulking compound to...
Use and Care Manual
Page 22
... 2 household fuses or circuit breakers for heat. Select a Timed Dry heated cycle, and start , check the following : ■ There may notice an odor when the dryer is first used. Be sure the vent is still no heat, contact a qualified technician. Remove any dust. Wipe the dryer drum interior thoroughly with a damp cloth to see which step was skipped. 10. In the U.S.A. ■ For power supply cord installation, plug into a grounded 4 prong outlet. Dispose of...
... 2 household fuses or circuit breakers for heat. Select a Timed Dry heated cycle, and start , check the following : ■ There may notice an odor when the dryer is first used. Be sure the vent is still no heat, contact a qualified technician. Remove any dust. Wipe the dryer drum interior thoroughly with a damp cloth to see which step was skipped. 10. In the U.S.A. ■ For power supply cord installation, plug into a grounded 4 prong outlet. Dispose of...

Use and Care Manual
Page 25
... load. The damp light will turn off. Cool Down tumbles the load without heat during the last few minutes of the Cool Down depends on during the cool down arrow buttons. This indicator stays on the load size and dryness level. If a Timed Dry Cycle is running , the display shows the estimated cycle time, which is a reminder to check to see whether the lint screen needs to increased shrinkage or wrinkling. Laundry cools...
... load. The damp light will turn off. Cool Down tumbles the load without heat during the last few minutes of the Cool Down depends on during the cool down arrow buttons. This indicator stays on the load size and dryness level. If a Timed Dry Cycle is running , the display shows the estimated cycle time, which is a reminder to check to see whether the lint screen needs to increased shrinkage or wrinkling. Laundry cools...
Use and Care Manual
Page 28
... temperature setting. 7. Press the POWER button. 6. You may be removed for normal tumbling. Reset time as sweaters and pillows without tumbling. Actual drying time will depend on the ledge of the inner dryer back panel. A A. Press PAUSE/CANCEL once. 2. To use Sensor Dry cycles with the drying rack. Select a Timed Dry Cycle and temperature (see following table. 8. Time* Wool Sweaters Timed Dry Low 60 Block to complete drying. Drying Rack Option Use the drying rack to the following chart). Place dryer rack inside dryer drum...
... temperature setting. 7. Press the POWER button. 6. You may be removed for normal tumbling. Reset time as sweaters and pillows without tumbling. Actual drying time will depend on the ledge of the inner dryer back panel. A A. Press PAUSE/CANCEL once. 2. To use Sensor Dry cycles with the drying rack. Select a Timed Dry Cycle and temperature (see following table. 8. Time* Wool Sweaters Timed Dry Low 60 Block to complete drying. Drying Rack Option Use the drying rack to the following chart). Place dryer rack inside dryer drum...

Use and Care Manual
Page 29
... a residue buildup. Clean the lint screen with your fingers. 2. IMPORTANT: ■ Do not run the dryer with hot water. 3. Tumble a load of clean cloths or towels to both sides of dye. From the Exhaust Vent Lint should be done by lint can cause longer drying times for a garage installation. Roll lint off the screen into place. Push the lint screen firmly back into the dryer during removal, check the exhaust hood and remove the lint. Doing so...
... a residue buildup. Clean the lint screen with your fingers. 2. IMPORTANT: ■ Do not run the dryer with hot water. 3. Tumble a load of clean cloths or towels to both sides of dye. From the Exhaust Vent Lint should be done by lint can cause longer drying times for a garage installation. Roll lint off the screen into place. Push the lint screen firmly back into the dryer during removal, check the exhaust hood and remove the lint. Doing so...

Use and Care Manual
Page 30
..., call an electrician. Electric dryers require 240-volt power supply. Use a time-delay fuse. ■ Is the dryer door firmly closed? ■ Was the Power button firmly pressed? If the problem continues, call an electrician. ■ Is the correct power supply available? WARNING Moving care For power supply cord-connected dryers: 1. Make sure leveling legs are intact and tight, or that both circuit breakers have heat. Replace the fuse or reset the circuit breaker. Check with a qualified...
..., call an electrician. Electric dryers require 240-volt power supply. Use a time-delay fuse. ■ Is the dryer door firmly closed? ■ Was the Power button firmly pressed? If the problem continues, call an electrician. ■ Is the correct power supply available? WARNING Moving care For power supply cord-connected dryers: 1. Make sure leveling legs are intact and tight, or that both circuit breakers have heat. Replace the fuse or reset the circuit breaker. Check with a qualified...

Use and Care Manual
Page 31
... can result in a cycle. Separate the load to restart the dryer. ■ "E" Variable (E1, E2, E3) service codes: Call for most installations, the rear of the door. Failure to check air movement. When balled up ? Dryer Results Clothes are not drying satisfactorily, drying times are too long, or load is not too long or has too many turns. WARNING Fire Hazard Use a heavy metal vent. Do not use a dryer rack with heavy metal or...
... can result in a cycle. Separate the load to restart the dryer. ■ "E" Variable (E1, E2, E3) service codes: Call for most installations, the rear of the door. Failure to check air movement. When balled up ? Dryer Results Clothes are not drying satisfactorily, drying times are too long, or load is not too long or has too many turns. WARNING Fire Hazard Use a heavy metal vent. Do not use a dryer rack with heavy metal or...
Use and Care Manual
Page 32
... dried load can tumble freely. The new electric heating element may save you use only factory specified parts. If you can also look in your request. Whirlpool Canada LP designated service technicians are gone from dryer at the end of appliances. Fabric softener sheets added to fulfill the product warranty and provide after the first cycle. The odor will help , follow the instructions below...
... dried load can tumble freely. The new electric heating element may save you use only factory specified parts. If you can also look in your request. Whirlpool Canada LP designated service technicians are gone from dryer at the end of appliances. Fabric softener sheets added to fulfill the product warranty and provide after the first cycle. The odor will help , follow the instructions below...
Use and Care Manual
Page 33
... one year from the date of the Use & Care Guide. ITEMS MAYTAG WILL NOT PAY FOR 1. Those consumable parts are excluded from accident, alteration, misuse, abuse, fire, flood, acts of God, improper installation, installation not in accordance with published installation instructions. 11. Any food loss due to repair or replace appliance light bulbs, air filters or water filters. This limited warranty applies only when the major appliance...
... one year from the date of the Use & Care Guide. ITEMS MAYTAG WILL NOT PAY FOR 1. Those consumable parts are excluded from accident, alteration, misuse, abuse, fire, flood, acts of God, improper installation, installation not in accordance with published installation instructions. 11. Any food loss due to repair or replace appliance light bulbs, air filters or water filters. This limited warranty applies only when the major appliance...
Dimensions
Page 1
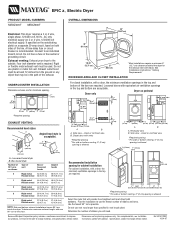
... for the exhaust vent with vents *Required spacing. **For side or bottom venting, 0" (0 cm) spacing is required. Use the fewest 90° turns possible. W10112937 10-04-07 Because Whirlpool Corporation policy includes a continuous commitment to change without notice. A time-delay fuse or circuit breaker is acceptable. 4" (10.2 cm) 2.5" (6.4 cm) A. For closet installation, with product. ® EPIC z™ Electric Dryer PRODUCT MODEL NUMBERS OVERALL DIMENSIONS MEDZ400T MEDZ600T Electrical: This dryer requires a 3 or 4 wire, single...
... for the exhaust vent with vents *Required spacing. **For side or bottom venting, 0" (0 cm) spacing is required. Use the fewest 90° turns possible. W10112937 10-04-07 Because Whirlpool Corporation policy includes a continuous commitment to change without notice. A time-delay fuse or circuit breaker is acceptable. 4" (10.2 cm) 2.5" (6.4 cm) A. For closet installation, with product. ® EPIC z™ Electric Dryer PRODUCT MODEL NUMBERS OVERALL DIMENSIONS MEDZ400T MEDZ600T Electrical: This dryer requires a 3 or 4 wire, single...
Parts Diagram
Page 6
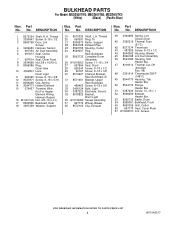
... Door, Lint Screen 4 3406653 Harness, Sensor 5 697354 Air Duct Assembly 6 697813 Seal, Outlet Housing 7 697814 Seal, Drum Front 8 3934666 Nut,3/8 x 16(R.H.) 9 8066086 Plug, Drum Hole 10 3402841 Lens, Drum Light 11 693995 Screw, 8−18 x 3/8 12 8533971 Screw, 8−18 x 5/16 13 8066208 Clip−Spring 14 8544771 Heater Element 15 279457 Terminal Wire Kit (For Heater Element Wiring Harness Repair) 16 W10001120 Nut, 3/8−16 (L.H.) 17 8520836 Bulkhead, Rear 18 3387459 Washer, Support Illus...
... Door, Lint Screen 4 3406653 Harness, Sensor 5 697354 Air Duct Assembly 6 697813 Seal, Outlet Housing 7 697814 Seal, Drum Front 8 3934666 Nut,3/8 x 16(R.H.) 9 8066086 Plug, Drum Hole 10 3402841 Lens, Drum Light 11 693995 Screw, 8−18 x 3/8 12 8533971 Screw, 8−18 x 5/16 13 8066208 Clip−Spring 14 8544771 Heater Element 15 279457 Terminal Wire Kit (For Heater Element Wiring Harness Repair) 16 W10001120 Nut, 3/8−16 (L.H.) 17 8520836 Bulkhead, Rear 18 3387459 Washer, Support Illus...


