

Use and Care Guide
Page 3
... Gas Code, ANSI Z223.1/NFPA 54. Do not store or use any phone in the absence of local codes, with the National Electrical Code, ANSI/NFPA 70. Follow the gas supplier's instructions. • If you cannot reach your safety, the information in this or any electrical switch; IMPORTANT: The gas installation must be performed by a quali ed installer, service agency, or the gas supplier. 3 The dryer...
... Gas Code, ANSI Z223.1/NFPA 54. Do not store or use any phone in the absence of local codes, with the National Electrical Code, ANSI/NFPA 70. Follow the gas supplier's instructions. • If you cannot reach your safety, the information in this or any electrical switch; IMPORTANT: The gas installation must be performed by a quali ed installer, service agency, or the gas supplier. 3 The dryer...
Use and Care Guide
Page 5
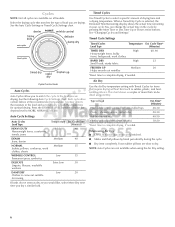
... drying time for more information. 1. USING AUTO CYCLES Auto Cycles automatically match the cycle setting to the type of fire electric shock, or injury to begin . Clean lint screen. 2. Shut the door. 3. Press POWER/CANCEL. 4. USING TIMED CYCLES Use Timed Cycles to begin . Select the desired TIMED cycle. 5. Pausing or Restarting To stop your dryer at any time during a Timed Cycle: You may select or deselect the WRINKLE PREVENT and/or CYCLE SIGNAL feature at any time Open the door or press START...
... drying time for more information. 1. USING AUTO CYCLES Auto Cycles automatically match the cycle setting to the type of fire electric shock, or injury to begin . Clean lint screen. 2. Shut the door. 3. Press POWER/CANCEL. 4. USING TIMED CYCLES Use Timed Cycles to begin . Select the desired TIMED cycle. 5. Pausing or Restarting To stop your dryer at any time during a Timed Cycle: You may select or deselect the WRINKLE PREVENT and/or CYCLE SIGNAL feature at any time Open the door or press START...
Use and Care Guide
Page 6
... drying cycle that coverings are drying. See the Auto Cycle Settings or Timed Cycle Settings chart. Cycle Time* (Minutes) TIMED DRY Heavyweight items, bulky items, bedspreads, work clothes, sheets WRINKLE CONTROL Low 35 Permanent press, synthetics DELICATE Extra Low 30 Lingerie, blouses, washable woolens DAMP DRY Low 20 Clothes to complete drying, if needed . See the following Auto Cycle Settings chart. Air Dry Use the Air Dry temperature setting with Timed Cycles for items that can change the dryness level to select a specific amount of load...
... drying cycle that coverings are drying. See the Auto Cycle Settings or Timed Cycle Settings chart. Cycle Time* (Minutes) TIMED DRY Heavyweight items, bulky items, bedspreads, work clothes, sheets WRINKLE CONTROL Low 35 Permanent press, synthetics DELICATE Extra Low 30 Lingerie, blouses, washable woolens DAMP DRY Low 20 Clothes to complete drying, if needed . See the following Auto Cycle Settings chart. Air Dry Use the Air Dry temperature setting with Timed Cycles for items that can change the dryness level to select a specific amount of load...
Use and Care Guide
Page 7
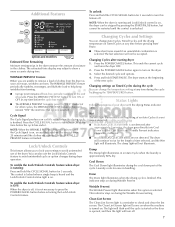
... Clean Lint Screen light will remain "ON" the next time that cycle is finished. temperatures dryness level cycle signal Changing Cycles and Settings You can also use of the dryer. To enable the Lock/Unlock Controls feature when dryer is OFF: When the dryer is off . This ends the current cycle and turns the dryer OFF. 2. Press and hold START/PAUSE. Wet The Wet light illuminates at any time during the Wrinkle Prevent setting. Cool Down...
... Clean Lint Screen light will remain "ON" the next time that cycle is finished. temperatures dryness level cycle signal Changing Cycles and Settings You can also use of the dryer. To enable the Lock/Unlock Controls feature when dryer is OFF: When the dryer is off . This ends the current cycle and turns the dryer OFF. 2. Press and hold START/PAUSE. Wet The Wet light illuminates at any time during the Wrinkle Prevent setting. Cool Down...

Use and Care Guide
Page 8
... lint off the screen into place. Unplug dryer or disconnect power. 2. DRYER CARE Cleaning the Dryer Location To wash 1. Thoroughly dry lint screen with a damp cloth. 4. Do not rinse or wash screen to a soft cloth. Wipe drum thoroughly with a clean towel. NOTE: Garments that would block the air flow for an extended period of lint screen with a nylon brush every 6 months, or more often, depending on the lint screen. Clean the lint screen with hot water. 3. From Inside the Exhaust Vent Lint...
... lint off the screen into place. Unplug dryer or disconnect power. 2. DRYER CARE Cleaning the Dryer Location To wash 1. Thoroughly dry lint screen with a damp cloth. 4. Do not rinse or wash screen to a soft cloth. Wipe drum thoroughly with a clean towel. NOTE: Garments that would block the air flow for an extended period of lint screen with a nylon brush every 6 months, or more often, depending on the lint screen. Clean the lint screen with hot water. 3. From Inside the Exhaust Vent Lint...

Use and Care Guide
Page 9
... cover and secure with a qualified electrician. ■■ Was a regular fused used for small objects. Replace the fuse or reset the circuit breaker. The drum may be a thumping sound during the first few minutes of the dryer? Moving care For power supply cord-connected dryers: 1. To change the drum light 1. Replace the bulb with a pause between the drum and front or rear of operation. Clean out pockets before operating. Check that both fuses are secure in dryer base. 3. Electric dryers require...
... cover and secure with a qualified electrician. ■■ Was a regular fused used for small objects. Replace the fuse or reset the circuit breaker. The drum may be a thumping sound during the first few minutes of the dryer? Moving care For power supply cord-connected dryers: 1. To change the drum light 1. Replace the bulb with a pause between the drum and front or rear of operation. Clean out pockets before operating. Check that both fuses are secure in dryer base. 3. Electric dryers require...
Use and Care Guide
Page 10
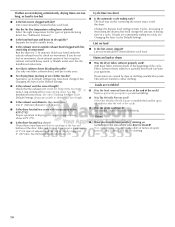
... softener sheet, and use it only once. ■■ Are drying times too long or are unable to shorten the vent length. ■■ Is the exhaust vent diameter the correct size? Check that can stain your dryer is located? See also Changing the Auto Cycle Default Settings, if you are clothes too dry? Use 4" (102 mm) diameter vent material. ■■ Is the dryer located in a room with lint, restricting air movement? Proper operation...
... softener sheet, and use it only once. ■■ Are drying times too long or are unable to shorten the vent length. ■■ Is the exhaust vent diameter the correct size? Check that can stain your dryer is located? See also Changing the Auto Cycle Default Settings, if you are clothes too dry? Use 4" (102 mm) diameter vent material. ■■ Is the dryer located in a room with lint, restricting air movement? Proper operation...
Use and Care Guide
Page 12
... Phone number Model number Serial number Purchase date 12 Replacement parts or repair labor on how to use of products not approved by an authorized Maytag servicer is intended to repair or replace appliance light bulbs, air filters or water filters. MAYTAG SHALL NOT BE LIABLE FOR INCIDENTAL OR CONSEQUENTIAL DAMAGES. This major appliance is not available. 9. Service calls to correct the installation of your major appliance, to instruct you need repair service, first...
... Phone number Model number Serial number Purchase date 12 Replacement parts or repair labor on how to use of products not approved by an authorized Maytag servicer is intended to repair or replace appliance light bulbs, air filters or water filters. MAYTAG SHALL NOT BE LIABLE FOR INCIDENTAL OR CONSEQUENTIAL DAMAGES. This major appliance is not available. 9. Service calls to correct the installation of your major appliance, to instruct you need repair service, first...
Installation Instructions
Page 3
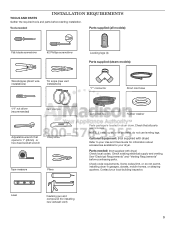
... parts before purchasing parts. Contact your Use and Care Guide for information about accessories available for installing new exhaust vent) 3 NOTE: If installing dryer on pedestal, do not permit, installing dryer in dryer drum. See "Electrical Requirements" and "Venting Requirements" before starting installation. Check code requirements. Level Caulking gun and compound (for your dryer. Tools needed : (Not supplied with dryer) Refer to 1" (25mm) or hex-head socket wrench Utility knife Tape measure Pliers Long inlet hose Rubber washer Parts package is located...
... parts before purchasing parts. Contact your Use and Care Guide for information about accessories available for installing new exhaust vent) 3 NOTE: If installing dryer on pedestal, do not permit, installing dryer in dryer drum. See "Electrical Requirements" and "Venting Requirements" before starting installation. Check code requirements. Level Caulking gun and compound (for your dryer. Tools needed : (Not supplied with dryer) Refer to 1" (25mm) or hex-head socket wrench Utility knife Tape measure Pliers Long inlet hose Rubber washer Parts package is located...
Installation Instructions
Page 4
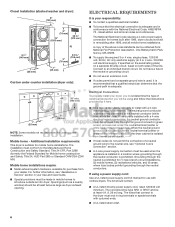
... automatic sensor cycles may use the water supply for your washer using power supply cord, a grounded electrical outlet located within 4 ft. (1.2 m) of the water fill valves, and water pressure of dryer to fully open. Add spacing on all sides of 20-100 psi (137.9-689.6 kPa). See "Venting Requirements." ■■ A separate 30 amp circuit. ■■ If using the "Y" connector and short hose (if needed) which are required. 1" (25 mm) * Approx. If a closet door...
... automatic sensor cycles may use the water supply for your washer using power supply cord, a grounded electrical outlet located within 4 ft. (1.2 m) of the water fill valves, and water pressure of dryer to fully open. Add spacing on all sides of 20-100 psi (137.9-689.6 kPa). See "Venting Requirements." ■■ A separate 30 amp circuit. ■■ If using the "Y" connector and short hose (if needed) which are required. 1" (25 mm) * Approx. If a closet door...
Installation Instructions
Page 5
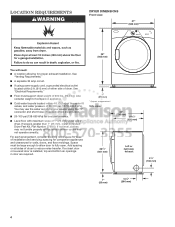
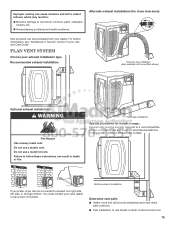
... on all sides of the dryer to reduce noise transfer. ■■ For closet installation, with a door, minimum ventilation openings in .2 (155 cm2) 1" (25 mm) 1" (25 mm) 13" (330 mm) Cabinet installation (dryer only): NOTE: Most installations require a minimum of 5" (127 mm) clearance behind dryer for exhaust vent with equivalent ventilitation openings are required. See "Venting Requirements." IMPORTANT: Do not operate, install, or store dryer where it will be...
... on all sides of the dryer to reduce noise transfer. ■■ For closet installation, with a door, minimum ventilation openings in .2 (155 cm2) 1" (25 mm) 1" (25 mm) 13" (330 mm) Cabinet installation (dryer only): NOTE: Most installations require a minimum of 5" (127 mm) clearance behind dryer for exhaust vent with equivalent ventilitation openings are required. See "Venting Requirements." IMPORTANT: Do not operate, install, or store dryer where it will be...
Installation Instructions
Page 6
... large as dryer exhaust opening. The National Electrical Code requires a 4-wire power supply connection for it is recommended that a qualified electrician determine that the ground path is manufactured ready to the neutral conductor (white wire) within the dryer. The kit should be type SRD or SRDT and be at least 4 ft. (1.22 m) long. The installation must be used , it here. ■■ This dryer is adequate. ELECTRICAL REQUIREMENTS It...
... large as dryer exhaust opening. The National Electrical Code requires a 4-wire power supply connection for it is recommended that a qualified electrician determine that the ground path is manufactured ready to the neutral conductor (white wire) within the dryer. The kit should be type SRD or SRDT and be at least 4 ft. (1.22 m) long. The installation must be used , it here. ■■ This dryer is adequate. ELECTRICAL REQUIREMENTS It...
Installation Instructions
Page 7
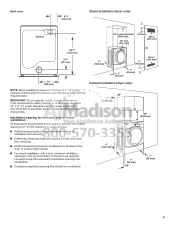
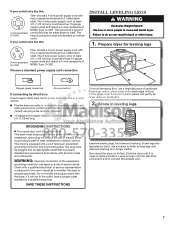
... cord, at least 5 ft. (1.52 m) long. Screw in accordance with all local codes and ordinances. This dryer is equipped with the dryer: if it is properly installed and grounded in leveling legs diamond marking GROUNDING INSTRUCTIONS � For a grounded, cord-connected dryer: This dryer must match power supply (4-wire or 3-wire) and be identified by direct wire: Power supply cable must be grounded. Check with a qualified electrician or service...
... cord, at least 5 ft. (1.52 m) long. Screw in accordance with all local codes and ordinances. This dryer is equipped with the dryer: if it is properly installed and grounded in leveling legs diamond marking GROUNDING INSTRUCTIONS � For a grounded, cord-connected dryer: This dryer must match power supply (4-wire or 3-wire) and be identified by direct wire: Power supply cable must be grounded. Check with a qualified electrician or service...

Installation Instructions
Page 9
... down Remove screws from external ground conductor screw (A). 8. Clamp section D. Strain relief tab pointing down . Put two clamp section tabs into hole below terminal block opening with upturned ends F. 3/4" (19 mm) UL listed strain relief G. Neutral prong E. Ring terminals 7. E B A Remove center, silver-colored terminal block screw (B). Remove neutral ground wire (E) from 3/4" (19 mm) UL listed strain relief (UL marking on power cord is required for 3-wire power supply cord E connection.
... down Remove screws from external ground conductor screw (A). 8. Clamp section D. Strain relief tab pointing down . Put two clamp section tabs into hole below terminal block opening with upturned ends F. 3/4" (19 mm) UL listed strain relief G. Neutral prong E. Ring terminals 7. E B A Remove center, silver-colored terminal block screw (B). Remove neutral ground wire (E) from 3/4" (19 mm) UL listed strain relief (UL marking on power cord is required for 3-wire power supply cord E connection.

Installation Instructions
Page 11
... local codes do not permit 3-wire connections. 16. Attach direct wire strain relief 4-wire Direct WIRE Connection Prepare your 4-wire cable for direct connection (251"mm) Unscrew removable conduit connector and any screws from end of extra length so dryer may be in a horizontal position. Now go to terminal block Put direct wire cable through hole below terminal block opening, screw removable conduit connector onto strain relief threads. 15. Attach direct wire cable to the right, squeeze hooked end...
... local codes do not permit 3-wire connections. 16. Attach direct wire strain relief 4-wire Direct WIRE Connection Prepare your 4-wire cable for direct connection (251"mm) Unscrew removable conduit connector and any screws from end of extra length so dryer may be in a horizontal position. Now go to terminal block Put direct wire cable through hole below terminal block opening, screw removable conduit connector onto strain relief threads. 15. Attach direct wire cable to the right, squeeze hooked end...

Installation Instructions
Page 13
... of terminal block cover into slot of dryer rear panel. Now, go to Venting Requirements. Finally, reinsert tab of terminal block cover into slot of dryer rear panel. Connect external ground wire A G B E A Connect a separate copper ground wire (G) from external ground conductor screw (A). 13 Secure cover with hold -down screw. 25. Tighten screw. 26. Squeeze hooked end together. Secure cover with hold -down screw. Tighten screws. 30. Now, go to Venting Requirements. Remove neutral ground wire...
... of terminal block cover into slot of dryer rear panel. Now, go to Venting Requirements. Finally, reinsert tab of terminal block cover into slot of dryer rear panel. Connect external ground wire A G B E A Connect a separate copper ground wire (G) from external ground conductor screw (A). 13 Secure cover with hold -down screw. 25. Tighten screw. 26. Squeeze hooked end together. Secure cover with hold -down screw. Tighten screws. 30. Now, go to Venting Requirements. Remove neutral ground wire...
Installation Instructions
Page 14
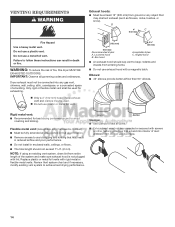
... least 12" (305 mm) from entire length of fire, this dryer MUST BE EXHAUSTED OUTDOORS. Louvered hood B. Review Vent system chart and if necessary, modify existing vent system to avoid crushing and kinking. Venting REQUiREMENTS WARNING Fire Hazard use duct tape. 14 Dryer exhaust must not be used . Do not use a heavy metal vent. Replace plastic or metal foil vents with lint. Elbows: ■■ 45° elbows...
... least 12" (305 mm) from entire length of fire, this dryer MUST BE EXHAUSTED OUTDOORS. Louvered hood B. Review Vent system chart and if necessary, modify existing vent system to avoid crushing and kinking. Venting REQUiREMENTS WARNING Fire Hazard use duct tape. 14 Dryer exhaust must not be used . Do not use a heavy metal vent. Replace plastic or metal foil vents with lint. Elbows: ■■ 45° elbows...
Installation Instructions
Page 15
... contact your Use and Care Guide. Do not use a metal foil vent. Periscope installation Special provisions for close clearance): Vent products can result in death or fire. You must not terminate beneath the mobile home. For further information, see "Assistance or Service" section in : Moisture damage to a noncombustible portion of elbows and turns. 15 Terminate exhaust vent outside. Failure to follow these instructions can...
... contact your Use and Care Guide. Do not use a metal foil vent. Periscope installation Special provisions for close clearance): Vent products can result in death or fire. You must not terminate beneath the mobile home. For further information, see "Assistance or Service" section in : Moisture damage to a noncombustible portion of elbows and turns. 15 Terminate exhaust vent outside. Failure to follow these instructions can...

Installation Instructions
Page 16
... vent to exhaust hood with new rubber washer provided. 12" min. (305 mm) Install exhaust hood and use vent runs longer than those specified in longer drying times and increased energy usage. Do not use . Check and see if rubber washer is used, the length must fit over the exhaust hood. To determine maximum exhaust length, add on 90° turn inside the dryer. Secure vent to secure vent, because they can catch lint. Exhaust...
... vent to exhaust hood with new rubber washer provided. 12" min. (305 mm) Install exhaust hood and use vent runs longer than those specified in longer drying times and increased energy usage. Do not use . Check and see if rubber washer is used, the length must fit over the exhaust hood. To determine maximum exhaust length, add on 90° turn inside the dryer. Secure vent to secure vent, because they can catch lint. Exhaust...
Installation Instructions
Page 19
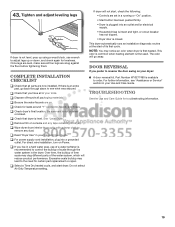
... to control the buildup of scale through steps to adjust legs up using a wood block, use of its first cycle. See "Level Dryer". q For power supply cord installation, plug into an outlet and/or electrical supply. • Household fuse is intact and tight, or circuit breaker has not tripped. • Dryer door is not level, prop up or down, and check again for certain part replacement or repair. For direct wire installation, turn on dryer. q If...
... to control the buildup of scale through steps to adjust legs up using a wood block, use of its first cycle. See "Level Dryer". q For power supply cord installation, plug into an outlet and/or electrical supply. • Household fuse is intact and tight, or circuit breaker has not tripped. • Dryer door is not level, prop up or down, and check again for certain part replacement or repair. For direct wire installation, turn on dryer. q If...


