User Instructions
Page 1
...located at the top inside dryer door well. You will need to help is available by calling our Customer Interaction Center at www.whirlpool.com. Dealer name Serial number Address Phone number Model number Purchase date 8578183 Additional help you obtain assistance or service if you ...need it. To order parts and accessories, call 1-800-442-9991 or visit our website at 1-800-253-1301 from anywhere in the U.S.A., or write: Whirlpool Corporation Customer Interaction Center 553 Benson Road Benton Harbor, MI 49022-2692....
...located at the top inside dryer door well. You will need to help is available by calling our Customer Interaction Center at www.whirlpool.com. Dealer name Serial number Address Phone number Model number Purchase date 8578183 Additional help you obtain assistance or service if you ...need it. To order parts and accessories, call 1-800-442-9991 or visit our website at 1-800-253-1301 from anywhere in the U.S.A., or write: Whirlpool Corporation Customer Interaction Center 553 Benson Road Benton Harbor, MI 49022-2692....
User Instructions
Page 2
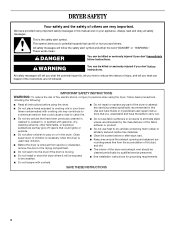
... contribute to a chemical reaction that you don't follow the safety alert symbol and either the word "DANGER" or "WARNING." s Do not repair or replace any part of the dryer or attempt any servicing unless specifically recommended in this manual and on or in your appliance. rounding areas free from service or...
... contribute to a chemical reaction that you don't follow the safety alert symbol and either the word "DANGER" or "WARNING." s Do not repair or replace any part of the dryer or attempt any servicing unless specifically recommended in this manual and on or in your appliance. rounding areas free from service or...
User Instructions
Page 4
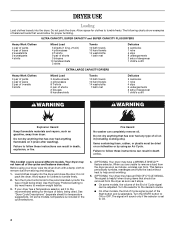
... fire. Do not pack the dryer. Your dryer may not have a WRINKLE SHIELD™ feature selector. The signal will sound only if the selector is part of the cycles and features described. See "Dryer Cycle Descriptions" (separate sheet) for the type of sleepwear 1 child's outfit WARNING WARNING Explosion Hazard Keep flammable...
... fire. Do not pack the dryer. Your dryer may not have a WRINKLE SHIELD™ feature selector. The signal will sound only if the selector is part of the cycles and features described. See "Dryer Cycle Descriptions" (separate sheet) for the type of sleepwear 1 child's outfit WARNING WARNING Explosion Hazard Keep flammable...
User Instructions
Page 8
...HEREIN. Contact your nearest designated service center. After checking "Troubleshooting," additio nal help can be provided by Whirlpool. 5. To locate FSP replacement parts in remote locations. 10. This major appliance is designed to be repaired in accordance with electrical or plumbing... EXCLUSIONS OR LIMITATIONS MAY NOT APPLY TO YOU. For information on how to contact Whirlpool Corporation, please see the "Troubleshooting" section of the Use & Care Guide. Service calls to parts or systems resulting from warranty coverage. 3. Damage resulting from accident, alteration, misuse,...
...HEREIN. Contact your nearest designated service center. After checking "Troubleshooting," additio nal help can be provided by Whirlpool. 5. To locate FSP replacement parts in remote locations. 10. This major appliance is designed to be repaired in accordance with electrical or plumbing... EXCLUSIONS OR LIMITATIONS MAY NOT APPLY TO YOU. For information on how to contact Whirlpool Corporation, please see the "Troubleshooting" section of the Use & Care Guide. Service calls to parts or systems resulting from warranty coverage. 3. Damage resulting from accident, alteration, misuse,...
Installation Instructions
Page 1
... INSTRUCCIONES DE INSTALACIÓN PARA LA SECADORA ELÉCTRICA DE 29" (73,7 CM) Table of Contents / Índice DRYER SAFETY ...1 INSTALLATION INSTRUCTIONS ...2 Tools and Parts ...2 Location Requirements ...2 Electrical Requirements ...4 Electrical Connection ...5 Venting Requirements...10 Plan Vent System ...11 Install Vent System...12 Install Leveling Legs...12 Connect Vent ...12 Level...
... INSTRUCCIONES DE INSTALACIÓN PARA LA SECADORA ELÉCTRICA DE 29" (73,7 CM) Table of Contents / Índice DRYER SAFETY ...1 INSTALLATION INSTRUCTIONS ...2 Tools and Parts ...2 Location Requirements ...2 Electrical Requirements ...4 Electrical Connection ...5 Venting Requirements...10 Plan Vent System ...11 Install Vent System...12 Install Leveling Legs...12 Connect Vent ...12 Level...
Installation Instructions
Page 2
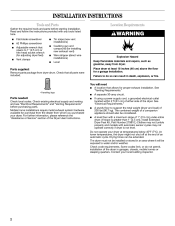
...at the end of a companion appliance should also be extended. Check code requirements. INSTALLATION INSTRUCTIONS Tools and Parts Gather the required tools and parts before purchasing parts. You will be installed or stored in an area where it will need s 4 leveling legs A...wire installations) Level s s Explosion Hazard Keep flammable materials and vapors, such as gasoline, away from dryer drum. See "Electrical Requirements." s s Parts needed: Check local codes. s s Do not operate your local building inspector. 2 A separate 30-amp circuit. A sturdy floor to water and/...
...at the end of a companion appliance should also be extended. Check code requirements. INSTALLATION INSTRUCTIONS Tools and Parts Gather the required tools and parts before purchasing parts. You will be installed or stored in an area where it will need s 4 leveling legs A...wire installations) Level s s Explosion Hazard Keep flammable materials and vapors, such as gasoline, away from dryer drum. See "Electrical Requirements." s s Parts needed: Check local codes. s s Do not operate your local building inspector. 2 A separate 30-amp circuit. A sturdy floor to water and/...
Installation Instructions
Page 3
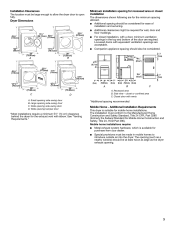
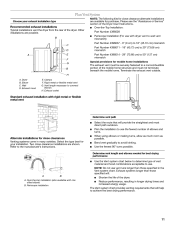
... location must be made in mobile homes to the Manufactured Home Construction and Safety Standard, Title 24 CFR, Part 3280 (formerly the Federal Standard for Mobile Home Construction and Safety, Title 24, HUD Part 280). Large opening side-swing door C. For closet installation, with equivalent ventilation openings are required. Companion appliance spacing...
... location must be made in mobile homes to the Manufactured Home Construction and Safety Standard, Title 24 CFR, Part 3280 (formerly the Federal Standard for Mobile Home Construction and Safety, Title 24, HUD Part 280). Large opening side-swing door C. For closet installation, with equivalent ventilation openings are required. Companion appliance spacing...
Installation Instructions
Page 10
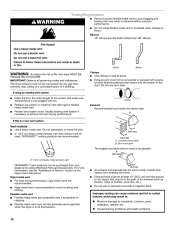
..., ceiling or a concealed space of the system and make sure exhaust hood is recommended to keep rodents and insects from your dealer or by calling Whirlpool Parts and Accessories. Rigid metal vent is not plugged with a magnetic latch. Fire Hazard Use a heavy metal vent. Exhaust vent must be connected or secured with...
..., ceiling or a concealed space of the system and make sure exhaust hood is recommended to keep rodents and insects from your dealer or by calling Whirlpool Parts and Accessories. Rigid metal vent is not plugged with a magnetic latch. Fire Hazard Use a heavy metal vent. Exhaust vent must be connected or secured with...
Installation Instructions
Page 11
...and hood combinations acceptable to use with dryer vent to wall vent mismatch): Part Number 4396037 - 0" (0 cm) to 18" (45.72 cm) mismatch Part Number 4396011 - 18" (45.72 cm) to 29" (73.66 cm) mismatch Part Number 4396014 - 29" (73.66 cm) to use vent runs longer... see the "Assistance or Service" section of the dryer. When using elbows or making turns, allow as much room as possible. s Over-the-Top Installation: Part Number 4396028 s B C D A E F G B H A. Plan the installation to 50" (127 cm) mismatch Special provisions for your exhaust installation type Recommended exhaust ...
...and hood combinations acceptable to use with dryer vent to wall vent mismatch): Part Number 4396037 - 0" (0 cm) to 18" (45.72 cm) mismatch Part Number 4396011 - 18" (45.72 cm) to 29" (73.66 cm) mismatch Part Number 4396014 - 29" (73.66 cm) to use vent runs longer... see the "Assistance or Service" section of the dryer. When using elbows or making turns, allow as much room as possible. s Over-the-Top Installation: Part Number 4396028 s B C D A E F G B H A. Plan the installation to 50" (127 cm) mismatch Special provisions for your exhaust installation type Recommended exhaust ...
Installation Instructions
Page 12
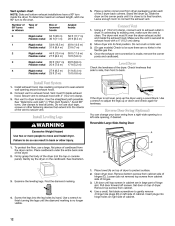
.... Do not use a large, flat piece of hinge slot. Use a wrench to adjust the legs up . Reverse Door Swing (Optional) You can result in large part of cardboard from cabinet side of cabinet. Failure to do not remove) top screws from the dryer carton. Firmly grasp the body of the dryer...
.... Do not use a large, flat piece of hinge slot. Use a wrench to adjust the legs up . Reverse Door Swing (Optional) You can result in large part of cardboard from cabinet side of cabinet. Failure to do not remove) top screws from the dryer carton. Firmly grasp the body of the dryer...
Installation Instructions
Page 13
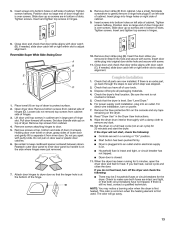
Tighten screws. Remove door strike (E) from cabinet. 4. If there is an extra part, go away. 13 Check the dryer's final location. Set the dryer on left side of dryer. Pull door forward off the dryer and check the ... seal or plastic door catches. 6. See "Level Dryer." 6. Remove the blue protective film on top of dryer to dryer door so that all parts are set in large part of hinges. 3. Wipe the dryer drum interior thoroughly with screw. Attach door hinges to protect surface. 2. If you removed in hinges. 6. Slide door...
Tighten screws. Remove door strike (E) from cabinet. 4. If there is an extra part, go away. 13 Check the dryer's final location. Set the dryer on left side of dryer. Pull door forward off the dryer and check the ... seal or plastic door catches. 6. See "Level Dryer." 6. Remove the blue protective film on top of dryer to dryer door so that all parts are set in large part of hinges. 3. Wipe the dryer drum interior thoroughly with screw. Attach door hinges to protect surface. 2. If you removed in hinges. 6. Slide door...


