User Instructions
Page 1
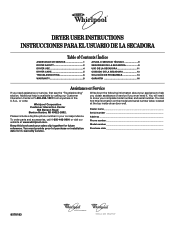
...Table of purchase or installation date for future reference. You must provide proof of Contents / Índice ASSISTANCE OR SERVICE 1 DRYER SAFETY 2 DRYER USE 4 DRYER CARE 5 TROUBLESHOOTING 6 WARRANTY 8 AYUDA O SERVICIO TÉCNICO 9 SEGURIDAD DE LA SECADORA 9 USO DE LA SECADORA 11 CUIDADO... "Troubleshooting" section. Please include a daytime phone number in your sales slip together for in the U.S.A., or write: Whirlpool Corporation Customer Interaction Center 553 Benson Road Benton Harbor, MI 49022-2692. Dealer name Serial number Address Phone number Model number ...
...Table of purchase or installation date for future reference. You must provide proof of Contents / Índice ASSISTANCE OR SERVICE 1 DRYER SAFETY 2 DRYER USE 4 DRYER CARE 5 TROUBLESHOOTING 6 WARRANTY 8 AYUDA O SERVICIO TÉCNICO 9 SEGURIDAD DE LA SECADORA 9 USO DE LA SECADORA 11 CUIDADO... "Troubleshooting" section. Please include a daytime phone number in your sales slip together for in the U.S.A., or write: Whirlpool Corporation Customer Interaction Center 553 Benson Road Benton Harbor, MI 49022-2692. Dealer name Serial number Address Phone number Model number ...
User Instructions
Page 2
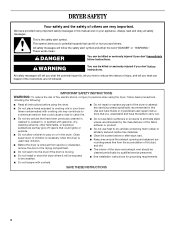
...instructions. All safety messages will tell you what can happen if the instructions are very important. s Do not install or store the dryer where it will follow basic precautions, including the following: s Read all safety messages. SAVE THESE INSTRUCTIONS 2 s Do not repair or... or in your appliance. s See installation instructions for grounding requirements. IMPORTANT SAFETY INSTRUCTIONS WARNING: To reduce the risk of the dryer or attempt any servicing unless specifically recommended in published user-repair instructions that could ignite or explode. s Do not allow children ...
...instructions. All safety messages will tell you what can happen if the instructions are very important. s Do not install or store the dryer where it will follow basic precautions, including the following: s Read all safety messages. SAVE THESE INSTRUCTIONS 2 s Do not repair or... or in your appliance. s See installation instructions for grounding requirements. IMPORTANT SAFETY INSTRUCTIONS WARNING: To reduce the risk of the dryer or attempt any servicing unless specifically recommended in published user-repair instructions that could ignite or explode. s Do not allow children ...
User Instructions
Page 3
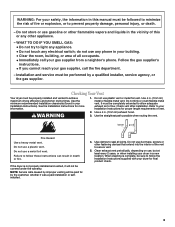
...metal vent. Failure to achieve maximum drying efficiency and shorten drying times. Follow the gas supplier's instructions. • If you cannot reach your dryer in a new location. Do not kink or crush flexible metal vent. NOTE: Service calls caused by improper venting will be paid installation or ...information in this or any phone in your building. • Clear the room, building, or area of the vent to secure vent. 5. If the dryer is complete, be sure to seal all occupants. • Immediately call the fire department. - Do not use , but at least every 2 years...
...metal vent. Failure to achieve maximum drying efficiency and shorten drying times. Follow the gas supplier's instructions. • If you cannot reach your dryer in a new location. Do not kink or crush flexible metal vent. NOTE: Service calls caused by improper venting will be paid installation or ...information in this or any phone in your building. • Clear the room, building, or area of the vent to secure vent. 5. If the dryer is complete, be sure to seal all occupants. • Immediately call the fire department. - Do not use , but at least every 2 years...
User Instructions
Page 4
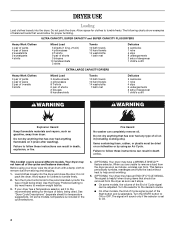
...Towels 10 bath towels 10 hand towels 14 washcloths 1 bath mat Delicates 3 camisoles 1 robe 4 slips 8 undergarments 2 sets of sleepwear 1 child's outfit EXTRA LARGE CAPACITY DRYERS Heavy Work Clothes 3 pair of pants 4 pair of jeans 2 pair of overalls 3 shirts Mixed Load 3 double sheets 4 pillowcases 8 T-shirts 6 pair of shorts ... set it stops. Turn the START button to tumble freely. Do not dry anything that should be removed from dryer. Do not pack the dryer. Your dryer may have all of Cycle signal can form. Allow space for the type of fabric being dried. Turn the selector...
...Towels 10 bath towels 10 hand towels 14 washcloths 1 bath mat Delicates 3 camisoles 1 robe 4 slips 8 undergarments 2 sets of sleepwear 1 child's outfit EXTRA LARGE CAPACITY DRYERS Heavy Work Clothes 3 pair of pants 4 pair of jeans 2 pair of overalls 3 shirts Mixed Load 3 double sheets 4 pillowcases 8 T-shirts 6 pair of shorts ... set it stops. Turn the START button to tumble freely. Do not dry anything that should be removed from dryer. Do not pack the dryer. Your dryer may have all of Cycle signal can form. Allow space for the type of fabric being dried. Turn the selector...
User Instructions
Page 5
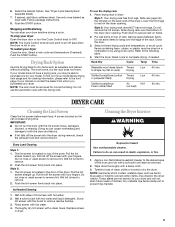
.... If desired, add fabric softener sheet. If your fingers. To use . Slide rear pegs into place. Slide drying rack over the edge of the dryer. Push down to remove. 2. Reset cycle to the following table. 4. A screen blocked by using an air cycle. Wet lint is hard to secure... the desired Option. Use only ones labeled as sweaters and pillows without tumbling. The drum turns, but the rack does not move. Start the dryer. DRYER CARE Cleaning the Lint Screen Clean the lint screen before each load. s If lint falls off the screen with hot water. 2. Roll lint off...
.... If desired, add fabric softener sheet. If your fingers. To use . Slide rear pegs into place. Slide drying rack over the edge of the dryer. Push down to remove. 2. Reset cycle to the following table. 4. A screen blocked by using an air cycle. Wet lint is hard to secure... the desired Option. Use only ones labeled as sweaters and pillows without tumbling. The drum turns, but the rack does not move. Start the dryer. DRYER CARE Cleaning the Lint Screen Clean the lint screen before each load. s If lint falls off the screen with hot water. 2. Roll lint off...
User Instructions
Page 6
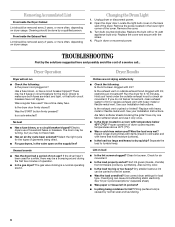
...? s Has an air dry cycle been selected? s Is it only once. The gas valve clicking is the valve open on the supply line? Dryer Results Clothes are intact and tight, or that hold moisture (cottons). If you may be turning, but you do not feel air movement, clean exhaust...? There may be a thumping sound during the first few minutes of lint or replace exhaust vent with lint? Is the dryer door firmly closed? Electric dryers use ? Run the dryer for load type. Are fabric softener sheets blocking the grille? Proper operation of a service call... Expect longer drying times with...
...? s Has an air dry cycle been selected? s Is it only once. The gas valve clicking is the valve open on the supply line? Dryer Results Clothes are intact and tight, or that hold moisture (cottons). If you may be turning, but you do not feel air movement, clean exhaust...? There may be a thumping sound during the first few minutes of lint or replace exhaust vent with lint? Is the dryer door firmly closed? Electric dryers use ? Run the dryer for load type. Are fabric softener sheets blocking the grille? Proper operation of a service call... Expect longer drying times with...
User Instructions
Page 7
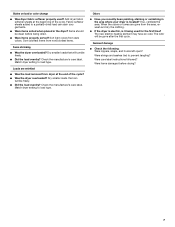
...the area. Were strings and sashes tied to load type. Sort light colors from the area, rewash and dry the clothing. s If the dryer is electric, is located? s Were items properly sorted? Dry smaller loads that will be clean before drying? 7 s Did the load overdry...cycle? Loads are gone from dark colors. s Did the load overdry? Odors s Have you recently been painting, staining or varnishing in the dryer? The odor will tumble freely. Garment damage s Check the following: Were zippers, snaps, and hooks left open? Were care label instructions followed...
...the area. Were strings and sashes tied to load type. Sort light colors from the area, rewash and dry the clothing. s If the dryer is electric, is located? s Were items properly sorted? Dry smaller loads that will be clean before drying? 7 s Did the load overdry...cycle? Loads are gone from dark colors. s Did the load overdry? Odors s Have you recently been painting, staining or varnishing in the dryer? The odor will tumble freely. Garment damage s Check the following: Were zippers, snaps, and hooks left open? Were care label instructions followed...
Installation Instructions
Page 1
... Requirements ...4 Electrical Connection ...5 Venting Requirements...10 Plan Vent System ...11 Install Vent System...12 Install Leveling Legs...12 Connect Vent ...12 Level Dryer ...12 Reverse Door Swing (Optional)...12 Complete Installation ...13 SEGURIDAD DE LA SECADORA ...14 INSTRUCCIONES DE INSTALACIÓN ...15 Herramientas y piezas......ón de la secadora...26 Cómo invertir el cierre de la puerta (opcional)...26 Complete la instalación...27 DRYER SAFETY Your safety and the safety of injury, and tell you what the potential hazard is the safety alert symbol. Always...
... Requirements ...4 Electrical Connection ...5 Venting Requirements...10 Plan Vent System ...11 Install Vent System...12 Install Leveling Legs...12 Connect Vent ...12 Level Dryer ...12 Reverse Door Swing (Optional)...12 Complete Installation ...13 SEGURIDAD DE LA SECADORA ...14 INSTRUCCIONES DE INSTALACIÓN ...15 Herramientas y piezas......ón de la secadora...26 Cómo invertir el cierre de la puerta (opcional)...26 Complete la instalación...27 DRYER SAFETY Your safety and the safety of injury, and tell you what the potential hazard is the safety alert symbol. Always...
Installation Instructions
Page 2
...lbs (90.7 kg). Read and follow the instructions provided with automatic sensor cycles may not operate correctly if dryer is greater than 1" [2.5 cm], install Extended Dryer Feet Kit, Part Number 279810.) Clothes may not tumble properly and models with any tools listed here. s ...s s Location Requirements WARNING Flat-blade screwdriver #2 Phillips screwdriver Adjustable wrench that opens to support the total weight (dryer and load) of the Dryer User Instructions. The combined weight of an automatic cycle. See "Electrical Requirements." A sturdy floor to 1" (2.5 cm) or ...
...lbs (90.7 kg). Read and follow the instructions provided with automatic sensor cycles may not operate correctly if dryer is greater than 1" [2.5 cm], install Extended Dryer Feet Kit, Part Number 279810.) Clothes may not tumble properly and models with any tools listed here. s ...s s Location Requirements WARNING Flat-blade screwdriver #2 Phillips screwdriver Adjustable wrench that opens to support the total weight (dryer and load) of the Dryer User Instructions. The combined weight of an automatic cycle. See "Electrical Requirements." A sturdy floor to 1" (2.5 cm) or ...
Installation Instructions
Page 3
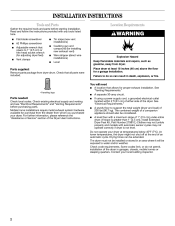
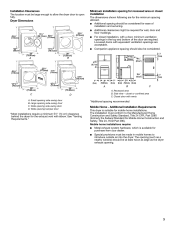
...allowed. The opening . 3 For closet installation, with equivalent ventilation openings are required. Companion appliance spacing should be at least twice as large as the dryer exhaust opening (such as a nearby window) should also be considered. 14" max. (35.6cm) 3" (7.6 cm) 48 in. 2 (310... of installation and servicing. Large opening hamper door D A. Wide opening side-swing door C. Additional Installation Requirements This dryer is available for purchase from your dealer. Mobile home installations require: s Metal exhaust system hardware, which is suitable for...
...allowed. The opening . 3 For closet installation, with equivalent ventilation openings are required. Companion appliance spacing should be at least twice as large as the dryer exhaust opening (such as a nearby window) should also be considered. 14" max. (35.6cm) 3" (7.6 cm) 48 in. 2 (310... of installation and servicing. Large opening hamper door D A. Wide opening side-swing door C. Additional Installation Requirements This dryer is available for purchase from your dealer. Mobile home installations require: s Metal exhaust system hardware, which is suitable for...

Installation Instructions
Page 4
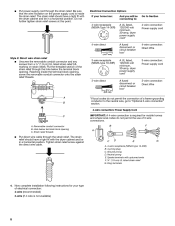
... All current-carrying wires must have a fuse in a location where grounding through the neutral conductors. For a permanently connected dryer: This dryer must be plugged into an appropriate outlet that the electrical connection is adequate and in accordance with a qualified electrician or service ...representative or personnel if you will reduce the risk of a neutral ground wire to the neutral conductor (white wire) within the dryer. s s A UL listed strain relief. s s 10-gauge solid copper wire (do not permit the connection of electric shock by a...
... All current-carrying wires must have a fuse in a location where grounding through the neutral conductors. For a permanently connected dryer: This dryer must be plugged into an appropriate outlet that the electrical connection is adequate and in accordance with a qualified electrician or service ...representative or personnel if you will reduce the risk of a neutral ground wire to the neutral conductor (white wire) within the dryer. s s A UL listed strain relief. s s 10-gauge solid copper wire (do not permit the connection of electric shock by a...
Installation Instructions
Page 6
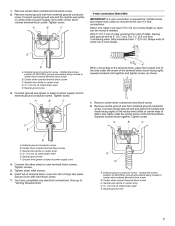
...terminal block opening . Reaching inside the strain relief. Tighten strain relief screw against the direct wire cable. Spade terminals with the dryer cabinet and be in a horizontal position. Now complete installation following instructions for mobile homes and where local codes do not permit the...) UL listed strain relief G. A. Ring terminals 4. The strain relief should have a tight fit with the dryer cabinet and be connecting to: A UL listed, 120/240-volt minimum, 30-amp, dryer power supply cord* A fused disconnect or circuit breaker box* A UL listed, 120/240-volt minimum, 30...
...terminal block opening . Reaching inside the strain relief. Tighten strain relief screw against the direct wire cable. Spade terminals with the dryer cabinet and be in a horizontal position. Now complete installation following instructions for mobile homes and where local codes do not permit the...) UL listed strain relief G. A. Ring terminals 4. The strain relief should have a tight fit with the dryer cabinet and be connecting to: A UL listed, 120/240-volt minimum, 30-amp, dryer power supply cord* A fused disconnect or circuit breaker box* A UL listed, 120/240-volt minimum, 30...
Installation Instructions
Page 7
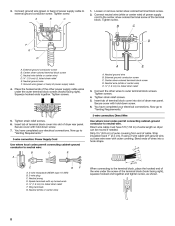
...wire (white or center wire) of direct wire cable under the screw of the terminal block. Tighten strain relief screws. 6. Insert tab of dryer rear panel. Dotted line shows position of power supply cord to the terminal block, place the hooked end of the wire under the center ... facing right), squeeze hooked end together and tighten screw, as shown. 3. Tighten screw. Remove neutral ground wire from end of extra length so dryer can be moved if needed. Squeeze hooked ends together. Connect ground wire (green or bare) of NEUTRAL ground wire before being moved to center ...
...wire (white or center wire) of direct wire cable under the screw of the terminal block. Tighten strain relief screws. 6. Insert tab of dryer rear panel. Dotted line shows position of power supply cord to the terminal block, place the hooked end of the wire under the center ... facing right), squeeze hooked end together and tighten screw, as shown. 3. Tighten screw. Remove neutral ground wire from end of extra length so dryer can be moved if needed. Squeeze hooked ends together. Connect ground wire (green or bare) of NEUTRAL ground wire before being moved to center ...
Installation Instructions
Page 8
...up turned ends E 1.9 cm) UL listed strain relief F. Spade terminals with outer covering. Place the hooked ends of extra length so dryer can be moved if needed. You have completed your electrical connections. You have completed your electrical connections. Neutral prong D. Tighten screw. .... 6. Tighten screw. Neutral ground wire B. Tighten strain relief screws. 5. Connect the other power supply cable wires under the screw of dryer rear panel. Insert tab of terminal block cover into slot of the terminal block (hook facing right), squeeze hooked end together and tighten...
...up turned ends E 1.9 cm) UL listed strain relief F. Spade terminals with outer covering. Place the hooked ends of extra length so dryer can be moved if needed. You have completed your electrical connections. You have completed your electrical connections. Neutral prong D. Tighten screw. .... 6. Tighten screw. Neutral ground wire B. Tighten strain relief screws. 5. Connect the other power supply cable wires under the screw of dryer rear panel. Insert tab of terminal block cover into slot of the terminal block (hook facing right), squeeze hooked end together and tighten...

Installation Instructions
Page 9
... center wire) of terminal block (hook facing right). External ground conductor screw C. Center silver-colored terminal block screw D. Place the hooked ends of dryer rear panel. Now go to neutral wire. 1. Connect neutral ground wire and the neutral wire (white or center wire) of... dryer rear panel. A. Tighten screws. 4. Squeeze hooked ends together. Tighten screws. Tighten screw. Remove center silver-colored terminal block screw. 2. Insert tab of ...
... center wire) of terminal block (hook facing right). External ground conductor screw C. Center silver-colored terminal block screw D. Place the hooked ends of dryer rear panel. Now go to neutral wire. 1. Connect neutral ground wire and the neutral wire (white or center wire) of... dryer rear panel. A. Tighten screws. 4. Squeeze hooked ends together. Tighten screws. Tighten screw. Remove center silver-colored terminal block screw. 2. Insert tab of ...
Installation Instructions
Page 10
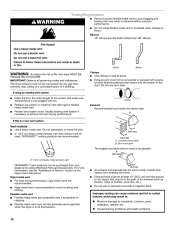
...10.2 cm 4" (10.2 cm) 4" (10.2 cm) heavy metal exhaust vent DURASAFE™ vent products can be fully extended and supported when the dryer is a new vent system Clamp Exhaust Recommended hood styles are recommended. Venting Requirements s WARNING s Remove excess flexible metal vent to achieve the best drying ... of the exhaust (such as flowers, rocks or bushes, snow line, etc.). Clean lint from your dealer or by calling Whirlpool Parts and Accessories. If this dryer MUST BE EXHAUSTED OUTDOORS. Do not use plastic or metal foil vent. 4" (10.2 cm) heavy metal exhaust vent and ...
...10.2 cm 4" (10.2 cm) 4" (10.2 cm) heavy metal exhaust vent DURASAFE™ vent products can be fully extended and supported when the dryer is a new vent system Clamp Exhaust Recommended hood styles are recommended. Venting Requirements s WARNING s Remove excess flexible metal vent to achieve the best drying ... of the exhaust (such as flowers, rocks or bushes, snow line, etc.). Clean lint from your dealer or by calling Whirlpool Parts and Accessories. If this dryer MUST BE EXHAUSTED OUTDOORS. Do not use plastic or metal foil vent. 4" (10.2 cm) heavy metal exhaust vent and ...
Installation Instructions
Page 11
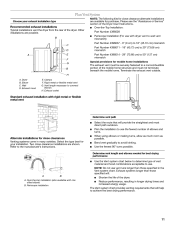
... purchase. Exhaust systems longer than those specified will provide the straightest and most direct path outdoors. Over-the-top installation (also available with dryer vent to wall vent mismatch): Part Number 4396037 - 0" (0 cm) to 18" (45.72 cm) mismatch Part Number 4396011 - 18...provisions for close clearances Venting systems come in many varieties. Other installations are shown. Refer to use the fewest number of the dryer. NOTE: Do not use with one offset elbow) B. Plan Vent System Choose your installation. Two close-clearance installations are possible...
... purchase. Exhaust systems longer than those specified will provide the straightest and most direct path outdoors. Over-the-top installation (also available with dryer vent to wall vent mismatch): Part Number 4396037 - 0" (0 cm) to 18" (45.72 cm) mismatch Part Number 4396011 - 18...provisions for close clearances Venting systems come in many varieties. Other installations are shown. Refer to use the fewest number of the dryer. NOTE: Do not use with one offset elbow) B. Plan Vent System Choose your installation. Two close-clearance installations are possible...
Installation Instructions
Page 12
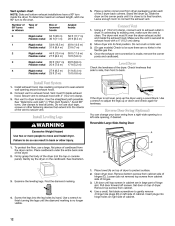
...) You can result in the flexible gas line. 4. Place cardboard under each of cabinet. Examine the leveling legs. Place towel (A) on top of dryer to gently remove 4 hinge hole plugs (D) on left -side opening around exhaust hood. 2. Remove bottom screws from cabinet. 4. Pull door forward off... screws. Use a small, flat-blade screwdriver to protect surface. 2. Number of 90º turns or elbows 0 1 2 3 4 Type of the dryer. 2. Make sure the vent is clean. Use a wrench to adjust the legs up . Install Leveling Legs WARNING Excessive Weight Hazard Use two or more people...
...) You can result in the flexible gas line. 4. Place cardboard under each of cabinet. Examine the leveling legs. Place towel (A) on top of dryer to gently remove 4 hinge hole plugs (D) on left -side opening around exhaust hood. 2. Remove bottom screws from cabinet. 4. Pull door forward off... screws. Use a small, flat-blade screwdriver to protect surface. 2. Number of 90º turns or elbows 0 1 2 3 4 Type of the dryer. 2. Make sure the vent is clean. Use a wrench to adjust the legs up . Install Leveling Legs WARNING Excessive Weight Hazard Use two or more people...
Installation Instructions
Page 13
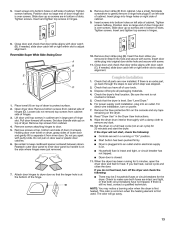
... see which step was skipped. 2. Check that all parts are intact and tight, or that door strike aligns with door catch (C). Check the dryer's final location. Remove the blue protective film on the console and any dust. 10. Remove screws attaching hinges to keep cardboard spacer centered between... door so large end of outer door and gently lift to make sure both circuit breakers have all packaging materials. 4. Place towel (A) on dryer, grasp sides of door hinge slot is closed. 7. Household fuse is on left or right within slot to inner door panel so handle is...
... see which step was skipped. 2. Check that all parts are intact and tight, or that door strike aligns with door catch (C). Check the dryer's final location. Remove the blue protective film on the console and any dust. 10. Remove screws attaching hinges to keep cardboard spacer centered between... door so large end of outer door and gently lift to make sure both circuit breakers have all packaging materials. 4. Place towel (A) on dryer, grasp sides of door hinge slot is closed. 7. Household fuse is on left or right within slot to inner door panel so handle is...


