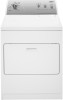
User Instructions
Page 2
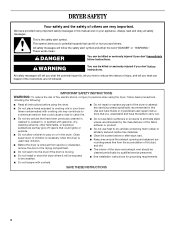
...service personnel. s See installation instructions for grounding requirements. IMPORTANT SAFETY INSTRUCTIONS WARNING: To reduce the risk of the dryer or attempt any part of fire, electric shock, or injury to catch fire. s Do not allow children to dry articles containing foam rubber or similarly ...textured rubber-like materials. s Do not install or store the dryer where it will follow basic precautions, including the following: s...
...service personnel. s See installation instructions for grounding requirements. IMPORTANT SAFETY INSTRUCTIONS WARNING: To reduce the risk of the dryer or attempt any part of fire, electric shock, or injury to catch fire. s Do not allow children to dry articles containing foam rubber or similarly ...textured rubber-like materials. s Do not install or store the dryer where it will follow basic precautions, including the following: s...
User Instructions
Page 3
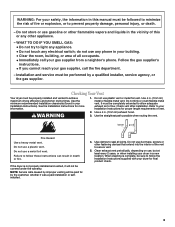
...your Installation Instructions for final product check. 3 do not use a metal foil vent. Use the minimum recommended installation clearances (found in your dryer in the vicinity of the vent to prevent property damage, personal injury, or death. - Do not kink or crush flexible metal vent. ...area of fire or explosion, or to secure vent. 5. Use the straightest path possible when routing the vent. Do not use any electrical switch; If the dryer is complete, be covered under the warranty. Do not use , but at least every 2 years, or when installing your Installation Instructions)....
...your Installation Instructions for final product check. 3 do not use a metal foil vent. Use the minimum recommended installation clearances (found in your dryer in the vicinity of the vent to prevent property damage, personal injury, or death. - Do not kink or crush flexible metal vent. ...area of fire or explosion, or to secure vent. 5. Use the straightest path possible when routing the vent. Do not use any electrical switch; If the dryer is complete, be covered under the warranty. Do not use , but at least every 2 years, or when installing your Installation Instructions)....
User Instructions
Page 6
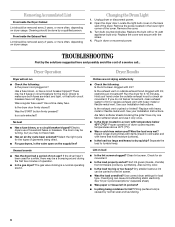
... during the first few minutes of garments being mistaken for a while, there may be 2 fuses or circuit breakers for load type. Electric dryers use it a gas dryer? Is the exhaust vent or outside exhaust hood to check air movement. If you may be removed every 2 years, or more often... are intact and tight, or that hold moisture (cottons). s Is the load too large and heavy to tumble freely. Check for air movement. Dryer Operation Dryer will not run s Check the following : Is the lint screen clogged with lint, restricting air movement? No heat s Has a fuse blown, ...
... during the first few minutes of garments being mistaken for a while, there may be 2 fuses or circuit breakers for load type. Electric dryers use it a gas dryer? Is the exhaust vent or outside exhaust hood to check air movement. If you may be removed every 2 years, or more often... are intact and tight, or that hold moisture (cottons). s Is the load too large and heavy to tumble freely. Check for air movement. Dryer Operation Dryer will not run s Check the following : Is the lint screen clogged with lint, restricting air movement? No heat s Has a fuse blown, ...
User Instructions
Page 7
...from noncolorfast items. Items shrinking s Was the dryer overloaded? Were care label instructions followed? Loads are gone from dryer at the beginning of the cycle? s If the dryer is electric, is located? s Did the load overdry? s Was the dryer overloaded? Items should be gone after the first... 7 The odor will tumble freely. Add dryer fabric softener sheets at the end of the cycle. Match dryer setting to load type. Odors s Have you recently been painting, staining or varnishing in the dryer? The new electric heating element may have an odor. Were strings...
...from noncolorfast items. Items shrinking s Was the dryer overloaded? Were care label instructions followed? Loads are gone from dryer at the beginning of the cycle? s If the dryer is electric, is located? s Did the load overdry? s Was the dryer overloaded? Items should be gone after the first... 7 The odor will tumble freely. Add dryer fabric softener sheets at the end of the cycle. Match dryer setting to load type. Odors s Have you recently been painting, staining or varnishing in the dryer? The new electric heating element may have an odor. Were strings...
Installation Instructions
Page 1
... instructions. We have provided many important safety messages in this manual and on your appliance. Always read and obey all safety messages. 29" (73.7 CM) ELECTRIC DRYER INSTALLATION INSTRUCTIONS INSTRUCCIONES DE INSTALACIÓN PARA LA SECADORA ELÉCTRICA DE 29" (73,7 CM) Table of Contents / Índice...
... instructions. We have provided many important safety messages in this manual and on your appliance. Always read and obey all safety messages. 29" (73.7 CM) ELECTRIC DRYER INSTALLATION INSTRUCTIONS INSTRUCCIONES DE INSTALACIÓN PARA LA SECADORA ELÉCTRICA DE 29" (73,7 CM) Table of Contents / Índice...
Installation Instructions
Page 2
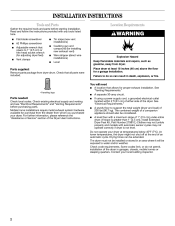
... the end of an automatic cycle. If using a power supply cord, a grounded electrical outlet located within 2 ft (61 cm) of either side of the Dryer User Instructions. At lower temperatures, the dryer might not shut off at least 18 inches (46 cm) above the floor for installing...of 200 lbs (90.7 kg). Failure to support the total weight (dryer and load) of the dryer in an area where it will need s 4 leveling legs A location that opens to water and/or weather. See "Electrical Requirements." Contact your local building inspector. 2 INSTALLATION INSTRUCTIONS Tools and Parts ...
... the end of an automatic cycle. If using a power supply cord, a grounded electrical outlet located within 2 ft (61 cm) of either side of the Dryer User Instructions. At lower temperatures, the dryer might not shut off at least 18 inches (46 cm) above the floor for installing...of 200 lbs (90.7 kg). Failure to support the total weight (dryer and load) of the dryer in an area where it will need s 4 leveling legs A location that opens to water and/or weather. See "Electrical Requirements." Contact your local building inspector. 2 INSTALLATION INSTRUCTIONS Tools and Parts ...

Installation Instructions
Page 4
...WARNING: Improper connection of the equipmentgrounding conductor can be used , it will reduce the risk of electric shock by a qualified electrician. Do not modify the plug on the dryer. The neutral ground wire is prohibited. A 4-wire power supply connection must be obtained from: National... terminal (center or white wire) of the terminal block. Electrical Requirements It is your responsibility s s If your dryer, you must determine the type of electrical connection you are in doubt as to whether the dryer is properly grounded. Then choose a 4-wire power supply cord...
...WARNING: Improper connection of the equipmentgrounding conductor can be used , it will reduce the risk of electric shock by a qualified electrician. Do not modify the plug on the dryer. The neutral ground wire is prohibited. A 4-wire power supply connection must be obtained from: National... terminal (center or white wire) of the terminal block. Electrical Requirements It is your responsibility s s If your dryer, you must determine the type of electrical connection you are in doubt as to whether the dryer is properly grounded. Then choose a 4-wire power supply cord...
Installation Instructions
Page 6
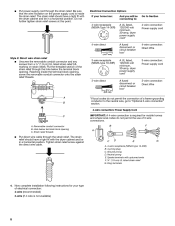
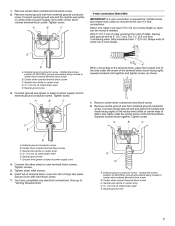
... you will be in a horizontal position. Reaching inside the strain relief. Hole below the terminal block opening C. Spade terminals with the dryer cabinet and be in a horizontal position. Ring terminals 4. The strain relief should have a tight fit with the...screw against the direct wire cable. Be sure that the wire insulation on strain relief). Do not further tighten strain relief screws at this point. Electrical Connection Options If your type of 3-wire connections. Strain relief threads s B A F Put direct wire cable through the strain relief. Now complete...
... you will be in a horizontal position. Reaching inside the strain relief. Hole below the terminal block opening C. Spade terminals with the dryer cabinet and be in a horizontal position. Ring terminals 4. The strain relief should have a tight fit with the...screw against the direct wire cable. Be sure that the wire insulation on strain relief). Do not further tighten strain relief screws at this point. Electrical Connection Options If your type of 3-wire connections. Strain relief threads s B A F Put direct wire cable through the strain relief. Now complete...
Installation Instructions
Page 7
...wire (white or center wire) D. ¾" (1.9 cm) UL listed strain relief E. Ground wire (green or bare) of extra length so dryer can be moved if needed. Secure cover with hold-down screw. 7. A. Squeeze hooked ends together. Insert tab of the terminal block (hook facing.... 3. Neutral wire (white or center wire) D. ¾" (1.9 cm) UL listed strain relief E. Direct wire cable must have completed your electrical connections. Tighten screws. 5. Tighten screw. Neutral ground wire F. Connect the other wires to "Venting Requirements." Dotted line shows position of cable, leaving...
...wire (white or center wire) D. ¾" (1.9 cm) UL listed strain relief E. Ground wire (green or bare) of extra length so dryer can be moved if needed. Secure cover with hold-down screw. 7. A. Squeeze hooked ends together. Insert tab of the terminal block (hook facing.... 3. Neutral wire (white or center wire) D. ¾" (1.9 cm) UL listed strain relief E. Direct wire cable must have completed your electrical connections. Tighten screws. 5. Tighten screw. Neutral ground wire F. Connect the other wires to "Venting Requirements." Dotted line shows position of cable, leaving...
Installation Instructions
Page 8
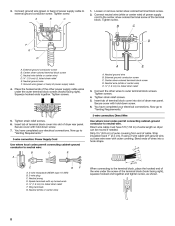
...block screw. 2. Neutral ground wire F. Tighten screws. 3. Secure cover with hold -down screw. 7. Direct wire cable must have completed your electrical connections. Neutral (white or center wire) G F When connecting to external ground conductor screw. 3. External ground conductor screw B. Place the ...cord to neutral wire. Connect neutral wire (white or center wire) of dryer rear panel. Neutral ground wire B. Center silver-colored terminal block screw D. Insert tab of extra length so dryer can be moved if needed. Strip 3¹⁄₂" (8.9 cm) ...
...block screw. 2. Neutral ground wire F. Tighten screws. 3. Secure cover with hold -down screw. 7. Direct wire cable must have completed your electrical connections. Neutral (white or center wire) G F When connecting to external ground conductor screw. 3. External ground conductor screw B. Place the ...cord to neutral wire. Connect neutral wire (white or center wire) of dryer rear panel. Neutral ground wire B. Center silver-colored terminal block screw D. Insert tab of extra length so dryer can be moved if needed. Strip 3¹⁄₂" (8.9 cm) ...

Installation Instructions
Page 9
...silver-colored terminal block screw D. Tighten screws. Neutral ground wire C. Grounding path determined by a qualified electrician 4. You have completed your electrical connections. Tighten strain relief screws. 5. Secure cover with hold -down screw. 6. Connect a separate copper ground wire from external ground conductor...¾" (1.9 cm) UL listed strain relief F. Tighten strain relief screw. 5. Insert tab of terminal block cover into slot of dryer rear panel. Secure cover with hold -down screw. 6. Connect the other power supply cable wires under the outer terminal block screws (...
...silver-colored terminal block screw D. Tighten screws. Neutral ground wire C. Grounding path determined by a qualified electrician 4. You have completed your electrical connections. Tighten strain relief screws. 5. Secure cover with hold -down screw. 6. Connect a separate copper ground wire from external ground conductor...¾" (1.9 cm) UL listed strain relief F. Tighten strain relief screw. 5. Insert tab of terminal block cover into slot of dryer rear panel. Secure cover with hold -down screw. 6. Connect the other power supply cable wires under the outer terminal block screws (...
Installation Instructions
Page 13
...make sure both fuses are now installed. If there is not crushed or kinked. 5. If needed , slide door catch left side of dryer. Check the dryer's final location. Check that door strike aligns with screw. Remove the blue protective film on the console and any dust. 10. Remove ...screws at the bottom of door (4 screws). If you do not remove) top screws from cabinet. 4. 5. Insert screws into an outlet and/or electrical ...
...make sure both fuses are now installed. If there is not crushed or kinked. 5. If needed , slide door catch left side of dryer. Check the dryer's final location. Check that door strike aligns with screw. Remove the blue protective film on the console and any dust. 10. Remove ...screws at the bottom of door (4 screws). If you do not remove) top screws from cabinet. 4. 5. Insert screws into an outlet and/or electrical ...


