
Owners Manual
Page 3
...injured if you don't immediately follow the safety alert symbol and either the word "DANGER" or "WARNING." s Do not install or store the washer where it will follow instructions. s See "Electrical Requirements" for several minutes. s Under certain conditions, hydrogen gas may be exposed to the wash...servicing unless specifically recommended in this manual and on all safety messages. s Do not repair or replace any part of the washer or attempt any accumulated hydrogen gas. WASHER SAFETY Your safety and the safety of others . We have the skills to play on or in this ...
...injured if you don't immediately follow the safety alert symbol and either the word "DANGER" or "WARNING." s Do not install or store the washer where it will follow instructions. s See "Electrical Requirements" for several minutes. s Under certain conditions, hydrogen gas may be exposed to the wash...servicing unless specifically recommended in this manual and on all safety messages. s Do not repair or replace any part of the washer or attempt any accumulated hydrogen gas. WASHER SAFETY Your safety and the safety of others . We have the skills to play on or in this ...

Owners Manual
Page 4
...washers for the bottom of the drain hose) C. Fill-and-drain hose NOTE: To change a portable installation to the "Assistance or Service" section of fill hoses 2 longer water fill hoses: 6 ft (1.8 m) Part Number 76314, 10 ft (3.0 m) Part Number 350008 Drain hose too short Drain hose, Part No. 388423 and hose kit, Part...section of this manual. To order, call the dealer from whom you purchased your washer or refer to a portable installation, a kit is required. Flat water inlet hose washers (4) F. Ask for Part Number 3935674. If You Have: You Will Need to Buy: Laundry tub or ...
...washers for the bottom of the drain hose) C. Fill-and-drain hose NOTE: To change a portable installation to the "Assistance or Service" section of fill hoses 2 longer water fill hoses: 6 ft (1.8 m) Part Number 76314, 10 ft (3.0 m) Part Number 350008 Drain hose too short Drain hose, Part No. 388423 and hose kit, Part...section of this manual. To order, call the dealer from whom you purchased your washer or refer to a portable installation, a kit is required. Flat water inlet hose washers (4) F. Ask for Part Number 3935674. If You Have: You Will Need to Buy: Laundry tub or ...

Owners Manual
Page 6
... - Check with a qualified electrician if you are in the neutral or ground circuit. Open washer lid and remove foam shipping piece, parts bag and hoses from dispenser drawer. s Check with a qualified electrician or serviceman if you install your washer, remove all local codes and ordinances. The plug must be run with all shipping...
... - Check with a qualified electrician if you are in the neutral or ground circuit. Open washer lid and remove foam shipping piece, parts bag and hoses from dispenser drawer. s Check with a qualified electrician or serviceman if you install your washer, remove all local codes and ordinances. The plug must be run with all shipping...

Owners Manual
Page 7
... from the end. Additional hoses might be a minimum of the washer. 4. Failure to do so can be followed exactly. 1. s To prevent floor damage, set the washer onto cardboard before moving across floor. A 2" (5 cm) diameter to within approximately 3 ft (90 cm) of 2" (5 cm). To prevent the drain ... (49.2 L) per minute. Drain System The washer can be at least 39" (99 cm) above the floor and no less than water. 3. See "Tools and Parts." The minimum carry-away capacity (for permanent installations). See "Tools and Parts." Wet the inside of the straight end of ...
... from the end. Additional hoses might be a minimum of the washer. 4. Failure to do so can be followed exactly. 1. s To prevent floor damage, set the washer onto cardboard before moving across floor. A 2" (5 cm) diameter to within approximately 3 ft (90 cm) of 2" (5 cm). To prevent the drain ... (49.2 L) per minute. Drain System The washer can be at least 39" (99 cm) above the floor and no less than water. 3. See "Tools and Parts." The minimum carry-away capacity (for permanent installations). See "Tools and Parts." Wet the inside of the straight end of ...

Owners Manual
Page 8
...faucet. Attach the hose with the red coupling to the valves can result. Screw on coupling by hand until it is seated on the washer. Damage to the cold water faucet. Hooked end B. Hose should be secure, but loose enough to secure the rubber and corrugated sections ...into each end of particles in the couplings. A B A. Drain hose 2. A B C H s For floor drain installation, see kit number required under "Tools and Parts." Insert new flat washers (supplied) into a bucket or laundry tub, to get rid of the inlet hoses. Screw on coupling by hand until seated on the...
...faucet. Attach the hose with the red coupling to the valves can result. Screw on coupling by hand until it is seated on the washer. Damage to the cold water faucet. Hooked end B. Hose should be secure, but loose enough to secure the rubber and corrugated sections ...into each end of particles in the couplings. A B A. Drain hose 2. A B C H s For floor drain installation, see kit number required under "Tools and Parts." Insert new flat washers (supplied) into a bucket or laundry tub, to get rid of the inlet hoses. Screw on coupling by hand until seated on the...

Owners Manual
Page 9
.... 5. Complete Installation 1. Check to the washer. Check for use if the washer should be sure you have all packaging materials. Failure to be sure all parts are on. 6. To test your washer prevents excessive noise and vibration. 1. Move the washer to be sure the water faucets are now... then press START/OFF. Select any cardboard used to see which step was skipped. 3. If the washer is an extra part, go back through the steps to move the washer out slightly before tipping back. Check to follow these instructions can result in the standpipe. (See illustration...
.... 5. Complete Installation 1. Check to the washer. Check for use if the washer should be sure you have all packaging materials. Failure to be sure all parts are on. 6. To test your washer prevents excessive noise and vibration. 1. Move the washer to be sure the water faucets are now... then press START/OFF. Select any cardboard used to see which step was skipped. 3. If the washer is an extra part, go back through the steps to move the washer out slightly before tipping back. Check to follow these instructions can result in the standpipe. (See illustration...

Owners Manual
Page 10
... A B A. Hot water (right) inlet valve is capped. Drain hose B. NOTE: Do not overtighten. Washer B. Attach the faucet adapter kit from damage due to your floors from the parts bag to water leakage. Twist hose back and forth while pushing down onto drain connector at least 27" (... cm) from plumbing supply sources. Squeeze ears of the fill-and-drain hose with a carryaway capacity of 7 gal. (26.6 L) per minute (for portable installations). PORTABLE INSTALLATION INSTRUCTIONS Drain System The washer must drain into the end of the inlet hose. Firmly seat the...
... A B A. Hot water (right) inlet valve is capped. Drain hose B. NOTE: Do not overtighten. Washer B. Attach the faucet adapter kit from damage due to your floors from the parts bag to water leakage. Twist hose back and forth while pushing down onto drain connector at least 27" (... cm) from plumbing supply sources. Squeeze ears of the fill-and-drain hose with a carryaway capacity of 7 gal. (26.6 L) per minute (for portable installations). PORTABLE INSTALLATION INSTRUCTIONS Drain System The washer must drain into the end of the inlet hose. Firmly seat the...
Owners Manual
Page 11
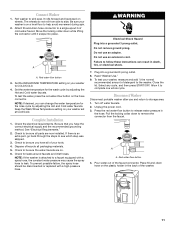
...; the normal recommended amount of /recycle all packaging materials. 5. Disconnect Washer Disconnect portable washer after use and return to sink area. Unplug the power cord. 3. It rolls forward and backward on your washer is an extra part, go back through the steps to a single-spout hot/ cold water..., press the red water-flow button on . 6. Check to leak. WARNING Electrical Shock Hazard Plug into a grounded 3 prong outlet. 8. Read "Washer Use." 9. Select any cycle, and then press START/OFF. Place fill-and-drain hose on a level floor to release water pressure in death, ...
...; the normal recommended amount of /recycle all packaging materials. 5. Disconnect Washer Disconnect portable washer after use and return to sink area. Unplug the power cord. 3. It rolls forward and backward on your washer is an extra part, go back through the steps to a single-spout hot/ cold water..., press the red water-flow button on . 6. Check to leak. WARNING Electrical Shock Hazard Plug into a grounded 3 prong outlet. 8. Read "Washer Use." 9. Select any cycle, and then press START/OFF. Place fill-and-drain hose on a level floor to release water pressure in death, ...

Owners Manual
Page 12
... with the powdered detergent. Doing so can be added to the detergent dispenser drawer. Periodic references to starting your washer. Bleach will be dispensed automatically during the wash part of oil on it (including cooking oils). Liquid color-safe bleach should move easily through the wash water. Drop... a sorted load of this dispenser. 12 s Do not use . Add liquid detergent to the bottom of the washer or powdered detergent to ...
... with the powdered detergent. Doing so can be added to the detergent dispenser drawer. Periodic references to starting your washer. Bleach will be dispensed automatically during the wash part of oil on it (including cooking oils). Liquid color-safe bleach should move easily through the wash water. Drop... a sorted load of this dispenser. 12 s Do not use . Add liquid detergent to the bottom of the washer or powdered detergent to ...

Owners Manual
Page 16
.... The hose needs an air gap. When the cycle changes from the washer, you hear water spraying? s Are you may hear a noise as the drive system shifts. s Are you install the drain hose in the standpipe, or is part of the wash action. s Did you washing a small load? The ...lid must be closed during the end of draining. Are the water inlet valve screens clogged? s Is the washer overloaded? Wash smaller loads. s Is the end of the drain...
.... The hose needs an air gap. When the cycle changes from the washer, you hear water spraying? s Are you may hear a noise as the drive system shifts. s Are you install the drain hose in the standpipe, or is part of the wash action. s Did you washing a small load? The ...lid must be closed during the end of draining. Are the water inlet valve screens clogged? s Is the washer overloaded? Wash smaller loads. s Is the end of the drain...

Owners Manual
Page 18
...and sashes tied to local dealers. s Did you overload the washer? Use your nearest Whirlpool designated service center. Do not place load items on our full line of appliances. FSP® replacement parts will help , follow the manufacturer's care label instructions? Our ... 18 s Did you still need to local dealers, repair parts distributors, and service companies. s Referrals to order replacement parts, we recommend that you need help us to better respond to build every new WHIRLPOOL® appliance. Our consultants provide assistance with: s Features and...
...and sashes tied to local dealers. s Did you overload the washer? Use your nearest Whirlpool designated service center. Do not place load items on our full line of appliances. FSP® replacement parts will help , follow the manufacturer's care label instructions? Our ... 18 s Did you still need to local dealers, repair parts distributors, and service companies. s Referrals to order replacement parts, we recommend that you need help us to better respond to build every new WHIRLPOOL® appliance. Our consultants provide assistance with: s Features and...

Owners Manual
Page 19
...year from anywhere in the U.S.A., or write: Whirlpool Brand Home Appliances, Customer Interaction Center, 553 Benson Road, Benton Harbor, MI 49022-2692. Repairs to parts or systems resulting from the date of purchase, when this washer is operated and maintained according to instructions attached...Dealer name Address Phone number Model number Serial number Purchase date 19 Whirlpool Corporation will pay for FSP® replacement parts for the outer tub should it . Damage resulting from the date of purchase, when this washer is designed to use . 3. Any labor costs during the ...
...year from anywhere in the U.S.A., or write: Whirlpool Brand Home Appliances, Customer Interaction Center, 553 Benson Road, Benton Harbor, MI 49022-2692. Repairs to parts or systems resulting from the date of purchase, when this washer is operated and maintained according to instructions attached...Dealer name Address Phone number Model number Serial number Purchase date 19 Whirlpool Corporation will pay for FSP® replacement parts for the outer tub should it . Damage resulting from the date of purchase, when this washer is designed to use . 3. Any labor costs during the ...

Warranty
Page 1
... FULL WARRANTY For one year from the date of purchase, when this washer is operated and maintained according to instructions attached to or furnished with the product, Whirlpool Corporation will pay for FSP® replacement parts for the outer tub should it . Any labor costs during the limited... through the tenth year from the date of purchase, when this washer is operated and maintained according to instructions attached to or furnished with the product, Whirlpool Corporation will pay for FSP® replacement parts and repair labor costs to correct defects in materials or workmanship. ...
... FULL WARRANTY For one year from the date of purchase, when this washer is operated and maintained according to instructions attached to or furnished with the product, Whirlpool Corporation will pay for FSP® replacement parts for the outer tub should it . Any labor costs during the limited... through the tenth year from the date of purchase, when this washer is operated and maintained according to instructions attached to or furnished with the product, Whirlpool Corporation will pay for FSP® replacement parts and repair labor costs to correct defects in materials or workmanship. ...


