
Use and Care Guide
Page 5
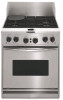
... locations and appearances of the features shown here may have some or all of unit not for factory test only) 10. Range 9 10 1 11 2 12 3 4 13 5 14 6 15 7 8 1. for consumer use - Surface Burner 2. Oven Vent 5. Oven Rack 5 Surface Burner Grate 3. Model and Serial Number Plate (located on center front frame, below... not match those of unit) 6. Gas Regulator (rear of your model. Door Gasket 7. Grille, Griddle, Center Burners or Filler Grate 12. Electronic Oven Control Display 13. Broil Element (not shown) 15.
... locations and appearances of the features shown here may have some or all of unit not for factory test only) 10. Range 9 10 1 11 2 12 3 4 13 5 14 6 15 7 8 1. for consumer use - Surface Burner 2. Oven Vent 5. Oven Rack 5 Surface Burner Grate 3. Model and Serial Number Plate (located on center front frame, below... not match those of unit) 6. Gas Regulator (rear of your model. Door Gasket 7. Grille, Griddle, Center Burners or Filler Grate 12. Electronic Oven Control Display 13. Broil Element (not shown) 15.

Use and Care Guide
Page 13
... what counts. Doing so will cause poor air circulation, affecting cooking and cleaning results. Make sure that could melt or burn near the oven vent. 13 Follow manufacturer's recommendations and use temperature recommended in the recipe. Use the following chart as a guide. s For pies, breads and casseroles, use the bakeware size...
... what counts. Doing so will cause poor air circulation, affecting cooking and cleaning results. Make sure that could melt or burn near the oven vent. 13 Follow manufacturer's recommendations and use temperature recommended in the recipe. Use the following chart as a guide. s For pies, breads and casseroles, use the bakeware size...

Use and Care Guide
Page 17
..., remove the plastic wrap. Turn the SELECTOR knob to the desired convection broil level. 4. Adjust SET knob to PROOF/KEEP WARM. Internal Food Temp. 13 lbs. Put 2 cups (500 mL) of the oven rack with the longest side parallel to be adjusted. Follow the same placement, broiler pan and ... for 5 minutes. The display will read 430°F (221°C). 2. Press the ENTER button to preheat for general broiling guidelines. and under (5.85 kg) Over 13 lbs. (5.85 kg) 10-15 10-12 300°F (149°C) 185°F (85°C) 300°F (149°C) 185°F (85°C) *...
..., remove the plastic wrap. Turn the SELECTOR knob to the desired convection broil level. 4. Adjust SET knob to PROOF/KEEP WARM. Internal Food Temp. 13 lbs. Put 2 cups (500 mL) of the oven rack with the longest side parallel to be adjusted. Follow the same placement, broiler pan and ... for 5 minutes. The display will read 430°F (221°C). 2. Press the ENTER button to preheat for general broiling guidelines. and under (5.85 kg) Over 13 lbs. (5.85 kg) 10-15 10-12 300°F (149°C) 185°F (85°C) 300°F (149°C) 185°F (85°C) *...
Installation Instructions
Page 6
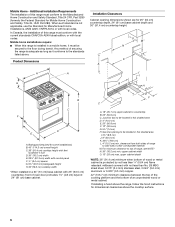
... applicable, use the Standard for 25" (64 cm) countertop depth, 24" (61 cm) base cabinet depth and 36" (91.4 cm) countertop height. upper cabinet width O. 13" (33 cm) max. When such standard is adequate as long as it must conform with the current standards CAN/CSA-A240-latest edition, or with...
... applicable, use the Standard for 25" (64 cm) countertop depth, 24" (61 cm) base cabinet depth and 36" (91.4 cm) countertop height. upper cabinet width O. 13" (33 cm) max. When such standard is adequate as long as it must conform with the current standards CAN/CSA-A240-latest edition, or with...

Installation Instructions
Page 13
... that power supply is turned to light the burner. A A A. Press ENTER. Electronic Ignition System Initial lighting and gas flame adjustments Cooktop and oven burners use . 13
... that power supply is turned to light the burner. A A A. Press ENTER. Electronic Ignition System Initial lighting and gas flame adjustments Cooktop and oven burners use . 13
