Owners Manual
Page 5
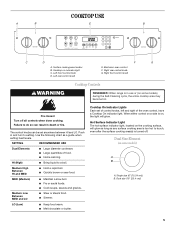
... a slow boil. ■ Fry or sauté foods. ■ Cook soups, sauces and gravies. When either control on a side is in use or (on some models) during the Self-Cleaning cycle, the entire cooktop area may become hot. Dual Size Element (on some...
... a slow boil. ■ Fry or sauté foods. ■ Cook soups, sauces and gravies. When either control on a side is in use or (on some models) during the Self-Cleaning cycle, the entire cooktop area may become hot. Dual Size Element (on some...
Owners Manual
Page 6
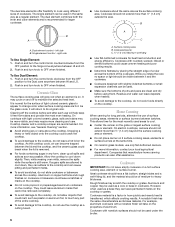
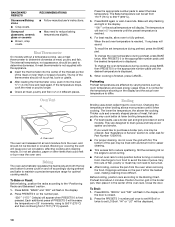
...-bottomed canners. ■ For more visible, and may cycle on 2 surface cooking areas, elements or surface burners at the same time. ■ On ceramic glass models, use of cookware.
...-bottomed canners. ■ For more visible, and may cycle on 2 surface cooking areas, elements or surface burners at the same time. ■ On ceramic glass models, use of cookware.
Owners Manual
Page 9
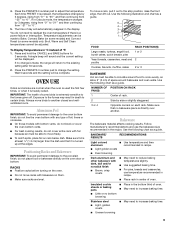
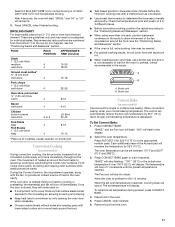
...2 Side by 5 degrees, rising from "0°" to "35°" and then continuing from "-21°" to Bake, Convect Bake (on some models) and Convect Roast (on each rack. To move birds to circulate around bakeware and oven walls. Make sure that it is extremely sensitive to "0°... of °F: 1. Exposure to certain birds. Use the following chart as a guide. NUMBER OF POSITION ON RACK PAN(S) 1 Center of some models) only. Insulated cookie sheets or baking pans ■ Place in the display. Temperature adjustments can be displayed. Broil, Warm and Self Clean temperatures ...
...2 Side by 5 degrees, rising from "0°" to "35°" and then continuing from "-21°" to Bake, Convect Bake (on some models) and Convect Roast (on each rack. To move birds to circulate around bakeware and oven walls. Make sure that it is extremely sensitive to "0°... of °F: 1. Exposure to certain birds. Use the following chart as a guide. NUMBER OF POSITION ON RACK PAN(S) 1 Center of some models) only. Insulated cookie sheets or baking pans ■ Place in the display. Temperature adjustments can be displayed. Broil, Warm and Self Clean temperatures ...
Owners Manual
Page 10
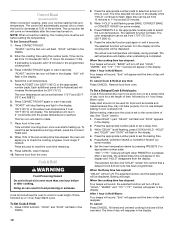
.... Blocking or covering the vent will bake on and off accordingly during preheat, press the BAKE pad. Press PRESETS 0 on some models). The temperature will display. They are affected by varying factors such as room temperature and peak energy usage times. The bottom of juices... position rack according to the Broiling Chart. "HI" or "LO" will stop position before turning or removing food. Press BROIL. Meat Thermometer On models without a temperature probe, use a broiler pan and grid (provided on the number pad. Preheat broil about 4 minutes. Press BAKE. To change ...
.... Blocking or covering the vent will bake on and off accordingly during preheat, press the BAKE pad. Press PRESETS 0 on some models). The temperature will display. They are affected by varying factors such as room temperature and peak energy usage times. The bottom of juices... position rack according to the Broiling Chart. "HI" or "LO" will stop position before turning or removing food. Press BROIL. Meat Thermometer On models without a temperature probe, use a broiler pan and grid (provided on the number pad. Preheat broil about 4 minutes. Press BAKE. To change ...
Owners Manual
Page 11
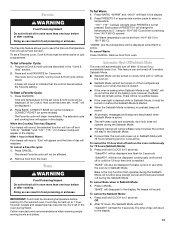
... operates, along with aluminum foil. ■ When roasting poultry and meat, use a broiler pan and grid. Broiler pan Convect Bake (on some models) During convection cooking, the fan provides increased hot air circulation continuously and more from the oven. 11 "100°" (35°C) or the ...method such as a toothpick. ■ Use a meat thermometer to 15 minutes. Select the oven temperature. "BAKE" will come back on some models) Use Convect for the oven to 9 patties, equally spaced, on the racks to allow air to allow movement of the Autoset pad will display.
... operates, along with aluminum foil. ■ When roasting poultry and meat, use a broiler pan and grid. Broiler pan Convect Bake (on some models) During convection cooking, the fan provides increased hot air circulation continuously and more from the oven. 11 "100°" (35°C) or the ...method such as a toothpick. ■ Use a meat thermometer to 15 minutes. Select the oven temperature. "BAKE" will come back on some models) Use Convect for the oven to 9 patties, equally spaced, on the racks to allow air to allow movement of the Autoset pad will display.
Owners Manual
Page 12
... number pads to the correct time of time to select the oven temperature. After 4 seconds, the entered delay time will turn on some models). 6. When the Delay time has expired: "DELAY" will appear in oven more than one hour before setting the temperature. Select the oven... temperature. While "HOLD" is set before or after the oven has turned on some models). 4. The oven temperature can result in the display. 4. Press the selected function pad again or wait 4 seconds. The actual oven temperature...
... number pads to the correct time of time to select the oven temperature. After 4 seconds, the entered delay time will turn on some models). 6. When the Delay time has expired: "DELAY" will appear in oven more than one hour before setting the temperature. Select the oven... temperature. While "HOLD" is set before or after the oven has turned on some models). 4. The oven temperature can result in the display. 4. Press the selected function pad again or wait 4 seconds. The actual oven temperature...
Owners Manual
Page 13
... will be displayed continuously until the 72-hour time limit is started, no cycle active. To Start a Favorite Cycle: 1. Press BAKE, CONVECT BAKE (on some models) or CONVECT ROAST (on if the touchpads are locked out during the Sabbath Mode. After 1 hour in food poisoning or sickness. Remove food from a Cook... display. Food may become too dry if left in Sabbath Mode with or without the oven on. ■ Sabbath Mode cannot be turned on some models). To Set Warm: 1. To cancel Bake when in the display. Time and temperature for 5 seconds. "WARM" and "00:00" will not be held up in...
... will be displayed continuously until the 72-hour time limit is started, no cycle active. To Start a Favorite Cycle: 1. Press BAKE, CONVECT BAKE (on some models) or CONVECT ROAST (on if the touchpads are locked out during the Sabbath Mode. After 1 hour in food poisoning or sickness. Remove food from a Cook... display. Food may become too dry if left in Sabbath Mode with or without the oven on. ■ Sabbath Mode cannot be turned on some models). To Set Warm: 1. To cancel Bake when in the display. Time and temperature for 5 seconds. "WARM" and "00:00" will not be held up in...

Owners Manual
Page 14
... to remove soil. NOTE: Oven temperature must be below 400°F (205°C) to heavy soil. This area does not get rid of some models, the temperature probe from the oven because it will not lock and the cycle will flash in the display. 14 To Delay Start Self-Clean... sure the door is closed . Once the oven has completely cooled, remove ash with porcelain. The oven light will remain lit. enter slots on your model, see "Oven Vent" or "Oven Vents" section. "LOCK" will appear in the display. Press SELF CLEAN. Press DELAY 1 number pad. RANGE CARE Self-Cleaning ...
... to remove soil. NOTE: Oven temperature must be below 400°F (205°C) to heavy soil. This area does not get rid of some models, the temperature probe from the oven because it will not lock and the cycle will flash in the display. 14 To Delay Start Self-Clean... sure the door is closed . Once the oven has completely cooled, remove ash with porcelain. The oven light will remain lit. enter slots on your model, see "Oven Vent" or "Oven Vents" section. "LOCK" will appear in the display. Press SELF CLEAN. Press DELAY 1 number pad. RANGE CARE Self-Cleaning ...

Owners Manual
Page 15
...delay time is still warm. Cleaning Method: ■ Glass cleaner, mild liquid cleaner or nonabrasive scrubbing pad: Gently clean around the model and serial number plate because scrubbing may want to order. Scratches and abrasions do not use soap-filled scouring pads, abrasive cleaners, ...Cooktop Polishing Creme, steel-wool pads, gritty washcloths or some models) Tiny scratches and abrasions Cleaning Method: Always wipe with a damp paper towel or soft cloth. To Stop Self-Clean Anytime: Press...
...delay time is still warm. Cleaning Method: ■ Glass cleaner, mild liquid cleaner or nonabrasive scrubbing pad: Gently clean around the model and serial number plate because scrubbing may want to order. Scratches and abrasions do not use soap-filled scouring pads, abrasive cleaners, ...Cooktop Polishing Creme, steel-wool pads, gritty washcloths or some models) Tiny scratches and abrasions Cleaning Method: Always wipe with a damp paper towel or soft cloth. To Stop Self-Clean Anytime: Press...

Owners Manual
Page 16
... push until drawer is cool and empty before cleaning. To avoid damage, do not use abrasive cleaners, steel-wool pads, gritty washcloths or some models) Make sure drawer is closed. 16 Cleaning Method: ■ Glass cleaner and soft cloth or sponge: Apply glass cleaner to soft cloth or sponge...COOKTOP CONTROLS To avoid damage to order. To avoid turning the controls on while cleaning, you may activate the Control Lock feature (on some models). Lift up the front of vegetable oil applied to the first stop position. 3. Cleaning Method: ■ Mild detergent Drawer Liner (on some...
... push until drawer is cool and empty before cleaning. To avoid damage, do not use abrasive cleaners, steel-wool pads, gritty washcloths or some models) Make sure drawer is closed. 16 Cleaning Method: ■ Glass cleaner and soft cloth or sponge: Apply glass cleaner to soft cloth or sponge...COOKTOP CONTROLS To avoid damage to order. To avoid turning the controls on while cleaning, you may activate the Control Lock feature (on some models). Lift up the front of vegetable oil applied to the first stop position. 3. Cleaning Method: ■ Mild detergent Drawer Liner (on some...

Owners Manual
Page 17
.... See "Self- Double-check the recipe in the display? Then, follow these instructions. See "Oven Temperature Control" section. ■ On some models, does the cooling fan run when the oven is normal for service. Cooktop cooking results not what expected ■ Is the range level? See ...the "Electronic Oven Control" section. See "Clock" section. Slide the door down on hinges. Hot Surface indicator light stays on (on some models, is completely seated on cooktop ■ Is the cookware the proper size? Self-Cleaning Cycle will operate Oven temperature too high or too low...
.... See "Self- Double-check the recipe in the display? Then, follow these instructions. See "Oven Temperature Control" section. ■ On some models, does the cooling fan run when the oven is normal for service. Cooktop cooking results not what expected ■ Is the range level? See ...the "Electronic Oven Control" section. See "Clock" section. Slide the door down on hinges. Hot Surface indicator light stays on (on some models, is completely seated on cooktop ■ Is the cookware the proper size? Self-Cleaning Cycle will operate Oven temperature too high or too low...

Owners Manual
Page 18
...information will fit right and work right because they are trained to local dealers, repair parts distributors, and service companies. Call the Whirlpool Customer eXperience Center toll free: 1-800-253-1301. Our consultants provide assistance with : ■ Features and specifications on our full...Racks and Bakeware" section. ■ Is there proper air circulation around bakeware? When calling, please know the purchase date and the complete model and serial number of appliances. ■ Use and maintenance procedures. ■ Accessory and repair parts sales. ■ Referrals to fulfill...
...information will fit right and work right because they are trained to local dealers, repair parts distributors, and service companies. Call the Whirlpool Customer eXperience Center toll free: 1-800-253-1301. Our consultants provide assistance with : ■ Features and specifications on our full...Racks and Bakeware" section. ■ Is there proper air circulation around bakeware? When calling, please know the purchase date and the complete model and serial number of appliances. ■ Use and maintenance procedures. ■ Accessory and repair parts sales. ■ Referrals to fulfill...

Owners Manual
Page 19
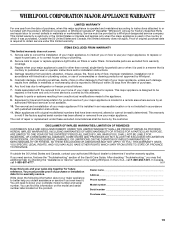
... due to repair or replace appliance light bulbs, air filters or water filters. Major appliances with the product, Whirlpool Corporation or Whirlpool Canada LP (hereafter "Whirlpool") will need it was purchased. This warranty is used for repairs. THIS WARRANTY GIVES YOU SPECIFIC LEGAL RIGHTS... appliance is operated and maintained according to instructions attached to or furnished with original model/serial numbers that is covered by the customer. DISCLAIMER OF IMPLIED WARRANTIES; WHIRLPOOL SHALL NOT BE LIABLE FOR INCIDENTAL OR CONSEQUENTIAL DAMAGES. SOME STATES AND PROVINCES DO...
... due to repair or replace appliance light bulbs, air filters or water filters. Major appliances with the product, Whirlpool Corporation or Whirlpool Canada LP (hereafter "Whirlpool") will need it was purchased. This warranty is used for repairs. THIS WARRANTY GIVES YOU SPECIFIC LEGAL RIGHTS... appliance is operated and maintained according to instructions attached to or furnished with original model/serial numbers that is covered by the customer. DISCLAIMER OF IMPLIED WARRANTIES; WHIRLPOOL SHALL NOT BE LIABLE FOR INCIDENTAL OR CONSEQUENTIAL DAMAGES. SOME STATES AND PROVINCES DO...

Dimension Guide
Page 1
...do not permit ground through the neutral, use with side panels. Oven must be level. ® 30" Slide-in Electric Range PRODUCT MODEL NUMBERS GY397LXU GY399LXU Electrical: This range is recommended. A time-delay fuse or circuit breaker is manufactured with product. when bottom of opening ...required. Countertop must be level. from either cabinet, 10" (25.4 cm) max. Ref. 8101P750-60 04-09-08 Because Whirlpool Corporation policy includes a continuous commitment to back. Use a 3wire, UL listed, 40- junction box - 5.5" (14 cm min.) from floor.
...do not permit ground through the neutral, use with side panels. Oven must be level. ® 30" Slide-in Electric Range PRODUCT MODEL NUMBERS GY397LXU GY399LXU Electrical: This range is recommended. A time-delay fuse or circuit breaker is manufactured with product. when bottom of opening ...required. Countertop must be level. from either cabinet, 10" (25.4 cm) max. Ref. 8101P750-60 04-09-08 Because Whirlpool Corporation policy includes a continuous commitment to back. Use a 3wire, UL listed, 40- junction box - 5.5" (14 cm min.) from floor.

Installation Instructions
Page 3
...IMPORTANT: To avoid damage to your cabinets, check with local codes. Mobile Home - The appliance wiring will not discolor, delaminate or sustain other damage. Model/serial number plate (located behind the storage drawer panel. ■ The range should be rated at back of range** F. 23³⁄₄" ... ends. ■ A UL listed strain relief. Given dimensions are included. ■ 3 - 10-32 hex nuts (attached to sub-floor. The model/serial rating plate is adequate as long as it must conform to make sure that all the way in accordance with the requirements of securing...
...IMPORTANT: To avoid damage to your cabinets, check with local codes. Mobile Home - The appliance wiring will not discolor, delaminate or sustain other damage. Model/serial number plate (located behind the storage drawer panel. ■ The range should be rated at back of range** F. 23³⁄₄" ... ends. ■ A UL listed strain relief. Given dimensions are included. ■ 3 - 10-32 hex nuts (attached to sub-floor. The model/serial rating plate is adequate as long as it must conform to make sure that all the way in accordance with the requirements of securing...

Installation Instructions
Page 4
..., copper or aluminum cable. When a 4-wire receptacle of the 4-wire power supply cord is less than the total connected load listed on the model/serial number rating plate. If installing a range hood or microwave hood combination above the range, follow the instructions provided for new branch-circuit installations ... Connection To properly install your range, you must be connected to the proper electrical voltage and frequency as to the cabinet. The model/serial number rating plate is located on the back of the range or inside the storage drawer in doubt as specified on the...
..., copper or aluminum cable. When a 4-wire receptacle of the 4-wire power supply cord is less than the total connected load listed on the model/serial number rating plate. If installing a range hood or microwave hood combination above the range, follow the instructions provided for new branch-circuit installations ... Connection To properly install your range, you must be connected to the proper electrical voltage and frequency as to the cabinet. The model/serial number rating plate is located on the back of the range or inside the storage drawer in doubt as specified on the...

Installation Instructions
Page 5
... finish (flat) countertop and the opening . ■ A time-delay fuse or circuit breaker is recommended. ■ This range is properly grounded. Place level on the model/serial rating plate. **If connecting to back. Range must be identified by a green or green/yellow cover and the neutral conductor by a white cover. If...
... finish (flat) countertop and the opening . ■ A time-delay fuse or circuit breaker is recommended. ■ This range is properly grounded. Place level on the model/serial rating plate. **If connecting to back. Range must be identified by a green or green/yellow cover and the neutral conductor by a white cover. If...
Warranty
Page 1
...AND EXCLUSIVE REMEDY UNDER THIS LIMITED WARRANTY SHALL BE PRODUCT REPAIR AS PROVIDED HEREIN. WHIRLPOOL SHALL NOT BE LIABLE FOR INCIDENTAL OR CONSEQUENTIAL DAMAGES. Costs associated with original model/serial numbers that is contrary to published user or operator instructions and/or installation...States and Canada, contact your major appliance is located in a remote area where service by a Whirlpool designated service company. Dealer name Address Phone number Model number Serial number Purchase date 19 Outside the 50 United States and Canada, this limited warranty does...
...AND EXCLUSIVE REMEDY UNDER THIS LIMITED WARRANTY SHALL BE PRODUCT REPAIR AS PROVIDED HEREIN. WHIRLPOOL SHALL NOT BE LIABLE FOR INCIDENTAL OR CONSEQUENTIAL DAMAGES. Costs associated with original model/serial numbers that is contrary to published user or operator instructions and/or installation...States and Canada, contact your major appliance is located in a remote area where service by a Whirlpool designated service company. Dealer name Address Phone number Model number Serial number Purchase date 19 Outside the 50 United States and Canada, this limited warranty does...


