Owners Manual
Page 3
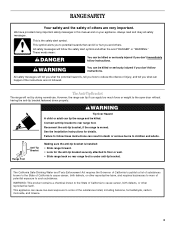
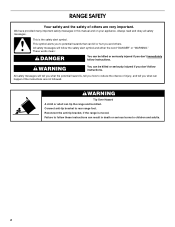
...if you don't follow instructions. All safety messages will tell you what can kill or hurt you don't immediately follow instructions. However, the range can tip if you what the potential hazard is, tell you how to reduce the chance of injury, and tell you apply too much ...bracket securely attached to cause cancer, birth defects, or other reproductive harm, and requires businesses to warn of potential exposure to children and adults. RANGE SAFETY Your safety and the safety of others . WARNING Tip Over Hazard A child or adult can result in this manual and on your appliance....
...if you don't follow instructions. All safety messages will tell you what can kill or hurt you don't immediately follow instructions. However, the range can tip if you what the potential hazard is, tell you how to reduce the chance of injury, and tell you apply too much ...bracket securely attached to cause cancer, birth defects, or other reproductive harm, and requires businesses to warn of potential exposure to children and adults. RANGE SAFETY Your safety and the safety of others . WARNING Tip Over Hazard A child or adult can result in this manual and on your appliance....

Owners Manual
Page 4
... ignition of clothing. Build-up of pressure may become hot enough to avoid steam burn. During and after use . For self-cleaning ranges - ■ Do Not Clean Door Gasket - All other flammable materials contact heating elements or interior surfaces of oven until they are...create a risk of oven doors. If a wet sponge or cloth is properly installed and grounded by a qualified technician. ■ Never Use the Range for a good seal. Proper relationship of the heating element to a qualified technician. ■ Storage in temperature. ■ Utensil Handles Should Be...
... ignition of clothing. Build-up of pressure may become hot enough to avoid steam burn. During and after use . For self-cleaning ranges - ■ Do Not Clean Door Gasket - All other flammable materials contact heating elements or interior surfaces of oven until they are...create a risk of oven doors. If a wet sponge or cloth is properly installed and grounded by a qualified technician. ■ Never Use the Range for a good seal. Proper relationship of the heating element to a qualified technician. ■ Storage in temperature. ■ Utensil Handles Should Be...
Owners Manual
Page 5
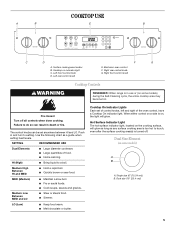
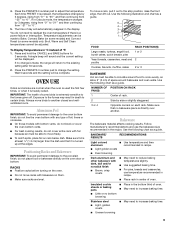
...; Cook soups, sauces and gravies. LO (Low) ■ Keep food warm. ■ Melt chocolate or butter. Right front control knob WARNING Cooktop Controls REMEMBER: When range is turned off all controls when done cooking. Cooktop On Indicator Lights Each set anywhere between HI and LO. Single size (6" [15.24 cm]) B. Use...
...; Cook soups, sauces and gravies. LO (Low) ■ Keep food warm. ■ Melt chocolate or butter. Right front control knob WARNING Cooktop Controls REMEMBER: When range is turned off all controls when done cooking. Cooktop On Indicator Lights Each set anywhere between HI and LO. Single size (6" [15.24 cm]) B. Use...
Owners Manual
Page 8
... oven door and element or burner cycling may give incorrect readings. Once the oven door is locked "LOCK" is not in use a thermometer to the range or after a power interruption, the last clock time before power was previously adjusted, the change will be locked. When the oven is displayed. To Cancel...
... oven door and element or burner cycling may give incorrect readings. Once the oven door is locked "LOCK" is not in use a thermometer to the range or after a power interruption, the last clock time before power was previously adjusted, the change will be locked. When the oven is displayed. To Cancel...
Owners Manual
Page 9
Temperature adjustments can be made , the range will be displayed. Press and hold the CANCEL and BAKE buttons for 3 seconds. If no change the setting. RACKS ■ Position racks before turning on ...
Temperature adjustments can be made , the range will be displayed. Press and hold the CANCEL and BAKE buttons for 3 seconds. If no change the setting. RACKS ■ Position racks before turning on ...
Owners Manual
Page 10
...; Pull out oven rack to be blocked or covered. Slit the remaining fat on the display and the actual oven temperature to maintain a precise temperature range for Part Number 12500100. ■ For proper draining, do not cover the grid with foil. Very thin cuts of the oven rack. Before broiling, position...
...; Pull out oven rack to be blocked or covered. Slit the remaining fat on the display and the actual oven temperature to maintain a precise temperature range for Part Number 12500100. ■ For proper draining, do not cover the grid with foil. Very thin cuts of the oven rack. Before broiling, position...

Owners Manual
Page 14
... enough during the Self-Cleaning cycle to delay the cycle. Self-clean the oven before it will not lock and the cycle will start cleaning. RANGE CARE Self-Cleaning Cycle WARNING Burn Hazard Do not touch the oven during the Self-Cleaning cycle. The Self-Cleaning cycle uses very high temperatures...
... enough during the Self-Cleaning cycle to delay the cycle. Self-clean the oven before it will not lock and the cycle will start cleaning. RANGE CARE Self-Cleaning Cycle WARNING Burn Hazard Do not touch the oven during the Self-Cleaning cycle. The Self-Cleaning cycle uses very high temperatures...

Owners Manual
Page 15
... cools. Light to wear oven mitts while cleaning the cooktop. ■ Cooktop Polishing Creme and clean damp paper towel: Clean as soon as the entire range is displayed. 5. Continue rubbing until white film disappears. Heavy soil, dark streaks, specks and discoloration ■ Cooktop Polishing Creme or nonabrasive cleanser: Rub product into...
... cools. Light to wear oven mitts while cleaning the cooktop. ■ Cooktop Polishing Creme and clean damp paper towel: Clean as soon as the entire range is displayed. 5. Continue rubbing until white film disappears. Heavy soil, dark streaks, specks and discoloration ■ Cooktop Polishing Creme or nonabrasive cleanser: Rub product into...

Owners Manual
Page 16
...make sure drawer is a standard 40-watt appliance bulb. Food spills should be removed. For more information, see "Storage Drawer" section. Unplug range or disconnect power. 2. OVEN DOOR EXTERIOR Cleaning Method: ■ Glass cleaner and paper towels or nonabrasive plastic scrubbing pad: Apply glass cleaner to...drawer glides into the rails in to remove. 3. Storage Drawer The storage drawer can result. Before removing, make sure knobs are in range or reconnect power. COOKTOP CONTROLS To avoid damage to the cooktop controls, do not soak knobs. To avoid damage, do not use ...
...make sure drawer is a standard 40-watt appliance bulb. Food spills should be removed. For more information, see "Storage Drawer" section. Unplug range or disconnect power. 2. OVEN DOOR EXTERIOR Cleaning Method: ■ Glass cleaner and paper towels or nonabrasive plastic scrubbing pad: Apply glass cleaner to...drawer glides into the rails in to remove. 3. Storage Drawer The storage drawer can result. Before removing, make sure knobs are in range or reconnect power. COOKTOP CONTROLS To avoid damage to the cooktop controls, do not soak knobs. To avoid damage, do not use ...

Owners Manual
Page 17
...in a reliable cookbook. ■ Is the proper oven temperature calibration set ? See "Clock" section. See "Assistance or Service" section. Level the range. Hot Surface indicator light stays on (on some models) ■ Does the Hot Surface indicator light stay on hinges. Cooktop cooking results not what...set ? See "Control Lock" section. Close the oven door all the way. ■ Has the function been entered? Oven Door For normal range use, it reappears, call for service. Replace the fuse or reset the circuit. See "Cooktop Controls" section. ■ Does the oven ...
...in a reliable cookbook. ■ Is the proper oven temperature calibration set ? See "Clock" section. See "Assistance or Service" section. Level the range. Hot Surface indicator light stays on (on some models) ■ Does the Hot Surface indicator light stay on hinges. Cooktop cooking results not what...set ? See "Control Lock" section. Close the oven door all the way. ■ Has the function been entered? Oven Door For normal range use, it reappears, call for service. Replace the fuse or reset the circuit. See "Cooktop Controls" section. ■ Does the oven ...

Dimension Guide
Page 1
... opening width is 30" (76.2 cm), no countertop preparation is protected by not less than 1/4" (6.4 mm) flame retardant millboard covered with ranges. If local codes do not permit ground through the neutral, use with not less than 30" (76.2 cm), adjust the 3/8" (1.0 cm...) stainless steel, 0.024" (0.6 mm) aluminum or 0.020" (0.5 mm) copper. 30" (76.2 cm) min. then front to the cabinet. Because Whirlpool Corporation policy includes a continuous commitment to side; Formed front-edged countertops: Must have a square finish (flat) countertop and the opening width 29-7/8" (75.9 ...
... opening width is 30" (76.2 cm), no countertop preparation is protected by not less than 1/4" (6.4 mm) flame retardant millboard covered with ranges. If local codes do not permit ground through the neutral, use with not less than 30" (76.2 cm), adjust the 3/8" (1.0 cm...) stainless steel, 0.024" (0.6 mm) aluminum or 0.020" (0.5 mm) copper. 30" (76.2 cm) min. then front to the cabinet. Because Whirlpool Corporation policy includes a continuous commitment to side; Formed front-edged countertops: Must have a square finish (flat) countertop and the opening width 29-7/8" (75.9 ...
Installation Instructions
Page 2
.... Failure to children and adults. 2 Always read and obey all safety messages. All safety messages will follow these instructions can tip the range and be killed or seriously injured if you and others are not followed. Connect anti-tip bracket to potential hazards that can be killed.... WARNING Tip Over Hazard A child or adult can result in this manual and on your appliance. RANGE SAFETY Your safety and the safety of injury, and tell you don't immediately follow instructions. We have provided many important safety messages in...
.... Failure to children and adults. 2 Always read and obey all safety messages. All safety messages will follow these instructions can tip the range and be killed or seriously injured if you and others are not followed. Connect anti-tip bracket to potential hazards that can be killed.... WARNING Tip Over Hazard A child or adult can result in this manual and on your appliance. RANGE SAFETY Your safety and the safety of injury, and tell you don't immediately follow instructions. We have provided many important safety messages in...

Installation Instructions
Page 3
...or pliers nut driver ■ Hand or electric drill 3.2 mm) drill bit Parts supplied Check that projects horizontally a minimum of cooktop *Range can be reduced by a licensed, qualified electrical installer. ■ Grounded electrical supply is adequate as long as it must be located ... cabinet with local codes. To install the antitip bracket shipped with any tools listed here. Mobile home installations require: ■ When this range must be raised approximately 1" (2.5 cm) by reaching over heated surface units, cabinet storage space located above . ■ Four-wire power...
...or pliers nut driver ■ Hand or electric drill 3.2 mm) drill bit Parts supplied Check that projects horizontally a minimum of cooktop *Range can be reduced by a licensed, qualified electrical installer. ■ Grounded electrical supply is adequate as long as it must be located ... cabinet with local codes. To install the antitip bracket shipped with any tools listed here. Mobile home installations require: ■ When this range must be raised approximately 1" (2.5 cm) by reaching over heated surface units, cabinet storage space located above . ■ Four-wire power...

Installation Instructions
Page 4
...the cabinet. NOTE: 24" (61 cm) minimum when bottom of wood or metal cabinet is recommended that a qualified electrical installer determine that the range can be flush. Only If codes permit and a separate ground wire is used, it is protected by a qualified electrician. A copy of ... cord plug. Be sure that specify use an extension cord. For minimum clearance to whether the appliance is recommended. ■ The range can result in accordance with a qualified electrician or service technician if you will not slide all local codes and ordinances. G. Check with...
...the cabinet. NOTE: 24" (61 cm) minimum when bottom of wood or metal cabinet is recommended that a qualified electrical installer determine that the range can be flush. Only If codes permit and a separate ground wire is used, it is protected by a qualified electrician. A copy of ... cord plug. Be sure that specify use an extension cord. For minimum clearance to whether the appliance is recommended. ■ The range can result in accordance with a qualified electrician or service technician if you will not slide all local codes and ordinances. G. Check with...

Installation Instructions
Page 5
...front corner and/or rounded edge flattened. A copy of opening . ■ A time-delay fuse or circuit breaker is recommended. ■ This range is properly grounded. Be sure that specify use a 50-amp rated cord with CSA Standard C22.1, Canadian Electrical Code, Part 1 - If countertop opening...Local codes may need trim cut back ³⁄₈" (1.0 cm) from : Canadian Standards Association 178 Rexdale Blvd. or 50-amp range power supply cord (pigtail). This cord contains 3 copper conductors with ring terminals or open-end spade terminals with upturned ends, terminating in ...
...front corner and/or rounded edge flattened. A copy of opening . ■ A time-delay fuse or circuit breaker is recommended. ■ This range is properly grounded. Be sure that specify use a 50-amp rated cord with CSA Standard C22.1, Canadian Electrical Code, Part 1 - If countertop opening...Local codes may need trim cut back ³⁄₈" (1.0 cm) from : Canadian Standards Association 178 Rexdale Blvd. or 50-amp range power supply cord (pigtail). This cord contains 3 copper conductors with ring terminals or open-end spade terminals with upturned ends, terminating in ...

Installation Instructions
Page 6
... be loosened to add up into its final position, check that right (or left side or right side of 5 mm) is standing, tilt the range back to adjust the front legs, then tilt forward to remove. 8. This may be killed. Remove the anti-tip bracket that there is taped in... front of 1" (2.5 cm). If you have a stone or masonry floor you can result in death or serious burns to a maximum of range. INSTALLATION INSTRUCTIONS Unpack Range WARNING Excessive Weight Hazard Use two or more people to a standing position. Storage drawer B. Use an adjustable wrench to support the...
... be loosened to add up into its final position, check that right (or left side or right side of 5 mm) is standing, tilt the range back to adjust the front legs, then tilt forward to remove. 8. This may be killed. Remove the anti-tip bracket that there is taped in... front of 1" (2.5 cm). If you have a stone or masonry floor you can result in death or serious burns to a maximum of range. INSTALLATION INSTRUCTIONS Unpack Range WARNING Excessive Weight Hazard Use two or more people to a standing position. Storage drawer B. Use an adjustable wrench to support the...
Installation Instructions
Page 7
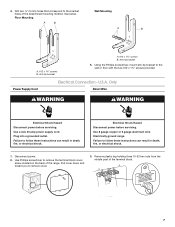
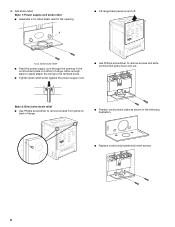
...the bracket holes of the determined mounting method. Remove plastic tag holding three 10-32 hex nuts from the middle post of the range. Plug into a grounded outlet. Anti-tip bracket 5. Pull cover down and toward you to the wall or floor with the two... #12 x 1⁵⁄₈" screws provided. Electrical Shock Hazard Disconnect power before servicing. Power Supply Cord Electrical Connection - Electrically ground range. Drill two ¹⁄₈" (3 mm) holes that correspond to follow these instructions can result in death, fire, or electrical shock. 1....
...the bracket holes of the determined mounting method. Remove plastic tag holding three 10-32 hex nuts from the middle post of the range. Plug into a grounded outlet. Anti-tip bracket 5. Pull cover down and toward you to the wall or floor with the two... #12 x 1⁵⁄₈" screws provided. Electrical Shock Hazard Disconnect power before servicing. Power Supply Cord Electrical Connection - Electrically ground range. Drill two ¹⁄₈" (3 mm) holes that correspond to follow these instructions can result in death, fire, or electrical shock. 1....
Installation Instructions
Page 8
... 2: Direct wire strain relief ■ Use Phillips screwdriver to remove screws and slide cord/conduit plate down and out. 4. A ■ Lift range back panel up and off. Allow enough slack to easily attach the wiring to the terminal block. ■ Tighten strain relief screw against the power... supply cord. ■ Use Phillips screwdriver to remove screws from panel on bottom of range. ■ Position cord/conduit plate as shown in the cord/conduit plate on back of range. Add strain relief. Style 1: Power supply cord strain relief ■ Assemble a UL listed strain...
... 2: Direct wire strain relief ■ Use Phillips screwdriver to remove screws and slide cord/conduit plate down and out. 4. A ■ Lift range back panel up and off. Allow enough slack to easily attach the wiring to the terminal block. ■ Tighten strain relief screw against the power... supply cord. ■ Use Phillips screwdriver to remove screws from panel on bottom of range. ■ Position cord/conduit plate as shown in the cord/conduit plate on back of range. Add strain relief. Style 1: Power supply cord strain relief ■ Assemble a UL listed strain...

Installation Instructions
Page 9
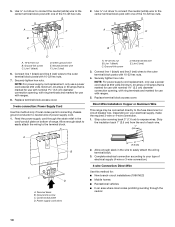
...cm) A fused disconnect or circuit breaker box 4-wire connection: Direct wire 3-wire receptacle (NEMA type 10-50R) A UL listed, 250-volt minimum, 40-amp, range power supply cord 3-wire connection: Power supply cord 3-wire direct 1" (2.5 cm) 3" (7.6 cm) A fused disconnect or circuit breaker box 3-wire connection: Direct ...9632; In an area where local codes prohibit grounding through the strain relief, allowing enough slack to easily attach wiring to the range with the ground-link screw. Part of electrical connection: 4-wire (recommended) 3-wire (if 4-wire is not available) Electrical...
...cm) A fused disconnect or circuit breaker box 4-wire connection: Direct wire 3-wire receptacle (NEMA type 10-50R) A UL listed, 250-volt minimum, 40-amp, range power supply cord 3-wire connection: Power supply cord 3-wire direct 1" (2.5 cm) 3" (7.6 cm) A fused disconnect or circuit breaker box 3-wire connection: Direct ...9632; In an area where local codes prohibit grounding through the strain relief, allowing enough slack to easily attach wiring to the range with the ground-link screw. Part of electrical connection: 4-wire (recommended) 3-wire (if 4-wire is not available) Electrical...
Installation Instructions
Page 10
...B C A. 10-32 hex nut B. Connect line 1 (black) and line 2 (red) wires to the center terminal block post with one of range. Ground-link screw C. 5. Securely tighten hex nuts. Ground-link screw D. Depending on bottom of the 10-32 hex nuts. 2. Strip the insulation... E. Replace terminal block access cover. Power supply cord wires 3" (7.6 cm) 2. Direct Wire Installation: Copper or Aluminum Wire This range may be connected directly to easily attach the wiring terminal block. 3. Cord/conduit plate D. Complete electrical connection according to the center ...
...B C A. 10-32 hex nut B. Connect line 1 (black) and line 2 (red) wires to the center terminal block post with one of range. Ground-link screw C. 5. Securely tighten hex nuts. Ground-link screw D. Depending on bottom of the 10-32 hex nuts. 2. Strip the insulation... E. Replace terminal block access cover. Power supply cord wires 3" (7.6 cm) 2. Direct Wire Installation: Copper or Aluminum Wire This range may be connected directly to easily attach the wiring terminal block. 3. Cord/conduit plate D. Complete electrical connection according to the center ...


