Owners Manual
Page 8
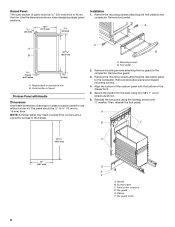
... A. Foot pedal 2. Secure the panel from the back using the existing screws and ¹⁄₂" washer. Handle B. Remove the mounting screws attaching the foot pedal to the compactor. Mounting screws B. Remove toe guard. 3. Then, reinstall the foot pedal. Custom panel C. Panel screw ...corners and a cutout for use without a trim kit. Remove decorative panel and discard mounting screws. 4. A B C 23 C (60.5 mm) 15" (38.1 mm) D E F A. Outer section of panel Trimless Panel with the bottom of the drawer front. 5. Remove the mounting screws ...
... A. Foot pedal 2. Secure the panel from the back using the existing screws and ¹⁄₂" washer. Handle B. Remove the mounting screws attaching the foot pedal to the compactor. Mounting screws B. Remove toe guard. 3. Then, reinstall the foot pedal. Custom panel C. Panel screw ...corners and a cutout for use without a trim kit. Remove decorative panel and discard mounting screws. 4. A B C 23 C (60.5 mm) 15" (38.1 mm) D E F A. Outer section of panel Trimless Panel with the bottom of the drawer front. 5. Remove the mounting screws ...
Owners Manual
Page 9
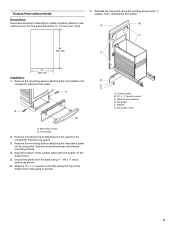
thick. 7. Remove the mounting screws attaching the foot pedal to the compactor. B A C 25" (63.5 cm) C 15" (38.1 cm) Installation 1. Remove the mounting screws attaching the decorative panel to the compactor. Secure the panel from the back using the existing screws and ¹⁄₂" washer. Reinstall the toe guard using 4 - #8 x 1" wood screws as shown. 6. Remove...
thick. 7. Remove the mounting screws attaching the foot pedal to the compactor. B A C 25" (63.5 cm) C 15" (38.1 cm) Installation 1. Remove the mounting screws attaching the decorative panel to the compactor. Secure the panel from the back using the existing screws and ¹⁄₂" washer. Reinstall the toe guard using 4 - #8 x 1" wood screws as shown. 6. Remove...