
Owners Manual
Page 1
www.whirlpool.com or www.whirlpoolappliances.ca Table of Contents 2 9872208 ® COMPACTORS Use & Care Guide For questions about features, operation/performance, parts, accessories or service, call : 1-800-807-6777 or visit our website at... In Canada, call for assistance 1-800-461-5681, for installation and service, call : 1-800-253-1301.
www.whirlpool.com or www.whirlpoolappliances.ca Table of Contents 2 9872208 ® COMPACTORS Use & Care Guide For questions about features, operation/performance, parts, accessories or service, call : 1-800-807-6777 or visit our website at... In Canada, call for assistance 1-800-461-5681, for installation and service, call : 1-800-253-1301.
Owners Manual
Page 2
TABLE OF CONTENTS COMPACTOR SAFETY 3 INSTALLATION INSTRUCTIONS 4 Unpacking 4 Location Requirements 4 Electrical Requirements 5 Freestanding and Undercounter Installation 6 Changing the Decorative Panel 7 COMPACTOR USE 10 How Your Compactor Works 10 Loading 10 Starting the Compactor 10 Removing a Filled Bag 11 Installing a New Bag 11 COMPACTOR CARE 12 Cleaning 12 TROUBLESHOOTING 13 ASSISTANCE OR SERVICE 14 In the U.S.A 14 In Canada 14 Accessories 14 WARRANTY 16 ® 2
TABLE OF CONTENTS COMPACTOR SAFETY 3 INSTALLATION INSTRUCTIONS 4 Unpacking 4 Location Requirements 4 Electrical Requirements 5 Freestanding and Undercounter Installation 6 Changing the Decorative Panel 7 COMPACTOR USE 10 How Your Compactor Works 10 Loading 10 Starting the Compactor 10 Removing a Filled Bag 11 Installing a New Bag 11 COMPACTOR CARE 12 Cleaning 12 TROUBLESHOOTING 13 ASSISTANCE OR SERVICE 14 In the U.S.A 14 In Canada 14 Accessories 14 WARRANTY 16 ® 2
Owners Manual
Page 3
.... Do not overload trash bag with care. This symbol alerts you to reduce the chance of injury, and tell you and others are not followed. s Do not touch moving parts. Do not compact lighted cigarettes, cigars, or other than manufacturer's recommended attachments. IMPORTANT SAFETY INSTRUCTIONS WARNING: When using the compactor. SAVE THESE INSTRUCTIONS 3 COMPACTOR SAFETY Your safety...
.... Do not overload trash bag with care. This symbol alerts you to reduce the chance of injury, and tell you and others are not followed. s Do not touch moving parts. Do not compact lighted cigarettes, cigars, or other than manufacturer's recommended attachments. IMPORTANT SAFETY INSTRUCTIONS WARNING: When using the compactor. SAVE THESE INSTRUCTIONS 3 COMPACTOR SAFETY Your safety...

Owners Manual
Page 4
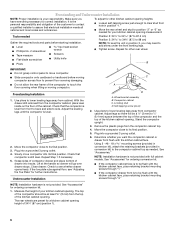
... compactor. Shipping base Location Requirements Product dimensions 34¹⁄₈" (86.7 cm) A. Do not remove the compactor bag. s Begin in back or other injury. Open the compactor... the drawer. Grasp the handle and raise the front of compactor. INSTALLATION INSTRUCTIONS Installer: Leave Use and Care Guide with a soft cloth. Dry thoroughly with the homeowner. Failure to do...sides of the compactor cabinet and put compactor on its side on the floor to move and install compactor. Place the other items from the carton on the 2 corner posts. 15" (38.1 cm...
... compactor. Shipping base Location Requirements Product dimensions 34¹⁄₈" (86.7 cm) A. Do not remove the compactor bag. s Begin in back or other injury. Open the compactor... the drawer. Grasp the handle and raise the front of compactor. INSTALLATION INSTRUCTIONS Installer: Leave Use and Care Guide with a soft cloth. Dry thoroughly with the homeowner. Failure to do...sides of the compactor cabinet and put compactor on its side on the floor to move and install compactor. Place the other items from the carton on the 2 corner posts. 15" (38.1 cm...
Owners Manual
Page 5
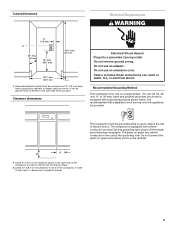
... equipped with a threeconductor cord and 3 prong grounding-type plug to remove the compactor bags. Leave 23" (58.4 cm) of clearance in front of the compactor in order to follow these instructions can be grounded while in use an adapter. Clearance dimensions Electrical Shock Hazard Plug... Failure to fully open or remove the compactor drawer. 5 This compactor must be provided. The green (or green and yellow) conductor in death, fire, or electrical shock. Do not use on a single phase, 115-volt, 60 Hz, AC only 15- Cutout dimensions Electrical Requirements WARNING 3" ...
... equipped with a threeconductor cord and 3 prong grounding-type plug to remove the compactor bags. Leave 23" (58.4 cm) of clearance in front of the compactor in order to follow these instructions can be grounded while in use an adapter. Clearance dimensions Electrical Shock Hazard Plug... Failure to fully open or remove the compactor drawer. 5 This compactor must be provided. The green (or green and yellow) conductor in death, fire, or electrical shock. Do not use on a single phase, 115-volt, 60 Hz, AC only 15- Cutout dimensions Electrical Requirements WARNING 3" ...
Owners Manual
Page 6
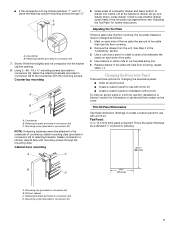
... the required tools and parts before moving compactor. B IMPORTANT: s Do not grasp control panel to prevent floor covering damaging. s Slide compactor onto cardboard or hardboard before starting installation. Plug into tracks. Slowly move compactor. Grasp sides of compactor drawer and place bottom of... of the compactor and the top of the compactor should be flush with full cabinet models. Use pliers to the compactor cabinet top as needed for a kitchen cabinet opening height of the cabinet. Check that electrical installation meets all national and local codes and ordinances....
... the required tools and parts before moving compactor. B IMPORTANT: s Do not grasp control panel to prevent floor covering damaging. s Slide compactor onto cardboard or hardboard before starting installation. Plug into tracks. Slowly move compactor. Grasp sides of compactor drawer and place bottom of... of the compactor and the top of the compactor should be flush with full cabinet models. Use pliers to the compactor cabinet top as needed for a kitchen cabinet opening height of the cabinet. Check that electrical installation meets all national and local codes and ordinances....
Owners Manual
Page 7
... compactor into tracks. Close drawer. Replace drawer. Changing the Decorative Panel There are three options for changing the decorative panel: s Order an acrylic panel s Create a custom panel for use with a trim kit s Create a custom panel for installation without trim To order an acrylic panel or a trim kit, see "Adjusting the Toe Plate" for information or call the toll-free number...
... compactor into tracks. Close drawer. Replace drawer. Changing the Decorative Panel There are three options for changing the decorative panel: s Order an acrylic panel s Create a custom panel for use with a trim kit s Create a custom panel for installation without trim To order an acrylic panel or a trim kit, see "Adjusting the Toe Plate" for information or call the toll-free number...
Owners Manual
Page 8
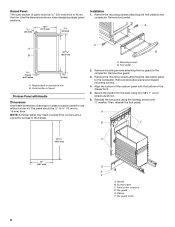
... mm) Installation 1. Mounting screws B. Remove the mounting screws attaching the decorative panel to the handle. Washer F. Toe guard screw 8 Remove the mounting screws attaching the foot pedal to create a custom panel for access to the compactor. Secure the panel from the... washer. Panel screw locations D. Then, reinstall the foot pedal. Outer section of panel Trimless Panel with the bottom of the custom panel with Handle Dimensions Use these dimensions drawings to the compactor. The panel should be 5.6 mm) thick to the compactor. A B C 23 C (60.5 mm) 15" (38...
... mm) Installation 1. Mounting screws B. Remove the mounting screws attaching the decorative panel to the handle. Washer F. Toe guard screw 8 Remove the mounting screws attaching the foot pedal to create a custom panel for access to the compactor. Secure the panel from the... washer. Panel screw locations D. Then, reinstall the foot pedal. Outer section of panel Trimless Panel with the bottom of the custom panel with Handle Dimensions Use these dimensions drawings to the compactor. The panel should be 5.6 mm) thick to the compactor. A B C 23 C (60.5 mm) 15" (38...
Owners Manual
Page 9
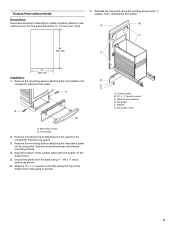
... mounting screws attaching the foot pedal to create a custom panel for use without Handle Dimensions Use these dimension drawings to the compactor. Remove the mounting screws attaching the decorative panel to the compactor. Toe guard E. Remove mounting screws attaching the toe guard to the compactor. Custom panel B. 15" x ¹⁄₂ " quarter-round C. B A C 25" (63.5 cm) C 15" (38.1 cm) Installation 1. Remove foot pedal. A A B A. D E F A.
... mounting screws attaching the foot pedal to create a custom panel for use without Handle Dimensions Use these dimension drawings to the compactor. Remove the mounting screws attaching the decorative panel to the compactor. Toe guard E. Remove mounting screws attaching the toe guard to the compactor. Custom panel B. 15" x ¹⁄₂ " quarter-round C. B A C 25" (63.5 cm) C 15" (38.1 cm) Installation 1. Remove foot pedal. A A B A. D E F A.
Owners Manual
Page 10
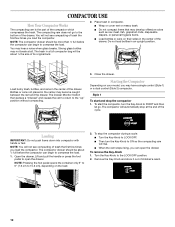
... or press the foot pedal to compress the load. 1. s When the ram stops rising, you may hear a noise when glass breaks. COMPACTOR USE How Your Compactor Works The compacting ram is the part of children's reach. 10 Loading IMPORTANT: Do not push items down into compactor with hands or ...in a full compactor bag will be about ¹⁄₂ full before the compactor can begin to open the drawer. Place trash in an upright position. The compactor will rise. NOTE: Pressing the foot pedal opens the container only 3" to 6" (7.6 cm to 15.2 cm), depending on your model, you can ...
... or press the foot pedal to compress the load. 1. s When the ram stops rising, you may hear a noise when glass breaks. COMPACTOR USE How Your Compactor Works The compacting ram is the part of children's reach. 10 Loading IMPORTANT: Do not push items down into compactor with hands or ...in a full compactor bag will be about ¹⁄₂ full before the compactor can begin to open the drawer. Place trash in an upright position. The compactor will rise. NOTE: Pressing the foot pedal opens the container only 3" to 6" (7.6 cm to 15.2 cm), depending on your model, you can ...
Owners Manual
Page 11
...When the ram stops rising, you can open . 11 Installing a New Bag Do not use any kind of debris. 1. Order replacement compactor bags through your compactor. s The container is compacted to the top of bag against the drawer bottom, sides and corners for use in the future. If the bag is securely ...Switch to ON. Remove and store key out of bag from bag retainer buttons. Lock bag in place by calling the toll-free number on the cover or in the "Assistance or Service" section. IMPORTANT: Before installing a new bag, be sure: s The drawer side is too heavy, compact less trash...
...When the ram stops rising, you can open . 11 Installing a New Bag Do not use any kind of debris. 1. Order replacement compactor bags through your compactor. s The container is compacted to the top of bag against the drawer bottom, sides and corners for use in the future. If the bag is securely ...Switch to ON. Remove and store key out of bag from bag retainer buttons. Lock bag in place by calling the toll-free number on the cover or in the "Assistance or Service" section. IMPORTANT: Before installing a new bag, be sure: s The drawer side is too heavy, compact less trash...
Owners Manual
Page 12
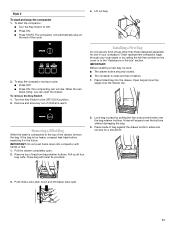
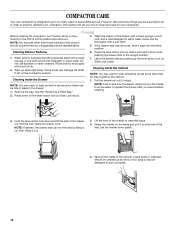
... position. 7. Lift the front of the way. Cleaning Before cleaning the compactor, turn the Key-Knob (or KeySwitch) to see how the drawer rollers move in the tracks. Do not use abrasive or harsh cleaners. See the "Removing a Filled Bag." Set the drawer down on the lever-action lock (or Side-Lock latch... finish if left on the sides and pull it back into the tilted position. Liquid spills or wet trash should be easier to replace the drawer after you how to clean and care for your compactor. If the drawer side was removed, slide it out the rest of the drawer to clear the...
... position. 7. Lift the front of the way. Cleaning Before cleaning the compactor, turn the Key-Knob (or KeySwitch) to see how the drawer rollers move in the tracks. Do not use abrasive or harsh cleaners. See the "Removing a Filled Bag." Set the drawer down on the lever-action lock (or Side-Lock latch... finish if left on the sides and pull it back into the tilted position. Liquid spills or wet trash should be easier to replace the drawer after you how to clean and care for your compactor. If the drawer side was removed, slide it out the rest of the drawer to clear the...
Owners Manual
Page 13
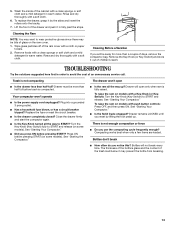
... service call. Remove the Key-Knob (or Key-Switch) and store it by lifting the foot pedal up ? Replace the fuse or reset the circuit breaker. Close the drawer firmly and start the compactor again. See "Starting the Compactor." To raise the ram on the ram cover. 1. Drawer remains LOCKED until you press ON before pressing START (on some models...
... service call. Remove the Key-Knob (or Key-Switch) and store it by lifting the foot pedal up ? Replace the fuse or reset the circuit breaker. Close the drawer firmly and start the compactor again. See "Starting the Compactor." To raise the ram on the ram cover. 1. Drawer remains LOCKED until you press ON before pressing START (on some models...
Owners Manual
Page 14
... Whirlpool Canada Inc. 1901 Minnesota Court Mississauga, Ontario L5N 3A7 Please include a daytime phone number in your compactor, use FSP® replacement parts. In Canada, call 1-800-253-1301 and ask for assistance or service, please check "Troubleshooting." Call for Part Number Trim Kits for Custom Front Panels: Order Part #9871381 (Brushed stainless steel) Order Part #9871382 (White) Order Part #9871383 (Black) Order Part...
... Whirlpool Canada Inc. 1901 Minnesota Court Mississauga, Ontario L5N 3A7 Please include a daytime phone number in your compactor, use FSP® replacement parts. In Canada, call 1-800-253-1301 and ask for assistance or service, please check "Troubleshooting." Call for Part Number Trim Kits for Custom Front Panels: Order Part #9871381 (Brushed stainless steel) Order Part #9871382 (White) Order Part #9871383 (Black) Order Part...

Owners Manual
Page 16
... serial number. Repairs to correct house wiring or plumbing. 2. The removal and reinstallation of purchase, when this book and your sales slip together for FSP® replacement parts and repair labor to know your major appliance, to instruct you how to use . 4. Contact your major appliance is not installed in accordance with published installation instructions. You can be provided by Whirlpool. 5. Service...
... serial number. Repairs to correct house wiring or plumbing. 2. The removal and reinstallation of purchase, when this book and your sales slip together for FSP® replacement parts and repair labor to know your major appliance, to instruct you how to use . 4. Contact your major appliance is not installed in accordance with published installation instructions. You can be provided by Whirlpool. 5. Service...

Dimension Guide
Page 1
... to remove the compactor bags. Raised panel or decorative trim B. Leave 6 in. (15.2 cm) of clearance space to the right side of the compactor in order to fully open or remove the compactor drawer. B. plywood or paneling. 8 mm) both sides 8 mm) A. Specifications subject to 16 mm) thick. or 20-amp. B A Without Trim Kit Models with product. Instructions packed with handles...
... to remove the compactor bags. Raised panel or decorative trim B. Leave 6 in. (15.2 cm) of clearance space to the right side of the compactor in order to fully open or remove the compactor drawer. B. plywood or paneling. 8 mm) both sides 8 mm) A. Specifications subject to 16 mm) thick. or 20-amp. B A Without Trim Kit Models with product. Instructions packed with handles...
Warranty
Page 1
... correct the installation of your major appliance, to instruct you how to or furnished with electrical or plumbing codes, or use your sales slip together for product service in materials or workmanship. Repairs when your major appliance is operated and maintained according to instructions attached to use of Whirlpool, U.S.A. Replacement parts or repair labor costs for FSP® replacement parts and repair labor...
... correct the installation of your major appliance, to instruct you how to or furnished with electrical or plumbing codes, or use your sales slip together for product service in materials or workmanship. Repairs when your major appliance is operated and maintained according to instructions attached to use of Whirlpool, U.S.A. Replacement parts or repair labor costs for FSP® replacement parts and repair labor...


