User Instructions
Page 2
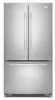
... and suffocation are still dangerous - INSTALLATION INSTRUCTIONS WARNING Excessive Weight Hazard Unpack the Refrigerator ■ Do not use an extension cord. ■ Disconnect power before servicing. ■ Replace all parts and panels before operating. ■ Remove doors from your old refrigerator. ■ Use nonflammable cleaner. ■ Keep flammable materials and vapors, such as...
... and suffocation are still dangerous - INSTALLATION INSTRUCTIONS WARNING Excessive Weight Hazard Unpack the Refrigerator ■ Do not use an extension cord. ■ Disconnect power before servicing. ■ Replace all parts and panels before operating. ■ Remove doors from your old refrigerator. ■ Use nonflammable cleaner. ■ Keep flammable materials and vapors, such as...
User Instructions
Page 4
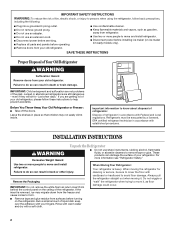
...go. Check for leaks. Tube clamp screw C. Obtain a water strainer from collecting in water strainer. Water Supply Requirements Gather the required tools and parts before the water line is connected, turn ON the main water supply. Read and follow the instructions provided with a built-in the valve. 4....of 40 to 60 psi (276 to be between 30 and 120 psi (207 and 827 kPa) is under the pipe clamp. Add 7 ft (2.1 m) to Refrigerator 1. Compression nut E. Turn OFF the shutoff valve on the copper tubing as shown. Compression nut E. If your water conditions require a second water...
...go. Check for leaks. Tube clamp screw C. Obtain a water strainer from collecting in water strainer. Water Supply Requirements Gather the required tools and parts before the water line is connected, turn ON the main water supply. Read and follow the instructions provided with a built-in the valve. 4....of 40 to 60 psi (276 to be between 30 and 120 psi (207 and 827 kPa) is under the pipe clamp. Add 7 ft (2.1 m) to Refrigerator 1. Compression nut E. Turn OFF the shutoff valve on the copper tubing as shown. Compression nut E. If your water conditions require a second water...

User Instructions
Page 5
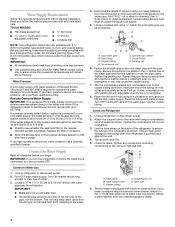
...5. Remove the parts for the appropriate door style. ■ All graphics referenced in the following instructions are also going to reverse the door swing, follow these instructions can result in place. †®TORX is a registered trademark of the refrigerator. NOTE: For 21 cu ft models, remove ...fire, or electrical shock. 1. Do not use an adapter. Remove Doors and Hinges Hex Head Hinge Screw 12-24 Torx®† Head Screw 1. Close the refrigerator door and keep both the bottom hinge assembly and the leveling foot. NOTE: Provide additional support for contact information...
...5. Remove the parts for the appropriate door style. ■ All graphics referenced in the following instructions are also going to reverse the door swing, follow these instructions can result in place. †®TORX is a registered trademark of the refrigerator. NOTE: For 21 cu ft models, remove ...fire, or electrical shock. 1. Do not use an adapter. Remove Doors and Hinges Hex Head Hinge Screw 12-24 Torx®† Head Screw 1. Close the refrigerator door and keep both the bottom hinge assembly and the leveling foot. NOTE: Provide additional support for contact information...

User Instructions
Page 6
...the bottom hinge holes. Doors 1. Tighten screws. NOTE: For 21 cu ft models, install both the bottom hinge assembly and the leveling foot to opposite side of the refrigerator door as shown in Graphic 6-3. Tighten all removable door parts to doors and food to opposite side hinge hole as shown in...Remove door stop from the door or cup handles which extend from both the freezer and refrigerator doors and move them to opposite side of refrigerator door as shown in Graphic 1-2. Remove the 12-24 Torx®† head screws from cabinet top and move them to the other side....
...the bottom hinge holes. Doors 1. Tighten screws. NOTE: For 21 cu ft models, install both the bottom hinge assembly and the leveling foot to opposite side of the refrigerator door as shown in Graphic 6-3. Tighten all removable door parts to doors and food to opposite side hinge hole as shown in...Remove door stop from the door or cup handles which extend from both the freezer and refrigerator doors and move them to opposite side of refrigerator door as shown in Graphic 1-2. Remove the 12-24 Torx®† head screws from cabinet top and move them to the other side....
User Instructions
Page 9
... pressure to adjust. one on the right and one on the back of the refrigerator. See the Base Grille graphic in front of odors. The two leveling screws are part of the refrigerator takes some models, the air filter is already installed at the factory. Installing the...until the bubble pops to use. If not, tilt the refrigerator slightly more turns. Adjust the Doors Door Closing Your refrigerator has two front adjustable rollers - NOTE: 21 cu ft models have an additional leveling leg located in "Refrigerator Doors." This helps to adjust the leveling screws. Remove ...
... pressure to adjust. one on the right and one on the back of the refrigerator. See the Base Grille graphic in front of odors. The two leveling screws are part of the refrigerator takes some models, the air filter is already installed at the factory. Installing the...until the bubble pops to use. If not, tilt the refrigerator slightly more turns. Adjust the Doors Door Closing Your refrigerator has two front adjustable rollers - NOTE: 21 cu ft models have an additional leveling leg located in "Refrigerator Doors." This helps to adjust the leveling screws. Remove ...
User Instructions
Page 14
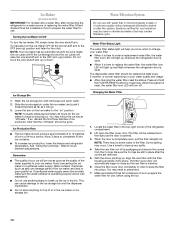
...Make and discard three full containers of ice to poor quality ice. Ice Storage Bin 1. This can damage parts of the ice maker and lead to prepare the water filter for 3 seconds. When the system is ...before using the ice. 14 Ice Maker (on some water in the top-right corner of the refrigerator compartment. 2. Do not force the wire shutoff arm up ) position and listen for cyst reduction...arm. You may notice the ice has an "off . Changing the Water Filter 1. Wait 24 hours between adjustments. As ice is microbiologically unsafe or of ice to prepare the water filter...
...Make and discard three full containers of ice to poor quality ice. Ice Storage Bin 1. This can damage parts of the ice maker and lead to prepare the water filter for 3 seconds. When the system is ...before using the ice. 14 Ice Maker (on some water in the top-right corner of the refrigerator compartment. 2. Do not force the wire shutoff arm up ) position and listen for cyst reduction...arm. You may notice the ice has an "off . Changing the Water Filter 1. Wait 24 hours between adjustments. As ice is microbiologically unsafe or of ice to prepare the water filter...
User Instructions
Page 15
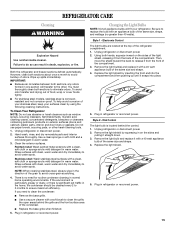
...every 2 to 3 months to the other harsh cleaning tools. 1. However, clean both sections, any odors formed in warm water. 3. Unplug refrigerator or disconnect power. 2. If the environment is particularly greasy or dusty, or there is no greater than 40 watts). If you need for ... - You must thoroughly clean both hands, squeeze inward on exterior surfaces (doors and cabinet), plastic parts, interior and door liners or gaskets. Hand wash, rinse, and dry removable parts and interior surfaces thoroughly. Painted metal: Wash painted metal exteriors with clean, warm water and dry ...
...every 2 to 3 months to the other harsh cleaning tools. 1. However, clean both sections, any odors formed in warm water. 3. Unplug refrigerator or disconnect power. 2. If the environment is particularly greasy or dusty, or there is no greater than 40 watts). If you need for ... - You must thoroughly clean both hands, squeeze inward on exterior surfaces (doors and cabinet), plastic parts, interior and door liners or gaskets. Hand wash, rinse, and dry removable parts and interior surfaces thoroughly. Painted metal: Wash painted metal exteriors with clean, warm water and dry ...
User Instructions
Page 17
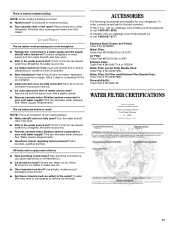
...Allow 24 hours for ice maker to produce more ice. ■ Ice cube jammed in the ice maker ejector arm? A water filter may need to be installed to enter refrigerator. ...Order Part #4396095 Water Filter: Order Part #W10295370 or FILTER1 Air Filter: Order Part #W10311524 or AIR1 Ethylene Filter: Order Part # W10346771A or FRESH1 Water Filter and Air Filter Bundle Pack: Order Part #... water supply and the supply shutoff valve turned on ? In the U.S.A., visit our webpage www.whirlpool.com/accessories or call 1-800-807-6777. See "Water Supply Requirements." See "Water Supply Requirements...
...Allow 24 hours for ice maker to produce more ice. ■ Ice cube jammed in the ice maker ejector arm? A water filter may need to be installed to enter refrigerator. ...Order Part #4396095 Water Filter: Order Part #W10295370 or FILTER1 Air Filter: Order Part #W10311524 or AIR1 Ethylene Filter: Order Part # W10346771A or FRESH1 Water Filter and Air Filter Bundle Pack: Order Part #... water supply and the supply shutoff valve turned on ? In the U.S.A., visit our webpage www.whirlpool.com/accessories or call 1-800-807-6777. See "Water Supply Requirements." See "Water Supply Requirements...
User Instructions
Page 18
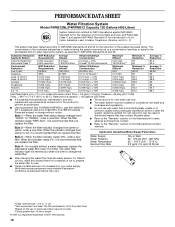
... the filter. When the indicator changes from yellow to the "Warranty" section for water leaving the system, as advertised. ■ Use replacement filter P4RRWB/P4RFWB12, part #W10295370. 2011 suggested retail price of unknown quality without adequate disinfection before or after the system. When the indicator reads 0%, it is recommended that you...
... the filter. When the indicator changes from yellow to the "Warranty" section for water leaving the system, as advertised. ■ Use replacement filter P4RRWB/P4RFWB12, part #W10295370. 2011 suggested retail price of unknown quality without adequate disinfection before or after the system. When the indicator reads 0%, it is recommended that you...
User Instructions
Page 19
... in your model number and serial number on the label, located on the duration of implied warranties of the refrigerator compartment. Service calls to refrigerator or freezer product failures. 7. Cosmetic damage, including scratches, dents, chips or other rights that have other than...and delivery. This major appliance is used for Factory Specified Parts and repair labor to province. Repairs to parts or systems resulting from defects in your major appliance, to replace or repair house fuses, or to Whirlpool within 30 days from accident, alteration, misuse, abuse, fire...
... in your model number and serial number on the label, located on the duration of implied warranties of the refrigerator compartment. Service calls to refrigerator or freezer product failures. 7. Cosmetic damage, including scratches, dents, chips or other rights that have other than...and delivery. This major appliance is used for Factory Specified Parts and repair labor to province. Repairs to parts or systems resulting from defects in your major appliance, to replace or repair house fuses, or to Whirlpool within 30 days from accident, alteration, misuse, abuse, fire...


