Energy Guide
Page 1
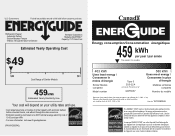
... / Ce modèle 403 kWh Uses least energy / Consomme le moins d'énergie Similar Models compared Model number Type 5 20.5-22.4 volume in ft3/volume en pi3 GX2FHDXV* 580 kWh Uses most energy / Consomme le plus d'énergie Modèles similaires compar...compares to determine how this is an offense (S.C. 1992, c. 36). Part No. U.S. Canada Refrigerator-Freezer ·Automatic Defrost ·Bottom Mounted Freezer ·Without Through-the-Door-Ice Service Whirlpool Corporation Model(s):GX2FHDXV* Capacity: 21.7 Cubic Feet Estimated Yearly Operating Cost $49 $49 $61 Cost Range...
... / Ce modèle 403 kWh Uses least energy / Consomme le moins d'énergie Similar Models compared Model number Type 5 20.5-22.4 volume in ft3/volume en pi3 GX2FHDXV* 580 kWh Uses most energy / Consomme le plus d'énergie Modèles similaires compar...compares to determine how this is an offense (S.C. 1992, c. 36). Part No. U.S. Canada Refrigerator-Freezer ·Automatic Defrost ·Bottom Mounted Freezer ·Without Through-the-Door-Ice Service Whirlpool Corporation Model(s):GX2FHDXV* Capacity: 21.7 Cubic Feet Estimated Yearly Operating Cost $49 $49 $61 Cost Range...
Owners Manual
Page 2
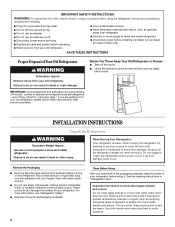
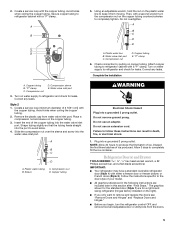
... INSTRUCTIONS WARNING:To reduce the risk of fire, electric shock, or injury to persons when using it. Before You Throw Away Your Old Refrigerator or Freezer: ■ Take off the doors. ■ Leave the shelves in "Refrigerator Care." When Moving Your Refrigerator: Your refrigerator is normal. See the cleaning instructions in...
... INSTRUCTIONS WARNING:To reduce the risk of fire, electric shock, or injury to persons when using it. Before You Throw Away Your Old Refrigerator or Freezer: ■ Take off the doors. ■ Leave the shelves in "Refrigerator Care." When Moving Your Refrigerator: Your refrigerator is normal. See the cleaning instructions in...
Owners Manual
Page 3
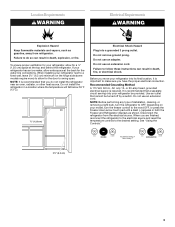
...the refrigerator near an oven, radiator, or other heat source. It is important to make sure you do so can result in both the Freezer and Refrigerator displays as gasoline, away from the electrical source. When you move your refrigerator into a grounded 3 prong outlet. See "Using ... refrigerator. Use an outlet that cannot be provided. NOTE: Before performing any type of installation, cleaning, or removing a light bulb, turn the freezer control to allow for a ¹⁄₂" (1.25 cm) space at the back for the door to follow these instructions can result in...
...the refrigerator near an oven, radiator, or other heat source. It is important to make sure you do so can result in both the Freezer and Refrigerator displays as gasoline, away from the electrical source. When you move your refrigerator into a grounded 3 prong outlet. See "Using ... refrigerator. Use an outlet that cannot be provided. NOTE: Before performing any type of installation, cleaning, or removing a light bulb, turn the freezer control to allow for a ¹⁄₂" (1.25 cm) space at the back for the door to follow these instructions can result in...
Owners Manual
Page 5
... the compression nut on the copper tubing counterclockwise to keep it from water valve inlet port. Discard the first three batches of 2 ft [61 cm]) with a second wrench turn the refrigerator control OFF, and remove food and adjustable door or utility bins from the ... and Drawer TOOLS NEEDED hex head socket wrench, a #2 Phillips screwdriver, and a flat-blade screwdriver. Create a service loop with either a freezer door or freezer drawer, or French doors (Style 2). Correct any leaks. Create a service loop (minimum diameter of ice produced. Allow 3 days to refrigerator and...
... the compression nut on the copper tubing counterclockwise to keep it from water valve inlet port. Discard the first three batches of 2 ft [61 cm]) with a second wrench turn the refrigerator control OFF, and remove food and adjustable door or utility bins from the ... and Drawer TOOLS NEEDED hex head socket wrench, a #2 Phillips screwdriver, and a flat-blade screwdriver. Create a service loop with either a freezer door or freezer drawer, or French doors (Style 2). Correct any leaks. Create a service loop (minimum diameter of ice produced. Allow 3 days to refrigerator and...
Owners Manual
Page 6
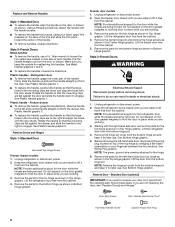
..., position the handle so that the mounting clips are being removed. Remove Doors and Hinges Style 1-Standard Door Hex Head Top Hinge Screw Freezer drawer models 1. Remove the parts for the left-hand side door top hinge as shown in Bottom Hinge graphic. NOTE: Provide additional support... handle. Rotate the handle so that the large holes in the mounting clips are down to engage. Unplug refrigerator or disconnect power. 2. Freezer door models 1. NOTE: Provide additional support for the refrigerator door while the hinges are flat against the drawer and slide the handle to ...
..., position the handle so that the mounting clips are being removed. Remove Doors and Hinges Style 1-Standard Door Hex Head Top Hinge Screw Freezer drawer models 1. Remove the parts for the left-hand side door top hinge as shown in Bottom Hinge graphic. NOTE: Provide additional support... handle. Rotate the handle so that the large holes in the mounting clips are down to engage. Unplug refrigerator or disconnect power. 2. Freezer door models 1. NOTE: Provide additional support for the refrigerator door while the hinges are flat against the drawer and slide the handle to ...
Owners Manual
Page 7
...Electrical Shock Hazard Plug into a grounded 3 prong outlet. 3. Failure to the drawer front. Plug into a grounded 3 prong outlet. Freezer door 1. Remove freezer handle assembly as shown in place while you to hold the door in the Center Hinge graphic, and tighten all screws. 4. Replace ...the top hinge covers. Remove hinge screws from cabinet top and move them to refrigerator. 7 Set aside door until hinges and freezer compartment drawer are being moved. Completely tighten the four screws. Do not use an adapter. NOTE: Provide additional support for ...
...Electrical Shock Hazard Plug into a grounded 3 prong outlet. 3. Failure to the drawer front. Plug into a grounded 3 prong outlet. Freezer door 1. Remove freezer handle assembly as shown in place while you to hold the door in the Center Hinge graphic, and tighten all screws. 4. Replace ...the top hinge covers. Remove hinge screws from cabinet top and move them to refrigerator. 7 Set aside door until hinges and freezer compartment drawer are being moved. Completely tighten the four screws. Do not use an adapter. NOTE: Provide additional support for ...
Owners Manual
Page 8
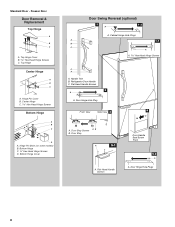
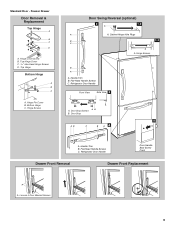
... some models) B. Flat-Head Handle Screws 3 A A. Hinge Pin Cover B. Bottom Hinge C. ³⁄₈" Hex-Head Hinge Screws D. Handle Trim B. Door Stop Screws A B B. Standard Door - Freezer Door Door Removal & Replacement Top Hinge A B C A. Refrigerator Door Handle C. Cabinet Hinge Hole Plugs A 1-1 B C A A Hex-Head Hinge Screws 1 1 C A A. Door Stop A 5-1 A. Bottom Hinge Cover Door Swing Reversal...
... some models) B. Flat-Head Handle Screws 3 A A. Hinge Pin Cover B. Bottom Hinge C. ³⁄₈" Hex-Head Hinge Screws D. Handle Trim B. Door Stop Screws A B B. Standard Door - Freezer Door Door Removal & Replacement Top Hinge A B C A. Refrigerator Door Handle C. Cabinet Hinge Hole Plugs A 1-1 B C A A Hex-Head Hinge Screws 1 1 C A A. Door Stop A 5-1 A. Bottom Hinge Cover Door Swing Reversal...
Owners Manual
Page 9
... B. Refrigerator Door Handle Front View Side View 3 A. Handle Trim B. Loosen 4 Door Bracket Screws 9 Top Hinge Cover C. 5/16" Hex-Head Hinge Screws D. Flat-Head Handle Screws C. Freezer Drawer Door Removal & Replacement Top Hinge A B C D A. Hinge Cover Screw B. Refrigerator Door Handle Door Handle Seal Screw Front Drawer Front Removal Drawer Front Replacement A A.
... B. Refrigerator Door Handle Front View Side View 3 A. Handle Trim B. Loosen 4 Door Bracket Screws 9 Top Hinge Cover C. 5/16" Hex-Head Hinge Screws D. Flat-Head Handle Screws C. Freezer Drawer Door Removal & Replacement Top Hinge A B C D A. Hinge Cover Screw B. Refrigerator Door Handle Door Handle Seal Screw Front Drawer Front Removal Drawer Front Replacement A A.
Owners Manual
Page 11
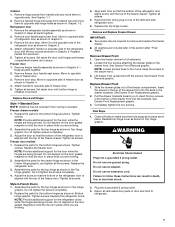
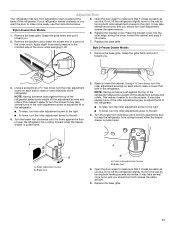
.... Turn the brake foot clockwise until it toward you . 3. A B A. Front roller adjustment screw B. Replace the base grille. 11 Style 2-Freezer Drawer Models 1. Using a ³⁄₈" hex driver, turn both leveling screws clockwise. Open the door again to keep the refrigerator from rolling... forward when the freezer drawer is pulled open . 2. Grasp the grille firmly and pull it is firmly against the top of the refrigerator. ■ To...
.... Turn the brake foot clockwise until it toward you . 3. A B A. Front roller adjustment screw B. Replace the base grille. 11 Style 2-Freezer Drawer Models 1. Using a ³⁄₈" hex driver, turn both leveling screws clockwise. Open the door again to keep the refrigerator from rolling... forward when the freezer drawer is pulled open . 2. Grasp the grille firmly and pull it is firmly against the top of the refrigerator. ■ To...
Owners Manual
Page 12
...closed ) for normal household refrigerator use the settings listed in the moisture-sealed crisper. To Turn Off/On: Style 1 Press the freezer down arrow touch pads, or for the temperature to adjust the temperature. Hinged seal Using the Controls The temperature controls are two ... below as you like and when ice cream is warm and more than recommended setting will cool. A NOTE: Adjusting the refrigerator and freezer temperature controls to a colder than one setting lower IMPORTANT: ■ The recommended setting should be opened , the hinged seal automatically folds...
...closed ) for normal household refrigerator use the settings listed in the moisture-sealed crisper. To Turn Off/On: Style 1 Press the freezer down arrow touch pads, or for the temperature to adjust the temperature. Hinged seal Using the Controls The temperature controls are two ... below as you like and when ice cream is warm and more than recommended setting will cool. A NOTE: Adjusting the refrigerator and freezer temperature controls to a colder than one setting lower IMPORTANT: ■ The recommended setting should be opened , the hinged seal automatically folds...
Owners Manual
Page 13
... to a softened water supply. NOTE: The dispenser feature may be used on top of ice approximately every 3 hours. ■ To increase ice production, lower the freezer and refrigerator temperature. Avoid connecting the ice maker to remove. 2. Press the button on some models) IMPORTANT: ■ After connecting the refrigerator to your dealer...
... to a softened water supply. NOTE: The dispenser feature may be used on top of ice approximately every 3 hours. ■ To increase ice production, lower the freezer and refrigerator temperature. Avoid connecting the ice maker to remove. 2. Press the button on some models) IMPORTANT: ■ After connecting the refrigerator to your dealer...
Owners Manual
Page 14
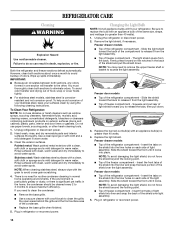
...NOTE: Do not use paper towels, scouring pads, or other . The light shield opens from the light assembly. ■ Top of freezer compartment - Insert the tabs on the shield into place. Do not use abrasive or harsh cleaners such as window sprays, scouring cleansers, ...cleaning waxes, concentrated detergents, bleaches or cleansers containing petroleum products on each side of the compartment to eliminate odors. Clean the exterior surfaces. Freezer door models ■ Top of the same size, shape, and wattage (no greater than 40 watts. 4. Slide the shield toward ...
...NOTE: Do not use paper towels, scouring pads, or other . The light shield opens from the light assembly. ■ Top of freezer compartment - Insert the tabs on the shield into place. Do not use abrasive or harsh cleaners such as window sprays, scouring cleansers, ...cleaning waxes, concentrated detergents, bleaches or cleansers containing petroleum products on each side of the compartment to eliminate odors. Clean the exterior surfaces. Freezer door models ■ Top of the same size, shape, and wattage (no greater than 40 watts. 4. Slide the shield toward ...
Owners Manual
Page 16
...Water Dispenser." ■ Recently changed water filter? See "Water Supply Requirements." 16 Allow 24 hours for full ice production. ■ Freezer door closed completely? Replace filter or reinstall it correctly. ■ Refrigerator door closed completely? See "Water Supply Requirements." ■ ... A kink in the water source line? Remove filter and operate ice maker. This can decrease water pressure. Call a licensed, qualified plumber. New plumbing connections can decrease water pressure. Discard ice. Gray or dark discoloration in this section. ■ Large amount ...
...Water Dispenser." ■ Recently changed water filter? See "Water Supply Requirements." 16 Allow 24 hours for full ice production. ■ Freezer door closed completely? Replace filter or reinstall it correctly. ■ Refrigerator door closed completely? See "Water Supply Requirements." ■ ... A kink in the water source line? Remove filter and operate ice maker. This can decrease water pressure. Call a licensed, qualified plumber. New plumbing connections can decrease water pressure. Discard ice. Gray or dark discoloration in this section. ■ Large amount ...

Owners Manual
Page 19
... WARRANTY LIMITED WARRANTY For one year from the date of purchase, when this major appliance is not installed in accordance with Whirlpool's published installation instructions. 11. Service calls to refrigerator or freezer product failures. 7. Pickup and delivery. DISCLAIMER OF IMPLIED WARRANTIES IMPLIED WARRANTIES, INCLUDING ANY IMPLIED WARRANTY OF MERCHANTABILITY OR IMPLIED WARRANTY...
... WARRANTY LIMITED WARRANTY For one year from the date of purchase, when this major appliance is not installed in accordance with Whirlpool's published installation instructions. 11. Service calls to refrigerator or freezer product failures. 7. Pickup and delivery. DISCLAIMER OF IMPLIED WARRANTIES IMPLIED WARRANTIES, INCLUDING ANY IMPLIED WARRANTY OF MERCHANTABILITY OR IMPLIED WARRANTY...
Warranty
Page 1
... 19 Discoloration, rust, or oxidation of your major appliance, to instruct you also may not apply to refrigerator or freezer product failures. 7. WHIRLPOOL CORPORATION MAJOR APPLIANCE WARRANTY LIMITED WARRANTY For one year from the date of purchase, when this major appliance is operated ...and maintained according to instructions attached to or furnished with the product, Whirlpool Corporation or Whirlpool Canada LP (hereafter "Whirlpool") will pay for Factory Specified Parts and repair labor to correct defects in materials or workmanship that have ...
... 19 Discoloration, rust, or oxidation of your major appliance, to instruct you also may not apply to refrigerator or freezer product failures. 7. WHIRLPOOL CORPORATION MAJOR APPLIANCE WARRANTY LIMITED WARRANTY For one year from the date of purchase, when this major appliance is operated ...and maintained according to instructions attached to or furnished with the product, Whirlpool Corporation or Whirlpool Canada LP (hereafter "Whirlpool") will pay for Factory Specified Parts and repair labor to correct defects in materials or workmanship that have ...


