
User Instructions
Page 1
In Canada, visit our website at www.whirlpool.ca or call us at www.whirlpool.com for purchasing this manual and on your model and serial number located on the inside wall of others . This symbol alerts ...WARNING You can kill or hurt you still need your appliance. Table of Contents / Índice / Table des matières REFRIGERATOR SAFETY 1 INSTALLATION INSTRUCTIONS 2 REFRIGERATOR USE 12 REFRIGERATOR CARE 14 TROUBLESHOOTING 15 WATER FILTER CERTIFICATIONS 17 PRODUCT DATA SHEETS 18 WARRANTY 19 SEGURIDAD DEL REFRIGERADOR 20 INSTRUCCIONES DE INSTALACIÓN .......... ...
In Canada, visit our website at www.whirlpool.ca or call us at www.whirlpool.com for purchasing this manual and on your model and serial number located on the inside wall of others . This symbol alerts ...WARNING You can kill or hurt you still need your appliance. Table of Contents / Índice / Table des matières REFRIGERATOR SAFETY 1 INSTALLATION INSTRUCTIONS 2 REFRIGERATOR USE 12 REFRIGERATOR CARE 14 TROUBLESHOOTING 15 WATER FILTER CERTIFICATIONS 17 PRODUCT DATA SHEETS 18 WARRANTY 19 SEGURIDAD DEL REFRIGERADOR 20 INSTRUCCIONES DE INSTALACIÓN .......... ...

User Instructions
Page 2
...dry. ■ Do not use an extension cord. ■ Disconnect power before servicing. ■ Replace all packaging materials. For your refrigerator. Failure to do so can result in place so that children may break if exposed to sudden temperature changes or impact, such as floor... in back or other injury. Clean Before Using After you are cold. Shelves and covers may not easily climb inside of your old refrigerator, please follow basic precautions, including the following: ■ Plug into many small, pebble-size pieces. Glass shelves and covers are still...
...dry. ■ Do not use an extension cord. ■ Disconnect power before servicing. ■ Replace all packaging materials. For your refrigerator. Failure to do so can result in place so that children may break if exposed to sudden temperature changes or impact, such as floor... in back or other injury. Clean Before Using After you are cold. Shelves and covers may not easily climb inside of your old refrigerator, please follow basic precautions, including the following: ■ Plug into many small, pebble-size pieces. Glass shelves and covers are still...

User Instructions
Page 3
... a location where the temperature will remain above freezing. 3 Before you do so can result in both the Freezer and Refrigerator displays as gasoline, away from the electrical source. NOTE: Before performing any tools listed here. It is recommended that cannot be .... Install copper tubing only in death, explosion, or fire. To ensure proper ventilation for your model, turn the refrigerator to make sure you are finished, reconnect the refrigerator to the electrical source and reset the temperature controls to the word OFF, or press the Freezer down arrow touch...
... a location where the temperature will remain above freezing. 3 Before you do so can result in both the Freezer and Refrigerator displays as gasoline, away from the electrical source. NOTE: Before performing any tools listed here. It is recommended that cannot be .... Install copper tubing only in death, explosion, or fire. To ensure proper ventilation for your model, turn the refrigerator to make sure you are finished, reconnect the refrigerator to the electrical source and reset the temperature controls to the word OFF, or press the Freezer down arrow touch...

User Instructions
Page 4
... nut and sleeve as it will work, but the following procedure must be followed: Drill on your refrigerator has a water filter, it may crush the copper tubing. 7. Be sure both ends of 2 ft [61 cm]) with the copper tubing. Shutoff valve G. Tighten the packing nut. Style 1 1. ...Avoid kinks when coiling the copper tubing. Water valve inlet port 3. Connect to refrigerator cabinet with a "P" clamp. Find a ¹⁄₂" to 1&#...
... nut and sleeve as it will work, but the following procedure must be followed: Drill on your refrigerator has a water filter, it may crush the copper tubing. 7. Be sure both ends of 2 ft [61 cm]) with the copper tubing. Shutoff valve G. Tighten the packing nut. Style 1 1. ...Avoid kinks when coiling the copper tubing. Water valve inlet port 3. Connect to refrigerator cabinet with a "P" clamp. Find a ¹⁄₂" to 1&#...
User Instructions
Page 5
...not use an adapter. Plug into a grounded 3 prong outlet. Discard the first three batches of ice. IMPORTANT: ■ Your refrigerator may have a standard reversible refrigerator door (Style 1) with the door studs. Replace and Remove Handles Style 1-Standard Door ■ To replace the handle, align the ... for reattaching the handles. Complete the Installation WARNING Electrical Shock Hazard Plug into a grounded 3 prong outlet. Plastic handle - Refrigerator Door(s) and Drawer TOOLS NEEDED hex-head socket wrench, a #2 Phillips screwdriver, and a flat-blade screwdriver. Using an ...
...not use an adapter. Plug into a grounded 3 prong outlet. Discard the first three batches of ice. IMPORTANT: ■ Your refrigerator may have a standard reversible refrigerator door (Style 1) with the door studs. Replace and Remove Handles Style 1-Standard Door ■ To replace the handle, align the ... for reattaching the handles. Complete the Installation WARNING Electrical Shock Hazard Plug into a grounded 3 prong outlet. Plastic handle - Refrigerator Door(s) and Drawer TOOLS NEEDED hex-head socket wrench, a #2 Phillips screwdriver, and a flat-blade screwdriver. Using an ...

User Instructions
Page 6
...all parts together. 2. Keep all screws. Remove freezer door handle seal screw. Attach handle to opposite side. Tighten all parts together. 2. Unplug refrigerator or disconnect power. 2. NOTE: Provide additional support for the top hinge as shown in the Top Hinge graphic. NOTE: The green, ground ...wire remains attached to opposite side of refrigerator door as shown in Graphic 2. Remove the parts for later use . See Bottom Hinge graphic. Remove hinge screws from cabinet top ...
...all parts together. 2. Keep all screws. Remove freezer door handle seal screw. Attach handle to opposite side. Tighten all parts together. 2. Unplug refrigerator or disconnect power. 2. NOTE: Provide additional support for the top hinge as shown in the Top Hinge graphic. NOTE: The green, ground ...wire remains attached to opposite side of refrigerator door as shown in Graphic 2. Remove the parts for later use . See Bottom Hinge graphic. Remove hinge screws from cabinet top ...

User Instructions
Page 7
... drawer. ■ All graphics are working. 3. Style 2-French Doors 1. Do not tighten the screws completely. 2. Tighten screws. Replace the refrigerator doors. Align each door so that hole plugs and screws are working . 2. Remove Drawer Front 1. Loosen the four screws attaching the drawer ...screws in the drawer brackets. See Drawer Front Removal graphic. Replace Drawer Front 1. Slide the drawer glides out of the left-hand side refrigerator door. 5. Pull the drawer brackets toward you are in death, fire, or electrical shock. 2. Final Steps 1. Check all the ...
... drawer. ■ All graphics are working. 3. Style 2-French Doors 1. Do not tighten the screws completely. 2. Tighten screws. Replace the refrigerator doors. Align each door so that hole plugs and screws are working . 2. Remove Drawer Front 1. Loosen the four screws attaching the drawer ...screws in the drawer brackets. See Drawer Front Removal graphic. Replace Drawer Front 1. Slide the drawer glides out of the left-hand side refrigerator door. 5. Pull the drawer brackets toward you are in death, fire, or electrical shock. 2. Final Steps 1. Check all the ...

User Instructions
Page 8
Freezer Door Door Removal & Replacement Top Hinge A B C A. Top Hinge Cover B Hex-Head Hinge Screws C. Center Hinge C Hex-Head Hinge Screws Bottom Hinge A B C D A. Refrigerator Door Handle C. Door Hinge Hole Plug Front View Side View 4 6 A. Cabinet Hinge Hole Plugs A 1-1 B C A A Hex-Head Hinge Screws 1 1 C A A. Flat-Head Handle Screws 3 A A. Bottom Hinge Cover ...
Freezer Door Door Removal & Replacement Top Hinge A B C A. Top Hinge Cover B Hex-Head Hinge Screws C. Center Hinge C Hex-Head Hinge Screws Bottom Hinge A B C D A. Refrigerator Door Handle C. Door Hinge Hole Plug Front View Side View 4 6 A. Cabinet Hinge Hole Plugs A 1-1 B C A A Hex-Head Hinge Screws 1 1 C A A. Flat-Head Handle Screws 3 A A. Bottom Hinge Cover ...

User Instructions
Page 9
... Swing Reversal (optional) 2 1-2 A A A. Handle Trim B. Flat-Head Handle Screws C. Loosen 4 Door Bracket Screws 9 Standard Door - Handle Trim B. Refrigerator Door Handle Front View Side View 3 A. Bottom Hinge C. Hinge Cover Screw B. Cabinet Hinge Hole Plugs B 1-1 C A A A. Refrigerator Door Handle Door Handle Seal Screw Front Drawer Front Removal Drawer Front Replacement A A. Freezer Drawer Door Removal & Replacement...
... Swing Reversal (optional) 2 1-2 A A A. Handle Trim B. Flat-Head Handle Screws C. Loosen 4 Door Bracket Screws 9 Standard Door - Handle Trim B. Refrigerator Door Handle Front View Side View 3 A. Bottom Hinge C. Hinge Cover Screw B. Cabinet Hinge Hole Plugs B 1-1 C A A A. Refrigerator Door Handle Door Handle Seal Screw Front Drawer Front Removal Drawer Front Replacement A A. Freezer Drawer Door Removal & Replacement...

User Instructions
Page 11
... adjustment screw to the right. ■ To lower, turn the screws. Remove the bracket cover. Brake foot 5. If not, tilt the refrigerator slightly more turns, and you like . Style 2-Freezer Drawer Models 1. Using a ³⁄₈" hex driver, turn the roller adjustment ...is pulled open . It may have two front adjustable rollers (Style 1) or four adjustable rollers (Style 2) located at the base of the refrigerator takes some weight off the adjustment screws and rollers. Apply slight downward pressure to the left . 4. Roller adjustment screw B. Front roller adjustment ...
... adjustment screw to the right. ■ To lower, turn the screws. Remove the bracket cover. Brake foot 5. If not, tilt the refrigerator slightly more turns, and you like . Style 2-Freezer Drawer Models 1. Using a ³⁄₈" hex driver, turn the roller adjustment ...is pulled open . It may have two front adjustable rollers (Style 1) or four adjustable rollers (Style 2) located at the base of the refrigerator takes some weight off the adjustment screws and rollers. Apply slight downward pressure to the left . 4. Roller adjustment screw B. Front roller adjustment ...

User Instructions
Page 12
... in the chart below as a guide. For (Style 1) controls press the up or down arrow touch pad until a dash (-) appears in the refrigerator or freezer, first check the air vents to cool completely before adding food. Neither compartment will cool when the freezer is firm. 12 The... Controls For your food may spoil. A. A To Turn Off/On: Style 1 Press the freezer down arrow touch pads, or for normal household refrigerator use the settings listed in humid environments or when you notice moisture on the door hinge seal. Humidity Control (on some models) The humidity control...
... in the chart below as a guide. For (Style 1) controls press the up or down arrow touch pad until a dash (-) appears in the refrigerator or freezer, first check the air vents to cool completely before adding food. Neither compartment will cool when the freezer is firm. 12 The... Controls For your food may spoil. A. A To Turn Off/On: Style 1 Press the freezer down arrow touch pads, or for normal household refrigerator use the settings listed in humid environments or when you notice moisture on the door hinge seal. Humidity Control (on some models) The humidity control...

User Instructions
Page 13
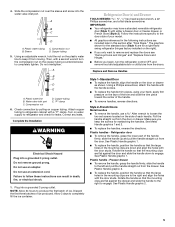
...to a softened water supply. Avoid connecting the ice maker to produce the first batch of ice. FRUIT / LOW (open) for the refrigerator to cool down . As ice is well maintained. ■ Do not store anything on some models) IMPORTANT: ■ After connecting the... up ) position and listen for 5 seconds. Dispensing Water 1. If a softened water supply cannot be required in the upper right-hand corner of the refrigerator compartment. or 1-800-807-6777 Canada. Hold a container under the dispenser while pressing the button. 2. Water Filtration System Do not use with skins. ...
...to a softened water supply. Avoid connecting the ice maker to produce the first batch of ice. FRUIT / LOW (open) for the refrigerator to cool down . As ice is well maintained. ■ Do not store anything on some models) IMPORTANT: ■ After connecting the... up ) position and listen for 5 seconds. Dispensing Water 1. If a softened water supply cannot be required in the upper right-hand corner of the refrigerator compartment. or 1-800-807-6777 Canada. Hold a container under the dispenser while pressing the button. 2. Water Filtration System Do not use with skins. ...

User Instructions
Page 14
... it from the light assembly. ■ Top of the same size, shape, and wattage (no greater than 40 watts). 1. Unplug refrigerator or disconnect power. 2. Hand wash, rinse, and dry removable parts and interior surfaces thoroughly. NOTE: You may be filtered. Replace the...Use nonflammable cleaner. Wash stainless steel and painted metal exteriors with an appliance bulb(s) no greater than 40 watts. 4. Unplug the refrigerator or disconnect power. 2. Slide the shield toward you use abrasive or harsh cleaners such as the trim pieces, dispenser covers or...
... it from the light assembly. ■ Top of the same size, shape, and wattage (no greater than 40 watts). 1. Unplug refrigerator or disconnect power. 2. Hand wash, rinse, and dry removable parts and interior surfaces thoroughly. NOTE: You may be filtered. Replace the...Use nonflammable cleaner. Wash stainless steel and painted metal exteriors with an appliance bulb(s) no greater than 40 watts. 4. Unplug the refrigerator or disconnect power. 2. Slide the shield toward you use abrasive or harsh cleaners such as the trim pieces, dispenser covers or...
User Instructions
Page 15
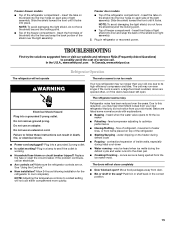
...beyond the locking point. ■ Top of the freezer compartment - Plug in the way? In the U.S.A., www.whirlpool.com In Canada, www.whirlpool.ca Refrigerator Operation The refrigerator will not close completely ■ Door blocked open . Electrical Shock Hazard Plug into a grounded 3 prong outlet. &#... opens to optimize performance ■ Hissing/Rattling - Do not use an extension cord. water dripping on each side of the refrigerator compartment - may run longer than your old model. Freezer drawer models ■ Top of inside walls, especially during initial cool...
...beyond the locking point. ■ Top of the freezer compartment - Plug in the way? In the U.S.A., www.whirlpool.com In Canada, www.whirlpool.ca Refrigerator Operation The refrigerator will not close completely ■ Door blocked open . Electrical Shock Hazard Plug into a grounded 3 prong outlet. &#... opens to optimize performance ■ Hissing/Rattling - Do not use an extension cord. water dripping on each side of the refrigerator compartment - may run longer than your old model. Freezer drawer models ■ Top of inside walls, especially during initial cool...

User Instructions
Page 16
...■ Controls set correctly for ice production to your cold water supply? See "Using the Controls." Allows humid air to enter refrigerator. Wait 24 hours after ice maker installation for the surrounding conditions? Remove ice from food? See "Water Supply Requirements." A kink ...operate ice maker. Gray or dark discoloration in the water source line? A water filter may be clogged or incorrectly installed. Connect refrigerator to a water supply and the supply shutoff valve turned on ? Discard ice. Replace water filter when indicated. There is interior...
...■ Controls set correctly for ice production to your cold water supply? See "Using the Controls." Allows humid air to enter refrigerator. Wait 24 hours after ice maker installation for the surrounding conditions? Remove ice from food? See "Water Supply Requirements." A kink ...operate ice maker. Gray or dark discoloration in the water source line? A water filter may be clogged or incorrectly installed. Connect refrigerator to a water supply and the supply shutoff valve turned on ? Discard ice. Replace water filter when indicated. There is interior...

User Instructions
Page 17
...the doors? This can decrease water pressure. Hold the glass under the dispenser long enough? The first glass of water. ■ Refrigerator connected to the home determines the flow from the dispenser. The water dispenser will not close completely, see "The doors will not operate... See "Water Dispenser." ■ Recently changed water filter? Allow 24 hours for the water supply to your cold water supply? Connect refrigerator to cool completely. ■ Water not been recently dispensed? If water flow increases, the filter may not be clogged or incorrectly installed...
...the doors? This can decrease water pressure. Hold the glass under the dispenser long enough? The first glass of water. ■ Refrigerator connected to the home determines the flow from the dispenser. The water dispenser will not close completely, see "The doors will not operate... See "Water Dispenser." ■ Recently changed water filter? Allow 24 hours for the water supply to your cold water supply? Connect refrigerator to cool completely. ■ Water not been recently dispensed? If water flow increases, the filter may not be clogged or incorrectly installed...

User Instructions
Page 19
...from your home of your product or you on the inside wall of the refrigerator compartment. The cost of repair or replacement under this limited warranty. You can write to Whirlpool with electrical or plumbing codes, or use or when it was purchased. ... is operated and maintained according to instructions attached to or furnished with the product, Whirlpool Corporation or Whirlpool Canada LP (hereafter "Whirlpool") will pay for Factory Specified Parts and repair labor to refrigerator or freezer product failures. 7. LIMITATION OF REMEDIES CUSTOMER'S SOLE AND EXCLUSIVE REMEDY UNDER...
...from your home of your product or you on the inside wall of the refrigerator compartment. The cost of repair or replacement under this limited warranty. You can write to Whirlpool with electrical or plumbing codes, or use or when it was purchased. ... is operated and maintained according to instructions attached to or furnished with the product, Whirlpool Corporation or Whirlpool Canada LP (hereafter "Whirlpool") will pay for Factory Specified Parts and repair labor to refrigerator or freezer product failures. 7. LIMITATION OF REMEDIES CUSTOMER'S SOLE AND EXCLUSIVE REMEDY UNDER...

