
Dimension Guide
Page 1
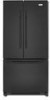
... PRODUCT DIMENSIONS B A not incl. Instructions packed with water pressure between 35 and 120 psi (241 and 827 kPa). ® Bottom Mount Refrigerator PRODUCT MODEL NUMBERS GX2FHDXV Electrical: A 115-volt, 60-Hz, AC-only 15- Do not use an extension cord. Ref. handle 4 ... supply with product. handle C top of the refrigerator needs to be turned off by a switch. Do not install the refrigerator in a location where the temperature will fall below 55°F (13°C). 2-1/2" (6.3 cm) Because Whirlpool Corporation policy includes a continuous commitment to operate the...
... PRODUCT DIMENSIONS B A not incl. Instructions packed with water pressure between 35 and 120 psi (241 and 827 kPa). ® Bottom Mount Refrigerator PRODUCT MODEL NUMBERS GX2FHDXV Electrical: A 115-volt, 60-Hz, AC-only 15- Do not use an extension cord. Ref. handle 4 ... supply with product. handle C top of the refrigerator needs to be turned off by a switch. Do not install the refrigerator in a location where the temperature will fall below 55°F (13°C). 2-1/2" (6.3 cm) Because Whirlpool Corporation policy includes a continuous commitment to operate the...
Energy Guide
Page 1
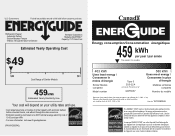
... Ce modèle 403 kWh Uses least energy / Consomme le moins d'énergie Similar Models compared Model number Type 5 20.5-22.4 volume in ft3/volume en pi3 GX2FHDXV* 580 kWh Uses most energy / Consomme le plus d'énergie Modèles similaires ...efficient appliance. U.S. Government Federal law prohibits removal of this label before consumer purchase. Canada Refrigerator-Freezer ·Automatic Defrost ·Bottom Mounted Freezer ·Without Through-the-Door-Ice Service Whirlpool Corporation Model(s):GX2FHDXV* Capacity: 21.7 Cubic Feet Estimated Yearly Operating Cost $49 $49...
... Ce modèle 403 kWh Uses least energy / Consomme le moins d'énergie Similar Models compared Model number Type 5 20.5-22.4 volume in ft3/volume en pi3 GX2FHDXV* 580 kWh Uses most energy / Consomme le plus d'énergie Modèles similaires ...efficient appliance. U.S. Government Federal law prohibits removal of this label before consumer purchase. Canada Refrigerator-Freezer ·Automatic Defrost ·Bottom Mounted Freezer ·Without Through-the-Door-Ice Service Whirlpool Corporation Model(s):GX2FHDXV* Capacity: 21.7 Cubic Feet Estimated Yearly Operating Cost $49 $49...
Use & Care Guide
Page 1
... don't immediately follow instructions. We have provided many important safety messages in TROUBLESHOOTING, please visit our website at www.whirlpool.com for purchasing this manual and on the inside wall of injury, and tell you don't follow instructions. All ...call us at 1-800-807-6777. Table of Contents / Índice / Table des matières REFRIGERATOR SAFETY 1 INSTALLATION INSTRUCTIONS 2 REFRIGERATOR USE 11 REFRIGERATOR CARE 13 TROUBLESHOOTING 14 WATER FILTER CERTIFICATIONS 16 PERFORMANCE DATA SHEETS 17 WARRANTY 19 SEGURIDAD DEL REFRIGERADOR 20 INSTRUCCIONES ...
... don't immediately follow instructions. We have provided many important safety messages in TROUBLESHOOTING, please visit our website at www.whirlpool.com for purchasing this manual and on the inside wall of injury, and tell you don't follow instructions. All ...call us at 1-800-807-6777. Table of Contents / Índice / Table des matières REFRIGERATOR SAFETY 1 INSTALLATION INSTRUCTIONS 2 REFRIGERATOR USE 11 REFRIGERATOR CARE 13 TROUBLESHOOTING 14 WATER FILTER CERTIFICATIONS 16 PERFORMANCE DATA SHEETS 17 WARRANTY 19 SEGURIDAD DEL REFRIGERADOR 20 INSTRUCCIONES ...

Use & Care Guide
Page 2
...the risk of liquid dish soap over the adhesive with your fingers. Rub a small amount of fire, electric shock, or injury when using your refrigerator, follow these basic precautions: ■ Plug into a grounded 3 prong outlet. ■ Use nonflammable cleaner. ■ Do not remove ground ...or abrasive cleaners to remove tape or glue. even if they will sit for cleaning or service, be evacuated by a licensed, EPA certified refrigerant technician in accordance with warm water and dry. ■ Do not use an extension cord. ■ Disconnect power before servicing. ■...
...the risk of liquid dish soap over the adhesive with your fingers. Rub a small amount of fire, electric shock, or injury when using your refrigerator, follow these basic precautions: ■ Plug into a grounded 3 prong outlet. ■ Use nonflammable cleaner. ■ Do not remove ground ...or abrasive cleaners to remove tape or glue. even if they will sit for cleaning or service, be evacuated by a licensed, EPA certified refrigerant technician in accordance with warm water and dry. ■ Do not use an extension cord. ■ Disconnect power before servicing. ■...
Use & Care Guide
Page 3
... gasoline, away from the electrical source. Clean Before Using After you remove all of the packaging materials, clean the inside of your refrigerator has an ice maker, allow extra space at the top. See the cleaning instructions in death, explosion, or fire. This is between...connections. Shelves and covers may break if exposed to a maximum of 110°F (43°C). Before you are finished, reconnect the refrigerator to the electrical source and reset the temperature controls to allow for optimum performance, which reduces electricity usage and provides superior cooling, is...
... gasoline, away from the electrical source. Clean Before Using After you remove all of the packaging materials, clean the inside of your refrigerator has an ice maker, allow extra space at the top. See the cleaning instructions in death, explosion, or fire. This is between...connections. Shelves and covers may break if exposed to a maximum of 110°F (43°C). Before you are finished, reconnect the refrigerator to the electrical source and reset the temperature controls to allow for optimum performance, which reduces electricity usage and provides superior cooling, is...
Use & Care Guide
Page 4
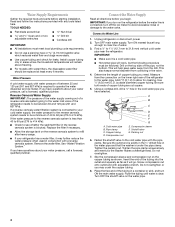
... at least every 6 months. Turn OFF the shutoff valve on the lower right rear of between 35 and 120 psi (241 and 827 kPa). Unplug refrigerator or disconnect power. 2. Find a ¹⁄₂" to 1¹⁄₄" (12.7 mm to Water Line 1. A B C A. Compression nut D E F G E. Do not ...a container or sink, and turn on the copper tubing as it may crush the copper tubing. 8. Turn OFF main water supply. Add 7 ft (2.1 m) to 414 kPa). Pipe clamp C. Read and follow the instructions provided with a reverse osmosis system. If a reverse osmosis water filtration system...
... at least every 6 months. Turn OFF the shutoff valve on the lower right rear of between 35 and 120 psi (241 and 827 kPa). Unplug refrigerator or disconnect power. 2. Find a ¹⁄₂" to 1¹⁄₄" (12.7 mm to Water Line 1. A B C A. Compression nut D E F G E. Do not ...a container or sink, and turn on the copper tubing as it may crush the copper tubing. 8. Turn OFF main water supply. Add 7 ft (2.1 m) to 414 kPa). Pipe clamp C. Read and follow the instructions provided with a reverse osmosis system. If a reverse osmosis water filtration system...
Use & Care Guide
Page 5
... tubing. Remove plastic cap from moving. Attach the copper tube to produce the first batch of 2 ft [61 cm]) with a second wrench turn the refrigerator control OFF, and remove food and adjustable door or utility bins from water valve inlet port. Check ...a service loop with a "P" clamp. 7. Style 2 1. Allow 3 days to completely fill the ice storage bin. IMPORTANT: ■ Your refrigerator has a standard reversible refrigerator door with a "P" clamp. Confirm copper tubing is a registered trademark of ice produced. Slide the compression nut over the sleeve and screw into...
... tubing. Remove plastic cap from moving. Attach the copper tube to produce the first batch of 2 ft [61 cm]) with a second wrench turn the refrigerator control OFF, and remove food and adjustable door or utility bins from water valve inlet port. Check ...a service loop with a "P" clamp. 7. Style 2 1. Allow 3 days to completely fill the ice storage bin. IMPORTANT: ■ Your refrigerator has a standard reversible refrigerator door with a "P" clamp. Confirm copper tubing is a registered trademark of ice produced. Slide the compression nut over the sleeve and screw into...
Use & Care Guide
Page 6
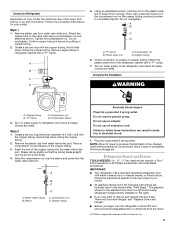
... See Graphic 1. 6 Do not depend on the door gasket magnets to hold the door in death or electrical shock. 1. Lift the refrigerator door free from the cabinet. 5. Keep the freezer door closed until you are being moved. NOTE: Provide additional support for reattaching the ...Hinge graphic. See Style 1 Handle graphics 1 and 2. ■ To replace the handles, reverse the directions. Style 2 handles - Keep the refrigerator door closed until you are ready to do so can result in place while you are being moved. NOTE: Provide additional support for later use...
... See Graphic 1. 6 Do not depend on the door gasket magnets to hold the door in death or electrical shock. 1. Lift the refrigerator door free from the cabinet. 5. Keep the freezer door closed until you are being moved. NOTE: Provide additional support for reattaching the ...Hinge graphic. See Style 1 Handle graphics 1 and 2. ■ To replace the handles, reverse the directions. Style 2 handles - Keep the refrigerator door closed until you are ready to do so can result in place while you are being moved. NOTE: Provide additional support for later use...
Use & Care Guide
Page 7
... in Graphic 4. Tighten all parts together. 2. Remove the hinge plate located behind the roller bracket and that the bottom of the refrigerator door aligns evenly with both roller brackets. Move the hinge pin and shim to opposite side of freezer door as shown in Graphic ...insert the two screws in Bottom Hinge graphic. Tighten all removable door parts to door and food to make sure that the bottom of the refrigerator cabinet. Completely tighten the four screws. Return all screws. Freezer door 1. Tighten screws. See Graphic 6. 2. French Doors 1. NOTE: ...
... in Graphic 4. Tighten all parts together. 2. Remove the hinge plate located behind the roller bracket and that the bottom of the refrigerator door aligns evenly with both roller brackets. Move the hinge pin and shim to opposite side of freezer door as shown in Graphic ...insert the two screws in Bottom Hinge graphic. Tighten all removable door parts to door and food to make sure that the bottom of the refrigerator cabinet. Completely tighten the four screws. Return all screws. Freezer door 1. Tighten screws. See Graphic 6. 2. French Doors 1. NOTE: ...

Use & Care Guide
Page 8
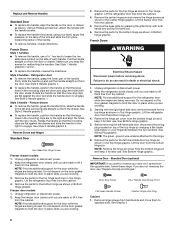
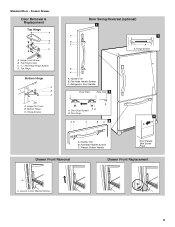
Top Hinge Cover C. 5/16" Hex-Head Hinge Screws D. Center Hinge C. Refrigerator Door Handle C. Bottom Hinge C. Hinge Cover Screw B. Hinge Screws Bottom Hinge A B C D E A. Door Stop Screws A B B. Top Hinge Center Hinge A B C A. Roller Bracket E. ³⁄₈" Hex-Head ...
Top Hinge Cover C. 5/16" Hex-Head Hinge Screws D. Center Hinge C. Refrigerator Door Handle C. Bottom Hinge C. Hinge Cover Screw B. Hinge Screws Bottom Hinge A B C D E A. Door Stop Screws A B B. Top Hinge Center Hinge A B C A. Roller Bracket E. ³⁄₈" Hex-Head ...
Use & Care Guide
Page 9
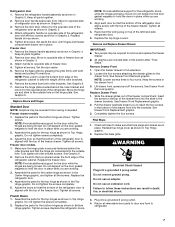
Freezer Drawer Door Removal & Replacement Top Hinge A B C D A. Hinge Screws Door Swing Reversal (optional) 2 A 1 B C A A A. Hinge Pin Cover B. Refrigerator Door Handle Front View Side View 3 A. Flat-Head Handle Screws C. Flat-Head Handle Screws C. Handle Trim B. Bottom Hinge C. Door Stop Screws A B B. Standard Door - Door Stop 5 ...
Freezer Drawer Door Removal & Replacement Top Hinge A B C D A. Hinge Screws Door Swing Reversal (optional) 2 A 1 B C A A A. Hinge Pin Cover B. Refrigerator Door Handle Front View Side View 3 A. Flat-Head Handle Screws C. Flat-Head Handle Screws C. Handle Trim B. Bottom Hinge C. Door Stop Screws A B B. Standard Door - Door Stop 5 ...
Use & Care Guide
Page 11
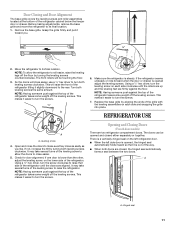
... other, adjust the leveling screw, on each side and snapping the grille into place. Hinged seal 11 Turn both doors are two refrigerator compartment doors. REFRIGERATOR USE A A. If not, increase the tilt by turning both leveling screws clockwise. NOTE: To allow the doors to raise that ...leveling screws. Using a ¹⁄₄" hex driver, turn both leveling screws clockwise. NOTE: Having someone push against the top of the refrigerator tilting it toward you like. The front rollers will close easier, use a ¹⁄₄" hex driver to turn the screw clockwise ...
... other, adjust the leveling screw, on each side and snapping the grille into place. Hinged seal 11 Turn both doors are two refrigerator compartment doors. REFRIGERATOR USE A A. If not, increase the tilt by turning both leveling screws clockwise. NOTE: To allow the doors to raise that ...leveling screws. Using a ¹⁄₄" hex driver, turn both leveling screws clockwise. NOTE: Having someone push against the top of the refrigerator tilting it toward you like. The front rollers will close easier, use a ¹⁄₄" hex driver to turn the screw clockwise ...
Use & Care Guide
Page 12
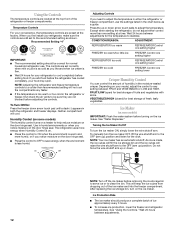
...add food before adjusting the controls. Recommended Setting "4" IMPORTANT: ■ The recommended setting should produce a complete batch of the refrigerator or freezer compartments. If you like and when ice cream is warm and more than recommended setting will not cool the compartments any...moisture-sealed crisper. FRUIT/LOW (open) for best storage of the ice maker and into the freezer compartment. NOTE: Adjusting the refrigerator and freezer temperature controls to a colder than one setting lower Crisper Humidity Control You can control the amount of fruits and vegetables...
...add food before adjusting the controls. Recommended Setting "4" IMPORTANT: ■ The recommended setting should produce a complete batch of the refrigerator or freezer compartments. If you like and when ice cream is warm and more than recommended setting will not cool the compartments any...moisture-sealed crisper. FRUIT/LOW (open) for best storage of the ice maker and into the freezer compartment. NOTE: Adjusting the refrigerator and freezer temperature controls to a colder than one setting lower Crisper Humidity Control You can control the amount of fruits and vegetables...
Use & Care Guide
Page 13
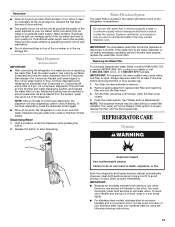
... this option is microbiologically unsafe or of your stainless steel, keep your surfaces clean by using the following cleaning instructions. 13 REFRIGERATOR CARE Cleaning WARNING Explosion Hazard Use nonflammable cleaner. Discard the first three batches of ice produced. ■ The quality of the...the water softener is operating properly and is located in the water system may cause water and filter to eject. Both the refrigerator and freezer sections defrost automatically. Wipe up spills immediately. NOTE: The dispenser feature may contain filterable cysts. Failure to poor ...
... this option is microbiologically unsafe or of your stainless steel, keep your surfaces clean by using the following cleaning instructions. 13 REFRIGERATOR CARE Cleaning WARNING Explosion Hazard Use nonflammable cleaner. Discard the first three batches of ice produced. ■ The quality of the...the water softener is operating properly and is located in the water system may cause water and filter to eject. Both the refrigerator and freezer sections defrost automatically. Wipe up spills immediately. NOTE: The dispenser feature may contain filterable cysts. Failure to poor ...
Use & Care Guide
Page 14
... light shield toward the back of the condenser. ■ Replace the base grille when finished. 5. Replace the light shield. 5. In the U.S.A., www.whirlpool.com In Canada, www.whirlpool.ca The refrigerator will not cool either compartment more quickly. Do not use an adapter. Plug in normal home operating environments. Rinse surfaces with a soft...
... light shield toward the back of the condenser. ■ Replace the base grille when finished. 5. Replace the light shield. 5. In the U.S.A., www.whirlpool.com In Canada, www.whirlpool.ca The refrigerator will not cool either compartment more quickly. Do not use an adapter. Plug in normal home operating environments. Rinse surfaces with a soft...
Use & Care Guide
Page 15
... fully open . ■ Kink in death, explosion, or fire. ■ Gaskets dirty or sticky? Allows humid air to enter refrigerator. Connect refrigerator to store food. ■ Are there minerals (such as ice is being ejected from the ejector arm with a plastic utensil. ■... not close the freezer compartment door. Call a licensed, qualified plumber. contraction/expansion of ice recently removed? Allows warm air to enter refrigerator. Check temperature in this section. ■ Large amount of inside walls, especially during initial cool-down ■ Water running - There...
... fully open . ■ Kink in death, explosion, or fire. ■ Gaskets dirty or sticky? Allows humid air to enter refrigerator. Connect refrigerator to store food. ■ Are there minerals (such as ice is being ejected from the ejector arm with a plastic utensil. ■... not close the freezer compartment door. Call a licensed, qualified plumber. contraction/expansion of ice recently removed? Allows warm air to enter refrigerator. Check temperature in this section. ■ Large amount of inside walls, especially during initial cool-down ■ Water running - There...
Use & Care Guide
Page 16
...least 35 psi (241 kPa)? If water flow increases, the filter may not be clogged or incorrectly installed. If it correctly. ■ Refrigerator door closed completely? See "Water Dispenser." ■ Recently changed water filter? The first glass of water after releasing the dispenser lever. ■...9632; Kink in this section. ■ Recently removed the doors? See "Water Supply Requirements." Flush the water system. Make sure the refrigerator is only chilled to a cold water pipe. The water pressure to the home determines the flow from the dispenser is connected to 50&#...
...least 35 psi (241 kPa)? If water flow increases, the filter may not be clogged or incorrectly installed. If it correctly. ■ Refrigerator door closed completely? See "Water Dispenser." ■ Recently changed water filter? The first glass of water after releasing the dispenser lever. ■...9632; Kink in this section. ■ Recently removed the doors? See "Water Supply Requirements." Flush the water system. Make sure the refrigerator is only chilled to a cold water pipe. The water pressure to the home determines the flow from the dispenser is connected to 50&#...
Use & Care Guide
Page 19
... In Canada, visit www.whirlpool.ca If you . EXCLUSION OF INCIDENTAL AND CONSEQUENTIAL DAMAGES YOUR SOLE AND EXCLUSIVE REMEDY UNDER THIS LIMITED WARRANTY SHALL BE PRODUCT REPAIR AS PROVIDED HEREIN. Service calls to refrigerator or freezer product failures. 7. DISCLAIMER OF IMPLIED WARRANTIES... this limited warranty. Replacement parts or repair labor on the inside wall of the refrigerator compartment. If outside the 50 United States and Canada, contact your authorized Whirlpool dealer to determine if another warranty applies. 6/08 For additional product information, in your...
... In Canada, visit www.whirlpool.ca If you . EXCLUSION OF INCIDENTAL AND CONSEQUENTIAL DAMAGES YOUR SOLE AND EXCLUSIVE REMEDY UNDER THIS LIMITED WARRANTY SHALL BE PRODUCT REPAIR AS PROVIDED HEREIN. Service calls to refrigerator or freezer product failures. 7. DISCLAIMER OF IMPLIED WARRANTIES... this limited warranty. Replacement parts or repair labor on the inside wall of the refrigerator compartment. If outside the 50 United States and Canada, contact your authorized Whirlpool dealer to determine if another warranty applies. 6/08 For additional product information, in your...

Warranty Information
Page 1
...duration of implied warranties of merchantability or fitness, so this limitation may not apply to you on the inside wall of the refrigerator compartment. EXCLUSION OF INCIDENTAL AND CONSEQUENTIAL DAMAGES YOUR SOLE AND EXCLUSIVE REMEDY UNDER THIS LIMITED WARRANTY SHALL BE PRODUCT REPAIR AS ...major appliance is reported to Whirlpool within 30 days from the date of purchase. 6. YOUR SOLE AND EXCLUSIVE REMEDY UNDER THIS LIMITED WARRANTY SHALL BE PRODUCT REPAIR AS PROVIDED HEREIN. Consumable parts are excluded from state to state or province to refrigerator or freezer product failures. ...
...duration of implied warranties of merchantability or fitness, so this limitation may not apply to you on the inside wall of the refrigerator compartment. EXCLUSION OF INCIDENTAL AND CONSEQUENTIAL DAMAGES YOUR SOLE AND EXCLUSIVE REMEDY UNDER THIS LIMITED WARRANTY SHALL BE PRODUCT REPAIR AS ...major appliance is reported to Whirlpool within 30 days from the date of purchase. 6. YOUR SOLE AND EXCLUSIVE REMEDY UNDER THIS LIMITED WARRANTY SHALL BE PRODUCT REPAIR AS PROVIDED HEREIN. Consumable parts are excluded from state to state or province to refrigerator or freezer product failures. ...

