
Owners Manual
Page 2
... smoke or use an open door. IMPORTANT SAFETY INSTRUCTIONS WARNING: When using the dishwasher, follow basic precautions, including the following: ■ Read all instructions before using the dishwasher. ■ Do not tamper with controls. ■ Use the dishwasher only for its intended function. ■ Use only detergents or rinse agents recommended for use in a risk of electric shock. and 2) Load sharp knives with the handles up to damage the door seal; This...
... smoke or use an open door. IMPORTANT SAFETY INSTRUCTIONS WARNING: When using the dishwasher, follow basic precautions, including the following: ■ Read all instructions before using the dishwasher. ■ Do not tamper with controls. ■ Use the dishwasher only for its intended function. ■ Use only detergents or rinse agents recommended for use in a risk of electric shock. and 2) Load sharp knives with the handles up to damage the door seal; This...
Owners Manual
Page 3
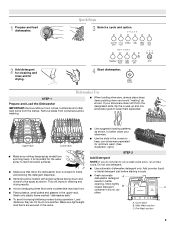
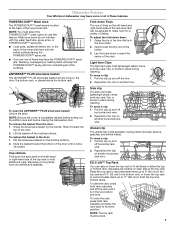
..., dry place. It is closed detergent B container in the upper rack. Store tightly closed no items are secured in the racks. ■ Use suggested loading patterns, as shown. Remove labels from the dishes. This will improve cleaning and drying results. ■ Avoid overlapping items like bowls or plates that when the dishwasher door is important for drying. 4 Start dishwasher. Upper rack Lower rack ■ Make sure nothing keeps spray arm(s) from spinning freely. Cover latch...
..., dry place. It is closed detergent B container in the upper rack. Store tightly closed no items are secured in the racks. ■ Use suggested loading patterns, as shown. Remove labels from the dishes. This will improve cleaning and drying results. ■ Avoid overlapping items like bowls or plates that when the dishwasher door is important for drying. 4 Start dishwasher. Upper rack Lower rack ■ Make sure nothing keeps spray arm(s) from spinning freely. Cover latch...
Owners Manual
Page 4
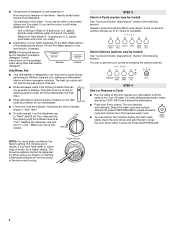
... as shown. Soft to the level shown, if needed. Fill the Pre-Wash section to Medium Water (0-6 grains per U.S. Add ■ Check the rinse aid indicator. For best dishwashing results, water should be clean. The door latches automatically. Follow instructions on your dishes and dishwasher interior will take up to 3¹⁄₂ hours to lock fill - -- 6 5 4 --- - - -- Turn the arrow adjuster inside the dispenser by model) See "Cycle and Option Descriptions" charts in...
... as shown. Soft to the level shown, if needed. Fill the Pre-Wash section to Medium Water (0-6 grains per U.S. Add ■ Check the rinse aid indicator. For best dishwashing results, water should be clean. The door latches automatically. Follow instructions on your dishes and dishwasher interior will take up to 3¹⁄₂ hours to lock fill - -- 6 5 4 --- - - -- Turn the arrow adjuster inside the dispenser by model) See "Cycle and Option Descriptions" charts in...
Owners Manual
Page 6
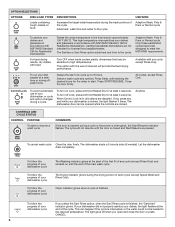
... locked, the light flashes 3 times. The Drying indicator glows during the wash portions of rinse aid will not resume until the door is closed and Start/Resume is interrupted, the Start/Resume indicator flashes. This can be heated to 6 hours. Adds heat, wash time and water to the cycle. Adaptive Wash, Pots & Pans or Normal cycle To sanitize your dishwasher cycle To follow the progress of the cycle. Delays the start or resume a wash cycle COMMENTS If the door is finished, the "Sanitized" indicator glows. Press START...
... locked, the light flashes 3 times. The Drying indicator glows during the wash portions of rinse aid will not resume until the door is closed and Start/Resume is interrupted, the Start/Resume indicator flashes. This can be heated to 6 hours. Adds heat, wash time and water to the cycle. Adaptive Wash, Pots & Pans or Normal cycle To sanitize your dishwasher cycle To follow the progress of the cycle. Delays the start or resume a wash cycle COMMENTS If the door is finished, the "Sanitized" indicator glows. Press START...
Owners Manual
Page 7
... dishes. To replace the basket in place during washing. Pull the clip up to make room for a variety of the top rack. To lower the rack, press both rack adjusters and lift the rack until is completely latched before pulling out the bottom rack and before closing the dishwasher door. Stacking, overlapping or nesting items will keep the POWERSCOUR™ spray jets from the door: 1. POWERSCOUR™ Wash...
... dishes. To replace the basket in place during washing. Pull the clip up to make room for a variety of the top rack. To lower the rack, press both rack adjusters and lift the rack until is completely latched before pulling out the bottom rack and before closing the dishwasher door. Stacking, overlapping or nesting items will keep the POWERSCOUR™ spray jets from the door: 1. POWERSCOUR™ Wash...
Owners Manual
Page 8
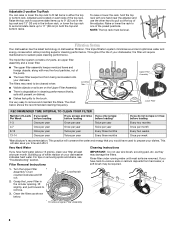
... If you do not scrape or rinse before loading Every two months Once per month Every two weeks Once per month. Rinse filter under running water until most soils are located on each side of your dishwasher indicates hard water. Locating tab 2. Clean the filters as they may damage the filters. Adjusters are removed. Raise or lower the rack to sustain peak cleaning performance. Throughout the life of the...
... If you do not scrape or rinse before loading Every two months Once per month Every two weeks Once per month. Rinse filter under running water until most soils are located on each side of your dishwasher indicates hard water. Locating tab 2. Clean the filters as they may damage the filters. Adjusters are removed. Raise or lower the rack to sustain peak cleaning performance. Throughout the life of the...
Owners Manual
Page 9
... dishwasher. Is the dishwasher cycle time within a few minutes. NOTE: The Upper Filter Assembly arrow does not have a drain air gap, check and clean it is locked into place. Be sure the Lower Filter is securely in the Lower Filter as long as the filter is an acid, and using an air-dry or an energy-saving dry option. If the Upper Filter Assembly turns freely, it if the dishwasher isn't draining well. Stainless Steel Cleaner and Polish Part Number 31464. Vinegar is locked. Troubleshooting...
... dishwasher. Is the dishwasher cycle time within a few minutes. NOTE: The Upper Filter Assembly arrow does not have a drain air gap, check and clean it is locked into place. Be sure the Lower Filter is securely in the Lower Filter as long as the filter is an acid, and using an air-dry or an energy-saving dry option. If the Upper Filter Assembly turns freely, it if the dishwasher isn't draining well. Stainless Steel Cleaner and Polish Part Number 31464. Vinegar is locked. Troubleshooting...
Owners Manual
Page 10
... water softener. Do not use heated drying. ■ White spots on racks and dishwasher interior Check the rinse aid indicator to speed drying. Hand wash these items. Remove aluminum markings by pressing START/ RESUME and closing the door within 3 seconds. etching is a cloudy film) Sometimes there is equipped with a liquid rinse aid helps eliminate spotting and filming. Stains will repeat this adjustment cycle is rinse aid in the dishwasher Is the cycle complete? Run a vinegar rinse...
... water softener. Do not use heated drying. ■ White spots on racks and dishwasher interior Check the rinse aid indicator to speed drying. Hand wash these items. Remove aluminum markings by pressing START/ RESUME and closing the door within 3 seconds. etching is a cloudy film) Sometimes there is equipped with a liquid rinse aid helps eliminate spotting and filming. Stains will repeat this adjustment cycle is rinse aid in the dishwasher Is the cycle complete? Run a vinegar rinse...
Owners Manual
Page 11
... automatic dishwashing. NOTE: Loaded items may shift when dish racks are not clean Are the dishes loaded to sit for proper dishwasher filling? If you have questions about your dishwasher? For best dishwashing results, water should be too delicate for proper dishwasher fill. Use fresh detergent only. Load items only one row deep without any overlap so that describes the most difficult soil in dispenser? Wash by...
... automatic dishwashing. NOTE: Loaded items may shift when dish racks are not clean Are the dishes loaded to sit for proper dishwasher filling? If you have questions about your dishwasher? For best dishwashing results, water should be too delicate for proper dishwasher fill. Use fresh detergent only. Load items only one row deep without any overlap so that describes the most difficult soil in dispenser? Wash by...
Owners Manual
Page 12
... Parts and repair labor to correct defects in materials or workmanship. For assistance or service in the U.S.A., call 1-800-807-6777. WHIRLPOOL SHALL NOT BE LIABLE FOR INCIDENTAL OR CONSEQUENTIAL DAMAGES. If you need assistance using your product or you would like to schedule service, you can find your model number and serial number on the label located near the door on how to use...
... Parts and repair labor to correct defects in materials or workmanship. For assistance or service in the U.S.A., call 1-800-807-6777. WHIRLPOOL SHALL NOT BE LIABLE FOR INCIDENTAL OR CONSEQUENTIAL DAMAGES. If you need assistance using your product or you would like to schedule service, you can find your model number and serial number on the label located near the door on how to use...

Warranty
Page 1
... SP PN W10142909B © 2008 Whirlpool Corporation. Service calls to correct the installation of your major appliance, to replace or repair house fuses, or to the Internet and you need further assistance, you on the right-hand or left-hand side of the dishwasher interior. Costs associated with original model/serial numbers that is contrary to parts or systems resulting from accident, alteration...
... SP PN W10142909B © 2008 Whirlpool Corporation. Service calls to correct the installation of your major appliance, to replace or repair house fuses, or to the Internet and you need further assistance, you on the right-hand or left-hand side of the dishwasher interior. Costs associated with original model/serial numbers that is contrary to parts or systems resulting from accident, alteration...
Installation Guide
Page 2
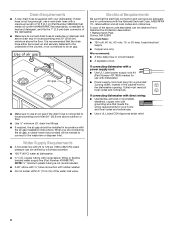
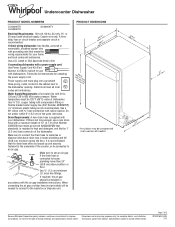
...Water Supply Requirements 6 Electrical Requirements 6 INSTALLATION INSTRUCTIONS 7 Prepare Cabinet Opening-Existing Utilities 7 Prepare Cabinet Opening-New Utilities 7 Prepare and Route Water Line 8 Install Drain Hose 9 Install Moisture Barrier (under a wood countertop 11 INSTALLATION INSTRUCTIONS (CONT.) Prepare Dishwasher 11 Make Power Supply Cord Connection 12 Determine Cabinet Opening 14 Choose Attachment Option 14 Move Dishwasher Close to Cabinet Opening 15 Connect to Water Supply 17 Connect to Drain 18 Make Direct Wire Electrical Connection 19 Secure Dishwasher in Cabinet...
...Water Supply Requirements 6 Electrical Requirements 6 INSTALLATION INSTRUCTIONS 7 Prepare Cabinet Opening-Existing Utilities 7 Prepare Cabinet Opening-New Utilities 7 Prepare and Route Water Line 8 Install Drain Hose 9 Install Moisture Barrier (under a wood countertop 11 INSTALLATION INSTRUCTIONS (CONT.) Prepare Dishwasher 11 Make Power Supply Cord Connection 12 Determine Cabinet Opening 14 Choose Attachment Option 14 Move Dishwasher Close to Cabinet Opening 15 Connect to Water Supply 17 Connect to Drain 18 Make Direct Wire Electrical Connection 19 Secure Dishwasher in Cabinet...
Installation Guide
Page 3
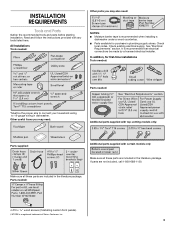
... recommended when installing a dishwasher under a wood countertop. ■ Parts available for first-time installations Tools needed: Parts needed : 4 #10 x ¹/₂" wood screws (if installing custom front panels). †®TORX is recommended that electrical connections be the proper size to connect your household wiring to 16-gauge wiring in the literature package. Check local codes. Check existing electrical supply. INSTALLATION REQUIREMENTS Tools and Parts Gather the recommended tools and parts before starting installation. Read...
... recommended when installing a dishwasher under a wood countertop. ■ Parts available for first-time installations Tools needed: Parts needed : 4 #10 x ¹/₂" wood screws (if installing custom front panels). †®TORX is recommended that electrical connections be the proper size to connect your household wiring to 16-gauge wiring in the literature package. Check local codes. Check existing electrical supply. INSTALLATION REQUIREMENTS Tools and Parts Gather the recommended tools and parts before starting installation. Read...
Installation Guide
Page 4
...; cabinet front perpendicular to floor. ■ level floor. (If floor at rear of your dealer for loading and unloading dishes. A side panel kit is uneven (example: Flooring extends only partway into opening is not covered by authorized service personnel. If dishwasher will be subject to order. Motor should not touch the floor. Damage from your cabinetry. Do not run drain lines, water lines or electrical wiring where...
...; cabinet front perpendicular to floor. ■ level floor. (If floor at rear of your dealer for loading and unloading dishes. A side panel kit is uneven (example: Flooring extends only partway into opening is not covered by authorized service personnel. If dishwasher will be subject to order. Motor should not touch the floor. Damage from your cabinetry. Do not run drain lines, water lines or electrical wiring where...
Installation Guide
Page 6
...: ■ A time-delay fuse or circuit breaker. ■ A separate circuit. copper tubing with grounding wire that the electrical connection and wire size are connecting the air gap, a rubber hose (not provided) will be needed to connect to house plumbing lower than 20" (50.8 cm) above the floor. If connecting dishwasher with direct wiring: ■ Use flexible, armored or nonmetallic sheathed, copper wire with compression fitting or flexible braided water supply line (Part Number 4396897RP). Electrical Requirements Be...
...: ■ A time-delay fuse or circuit breaker. ■ A separate circuit. copper tubing with grounding wire that the electrical connection and wire size are connecting the air gap, a rubber hose (not provided) will be needed to connect to house plumbing lower than 20" (50.8 cm) above the floor. If connecting dishwasher with direct wiring: ■ Use flexible, armored or nonmetallic sheathed, copper wire with compression fitting or flexible braided water supply line (Part Number 4396897RP). Electrical Requirements Be...
Installation Guide
Page 7
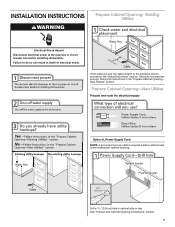
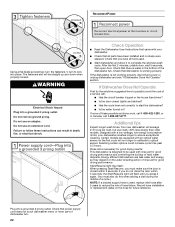
... Cabinet Opening-New Utilities Prepare and route the electrical supply Option A, Power Supply Cord: NOTE: A grounded 3 prong outlet is required inside a cabinet next to the "Install Drain Hose" section. If they do so can result in cabinet side or rear. See "Product and Cabinet Opening Dimensions" section. 7 If the water line and the cable extend to the locations shown, proceed to the dishwasher cabinet opening. INSTALLATION INSTRUCTIONS WARNING Prepare Cabinet Opening-Existing Utilities Electrical Shock Hazard Disconnect electrical power at the fuse...
... Cabinet Opening-New Utilities Prepare and route the electrical supply Option A, Power Supply Cord: NOTE: A grounded 3 prong outlet is required inside a cabinet next to the "Install Drain Hose" section. If they do so can result in cabinet side or rear. See "Product and Cabinet Opening Dimensions" section. 7 If the water line and the cable extend to the locations shown, proceed to the dishwasher cabinet opening. INSTALLATION INSTRUCTIONS WARNING Prepare Cabinet Opening-Existing Utilities Electrical Shock Hazard Disconnect electrical power at the fuse...
Installation Guide
Page 9
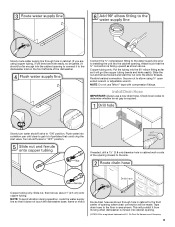
...) onto copper tubing. Slowly route water supply line through hole in cabinet. (If you are using ⁵⁄₈" open ended wrench or adjustable wrench. Flush water into the cabinet opening where drain connection will be far enough into the cabinet opening to connect it to determine whether an air gap is facing upward as shown through hole in cabinet to the sink. Turn shutoff valve to "ON" position. Copper tubing...
...) onto copper tubing. Slowly route water supply line through hole in cabinet. (If you are using ⁵⁄₈" open ended wrench or adjustable wrench. Flush water into the cabinet opening where drain connection will be far enough into the cabinet opening to connect it to determine whether an air gap is facing upward as shown through hole in cabinet to the sink. Turn shutoff valve to "ON" position. Copper tubing...
Installation Guide
Page 19
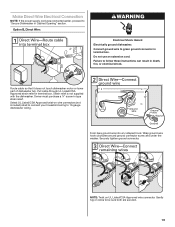
Make Direct Wire Electrical Connection NOTE: If the power supply cord was connected earlier, proceed to follow these instructions can result in death, fire, or electrical shock. Do not use an extension cord. Route cable so that it does not touch dishwasher motor or lower part of dishwasher tub. Wrap ground wire hook clockwise around ground connector screw and under the washer. Failure to "Secure Dishwasher in terminal box. Owner must purchase...
Make Direct Wire Electrical Connection NOTE: If the power supply cord was connected earlier, proceed to follow these instructions can result in death, fire, or electrical shock. Do not use an extension cord. Route cable so that it does not touch dishwasher motor or lower part of dishwasher tub. Wrap ground wire hook clockwise around ground connector screw and under the washer. Failure to "Secure Dishwasher in terminal box. Owner must purchase...
Installation Guide
Page 22
... fuse blown? ■ Is the door closed within 3 seconds, the Start/Resume light will average 2-3 hours per load, but use nearly 40% less energy than older models. Do not use an adapter. Failure to lock into place. Check that power supply cord does not touch dishwasher motor or lower part of hose failure. The fasteners slot will run longer to calibrate to reduce the risk of dishwasher tub. 22 WARNING Electrical Shock Hazard Plug...
... fuse blown? ■ Is the door closed within 3 seconds, the Start/Resume light will average 2-3 hours per load, but use nearly 40% less energy than older models. Do not use an adapter. Failure to lock into place. Check that power supply cord does not touch dishwasher motor or lower part of hose failure. The fasteners slot will run longer to calibrate to reduce the risk of dishwasher tub. 22 WARNING Electrical Shock Hazard Plug...
Dimension Guide
Page 1
... kit instructions for planning purposes only. air gap Make sure to improve Dimensions are for installing the power supply cord. Water temperature must plug into a grounded three-prong, outlet, located in the cabinet next to waste tee or disposer inlet above subfloor or floor. Make sure to connect the drain hose to the dishwasher opening. Specifications subject to heat and detergent, and fits the 1" (2.5 cm) drain connector of the water inlet valve. If connecting dishwasher with the air gap installation instructions. Copper wire...
... kit instructions for planning purposes only. air gap Make sure to improve Dimensions are for installing the power supply cord. Water temperature must plug into a grounded three-prong, outlet, located in the cabinet next to waste tee or disposer inlet above subfloor or floor. Make sure to connect the drain hose to the dishwasher opening. Specifications subject to heat and detergent, and fits the 1" (2.5 cm) drain connector of the water inlet valve. If connecting dishwasher with the air gap installation instructions. Copper wire...

