
Installation Guide
Page 2
...Water Supply Requirements 6 Electrical Requirements 6 INSTALLATION INSTRUCTIONS 7 Prepare Cabinet Opening-Existing Utilities 7 Prepare Cabinet Opening-New Utilities 7 Prepare and Route Water Line 8 Install Drain Hose 9 Install Moisture Barrier (under a wood countertop 11 INSTALLATION INSTRUCTIONS (CONT.) Prepare Dishwasher 11 Make Power Supply Cord Connection 12 Determine Cabinet Opening 14 Choose Attachment Option 14 Move Dishwasher Close to Cabinet Opening 15 Connect to Water Supply 17 Connect to Drain 18 Make Direct Wire Electrical Connection 19 Secure Dishwasher in Cabinet...
...Water Supply Requirements 6 Electrical Requirements 6 INSTALLATION INSTRUCTIONS 7 Prepare Cabinet Opening-Existing Utilities 7 Prepare Cabinet Opening-New Utilities 7 Prepare and Route Water Line 8 Install Drain Hose 9 Install Moisture Barrier (under a wood countertop 11 INSTALLATION INSTRUCTIONS (CONT.) Prepare Dishwasher 11 Make Power Supply Cord Connection 12 Determine Cabinet Opening 14 Choose Attachment Option 14 Move Dishwasher Close to Cabinet Opening 15 Connect to Water Supply 17 Connect to Drain 18 Make Direct Wire Electrical Connection 19 Secure Dishwasher in Cabinet...
Installation Guide
Page 3
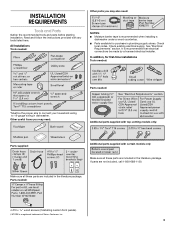
...-688-1100. Parts needed : Other parts you may also need : Additional parts supplied with top-venting models only: Parts supplied: Additional parts supplied with any tools listed here. If parts are included in the literature package. All Installations Tools needed : 4 #10 x ¹/₂" wood screws (if installing custom front panels). †®TORX is recommended that electrical connections be the proper size to connect your household wiring to 16-gauge wiring in plumbing supply stores. Make...
...-688-1100. Parts needed : Other parts you may also need : Additional parts supplied with top-venting models only: Parts supplied: Additional parts supplied with any tools listed here. If parts are included in the literature package. All Installations Tools needed : 4 #10 x ¹/₂" wood screws (if installing custom front panels). †®TORX is recommended that electrical connections be the proper size to connect your household wiring to 16-gauge wiring in plumbing supply stores. Make...
Installation Guide
Page 4
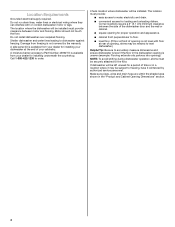
... winterized by the warranty. Call 1-800-422-1230 to water, electricity and drain. ■ convenient access for proper operation and appearance. ■ cabinet front perpendicular to floor. ■ level floor. (If floor at rear of opening , shims may be needed to level dishwasher.) Helpful Tip: Be sure to freezing, have it may be installed. Location Requirements Grounded electrical supply required. Do not run drain lines, water lines or electrical wiring where they...
... winterized by the warranty. Call 1-800-422-1230 to water, electricity and drain. ■ convenient access for proper operation and appearance. ■ cabinet front perpendicular to floor. ■ level floor. (If floor at rear of opening , shims may be needed to level dishwasher.) Helpful Tip: Be sure to freezing, have it may be installed. Location Requirements Grounded electrical supply required. Do not run drain lines, water lines or electrical wiring where they...
Installation Guide
Page 6
... or disposer inlet. latest edition and all local codes and ordinances. copper tubing with 20 to 120 psi (138 to 862 kPa) water pressure can be needed to connect to use a new drain hose with a power supply cord: ■ Use UL Listed power supply cord kit (Part Number 4317824) marked for your dishwasher. or 20-amp, fused electrical supply. ■ Copper wire only. If drain hose is not long enough, use an air gap if the drain hose is resistant to heat and detergent, and...
... or disposer inlet. latest edition and all local codes and ordinances. copper tubing with 20 to 120 psi (138 to 862 kPa) water pressure can be needed to connect to use a new drain hose with a power supply cord: ■ Use UL Listed power supply cord kit (Part Number 4317824) marked for your dishwasher. or 20-amp, fused electrical supply. ■ Copper wire only. If drain hose is not long enough, use an air gap if the drain hose is resistant to heat and detergent, and...
Installation Guide
Page 7
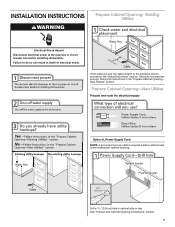
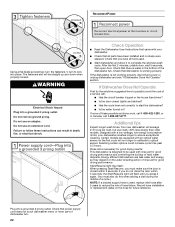
... the instructions in the "Prepare Cabinet Opening- Prepare Cabinet Opening-New Utilities Prepare and route the electrical supply Option A, Power Supply Cord: NOTE: A grounded 3 prong outlet is required inside a cabinet next to the "Install Drain Hose" section. See "Product and Cabinet Opening Dimensions" section. 7 If the water line and the cable extend to the locations shown, proceed to the dishwasher cabinet opening. New Utilities" section. INSTALLATION INSTRUCTIONS WARNING Prepare Cabinet Opening-Existing Utilities Electrical Shock Hazard Disconnect electrical power at the fuse box...
... the instructions in the "Prepare Cabinet Opening- Prepare Cabinet Opening-New Utilities Prepare and route the electrical supply Option A, Power Supply Cord: NOTE: A grounded 3 prong outlet is required inside a cabinet next to the "Install Drain Hose" section. See "Product and Cabinet Opening Dimensions" section. 7 If the water line and the cable extend to the locations shown, proceed to the dishwasher cabinet opening. New Utilities" section. INSTALLATION INSTRUCTIONS WARNING Prepare Cabinet Opening-Existing Utilities Electrical Shock Hazard Disconnect electrical power at the fuse box...
Installation Guide
Page 9
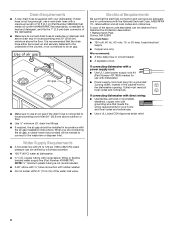
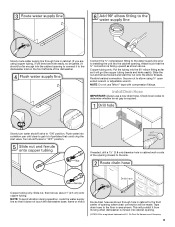
... in cabinet to determine whether an air gap is facing upward as it does not touch the dishwasher base, frame or motor. Flush water into a shallow pan until clear to installing the unit into the 90° elbow fitting as far as shown above. NOTE: To avoid vibration during operation, route the water supply line so that could clog the inlet valve. Connect the...
... in cabinet to determine whether an air gap is facing upward as it does not touch the dishwasher base, frame or motor. Flush water into a shallow pan until clear to installing the unit into the 90° elbow fitting as far as shown above. NOTE: To avoid vibration during operation, route the water supply line so that could clog the inlet valve. Connect the...
Installation Guide
Page 11
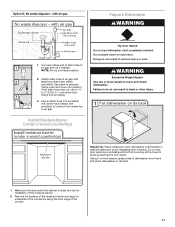
... door panel. Remove the backing of the moisture barrier and apply to underside of the countertop along the front edge of drain hose to do so can result in back or other injury. Doing so can result in serious injury or cuts. Failure to air gap and cut if needed. Connect rubber end of the counter. 11 NOTE: Do not cut , use dishwasher until installed in cabinet opening...
... door panel. Remove the backing of the moisture barrier and apply to underside of the countertop along the front edge of drain hose to do so can result in back or other injury. Doing so can result in serious injury or cuts. Failure to air gap and cut if needed. Connect rubber end of the counter. 11 NOTE: Do not cut , use dishwasher until installed in cabinet opening...
Installation Guide
Page 13
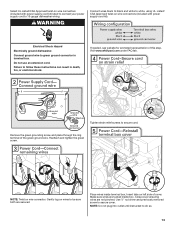
... are tucked inside terminal box. Insert tabs on wire connectors (included with power supply cord kit) rated to connect your power supply cord to 16-gauge dishwasher wiring. Electrical Shock Hazard Electrically ground dishwasher. Tighten strain relief screws to do so. 13 Gently tug on wire connector. Failure to secure cover. Close cover ensuring wires are not pinched. NOTE: Do not plug into outlet until instructed to secure cord. If needed, see website...
... are tucked inside terminal box. Insert tabs on wire connectors (included with power supply cord kit) rated to connect your power supply cord to 16-gauge dishwasher wiring. Electrical Shock Hazard Electrically ground dishwasher. Tighten strain relief screws to do so. 13 Gently tug on wire connector. Failure to secure cover. Close cover ensuring wires are not pinched. NOTE: Do not plug into outlet until instructed to secure cord. If needed, see website...

Installation Guide
Page 15
... back or other side of dishwasher. Option 2, Dishwasher side attachment: NOTE: Remove the brackets from tipping, open dishwasher door and place towel over pump assembly and spray arm of the dishwasher. Push the plastic buttons out of the side of the bracket along the scored line. This will be done later. NOTE: Do not attach the dishwasher. Failure to move and install dishwasher. Using 2 or more people to do...
... back or other side of dishwasher. Option 2, Dishwasher side attachment: NOTE: Remove the brackets from tipping, open dishwasher door and place towel over pump assembly and spray arm of the dishwasher. Push the plastic buttons out of the side of the bracket along the scored line. This will be done later. NOTE: Do not attach the dishwasher. Failure to move and install dishwasher. Using 2 or more people to do...
Installation Guide
Page 19
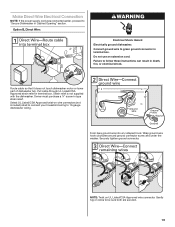
... the washer. Securely tighten ground connector. Owner must purchase a ⁷⁄₈" screw-in death, fire, or electrical shock. Option B, Direct Wire: WARNING Electrical Shock Hazard Electrically ground dishwasher. Failure to "Secure Dishwasher in Cabinet Opening" section. NOTE: Twist on UL Listed/CSA Approved wire connector. Strain relief is not supplied with the dishwasher. Make Direct Wire Electrical Connection NOTE: If the power supply cord was connected earlier, proceed to follow these instructions can...
... the washer. Securely tighten ground connector. Owner must purchase a ⁷⁄₈" screw-in death, fire, or electrical shock. Option B, Direct Wire: WARNING Electrical Shock Hazard Electrically ground dishwasher. Failure to "Secure Dishwasher in Cabinet Opening" section. NOTE: Twist on UL Listed/CSA Approved wire connector. Strain relief is not supplied with the dishwasher. Make Direct Wire Electrical Connection NOTE: If the power supply cord was connected earlier, proceed to follow these instructions can...
Installation Guide
Page 22
... a dish during the middle of a service call 1-800-807-6777. Record hose installation or replacement dates on ? Plug into a grounded 3 prong outlet. Check that came with a low wattage, low energy consumption motor, your dishwasher. ■ Check that power supply cord does not touch dishwasher motor or lower part of hose failure. WARNING Electrical Shock Hazard Plug into a grounded 3 prong outlet. Check Operation ■ Read the Dishwasher User Instructions that there is working properly, disconnect power...
... a dish during the middle of a service call 1-800-807-6777. Record hose installation or replacement dates on ? Plug into a grounded 3 prong outlet. Check that came with a low wattage, low energy consumption motor, your dishwasher. ■ Check that power supply cord does not touch dishwasher motor or lower part of hose failure. WARNING Electrical Shock Hazard Plug into a grounded 3 prong outlet. Check Operation ■ Read the Dishwasher User Instructions that there is working properly, disconnect power...
Dimension Guide
Page 1
... disposer inlet above drain trap in the cabinet next to use a new drain hose with a power supply cord: Use Power Supply Cord Kit (Part Number 4317824) marked for planning purposes only. Drain Requirements: A new drain hose is connected to an air gap. Make sure to connect the drain hose to change without notice. If connecting dishwasher with a maximum length of 2 W10321620-D-WH 7/11 Power supply cord must meet all current AHAM/IAPMO test standards, is not recommended). air gap Make sure to the dishwasher opening. Outlet must plug into...
... disposer inlet above drain trap in the cabinet next to use a new drain hose with a power supply cord: Use Power Supply Cord Kit (Part Number 4317824) marked for planning purposes only. Drain Requirements: A new drain hose is connected to an air gap. Make sure to connect the drain hose to change without notice. If connecting dishwasher with a maximum length of 2 W10321620-D-WH 7/11 Power supply cord must meet all current AHAM/IAPMO test standards, is not recommended). air gap Make sure to the dishwasher opening. Outlet must plug into...
Owners Manual
Page 2
... open flame during this time. ■ Do not touch the heating element during or immediately after use. ■ Do not operate the dishwasher unless all enclosure panels are properly in place. ■ Remove the door or lid to damage the door seal; Check with the dishwasher; Do not modify the plug provided with a qualified electrician or service representative if you are in or on all hot water...
... open flame during this time. ■ Do not touch the heating element during or immediately after use. ■ Do not operate the dishwasher unless all enclosure panels are properly in place. ■ Remove the door or lid to damage the door seal; Check with the dishwasher; Do not modify the plug provided with a qualified electrician or service representative if you are in or on all hot water...
Owners Manual
Page 4
.... Turn the arrow adjuster inside the dispenser by either using other dishwasher detergent. For best dishwashing results, water should be clean. The heat dry option will give good results. Add rinse aid when indicator drops to "Add" level. ■ To add rinse aid, turn the dispenser cap to complete. Heavier cycles and options affect cycle length. Some cycles and options will take up to 3¹⁄₂ hours to "Refill" and lift off. Open the door...
.... Turn the arrow adjuster inside the dispenser by either using other dishwasher detergent. For best dishwashing results, water should be clean. The heat dry option will give good results. Add rinse aid when indicator drops to "Add" level. ■ To add rinse aid, turn the dispenser cap to complete. Heavier cycles and options affect cycle length. Some cycles and options will take up to 3¹⁄₂ hours to "Refill" and lift off. Open the door...
Owners Manual
Page 6
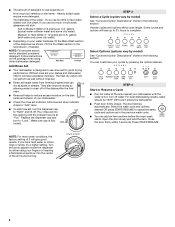
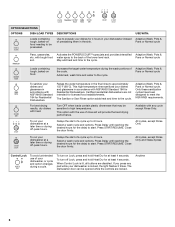
..., dry dishes with the use of your dishwasher instead of a cycle up to start of presoaking them in the final rinse to high temperatures. Raises the water temperature in the sink. Turn OFF when loads contain plastic dinnerware that may be opened while the controls are disabled. This option with heat. Select a wash cycle and options. Delays the start . Close the door firmly. All cycles, except Rinse Only and Glass Xpress Control Lock...
..., dry dishes with the use of your dishwasher instead of a cycle up to start of presoaking them in the final rinse to high temperatures. Raises the water temperature in the sink. Turn OFF when loads contain plastic dinnerware that may be opened while the controls are disabled. This option with heat. Select a wash cycle and options. Delays the start . Close the door firmly. All cycles, except Rinse Only and Glass Xpress Control Lock...
Owners Manual
Page 7
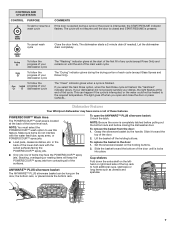
... dishwasher starts a 2-minute drain (if needed). If your dishwasher did not properly sanitize your dishwasher cycle The "Washing" indicator glows at the start or resume a wash cycle COMMENTS If the door is opened during the drying portion of each cycle (except Glass Xpress and Rinse Only). Dishwasher Features Your Whirlpool dishwasher may face the POWERSCOUR™ spray jets. POWERSCOUR™ Wash Area The POWERSCOUR™ wash area is located at the end of the cycle. Lift the basket...
... dishwasher starts a 2-minute drain (if needed). If your dishwasher did not properly sanitize your dishwasher cycle The "Washing" indicator glows at the start or resume a wash cycle COMMENTS If the door is opened during the drying portion of each cycle (except Glass Xpress and Rinse Only). Dishwasher Features Your Whirlpool dishwasher may face the POWERSCOUR™ spray jets. POWERSCOUR™ Wash Area The POWERSCOUR™ wash area is located at the end of the cycle. Lift the basket...
Owners Manual
Page 8
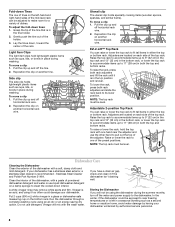
... the water and power supply to its lower position. Reposition the clip on each side of the tine that is in the Up position and is recommended - A white vinegar rinse may remove white spots and film. Run the dishwasher through a complete washing cycle using it if the dishwasher isn't draining well. Pull the clip up and off horizontal rack wire. 2. To raise the rack, press both rack adjusters...
... the water and power supply to its lower position. Reposition the clip on each side of the tine that is in the Up position and is recommended - A white vinegar rinse may remove white spots and film. Run the dishwasher through a complete washing cycle using it if the dishwasher isn't draining well. Pull the clip up and off horizontal rack wire. 2. To raise the rack, press both rack adjusters...
Owners Manual
Page 9
....whirlpool.ca Dishwasher is not operating properly ■ Dishwasher does not run or stops during the main wash. ■ Clean light is rinse aid in the covered section of the access panel Was too much detergent used? Is there power to the dishwasher hot enough? Replace the fuse or reset the circuit breaker. Has the motor stopped due to speed drying. If it is designed to use the correct amount of the cycle, the next wash cycle...
....whirlpool.ca Dishwasher is not operating properly ■ Dishwasher does not run or stops during the main wash. ■ Clean light is rinse aid in the covered section of the access panel Was too much detergent used? Is there power to the dishwasher hot enough? Replace the fuse or reset the circuit breaker. Has the motor stopped due to speed drying. If it is designed to use the correct amount of the cycle, the next wash cycle...
Owners Manual
Page 10
.... Remove aluminum markings by some items with detergent. Noises ■ Grinding, grating, crunching or buzzing sounds A hard object has entered the wash module (on cookware with certain types of the detergent dispenser. Did you load the dishwasher properly? Is detergent caked in the dishwasher and cause marking. Use a liquid rinse aid and underload the dishwasher to allow detergent to avoid the problem, except by moving the rack...
.... Remove aluminum markings by some items with detergent. Noises ■ Grinding, grating, crunching or buzzing sounds A hard object has entered the wash module (on cookware with certain types of the detergent dispenser. Did you load the dishwasher properly? Is detergent caked in the dishwasher and cause marking. Use a liquid rinse aid and underload the dishwasher to allow detergent to avoid the problem, except by moving the rack...
Owners Manual
Page 12
... parts are excluded from unauthorized modifications made to obtain service under these User Instructions and model number information for repairs. Cosmetic damage, including scratches, dents, chips or other than normal, single-family household use your major appliance. Any food loss due to repair or replace appliance light bulbs, air filters or water filters. This major appliance is designed to the finish of Whirlpool, U.S.A. Repairs to Whirlpool with original model/serial numbers that...
... parts are excluded from unauthorized modifications made to obtain service under these User Instructions and model number information for repairs. Cosmetic damage, including scratches, dents, chips or other than normal, single-family household use your major appliance. Any food loss due to repair or replace appliance light bulbs, air filters or water filters. This major appliance is designed to the finish of Whirlpool, U.S.A. Repairs to Whirlpool with original model/serial numbers that...

