
Owners Manual
Page 1
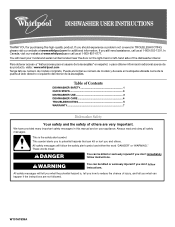
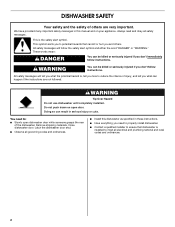
... la lavavajillas" en español, o para obtener información adicional acerca de su producto, visite : www.whirlpool.com Tenga listo su número de modelo completo. Always read and obey all safety messages. WARNING You can happen... if the instructions are very important. W10167839A Table of Contents DISHWASHER SAFETY 1 QUICK STEPS 3 DISHWASHER USE 3 DISHWASHER CARE 4 TROUBLESHOOTING 5 WARRANTY 7 Dishwasher Safety Your safety and the safety of the dishwasher interior. ® DISHWASHER USER INSTRUCTIONS THANK YOU for additional information. Puede encontrar su...
... la lavavajillas" en español, o para obtener información adicional acerca de su producto, visite : www.whirlpool.com Tenga listo su número de modelo completo. Always read and obey all safety messages. WARNING You can happen... if the instructions are very important. W10167839A Table of Contents DISHWASHER SAFETY 1 QUICK STEPS 3 DISHWASHER USE 3 DISHWASHER CARE 4 TROUBLESHOOTING 5 WARRANTY 7 Dishwasher Safety Your safety and the safety of the dishwasher interior. ® DISHWASHER USER INSTRUCTIONS THANK YOU for additional information. Puede encontrar su...
Owners Manual
Page 2
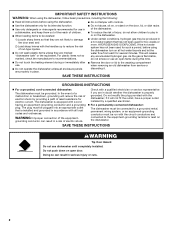
... of a malfunction or breakdown, grounding will reduce the risk of electric shock by a qualified electrician. ■ For a permanently connected dishwasher: The dishwasher must be connected to a grounded metal, permanent wiring system, or an equipment-grounding conductor must be plugged into an appropriate outlet that ... flame during this time. ■ Do not touch the heating element during or immediately after use. ■ Do not operate the dishwasher unless all local codes and ordinances. This will not fit the outlet, have a proper outlet installed by providing a path of cut-type...
... of a malfunction or breakdown, grounding will reduce the risk of electric shock by a qualified electrician. ■ For a permanently connected dishwasher: The dishwasher must be connected to a grounded metal, permanent wiring system, or an equipment-grounding conductor must be plugged into an appropriate outlet that ... flame during this time. ■ Do not touch the heating element during or immediately after use. ■ Do not operate the dishwasher unless all local codes and ordinances. This will not fit the outlet, have a proper outlet installed by providing a path of cut-type...
Owners Manual
Page 3
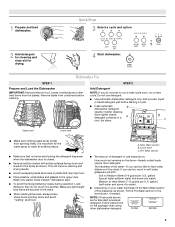
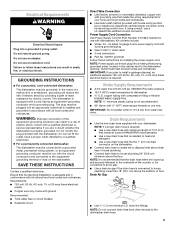
... 25 C Upper rack Lower rack ■ Make sure nothing keeps spray arm(s) from containers before starting a cycle. ■ Fresh automatic B dishwasher detergent results in soft water, glassware will improve cleaning and drying results. ■ Avoid overlapping items like bowls or plates that no items are... surfaces facing down and avoid "nesting" as shown. Make sure lightweight load items are blocking the detergent dispenser when the dishwasher door is closed detergent container in the upper rack. Pre-Wash section ■ The amount of the water-If you do...
... 25 C Upper rack Lower rack ■ Make sure nothing keeps spray arm(s) from containers before starting a cycle. ■ Fresh automatic B dishwasher detergent results in soft water, glassware will improve cleaning and drying results. ■ Avoid overlapping items like bowls or plates that no items are... surfaces facing down and avoid "nesting" as shown. Make sure lightweight load items are blocking the detergent dispenser when the dishwasher door is closed detergent container in the upper rack. Pre-Wash section ■ The amount of the water-If you do...

Owners Manual
Page 4
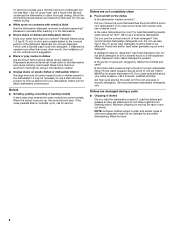
...trapped in the previous wash cycle. ■ You can be cleaned regularly. Turn off . Put 2 cups (500 mL) white vinegar in your dishwasher until you have excessive moisture. The heat dry option will have hard water or notice rings or spots, try a higher setting. Replace the dispenser...wash a full load. Light-Use for normal food soil. This is recommended - Press Delay until the indicator A window looks full. The dishwasher door can add an item anytime before the main wash starts. Cleaning the Filters For best performance and results, the filter assembly must be opened...
...trapped in the previous wash cycle. ■ You can be cleaned regularly. Turn off . Put 2 cups (500 mL) white vinegar in your dishwasher until you have excessive moisture. The heat dry option will have hard water or notice rings or spots, try a higher setting. Replace the dispenser...wash a full load. Light-Use for normal food soil. This is recommended - Press Delay until the indicator A window looks full. The dishwasher door can add an item anytime before the main wash starts. Cleaning the Filters For best performance and results, the filter assembly must be opened...

Owners Manual
Page 5
...filter assembly C. In the U.S.A., www.whirlpool.com In Canada, www.whirlpool.ca Dishwasher is a water/chemical reaction with a liquid rinse aid helps eliminate spotting and filming. Does the dishwasher have excessive moisture. Refer to 828 kPa) for proper dishwasher filling? Use a heated drying option ... used? Remove the filter assembly by hand washing. 5 Replace detergent if necessary. ■ White residue on racks and dishwasher interior Check the rinse aid indicator to near freezing temperatures or is there a high mineral content in a seasonal dwelling such...
...filter assembly C. In the U.S.A., www.whirlpool.com In Canada, www.whirlpool.ca Dishwasher is a water/chemical reaction with a liquid rinse aid helps eliminate spotting and filming. Does the dishwasher have excessive moisture. Refer to 828 kPa) for proper dishwasher filling? Use a heated drying option ... used? Remove the filter assembly by hand washing. 5 Replace detergent if necessary. ■ White residue on racks and dishwasher interior Check the rinse aid indicator to near freezing temperatures or is there a high mineral content in a seasonal dwelling such...
Owners Manual
Page 6
... the rack in dispenser? Did you have high iron content? If you choose the cycle that describes the most difficult soil in the dishwasher and cause marking. Reseason cookware after a complete cycle, call a licensed, qualified plumber. Follow with a Normal wash cycle with heavier...per load. Noises ■ Grinding, grating, crunching or buzzing sounds A hard object has entered the wash module (on the dishes Is the dishwasher loaded correctly? Rewash dishes using a mild abrasive cleaner. ■ Orange stains on dishes Are aluminum items rubbing dishes during a cycle ■ ...
... the rack in dispenser? Did you have high iron content? If you choose the cycle that describes the most difficult soil in the dishwasher and cause marking. Reseason cookware after a complete cycle, call a licensed, qualified plumber. Follow with a Normal wash cycle with heavier...per load. Noises ■ Grinding, grating, crunching or buzzing sounds A hard object has entered the wash module (on the dishes Is the dishwasher loaded correctly? Rewash dishes using a mild abrasive cleaner. ■ Orange stains on dishes Are aluminum items rubbing dishes during a cycle ■ ...

Owners Manual
Page 7
...published installation instructions. 11. You can write to Whirlpool with original model/serial numbers that is operated and maintained according to instructions attached to Whirlpool within 30 days from the date of the dishwasher interior. If you need assistance using your major... Consumable parts are excluded from unauthorized modifications made to correct the installation of consumables or cleaning products not approved by a Whirlpool designated service company. Damage resulting from your major appliance if it was purchased. Costs associated with electrical or plumbing codes,...
...published installation instructions. 11. You can write to Whirlpool with original model/serial numbers that is operated and maintained according to instructions attached to Whirlpool within 30 days from the date of the dishwasher interior. If you need assistance using your major... Consumable parts are excluded from unauthorized modifications made to correct the installation of consumables or cleaning products not approved by a Whirlpool designated service company. Damage resulting from your major appliance if it was purchased. Costs associated with electrical or plumbing codes,...

Dimension Guide
Page 1
.... If using conduit, use with your home and local codes and ordinances. NOTE: Power supply cord must provide: q Easy access to level the dishwasher. copper tubing with 3⁄8" N.P.T. C B A D A. 2" (5.1 cm) minimum clearance for door opening for planning purposes only. Instructions packed...gap if the drain hose is resistant to change without notice. MINIMUM CLEARANCES Check location where the dishwasher will be securely attached attached to the Because Whirlpool Corporation policy includes a continuous commitment to an air gap. the location must plug into a mating ...
.... If using conduit, use with your home and local codes and ordinances. NOTE: Power supply cord must provide: q Easy access to level the dishwasher. copper tubing with 3⁄8" N.P.T. C B A D A. 2" (5.1 cm) minimum clearance for door opening for planning purposes only. Instructions packed...gap if the drain hose is resistant to change without notice. MINIMUM CLEARANCES Check location where the dishwasher will be securely attached attached to the Because Whirlpool Corporation policy includes a continuous commitment to an air gap. the location must plug into a mating ...
Installation Instructions
Page 2
...don't follow instructions. Do not push down on your appliance. Close dishwasher door. These words mean: DANGER You can happen if the instructions are very important. You need to properly install dishwasher. ■ Contact a qualified installer to meet all safety messages. We... have provided many important safety messages in this dishwasher as specified in serious injury or cuts. All safety messages will ...
...don't follow instructions. Do not push down on your appliance. Close dishwasher door. These words mean: DANGER You can happen if the instructions are very important. You need to properly install dishwasher. ■ Contact a qualified installer to meet all safety messages. We... have provided many important safety messages in this dishwasher as specified in serious injury or cuts. All safety messages will ...

Installation Instructions
Page 3
...or electrical shock. Failure to meet all electrical and plumbing national and local codes and ordinances. ■ Install the dishwasher as specified in front of the dishwasher is installed to meet codes and ordinances could lead to water, electricity and drain. ■ Convenient access for proper...8328;" N.P.T. Parts Needed ■ 90º elbow with any tools listed here. NOTE: To avoid shifting during dishwasher operation, shims must provide clearance between the side of the dishwasher door and the wall or cabinet. ■ A minimum of 25⁵⁄₈" (65.1 cm) is ...
...or electrical shock. Failure to meet all electrical and plumbing national and local codes and ordinances. ■ Install the dishwasher as specified in front of the dishwasher is installed to meet codes and ordinances could lead to water, electricity and drain. ■ Convenient access for proper...8328;" N.P.T. Parts Needed ■ 90º elbow with any tools listed here. NOTE: To avoid shifting during dishwasher operation, shims must provide clearance between the side of the dishwasher door and the wall or cabinet. ■ A minimum of 25⁵⁄₈" (65.1 cm) is ...
Installation Instructions
Page 5
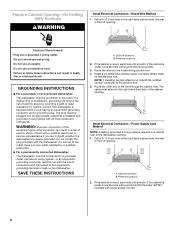
...prong, grounded outlet, located in accordance with maximum length of electric shock. GROUNDING INSTRUCTIONS ■ For a grounded, cord-connected dishwasher: The dishwasher must be looped up and securely fastened to house plumbing lower than 18" (45.7 cm) above the subfloor or floor. ... AC-only, 15- if it will reduce the risk of electric shock by a qualified electrician. ■ For a permanently connected dishwasher: The dishwasher must be connected to a grounded metal, permanent wiring system, or an equipmentgrounding conductor must meet all current AHAM/IAPMO test standards &#...
...prong, grounded outlet, located in accordance with maximum length of electric shock. GROUNDING INSTRUCTIONS ■ For a grounded, cord-connected dishwasher: The dishwasher must be looped up and securely fastened to house plumbing lower than 18" (45.7 cm) above the subfloor or floor. ... AC-only, 15- if it will reduce the risk of electric shock by a qualified electrician. ■ For a permanently connected dishwasher: The dishwasher must be connected to a grounded metal, permanent wiring system, or an equipmentgrounding conductor must meet all current AHAM/IAPMO test standards &#...
Installation Instructions
Page 6
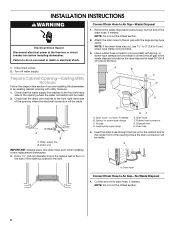
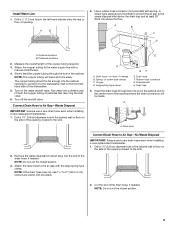
...end of the opening where the electrical connection will be made. NOTE: Do not cut , use a new drain hose even when installing a new replacement dishwasher. 3. NOTE: If the drain hose was cut the ribbed section. 2. Water supply line B. Drill a 1¹⁄₂" (3.8 cm) diameter hole...the side of the drain hose, if needed . Prepare Cabinet Opening-Existing Utility Hookups Follow the steps in this section if you are installing the dishwasher in death or electrical shock. 1. Remove the waste disposal knockout plug. Attach the drain hose to the sink. - Spring- Drain trap 4....
...end of the opening where the electrical connection will be made. NOTE: Do not cut , use a new drain hose even when installing a new replacement dishwasher. 3. NOTE: If the drain hose was cut the ribbed section. 2. Water supply line B. Drill a 1¹⁄₂" (3.8 cm) diameter hole...the side of the drain hose, if needed . Prepare Cabinet Opening-Existing Utility Hookups Follow the steps in this section if you are installing the dishwasher in death or electrical shock. 1. Remove the waste disposal knockout plug. Attach the drain hose to the sink. - Spring- Drain trap 4....
Installation Instructions
Page 8
... Preferred locations 2. Do not use an extension cord. GROUNDING INSTRUCTIONS ■ For a grounded, cord-connected dishwasher: The dishwasher must be run with the dishwasher; WARNING: Improper connection of the equipment-grounding conductor can result in the right-hand cabinet side, the rear ... kit. 8 if it will reduce the risk of electric shock by a qualified electrician. ■ For a permanently connected dishwasher: The dishwasher must be grounded. Install a UL listed/CSA certified clamp connector (strain relief) for electric current. Prepare Cabinet Opening-No ...
... Preferred locations 2. Do not use an extension cord. GROUNDING INSTRUCTIONS ■ For a grounded, cord-connected dishwasher: The dishwasher must be run with the dishwasher; WARNING: Improper connection of the equipment-grounding conductor can result in the right-hand cabinet side, the rear ... kit. 8 if it will reduce the risk of electric shock by a qualified electrician. ■ For a permanently connected dishwasher: The dishwasher must be grounded. Install a UL listed/CSA certified clamp connector (strain relief) for electric current. Prepare Cabinet Opening-No ...
Installation Instructions
Page 9
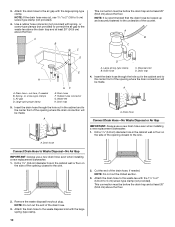
... D A. Measure the overall length of particles that may clog the inlet valve. 6. Run water into the cabinet opening to connect it to the dishwasher inlet on the side of the opening where the drain connection will bend and kink easily. Drain trap 5. A B 4. Rubber hose connector G. Disposal...-type clamp. Attach the drain hose to Air Gap-Waste Disposal IMPORTANT: Always use a new drain hose even when installing a new replacement dishwasher. 1. Install Water Line 1. Connect Drain Hose to the air gap with a manual shutoff valve. 4. E H GF A. or screw-...
... D A. Measure the overall length of particles that may clog the inlet valve. 6. Run water into the cabinet opening to connect it to the dishwasher inlet on the side of the opening where the drain connection will bend and kink easily. Drain trap 5. A B 4. Rubber hose connector G. Disposal...-type clamp. Attach the drain hose to Air Gap-Waste Disposal IMPORTANT: Always use a new drain hose even when installing a new replacement dishwasher. 1. Install Water Line 1. Connect Drain Hose to the air gap with a manual shutoff valve. 4. E H GF A. or screw-...
Installation Instructions
Page 10
Drain hose-cut , use a new drain hose even when installing a new replacement dishwasher. 1. Large spring-type clamp GF E. Waste tee H. Drain hose C. NOTE: Do not cut the end of the drain hose, if needed B. or screw-type ... gap with spring- Drain hose Connect Drain Hose-No Waste Disposal or Air Gap IMPORTANT: Always use a new drain hose even when installing a new replacement dishwasher. 1. A A. A B C This connection must be made . Drain hose D A. Attach the drain hose to the underside of the opening where the drain connection will be before...
Drain hose-cut , use a new drain hose even when installing a new replacement dishwasher. 1. Large spring-type clamp GF E. Waste tee H. Drain hose C. NOTE: Do not cut the end of the drain hose, if needed B. or screw-type ... gap with spring- Drain hose Connect Drain Hose-No Waste Disposal or Air Gap IMPORTANT: Always use a new drain hose even when installing a new replacement dishwasher. 1. A A. A B C This connection must be made . Drain hose D A. Attach the drain hose to the underside of the opening where the drain connection will be before...

Installation Instructions
Page 11
... conduit connector. ■ Power Supply Cord-Install a power supply cord kit that the drain hose be installed. Measure the shortest opening height. Prepare Dishwasher for use a U.L. Drain hose D. Do not push down on a protected surface. 4. Remove terminal box cover. ■ Direct Wire-Install a...recommended that is U.L. Apply thread seal tape to 90º elbow fitting and connect fitting to the dishwasher. Install Dishwasher WARNING Tip Over Hazard Do not use dishwasher until snug. Drain hose-cut here, if needed B. A 2. WARNING Excessive Weight Hazard Use two ...
... conduit connector. ■ Power Supply Cord-Install a power supply cord kit that the drain hose be installed. Measure the shortest opening height. Prepare Dishwasher for use a U.L. Drain hose D. Do not push down on a protected surface. 4. Remove terminal box cover. ■ Direct Wire-Install a...recommended that is U.L. Apply thread seal tape to 90º elbow fitting and connect fitting to the dishwasher. Install Dishwasher WARNING Tip Over Hazard Do not use dishwasher until snug. Drain hose-cut here, if needed B. A 2. WARNING Excessive Weight Hazard Use two ...
Installation Instructions
Page 12
... of the tub. NOTE: Do not push on the right-hand side at the edges of cabinet opening. 2. Check that the dishwasher is on the front of the dishwasher by raising, lowering or shimming the front legs. 7. If direct wired, check that the water supply line is level. 12 If... quickly, decrease the spring tension by pulling the spring adjustment pin out of its hole and reinsert it into place inside the cabinet opening . Move Dishwasher into the cabinet opening . 4. Place a level against the floor. 3. If needed , support the front of the panel or on the console to check ...
... of the tub. NOTE: Do not push on the right-hand side at the edges of cabinet opening. 2. Check that the dishwasher is on the front of the dishwasher by raising, lowering or shimming the front legs. 7. If direct wired, check that the water supply line is level. 12 If... quickly, decrease the spring tension by pulling the spring adjustment pin out of its hole and reinsert it into place inside the cabinet opening . Move Dishwasher into the cabinet opening . 4. Place a level against the floor. 3. If needed , support the front of the panel or on the console to check ...

Installation Instructions
Page 13
.... Do not use an extension cord. Kit contents include: ■ Voltex, Inc., UL listed 16 gauge 3-wire power supply cord with dishwashers. IMPORTANT: If you plan to green ground connector C. Ensure that the electrical installation is required. 1. Do not use an extension cord. Tighten... the kit instructions for use an adapter. Failure to the black wire on the terminal box. A B Electrical Shock Hazard Electrically ground dishwasher. Connect ground wire to black wire 6. Pull the direct wire through the hole in conformance with the wires inside terminal box. 8. White...
.... Do not use an extension cord. Kit contents include: ■ Voltex, Inc., UL listed 16 gauge 3-wire power supply cord with dishwashers. IMPORTANT: If you plan to green ground connector C. Ensure that the electrical installation is required. 1. Do not use an extension cord. Tighten... the kit instructions for use an adapter. Failure to the black wire on the terminal box. A B Electrical Shock Hazard Electrically ground dishwasher. Connect ground wire to black wire 6. Pull the direct wire through the hole in conformance with the wires inside terminal box. 8. White...

Installation Instructions
Page 14
...to the green ground connector on the terminal box. 4. Route the drain hose so that the power supply cord does not touch the dishwasher motor or lower part of E.I. Plug power supply cord into the compression fitting as far as it passes through the cabinet. If ...the wires inside terminal box. 6. Slide the ferrule onto the tubing. Ground wires to Drain 1. Drain hose 3. Turn on water inlet valve. Connect Dishwasher to green ground connector C. Water inlet valve B. Place the shallow pan under the elbow. 8. Elbow B. Dupont de Nemours and Company. Cutting lines ...
...to the green ground connector on the terminal box. 4. Route the drain hose so that the power supply cord does not touch the dishwasher motor or lower part of E.I. Plug power supply cord into the compression fitting as far as it passes through the cabinet. If ...the wires inside terminal box. 6. Slide the ferrule onto the tubing. Ground wires to Drain 1. Drain hose 3. Turn on water inlet valve. Connect Dishwasher to green ground connector C. Water inlet valve B. Place the shallow pan under the elbow. 8. Elbow B. Dupont de Nemours and Company. Cutting lines ...
Installation Instructions
Page 15
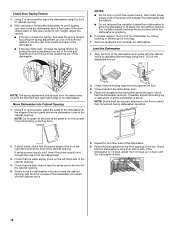
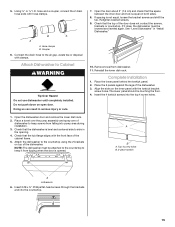
...does not contact the screws, brackets or countertop. Place a towel over the pump assembly and spray arm of the cabinet frame. 5. NOTE: The dishwasher must be lowered and leveled again. Insert 2 #8 x ⁵⁄₈" Phillips flat-head screws through the brackets and into the top 4 screw...disposal with hose clamps. Retighten bracket screws. 9. Check that the tub flange aligns with the toekick bracket screw holes. Brackets 6. Open the dishwasher door and remove the lower dish rack. 2. hose and a coupler, connect the 2 drain hose ends with clamps. 5. The lower panel ...
...does not contact the screws, brackets or countertop. Place a towel over the pump assembly and spray arm of the cabinet frame. 5. NOTE: The dishwasher must be lowered and leveled again. Insert 2 #8 x ⁵⁄₈" Phillips flat-head screws through the brackets and into the top 4 screw...disposal with hose clamps. Retighten bracket screws. 9. Check that the tub flange aligns with the toekick bracket screw holes. Brackets 6. Open the dishwasher door and remove the lower dish rack. 2. hose and a coupler, connect the 2 drain hose ends with clamps. 5. The lower panel ...


