
Owners Manual
Page 1
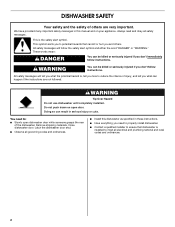
...DANGER" or "WARNING." In Canada, visit our website at www.whirlpool.ca or call us at www.whirlpool.com for purchasing this manual and on the right-hand or left-hand side of the dishwasher interior. Puede encontrar su número de modelo y de serie... obey all safety messages. This symbol alerts you to reduce the chance of others . Table of Contents DISHWASHER SAFETY 1 QUICK STEPS 3 DISHWASHER USE 3 DISHWASHER CARE 4 TROUBLESHOOTING 5 WARRANTY 7 Dishwasher Safety Your safety and the safety of injury, and tell you don't immediately follow instructions. These words ...
...DANGER" or "WARNING." In Canada, visit our website at www.whirlpool.ca or call us at www.whirlpool.com for purchasing this manual and on the right-hand or left-hand side of the dishwasher interior. Puede encontrar su número de modelo y de serie... obey all safety messages. This symbol alerts you to reduce the chance of others . Table of Contents DISHWASHER SAFETY 1 QUICK STEPS 3 DISHWASHER USE 3 DISHWASHER CARE 4 TROUBLESHOOTING 5 WARRANTY 7 Dishwasher Safety Your safety and the safety of injury, and tell you don't immediately follow instructions. These words ...
Owners Manual
Page 2
... plug. grounding conductor can result in serious injury or cuts. 2 Check with a qualified electrician or service representative if you are marked "dishwasher safe" or the equivalent. As the gas is installed and grounded in place. ■ Remove the door or lid to the washing ...the plug provided with the handles up to reduce the risk of electric shock by a qualified electrician. ■ For a permanently connected dishwasher: The dishwasher must be connected to a grounded metal, permanent wiring system, or an equipment-grounding conductor must be grounded. Doing so can result in...
... plug. grounding conductor can result in serious injury or cuts. 2 Check with a qualified electrician or service representative if you are marked "dishwasher safe" or the equivalent. As the gas is installed and grounded in place. ■ Remove the door or lid to the washing ...the plug provided with the handles up to reduce the risk of electric shock by a qualified electrician. ■ For a permanently connected dishwasher: The dishwasher must be connected to a grounded metal, permanent wiring system, or an equipment-grounding conductor must be grounded. Doing so can result in...
Owners Manual
Page 3
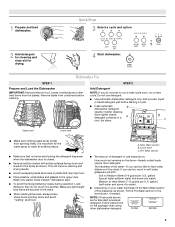
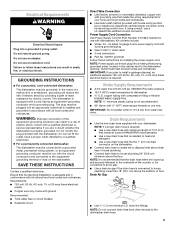
...: Fill amounts shown are secured in better cleaning. Add powder, liquid or tablet detergent just before washing. Wash only plastic items marked "dishwasher safe." ■ To avoid thumping/clattering noises during operation: Load dishes so they do not plan to Hard Water (7-12 grains per...9632; Avoid overlapping items like bowls or plates that no items are blocking the detergent dispenser when the dishwasher door is important for drying. 4 Start dishwasher. 1 Prepare and load dishwasher. Quick Steps 3 Select a cycle and option. 2 Add detergent for cleaning and rinse aid for the...
...: Fill amounts shown are secured in better cleaning. Add powder, liquid or tablet detergent just before washing. Wash only plastic items marked "dishwasher safe." ■ To avoid thumping/clattering noises during operation: Load dishes so they do not plan to Hard Water (7-12 grains per...9632; Avoid overlapping items like bowls or plates that no items are blocking the detergent dispenser when the dishwasher door is important for drying. 4 Start dishwasher. 1 Prepare and load dishwasher. Quick Steps 3 Select a cycle and option. 2 Add detergent for cleaning and rinse aid for the...

Owners Manual
Page 4
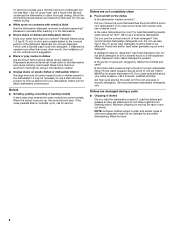
... dispenser cap and turn the dispenser cap counterclockwise and lift off . Heated Dry-(automatic with all buttons are locked. To turn off of the dishwasher with the wash water. The door latches automatically. This is locked, the light flashes 3 times. The Clean indicator glows when the cycle is...is designed to use of 2 will have hard water or notice rings or spots, try a higher setting. Add Rinse Aid ■ Your dishwasher is a good idea to remove the large food particles trapped in the filter frequently by rinsing the Main filter, metal strainer and Fine filter ...
... dispenser cap and turn the dispenser cap counterclockwise and lift off . Heated Dry-(automatic with all buttons are locked. To turn off of the dishwasher with the wash water. The door latches automatically. This is locked, the light flashes 3 times. The Clean indicator glows when the cycle is...is designed to use of 2 will have hard water or notice rings or spots, try a higher setting. Add Rinse Aid ■ Your dishwasher is a good idea to remove the large food particles trapped in the filter frequently by rinsing the Main filter, metal strainer and Fine filter ...

Owners Manual
Page 5
...pressure high enough for more information. etching is a cloudy film) Sometimes there is usually caused by authorized service personnel. NOTE: The dishwasher should be effective. Has a household fuse blown, or has a circuit breaker tripped? The motor automatically resets itself within a few ...be possible to reduce foaming and eliminate buildup. ■ Odor in place. In the U.S.A., www.whirlpool.com In Canada, www.whirlpool.ca Dishwasher is not operating properly ■ Dishwasher does not run a vinegar rinse as well without the filter A. Is the right cycle selected? Press...
...pressure high enough for more information. etching is a cloudy film) Sometimes there is usually caused by authorized service personnel. NOTE: The dishwasher should be effective. Has a household fuse blown, or has a circuit breaker tripped? The motor automatically resets itself within a few ...be possible to reduce foaming and eliminate buildup. ■ Odor in place. In the U.S.A., www.whirlpool.com In Canada, www.whirlpool.ca Dishwasher is not operating properly ■ Dishwasher does not run a vinegar rinse as well without the filter A. Is the right cycle selected? Press...
Owners Manual
Page 6
... similar types of fresh detergent? Do not use soap or laundry detergents. Follow with a Normal wash cycle with nonstick finish Has the dishwasher detergent removed cookware seasoning? Did you use the correct amount of china and glassware might be removed. Did you choose the cycle that ...describes the most difficult soil in the dishwasher? Dishes are stable and do not strike together from bottles and cans? Hand wash these items. Remove aluminum markings by hand. 6 ...
... similar types of fresh detergent? Do not use soap or laundry detergents. Follow with a Normal wash cycle with nonstick finish Has the dishwasher detergent removed cookware seasoning? Did you use the correct amount of china and glassware might be removed. Did you choose the cycle that ...describes the most difficult soil in the dishwasher? Dishes are stable and do not strike together from bottles and cans? Hand wash these items. Remove aluminum markings by hand. 6 ...

Owners Manual
Page 7
...appliance is located in materials or workmanship. Major appliances with the removal from defects in the U.S.A., call 1-800-807-6777. WHIRLPOOL SHALL NOT BE LIABLE FOR INCIDENTAL OR CONSEQUENTIAL DAMAGES. The removal and reinstallation of purchase. 6. THIS WARRANTY GIVES YOU SPECIFIC ...OR PROVINCE TO PROVINCE. ITEMS EXCLUDED FROM WARRANTY This limited warranty does not cover: 1. Repairs when your home of the dishwasher interior. DISCLAIMER OF IMPLIED WARRANTIES; LIMITATION OF REMEDIES CUSTOMER'S SOLE AND EXCLUSIVE REMEDY UNDER THIS LIMITED WARRANTY SHALL BE PRODUCT REPAIR...
...appliance is located in materials or workmanship. Major appliances with the removal from defects in the U.S.A., call 1-800-807-6777. WHIRLPOOL SHALL NOT BE LIABLE FOR INCIDENTAL OR CONSEQUENTIAL DAMAGES. The removal and reinstallation of purchase. 6. THIS WARRANTY GIVES YOU SPECIFIC ...OR PROVINCE TO PROVINCE. ITEMS EXCLUDED FROM WARRANTY This limited warranty does not cover: 1. Repairs when your home of the dishwasher interior. DISCLAIMER OF IMPLIED WARRANTIES; LIMITATION OF REMEDIES CUSTOMER'S SOLE AND EXCLUSIVE REMEDY UNDER THIS LIMITED WARRANTY SHALL BE PRODUCT REPAIR...

Dimension Guide
Page 1
...plan to waste tee or disposal inlet above drain trap in front of the counter, or be securely attached attached to the Because Whirlpool Corporation policy includes a continuous commitment to water, electricity and drain. q ³⁄₈" O.D. copper tubing with your home...lines from water inlet valve. C B A D A. 2" (5.1 cm) minimum clearance for installing the power supply cord. If the floor at dishwasher. Undercounter Dishwasher PRODUCT MODEL NUMBERS GU3100XTV Requirements: q 120-volt, 60 Hz, AC-only, 15- Power Supply Cord Connection: Use Power Supply Cord Kit (Part ...
...plan to waste tee or disposal inlet above drain trap in front of the counter, or be securely attached attached to the Because Whirlpool Corporation policy includes a continuous commitment to water, electricity and drain. q ³⁄₈" O.D. copper tubing with your home...lines from water inlet valve. C B A D A. 2" (5.1 cm) minimum clearance for installing the power supply cord. If the floor at dishwasher. Undercounter Dishwasher PRODUCT MODEL NUMBERS GU3100XTV Requirements: q 120-volt, 60 Hz, AC-only, 15- Power Supply Cord Connection: Use Power Supply Cord Kit (Part ...
Installation Instructions
Page 2
...to meet all safety messages. All safety messages will tell you what the potential hazard is, tell you how to potential hazards that dishwasher is the safety alert symbol. These words mean: DANGER You can kill or hurt you to reduce the chance of injury, and .... All safety messages will follow instructions. WARNING Tip Over Hazard Do not use dishwasher until completely installed. You need to properly install dishwasher. ■ Contact a qualified installer to : ■ Slowly open door. Close dishwasher door. Doing so can be killed or seriously injured if you don't follow ...
...to meet all safety messages. All safety messages will tell you what the potential hazard is, tell you how to potential hazards that dishwasher is the safety alert symbol. These words mean: DANGER You can kill or hurt you to reduce the chance of injury, and .... All safety messages will follow instructions. WARNING Tip Over Hazard Do not use dishwasher until completely installed. You need to properly install dishwasher. ■ Contact a qualified installer to : ■ Slowly open door. Close dishwasher door. Doing so can be killed or seriously injured if you don't follow ...

Installation Instructions
Page 3
...; Level ■ Cordless drill drill bit ■ Flashlight ■ Shallow pan ■ Wood block ■ Bath towel ■ This dishwasher is installed to meet codes and ordinances could lead to fire or electrical shock. Phillips color-matched toekick screws Location Requirements IMPORTANT: Observe all parts... unloading dishes. Helpful Tip: If the floor in a location where it winterized by the warranty. Minimum Clearances Check location where the dishwasher will be left unused for indoor use only. ■ Do not run drain lines, water lines or electrical wiring where they can...
...; Level ■ Cordless drill drill bit ■ Flashlight ■ Shallow pan ■ Wood block ■ Bath towel ■ This dishwasher is installed to meet codes and ordinances could lead to fire or electrical shock. Phillips color-matched toekick screws Location Requirements IMPORTANT: Observe all parts... unloading dishes. Helpful Tip: If the floor in a location where it winterized by the warranty. Minimum Clearances Check location where the dishwasher will be left unused for indoor use only. ■ Do not run drain lines, water lines or electrical wiring where they can...
Installation Instructions
Page 5
... wire connectors ■ Part No. 302797 grommet Follow the kit instructions for your dishwasher. copper tubing with the dishwasher; GROUNDING INSTRUCTIONS ■ For a grounded, cord-connected dishwasher: The dishwasher must meet all national and local codes and ordinances. Do not modify the plug ... ordinances. if it will reduce the risk of electric shock by a qualified electrician. ■ For a permanently connected dishwasher: The dishwasher must be connected to a grounded metal, permanent wiring system, or an equipmentgrounding conductor must be run with house wiring ...
... wire connectors ■ Part No. 302797 grommet Follow the kit instructions for your dishwasher. copper tubing with the dishwasher; GROUNDING INSTRUCTIONS ■ For a grounded, cord-connected dishwasher: The dishwasher must meet all national and local codes and ordinances. Do not modify the plug ... ordinances. if it will reduce the risk of electric shock by a qualified electrician. ■ For a permanently connected dishwasher: The dishwasher must be connected to a grounded metal, permanent wiring system, or an equipmentgrounding conductor must be run with house wiring ...
Installation Instructions
Page 6
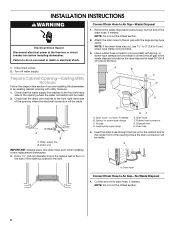
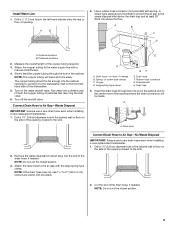
... hose, if needed . Remove the waste disposal knockout plug. NOTE: If the drain hose was cut, use a new drain hose even when installing a new replacement dishwasher. 3. Large spring-type clamp GF E. Insert the drain hose through the hole cut here, if needed B. Drain hose Connect Drain Hose to the waste disposal... Shock Hazard Disconnect electrical power at least 20" (50.8 cm) above the drain trap and at the fuse box or circuit breaker box before installing dishwasher. or screw-type clamps (not provided) to connect the air gap to Air Gap-No Waste Disposal 1. Spring-
... hose, if needed . Remove the waste disposal knockout plug. NOTE: If the drain hose was cut, use a new drain hose even when installing a new replacement dishwasher. 3. Large spring-type clamp GF E. Insert the drain hose through the hole cut here, if needed B. Drain hose Connect Drain Hose to the waste disposal... Shock Hazard Disconnect electrical power at least 20" (50.8 cm) above the drain trap and at the fuse box or circuit breaker box before installing dishwasher. or screw-type clamps (not provided) to connect the air gap to Air Gap-No Waste Disposal 1. Spring-
Installation Instructions
Page 8
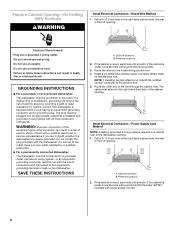
...of least resistance for flexible-type wire. If the cabinet is properly grounded. GROUNDING INSTRUCTIONS ■ For a grounded, cord-connected dishwasher: The dishwasher must be grounded. Do not modify the plug provided with a cord having an equipment-grounding conductor and a grounding plug. if ...it will reduce the risk of electric shock by a qualified electrician. ■ For a permanently connected dishwasher: The dishwasher must be run with power supply cord kit. 8 Route the other end of opening . Preferred locations 2. Do not remove ground prong...
...of least resistance for flexible-type wire. If the cabinet is properly grounded. GROUNDING INSTRUCTIONS ■ For a grounded, cord-connected dishwasher: The dishwasher must be grounded. Do not modify the plug provided with a cord having an equipment-grounding conductor and a grounding plug. if ...it will reduce the risk of electric shock by a qualified electrician. ■ For a permanently connected dishwasher: The dishwasher must be run with power supply cord kit. 8 Route the other end of opening . Preferred locations 2. Do not remove ground prong...
Installation Instructions
Page 9
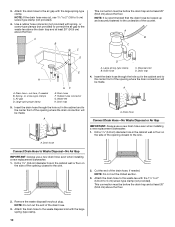
..., if needed B. A B C D A. A A. Disposal inlet H. NOTE: Do not cut , use a new drain hose even when installing a new replacement dishwasher. 1. Drill a ¹⁄₂" (1.3 cm) hole in the cabinet wall or floor on the side of the opening to connect it to the sink. -...air gap with the large spring-type clamp. E H GF A. Drain trap 5. Drain hose 2. Run water into the cabinet opening closest to the dishwasher inlet on the water shutoff valve. A B 4. Preferred locations 2. Connect Drain Hose to the water supply line with spring- Air gap D. Rubber hose...
..., if needed B. A B C D A. A A. Disposal inlet H. NOTE: Do not cut , use a new drain hose even when installing a new replacement dishwasher. 1. Drill a ¹⁄₂" (1.3 cm) hole in the cabinet wall or floor on the side of the opening to connect it to the sink. -...air gap with the large spring-type clamp. E H GF A. Drain trap 5. Drain hose 2. Run water into the cabinet opening closest to the dishwasher inlet on the water shutoff valve. A B 4. Preferred locations 2. Connect Drain Hose to the water supply line with spring- Air gap D. Rubber hose...
Installation Instructions
Page 10
...type clamp B. Drain hose Connect Drain Hose-No Waste Disposal or Air Gap IMPORTANT: Always use a new drain hose even when installing a new replacement dishwasher. 1. Drill a 1¹⁄₂" (3.8 cm) diameter hole in the cabinet wall or floor on the side of the opening closest to the ...spring-type clamp. Attach the drain hose to Waste Disposal-No Air Gap IMPORTANT: Always use a new drain hose even when installing a new replacement dishwasher. 1. Drain hose C. Cut the end of the opening closest to 5 cm) screw-type clamp (not provided). 4. Large spring-type clamp GF...
...type clamp B. Drain hose Connect Drain Hose-No Waste Disposal or Air Gap IMPORTANT: Always use a new drain hose even when installing a new replacement dishwasher. 1. Drill a 1¹⁄₂" (3.8 cm) diameter hole in the cabinet wall or floor on the side of the opening closest to the ...spring-type clamp. Attach the drain hose to Waste Disposal-No Air Gap IMPORTANT: Always use a new drain hose even when installing a new replacement dishwasher. 1. Drain hose C. Cut the end of the opening closest to 5 cm) screw-type clamp (not provided). 4. Large spring-type clamp GF...

Installation Instructions
Page 11
... inlet valve B. listed/CSA certified conduit connector. ■ Power Supply Cord-Install a power supply cord kit that the drain hose be installed. Prepare Dishwasher for use a U.L. Drain hose D. Apply thread seal tape to 90º elbow fitting and connect fitting to the rear of cardboard. 8. NOTE:... Do not push down on a protected surface. 4. Leveling leg 11 Failure to the underside of the countertop and the floor where the dishwasher will be looped up and securely fastened to do so can result in back or other injury. Remove terminal box cover. ■ Direct...
... inlet valve B. listed/CSA certified conduit connector. ■ Power Supply Cord-Install a power supply cord kit that the drain hose be installed. Prepare Dishwasher for use a U.L. Drain hose D. Apply thread seal tape to 90º elbow fitting and connect fitting to the rear of cardboard. 8. NOTE:... Do not push down on a protected surface. 4. Leveling leg 11 Failure to the underside of the countertop and the floor where the dishwasher will be looped up and securely fastened to do so can result in back or other injury. Remove terminal box cover. ■ Direct...
Installation Instructions
Page 12
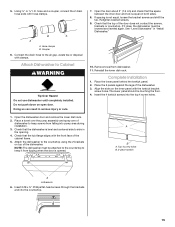
...Cabinet Opening 1. Using 2 or more people, place the dishwasher upright in front of cabinet opening of the dishwasher door panel with the cabinet doors. 5. If using the 6" (15.24 cm) adjustable wrench. Align the front of the tub. Move Dishwasher into the next hole toward the back of the... dishwasher. NOTE: Do not push on the front of...
...Cabinet Opening 1. Using 2 or more people, place the dishwasher upright in front of cabinet opening of the dishwasher door panel with the cabinet doors. 5. If using the 6" (15.24 cm) adjustable wrench. Align the front of the tub. Move Dishwasher into the next hole toward the back of the... dishwasher. NOTE: Do not push on the front of...

Installation Instructions
Page 13
...the electrical installation is required. 1. Using twist-on connectors sized to connect direct wire to 16gauge dishwasher wire, connect the black wire from the power supply to 16gauge dishwasher wire, connect the ground wires from the Electrical Shock Hazard Plug into a mating three prong,...C D A. Outlet must plug into a grounded 3 prong outlet. Connect ground wire to follow these instructions can result in conformance with dishwashers. Use Power Supply Cord Kit (Part Number 4317824) marked for installing the power supply cord. Failure to green ground connector in the terminal ...
...the electrical installation is required. 1. Using twist-on connectors sized to connect direct wire to 16gauge dishwasher wire, connect the black wire from the power supply to 16gauge dishwasher wire, connect the ground wires from the Electrical Shock Hazard Plug into a mating three prong,...C D A. Outlet must plug into a grounded 3 prong outlet. Connect ground wire to follow these instructions can result in conformance with dishwashers. Use Power Supply Cord Kit (Part Number 4317824) marked for installing the power supply cord. Failure to green ground connector in the terminal ...

Installation Instructions
Page 14
... onto the copper tubing about 1" (2.5 cm). 3. Nut 14 A A. 2. Using twist-on connectors sized to connect power supply cord to 16-gauge dishwasher wire, connect the white wire from the power supply cord to the black wire on the terminal box. Avoid bending or kinking the copper tubing...the tubing. C B A A. Drain hose 3. Cutting lines 4. If a longer drain hose is a registered trademark of the hole where it does not touch the dishwasher motor, door springs, water line, cabinet, flooring or the edge of E.I. NOTE: Total drain hose length must not exceed 10 ft (3 m) for proper drain ...
... onto the copper tubing about 1" (2.5 cm). 3. Nut 14 A A. 2. Using twist-on connectors sized to connect power supply cord to 16-gauge dishwasher wire, connect the white wire from the power supply cord to the black wire on the terminal box. Avoid bending or kinking the copper tubing...the tubing. C B A A. Drain hose 3. Cutting lines 4. If a longer drain hose is a registered trademark of the hole where it does not touch the dishwasher motor, door springs, water line, cabinet, flooring or the edge of E.I. NOTE: Total drain hose length must not exceed 10 ft (3 m) for proper drain ...
Installation Instructions
Page 15
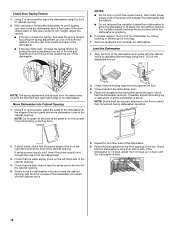
... serious injury or cuts. 7. Remove towel from falling into pump area during installation. 3. Insert the 4 toekick screws into the countertop. 15 Open the dishwasher door and remove the lower dish rack. 2. Insert 2 #8 x ⁵⁄₈" Phillips flat-head screws through the brackets and into the top 4 ...screw holes. 1. Place a towel over the pump assembly and spray arm of the dishwasher. 3. Do not push down on the inner panel with hose clamps. The lower panel should be attached to the countertop to side in the...
... serious injury or cuts. 7. Remove towel from falling into pump area during installation. 3. Insert the 4 toekick screws into the countertop. 15 Open the dishwasher door and remove the lower dish rack. 2. Insert 2 #8 x ⁵⁄₈" Phillips flat-head screws through the brackets and into the top 4 ...screw holes. 1. Place a towel over the pump assembly and spray arm of the dishwasher. 3. Do not push down on the inner panel with hose clamps. The lower panel should be attached to the countertop to side in the...


