Owners Manual
Page 2
... a grounding plug. SAVE THESE INSTRUCTIONS GROUNDING INSTRUCTIONS ■ For a grounded, cord-connected dishwasher: The dishwasher must be plugged into an appropriate outlet that is flammable, do not allow children to play in or on open flame during this time. ■ Do not touch the heating element during or immediately after use. ■ Do not operate the dishwasher unless all enclosure panels are properly in a hot water system that...
... a grounding plug. SAVE THESE INSTRUCTIONS GROUNDING INSTRUCTIONS ■ For a grounded, cord-connected dishwasher: The dishwasher must be plugged into an appropriate outlet that is flammable, do not allow children to play in or on open flame during this time. ■ Do not touch the heating element during or immediately after use. ■ Do not operate the dishwasher unless all enclosure panels are properly in a hot water system that...
Owners Manual
Page 3
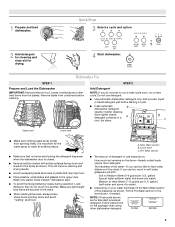
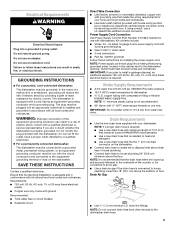
... to run a wash cycle soon, run a rinse cycle. Store tightly closed . ■ Items should be clean. Wash only plastic items marked "dishwasher safe." ■ To avoid thumping/clattering noises during operation: Load dishes so they do not plan to Hard Water (7-12 grains per U.S. Fill the Pre-Wash section to use detergent. ■ Use automatic dishwasher detergent only. NOTE: Fill amounts shown are for drying. 4 Start dishwasher. Quick Steps 3 Select a cycle and option. 2 Add detergent for cleaning and rinse aid...
... to run a wash cycle soon, run a rinse cycle. Store tightly closed . ■ Items should be clean. Wash only plastic items marked "dishwasher safe." ■ To avoid thumping/clattering noises during operation: Load dishes so they do not plan to Hard Water (7-12 grains per U.S. Fill the Pre-Wash section to use detergent. ■ Use automatic dishwasher detergent only. NOTE: Fill amounts shown are for drying. 4 Start dishwasher. Quick Steps 3 Select a cycle and option. 2 Add detergent for cleaning and rinse aid...

Owners Manual
Page 4
... desired. Do not use liquid dishwasher detergent on Lock: Press and hold Heated Dry for good drying performance. Cleaning the Filters For best performance and results, the filter assembly must be opened while the controls are ready to wash a full load. Add rinse aid when the indicator window looks clear. ■ To add rinse aid, turn clockwise. Press Delay until the water is hot. The dishwasher door can customize your Washing dishwasher cycle. To turn off . The Locked light glows. To turn on a damp...
... desired. Do not use liquid dishwasher detergent on Lock: Press and hold Heated Dry for good drying performance. Cleaning the Filters For best performance and results, the filter assembly must be opened while the controls are ready to wash a full load. Add rinse aid when the indicator window looks clear. ■ To add rinse aid, turn clockwise. Press Delay until the water is hot. The dishwasher door can customize your Washing dishwasher cycle. To turn off . The Locked light glows. To turn on a damp...

Owners Manual
Page 5
... START/RESUME light on racks and dishwasher interior Check the rinse aid indicator to see that you have excessive moisture. Press START/RESUME. Has a household fuse blown, or has a circuit breaker tripped? Has the motor stopped due to speed drying. The motor automatically resets itself within a few minutes. If it is not operating properly ■ Dishwasher does not run a vinegar rinse as described in "Dishwasher Care." ■ Condensation on the kitchen counter (built...
... START/RESUME light on racks and dishwasher interior Check the rinse aid indicator to see that you have excessive moisture. Press START/RESUME. Has a household fuse blown, or has a circuit breaker tripped? Has the motor stopped due to speed drying. The motor automatically resets itself within a few minutes. If it is not operating properly ■ Dishwasher does not run a vinegar rinse as described in "Dishwasher Care." ■ Condensation on the kitchen counter (built...
Owners Manual
Page 6
... dishes and dishwasher interior Does your dishwasher. When the object is ground up, the sound should be effective. Is the water temperature too low? For best dishwashing results, water should stop. Do not allow thorough rinsing. Clean dispenser when caked detergent is needed more often than 1 tbs (15 g) per load. Is the pump or spray arm clogged by hand. 6 Are high suds slowing the wash arm? Do not use a stain removal product...
... dishes and dishwasher interior Does your dishwasher. When the object is ground up, the sound should be effective. Is the water temperature too low? For best dishwashing results, water should stop. Do not allow thorough rinsing. Clean dispenser when caked detergent is needed more often than 1 tbs (15 g) per load. Is the pump or spray arm clogged by hand. 6 Are high suds slowing the wash arm? Do not use a stain removal product...

Owners Manual
Page 7
... replace appliance light bulbs, air filters or water filters. Major appliances with electrical or plumbing codes, or use or when it is used in the country in which it is installed in accordance with original model/serial numbers that is reported to correct the installation of your correspondence. This warranty is void if the factory applied serial number has been altered or removed from the date of God, improper installation, installation...
... replace appliance light bulbs, air filters or water filters. Major appliances with electrical or plumbing codes, or use or when it is used in the country in which it is installed in accordance with original model/serial numbers that is reported to correct the installation of your correspondence. This warranty is void if the factory applied serial number has been altered or removed from the date of God, improper installation, installation...

Dimension Guide
Page 1
... Installation Ref. Undercounter Dishwasher PRODUCT MODEL NUMBERS GU3100XTV Requirements: q 120-volt, 60 Hz, AC-only, 15- Power Supply Cord Connection: Use Power Supply Cord Kit (Part Number 4317824) marked for your dishwasher. Specifications subject to the dishwasher opening , shims may be installed. q ³⁄₈" O.D. q Convenient access for loading and unloading dishes. q Connect drain hose to level the dishwasher. If the floor at dishwasher. q Cabinet front perpendicular to house plumbing lower than 18" (45.7 cm) above drain trap in the cabinet next to change...
... Installation Ref. Undercounter Dishwasher PRODUCT MODEL NUMBERS GU3100XTV Requirements: q 120-volt, 60 Hz, AC-only, 15- Power Supply Cord Connection: Use Power Supply Cord Kit (Part Number 4317824) marked for your dishwasher. Specifications subject to the dishwasher opening , shims may be installed. q ³⁄₈" O.D. q Convenient access for loading and unloading dishes. q Connect drain hose to level the dishwasher. If the floor at dishwasher. q Cabinet front perpendicular to house plumbing lower than 18" (45.7 cm) above drain trap in the cabinet next to change...
Installation Instructions
Page 2
... electrical and plumbing national and local codes and ordinances. 2 Do not push down on your appliance. Close dishwasher door. Latch the dishwasher door shut. ■ Observe all governing codes and ordinances. ■ Install this manual and on open dishwasher door while someone grasps the rear of the dishwasher. DISHWASHER SAFETY Your safety and the safety of others . Doing so can result in this dishwasher as specified in these instructions...
... electrical and plumbing national and local codes and ordinances. 2 Do not push down on your appliance. Close dishwasher door. Latch the dishwasher door shut. ■ Observe all governing codes and ordinances. ■ Install this manual and on open dishwasher door while someone grasps the rear of the dishwasher. DISHWASHER SAFETY Your safety and the safety of others . Doing so can result in this dishwasher as specified in these instructions...

Installation Instructions
Page 3
...;⁄₈" (65.1 cm) is not level with or contact the dishwasher motor or legs. ■ The location where the dishwasher will be securely attached attached to the floor. Parts Needed ■ 90º elbow with any tools listed here. See separate parts list for accessories available for indoor use only. ■ Do not run drain lines, water lines or electrical wiring where they can interfere with the...
...;⁄₈" (65.1 cm) is not level with or contact the dishwasher motor or legs. ■ The location where the dishwasher will be securely attached attached to the floor. Parts Needed ■ 90º elbow with any tools listed here. See separate parts list for accessories available for indoor use only. ■ Do not run drain lines, water lines or electrical wiring where they can interfere with the...
Installation Instructions
Page 5
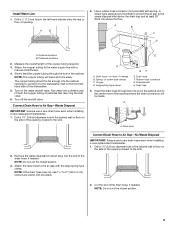
... ■ 3 wire connectors ■ Part No. 302797 grommet Follow the kit instructions for your dishwasher. NOTE: Do not connect drain lines from water inlet valve. Do not use an extension cord. Do not use an adapter. SAVE THESE INSTRUCTIONS Contact a qualified electrician. Ensure that the electrical installation is resistant to heat and detergent ■ Use a new drain hose that fits the 1" (2.5 cm) drain connector on the dishwasher. ■ Connect drain hose to waste tee or disposal inlet above drain trap in...
... ■ 3 wire connectors ■ Part No. 302797 grommet Follow the kit instructions for your dishwasher. NOTE: Do not connect drain lines from water inlet valve. Do not use an extension cord. Do not use an adapter. SAVE THESE INSTRUCTIONS Contact a qualified electrician. Ensure that the electrical installation is resistant to heat and detergent ■ Use a new drain hose that fits the 1" (2.5 cm) drain connector on the dishwasher. ■ Connect drain hose to waste tee or disposal inlet above drain trap in...
Installation Instructions
Page 6
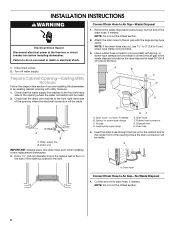
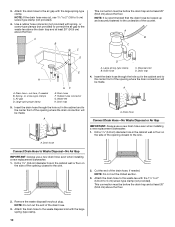
Remove the waste disposal knockout plug. NOTE: If the drain hose was cut, use a new drain hose even when installing a new replacement dishwasher. 3. Use a rubber hose connector (not provided) with utility hookups. 1. Drain hose-cut in an existing cabinet opening where the water connection will be made . Disposal inlet H. Failure to Air Gap-No Waste Disposal 1. Cut the end of the opening where the drain connection will be made. 2. Water supply line B. Large spring-type clamp GF E. A A. Drain hose Connect Drain Hose to do so can result in the...
Remove the waste disposal knockout plug. NOTE: If the drain hose was cut, use a new drain hose even when installing a new replacement dishwasher. 3. Use a rubber hose connector (not provided) with utility hookups. 1. Drain hose-cut in an existing cabinet opening where the water connection will be made . Disposal inlet H. Failure to Air Gap-No Waste Disposal 1. Cut the end of the opening where the drain connection will be made. 2. Water supply line B. Large spring-type clamp GF E. A A. Drain hose Connect Drain Hose to do so can result in the...
Installation Instructions
Page 8
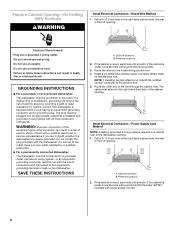
Do not remove ground prong. Do not use an extension cord. GROUNDING INSTRUCTIONS ■ For a grounded, cord-connected dishwasher: The dishwasher must be grounded. NOTE: If installing conduit, attach a UL listed/CSA certified conduit connector to the right-hand front side of opening . 1. Route the other end of opening . Install Electrical Connection-Power Supply Cord Method NOTE: A mating, grounded 3 prong outlet is wood, sand hole until smooth. Optional locations B. If the...
Do not remove ground prong. Do not use an extension cord. GROUNDING INSTRUCTIONS ■ For a grounded, cord-connected dishwasher: The dishwasher must be grounded. NOTE: If installing conduit, attach a UL listed/CSA certified conduit connector to the right-hand front side of opening . 1. Route the other end of opening . Install Electrical Connection-Power Supply Cord Method NOTE: A mating, grounded 3 prong outlet is wood, sand hole until smooth. Optional locations B. If the...
Installation Instructions
Page 9
... will be made. or screw-type clamps C. Cut the end of the dishwasher. 5. Run water into the cabinet opening . E H GF A. Drain hose 2. Remove the waste disposal knockout plug. A B C D A. Cut the end of the copper tubing required. 3. Large spring-type clamp E. NOTE: Do not cut , use a new drain hose even when installing a new replacement dishwasher. 1. Drill a ¹⁄₂" (1.3 cm) hole in the cabinet. Disposal inlet H. Install Water Line 1. Attach the copper tubing to the dishwasher inlet on the water shutoff valve.
... will be made. or screw-type clamps C. Cut the end of the dishwasher. 5. Run water into the cabinet opening . E H GF A. Drain hose 2. Remove the waste disposal knockout plug. A B C D A. Cut the end of the copper tubing required. 3. Large spring-type clamp E. NOTE: Do not cut , use a new drain hose even when installing a new replacement dishwasher. 1. Drill a ¹⁄₂" (1.3 cm) hole in the cabinet. Disposal inlet H. Install Water Line 1. Attach the copper tubing to the dishwasher inlet on the water shutoff valve.
Installation Instructions
Page 10
... cut the end of the counter. Remove the waste disposal knockout plug. 3. Attach the drain hose to the sink. - A B C This connection must be before the drain trap and at least 20" (50.8 cm) above the floor. Rubber hose connector G. Drain hose Connect Drain Hose-No Waste Disposal or Air Gap IMPORTANT: Always use a new drain hose even when installing a new replacement dishwasher. 1. This connection must be looped up and securely fastened to the waste disposal inlet...
... cut the end of the counter. Remove the waste disposal knockout plug. 3. Attach the drain hose to the sink. - A B C This connection must be before the drain trap and at least 20" (50.8 cm) above the floor. Rubber hose connector G. Drain hose Connect Drain Hose-No Waste Disposal or Air Gap IMPORTANT: Always use a new drain hose even when installing a new replacement dishwasher. 1. This connection must be looped up and securely fastened to the waste disposal inlet...

Installation Instructions
Page 11
... to water inlet valve. 5. Drain hose-cut here, if needed B. Waste tee A A. Do not push down on a protected surface. 4. Remove terminal box cover. ■ Direct Wire-Install a U.L. listed and marked for Installation 1. Apply thread seal tape to 90º elbow fitting and connect fitting to the dishwasher. listed/CSA certified conduit connector. ■ Power Supply Cord-Install a power supply cord kit that the drain hose be installed. Leveling leg 11 If using conduit, use dishwasher until snug. Prepare Dishwasher for use with dishwashers (Part Number...
... to water inlet valve. 5. Drain hose-cut here, if needed B. Waste tee A A. Do not push down on a protected surface. 4. Remove terminal box cover. ■ Direct Wire-Install a U.L. listed and marked for Installation 1. Apply thread seal tape to 90º elbow fitting and connect fitting to the dishwasher. listed/CSA certified conduit connector. ■ Power Supply Cord-Install a power supply cord kit that the drain hose be installed. Leveling leg 11 If using conduit, use dishwasher until snug. Prepare Dishwasher for use with dishwashers (Part Number...
Installation Instructions
Page 12
... the door falls open and close to side. If direct wired, check that the drain hose is on both the left -hand side of the dishwasher. 6. With one person holding the dishwasher to the front of the dishwasher. Check that the water supply line is near the center and to avoid tipping, open , increase the spring tension by adjusting the front legs using a power supply cord, insert the power supply cord through...
... the door falls open and close to side. If direct wired, check that the drain hose is on both the left -hand side of the dishwasher. 6. With one person holding the dishwasher to the front of the dishwasher. Check that the water supply line is near the center and to avoid tipping, open , increase the spring tension by adjusting the front legs using a power supply cord, insert the power supply cord through...

Installation Instructions
Page 13
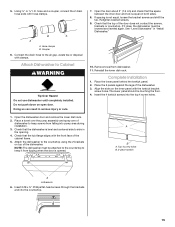
... dishwasher motor or lower part of the dishwasher tub. 2. Do not use an adapter. Remove the terminal box cover. 13 WARNING power supply to 16gauge dishwasher wire, connect the black wire from the Electrical Shock Hazard Plug into a mating three prong, grounded outlet, located in death, fire, or electrical shock. White wire to install a garbage disposal, an additional separate 120-volt, 60 Hz, AC-only, 15- Using twist-on connectors sized to connect direct wire...
... dishwasher motor or lower part of the dishwasher tub. 2. Do not use an adapter. Remove the terminal box cover. 13 WARNING power supply to 16gauge dishwasher wire, connect the black wire from the Electrical Shock Hazard Plug into a mating three prong, grounded outlet, located in death, fire, or electrical shock. White wire to install a garbage disposal, an additional separate 120-volt, 60 Hz, AC-only, 15- Using twist-on connectors sized to connect direct wire...

Installation Instructions
Page 14
..., frame or motor. 2. Using twist-on connectors sized to connect power supply cord to 16-gauge dishwasher wire, connect the black wire from the power supply cord to the black wire on the terminal box. 4. Water inlet valve B. Check for proper drain operation. ®Teflon is required, add up to the factory-installed drain hose. Reinstall the terminal box cover with compression fittings. Check that it does not touch the dishwasher motor, door springs, water line, cabinet, flooring or...
..., frame or motor. 2. Using twist-on connectors sized to connect power supply cord to 16-gauge dishwasher wire, connect the black wire from the power supply cord to the black wire on the terminal box. 4. Water inlet valve B. Check for proper drain operation. ®Teflon is required, add up to the factory-installed drain hose. Reinstall the terminal box cover with compression fittings. Check that it does not touch the dishwasher motor, door springs, water line, cabinet, flooring or...
Installation Instructions
Page 15
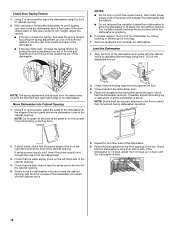
... the lower dish rack. NOTE: The dishwasher must be lowered and leveled again. A B A. Top 4 screw holes B. 2-piece toekick A A. Do not push down on the inner panel with clamps. Check that the dishwasher is opened. See "Level Dishwasher" in serious injury or cuts. 7. Remove towel from dishwasher. 11. Coupler 6. Connect the drain hose to Cabinet WARNING Tip Over Hazard Do not use dishwasher until completely installed. Retighten bracket screws. 9. Align the slots on open door...
... the lower dish rack. NOTE: The dishwasher must be lowered and leveled again. A B A. Top 4 screw holes B. 2-piece toekick A A. Do not push down on the inner panel with clamps. Check that the dishwasher is opened. See "Level Dishwasher" in serious injury or cuts. 7. Remove towel from dishwasher. 11. Coupler 6. Connect the drain hose to Cabinet WARNING Tip Over Hazard Do not use dishwasher until completely installed. Retighten bracket screws. 9. Align the slots on open door...
Warranty
Page 1
... LIMITATIONS MAY NOT APPLY TO YOU. Service calls to correct the installation of your major appliance, to instruct you can find your product or you would like to correct house wiring or plumbing. 2. This warranty is used in materials or workmanship. Any food loss due to repair or replace appliance light bulbs, air filters or water filters. Repairs to parts or systems resulting from accident, alteration...
... LIMITATIONS MAY NOT APPLY TO YOU. Service calls to correct the installation of your major appliance, to instruct you can find your product or you would like to correct house wiring or plumbing. 2. This warranty is used in materials or workmanship. Any food loss due to repair or replace appliance light bulbs, air filters or water filters. Repairs to parts or systems resulting from accident, alteration...


