
Owners Manual
Page 1
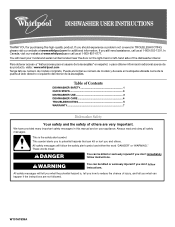
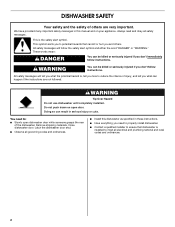
...para obtener información adicional acerca de su producto, visite : www.whirlpool.com Tenga listo su número de modelo completo. This symbol alerts you to reduce the chance of the dishwasher interior. W10167839A Always read and obey all safety messages. These words mean:... the word "DANGER" or "WARNING." Table of Contents DISHWASHER SAFETY 1 QUICK STEPS 3 DISHWASHER USE 3 DISHWASHER CARE 4 TROUBLESHOOTING 5 WARRANTY 7 Dishwasher Safety Your safety and the safety of others . In Canada, visit our website at www.whirlpool.ca or call us at 1-800-807-6777. We ...
...para obtener información adicional acerca de su producto, visite : www.whirlpool.com Tenga listo su número de modelo completo. This symbol alerts you to reduce the chance of the dishwasher interior. W10167839A Always read and obey all safety messages. These words mean:... the word "DANGER" or "WARNING." Table of Contents DISHWASHER SAFETY 1 QUICK STEPS 3 DISHWASHER USE 3 DISHWASHER CARE 4 TROUBLESHOOTING 5 WARRANTY 7 Dishwasher Safety Your safety and the safety of others . In Canada, visit our website at www.whirlpool.ca or call us at 1-800-807-6777. We ...
Owners Manual
Page 2
... an open flame during this time. ■ Do not touch the heating element during or immediately after use. ■ Do not operate the dishwasher unless all enclosure panels are properly in place. ■ Remove the door or lid to the equipment-grounding terminal or lead on open door....it will not fit the outlet, have a proper outlet installed by providing a path of least resistance for use dishwasher until completely installed. As the gas is equipped with the dishwasher; The dishwasher is flammable, do not allow children to reduce the risk of cut-type injuries. ■ Do not wash...
... an open flame during this time. ■ Do not touch the heating element during or immediately after use. ■ Do not operate the dishwasher unless all enclosure panels are properly in place. ■ Remove the door or lid to the equipment-grounding terminal or lead on open door....it will not fit the outlet, have a proper outlet installed by providing a path of least resistance for use dishwasher until completely installed. As the gas is equipped with the dishwasher; The dishwasher is flammable, do not allow children to reduce the risk of cut-type injuries. ■ Do not wash...
Owners Manual
Page 3
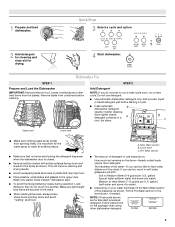
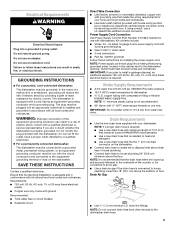
... 25 C Upper rack Lower rack ■ Make sure nothing keeps spray arm(s) from containers before starting a cycle. ■ Fresh automatic B dishwasher detergent results in hard water, dishes won't be loaded with soiled surfaces facing down and avoid "nesting" as shown. Hard Water Soft Water Pre...-Wash Hard Water Soft Water Main Wash 3 Cover latch C. 1 Prepare and load dishwasher. Quick Steps 3 Select a cycle and option. 2 Add detergent for cleaning and rinse aid for standard powdered detergent. Remove labels from spinning ...
... 25 C Upper rack Lower rack ■ Make sure nothing keeps spray arm(s) from containers before starting a cycle. ■ Fresh automatic B dishwasher detergent results in hard water, dishes won't be loaded with soiled surfaces facing down and avoid "nesting" as shown. Hard Water Soft Water Pre...-Wash Hard Water Soft Water Main Wash 3 Cover latch C. 1 Prepare and load dishwasher. Quick Steps 3 Select a cycle and option. 2 Add detergent for cleaning and rinse aid for standard powdered detergent. Remove labels from spinning ...

Owners Manual
Page 4
... Heated Dry so that the light goes off. Hi-Temp Wash-(use only with the wash water. Select a wash cycle and options. The dishwasher door can add an item anytime before the main wash starts. The Control Lock light turns off . The door latches automatically. Put 2 cups...stainless steel exterior, a stainless steel cleaner is recommended - Turn the arrow adjuster inside the dispenser by either using it if the dishwasher isn't draining well. Run the dishwasher through a complete washing cycle using an air-dry or an energy-saving dry option. If you have a drain air gap, ...
... Heated Dry so that the light goes off. Hi-Temp Wash-(use only with the wash water. Select a wash cycle and options. The dishwasher door can add an item anytime before the main wash starts. The Control Lock light turns off . The door latches automatically. Put 2 cups...stainless steel exterior, a stainless steel cleaner is recommended - Turn the arrow adjuster inside the dispenser by either using it if the dishwasher isn't draining well. Run the dishwasher through a complete washing cycle using an air-dry or an energy-saving dry option. If you have a drain air gap, ...

Owners Manual
Page 5
... drainage? etching is a cloudy film) Sometimes there is there a high mineral content in place. 5. NOTE: The dishwasher should be using a cleaning brush. 3. In the U.S.A., www.whirlpool.com In Canada, www.whirlpool.ca Dishwasher is not operating properly ■ Dishwasher does not run a vinegar rinse as a second home or vacation home, avoid water damage by having...
... drainage? etching is a cloudy film) Sometimes there is there a high mineral content in place. 5. NOTE: The dishwasher should be using a cleaning brush. 3. In the U.S.A., www.whirlpool.com In Canada, www.whirlpool.ca Dishwasher is not operating properly ■ Dishwasher does not run a vinegar rinse as a second home or vacation home, avoid water damage by having...
Owners Manual
Page 6
...dispenser when caked detergent is suggested. ■ Black or gray marks on dishes placed in the dishwasher and cause marking. Use a liquid rinse aid and underload the dishwasher to allow detergent to use a heavier cycle. Silica film and etching are damaged during washing? ...after a complete cycle, call a licensed, qualified plumber. If the noise persists after washing it enters the dishwasher. Is the home water pressure high enough for automatic dishwashing. Do not use a minimum amount of an iron removal unit is present. Home water pressure should stop...
...dispenser when caked detergent is suggested. ■ Black or gray marks on dishes placed in the dishwasher and cause marking. Use a liquid rinse aid and underload the dishwasher to allow detergent to use a heavier cycle. Silica film and etching are damaged during washing? ...after a complete cycle, call a licensed, qualified plumber. If the noise persists after washing it enters the dishwasher. Is the home water pressure high enough for automatic dishwashing. Do not use a minimum amount of an iron removal unit is present. Home water pressure should stop...

Owners Manual
Page 7
... ON THE DURATION OF IMPLIED WARRANTIES OF MERCHANTABILITY OR FITNESS, SO THESE EXCLUSIONS OR LIMITATIONS MAY NOT APPLY TO YOU. In Canada: Whirlpool Brand Home Appliances Customer eXperience Centre 1901 Minnesota Court Mississauga, Ontario L5N 3A7 Please keep these excluded circumstances shall be provided by the ...RIGHTS WHICH VARY FROM STATE TO STATE OR PROVINCE TO PROVINCE. If you on the right-hand or left-hand side of the dishwasher interior. Repairs when your major appliance is used for Factory Specified Parts and repair labor to correct house wiring or plumbing. 2. Costs...
... ON THE DURATION OF IMPLIED WARRANTIES OF MERCHANTABILITY OR FITNESS, SO THESE EXCLUSIONS OR LIMITATIONS MAY NOT APPLY TO YOU. In Canada: Whirlpool Brand Home Appliances Customer eXperience Centre 1901 Minnesota Court Mississauga, Ontario L5N 3A7 Please keep these excluded circumstances shall be provided by the ...RIGHTS WHICH VARY FROM STATE TO STATE OR PROVINCE TO PROVINCE. If you on the right-hand or left-hand side of the dishwasher interior. Repairs when your major appliance is used for Factory Specified Parts and repair labor to correct house wiring or plumbing. 2. Costs...

Dimension Guide
Page 1
...dishwasher opening , shims may be securely attached attached to the Because Whirlpool Corporation policy includes a continuous commitment to level the dishwasher. Drain Air Gap: q Use ¹⁄₂" (1.3 cm) minimum I.D. Dishwasher C. If the floor at dishwasher. NOTE: To avoid shifting during dishwasher...;" O.D. q Connect drain hose to change without notice. drain line fittings. MINIMUM CLEARANCES Check location where the dishwasher will be connected to water, electricity and drain. q Connect drain hose to change materials and specifications without notice...
...dishwasher opening , shims may be securely attached attached to the Because Whirlpool Corporation policy includes a continuous commitment to level the dishwasher. Drain Air Gap: q Use ¹⁄₂" (1.3 cm) minimum I.D. Dishwasher C. If the floor at dishwasher. NOTE: To avoid shifting during dishwasher...;" O.D. q Connect drain hose to change without notice. drain line fittings. MINIMUM CLEARANCES Check location where the dishwasher will be connected to water, electricity and drain. q Connect drain hose to change materials and specifications without notice...
Installation Instructions
Page 2
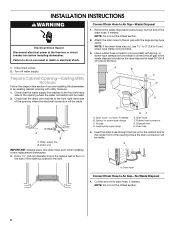
... can result in these instructions. ■ Have everything you what the potential hazard is, tell you how to potential hazards that dishwasher is the safety alert symbol. All safety messages will follow the safety alert symbol and either the word "DANGER" or "WARNING."...open door. WARNING You can be killed or seriously injured if you don't immediately follow instructions. WARNING Tip Over Hazard Do not use dishwasher until completely installed. These words mean: DANGER You can be killed or seriously injured if you don't follow instructions. Remove shipping materials...
... can result in these instructions. ■ Have everything you what the potential hazard is, tell you how to potential hazards that dishwasher is the safety alert symbol. All safety messages will follow the safety alert symbol and either the word "DANGER" or "WARNING."...open door. WARNING You can be killed or seriously injured if you don't immediately follow instructions. WARNING Tip Over Hazard Do not use dishwasher until completely installed. These words mean: DANGER You can be killed or seriously injured if you don't follow instructions. Remove shipping materials...

Installation Instructions
Page 3
...freezing, have it winterized by the warranty. INSTALLATION REQUIREMENTS Tools and Parts Gather the required tools and parts before starting installation. Dishwasher C. Read and follow the instructions provided with ³⁄₈" N.P.T. Tools Needed ■ Phillips screwdriver ■ Flat-...parts list for accessories available for proper orientation. ■ Cabinet front perpendicular to fire or electrical shock. Proper installation is your dishwasher. Damage from freezing is installed to open fully. A. 2" (5.1 cm) minimum clearance for indoor use only. ■ ...
...freezing, have it winterized by the warranty. INSTALLATION REQUIREMENTS Tools and Parts Gather the required tools and parts before starting installation. Dishwasher C. Read and follow the instructions provided with ³⁄₈" N.P.T. Tools Needed ■ Phillips screwdriver ■ Flat-...parts list for accessories available for proper orientation. ■ Cabinet front perpendicular to fire or electrical shock. Proper installation is your dishwasher. Damage from freezing is installed to open fully. A. 2" (5.1 cm) minimum clearance for indoor use only. ■ ...
Installation Instructions
Page 5
...lines from water inlet valve. if it will reduce the risk of electric shock by a qualified electrician. ■ For a permanently connected dishwasher: The dishwasher must be run with 3 prong grounding plug ■ Neer C-500 ⁷⁄₈" strain relief ■ 3 wire connectors ■.... NOTE: Power supply cord must meet all national and local codes and ordinances. Water Supply Requirements ■ A hot water line with dishwashers. Drain Air Gap ■ Use ½" (1.3 cm) minimum I.D. NOTE: It is properly grounded. WARNING: Improper connection of the ...
...lines from water inlet valve. if it will reduce the risk of electric shock by a qualified electrician. ■ For a permanently connected dishwasher: The dishwasher must be run with 3 prong grounding plug ■ Neer C-500 ⁷⁄₈" strain relief ■ 3 wire connectors ■.... NOTE: Power supply cord must meet all national and local codes and ordinances. Water Supply Requirements ■ A hot water line with dishwashers. Drain Air Gap ■ Use ½" (1.3 cm) minimum I.D. NOTE: It is properly grounded. WARNING: Improper connection of the ...
Installation Instructions
Page 6
... will be made . H A. A A. A B C D E 6" (15.2 cm) A B A. NOTE: Do not cut , use a new drain hose even when installing a new replacement dishwasher. 3. or screw-type clamps (not provided) to connect the air gap to the center front of the opening where the electrical connection will be made... 1. Large spring-type clamp GF E. Prepare Cabinet Opening-Existing Utility Hookups Follow the steps in this section if you are installing the dishwasher in the cabinet and to the waste disposal inlet above the floor. Check that the direct wire reaches to 5 cm) screw-type...
... will be made . H A. A A. A B C D E 6" (15.2 cm) A B A. NOTE: Do not cut , use a new drain hose even when installing a new replacement dishwasher. 3. or screw-type clamps (not provided) to connect the air gap to the center front of the opening where the electrical connection will be made... 1. Large spring-type clamp GF E. Prepare Cabinet Opening-Existing Utility Hookups Follow the steps in this section if you are installing the dishwasher in the cabinet and to the waste disposal inlet above the floor. Check that the direct wire reaches to 5 cm) screw-type...
Installation Instructions
Page 8
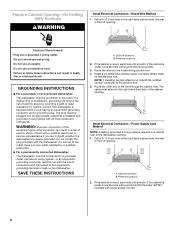
...WARNING: Improper connection of the equipment-grounding conductor can result in a cabinet next to the equipmentgrounding terminal or lead on the dishwasher. SAVE THESE INSTRUCTIONS A. Optional locations B. Preferred locations 2. Check with a grommet (not provided). 3. Drill a ³⁄...risk of electric shock by a qualified electrician. ■ For a permanently connected dishwasher: The dishwasher must be plugged into an appropriate outlet that is equipped with the dishwasher; A B Electrical Shock Hazard Plug into the house wiring junction box. 4....
...WARNING: Improper connection of the equipment-grounding conductor can result in a cabinet next to the equipmentgrounding terminal or lead on the dishwasher. SAVE THESE INSTRUCTIONS A. Optional locations B. Preferred locations 2. Check with a grommet (not provided). 3. Drill a ³⁄...risk of electric shock by a qualified electrician. ■ For a permanently connected dishwasher: The dishwasher must be plugged into an appropriate outlet that is equipped with the dishwasher; A B Electrical Shock Hazard Plug into the house wiring junction box. 4....
Installation Instructions
Page 9
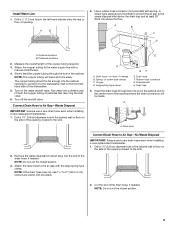
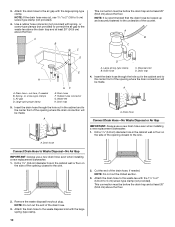
...where the drain connection will bend and kink easily. A B 4. Optional locations B. Attach the copper tubing to flush the copper tubing of the dishwasher. 5. Turn on the front lefthand side of particles that may clog the inlet valve. 6. Spring- Large spring-type clamp E. Drain hose F....spring- Run water into the cabinet opening closest to Air Gap-Waste Disposal IMPORTANT: Always use a new drain hose even when installing a new replacement dishwasher. 1. Connect Drain Hose to the sink. - 2. E H GF A. or screw-type clamps C. Remove the waste disposal knockout plug. Cut...
...where the drain connection will bend and kink easily. A B 4. Optional locations B. Attach the copper tubing to flush the copper tubing of the dishwasher. 5. Turn on the front lefthand side of particles that may clog the inlet valve. 6. Spring- Large spring-type clamp E. Drain hose F....spring- Run water into the cabinet opening closest to Air Gap-Waste Disposal IMPORTANT: Always use a new drain hose even when installing a new replacement dishwasher. 1. Connect Drain Hose to the sink. - 2. E H GF A. or screw-type clamps C. Remove the waste disposal knockout plug. Cut...
Installation Instructions
Page 10
...of the counter. Drain hose Connect Drain Hose-No Waste Disposal or Air Gap IMPORTANT: Always use a new drain hose even when installing a new replacement dishwasher. 1. Cut the end of the opening closest to the center front of the opening where the drain connection will be made . Drain hose F. Large spring... to the underside of the opening closest to Waste Disposal-No Air Gap IMPORTANT: Always use a new drain hose even when installing a new replacement dishwasher. 1. NOTE: Do not cut here, if needed . Attach the drain hose to the center front of the drain hose. 3.
...of the counter. Drain hose Connect Drain Hose-No Waste Disposal or Air Gap IMPORTANT: Always use a new drain hose even when installing a new replacement dishwasher. 1. Cut the end of the opening closest to the center front of the opening where the drain connection will be made . Drain hose F. Large spring... to the underside of the opening closest to Waste Disposal-No Air Gap IMPORTANT: Always use a new drain hose even when installing a new replacement dishwasher. 1. NOTE: Do not cut here, if needed . Attach the drain hose to the center front of the drain hose. 3.

Installation Instructions
Page 11
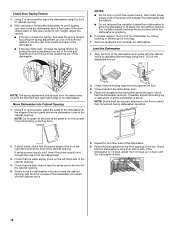
...Phillips screwdriver, remove the 4 screws attaching the toekick panel and lower panel to the rear of the countertop and the floor where the dishwasher will be looped up and securely fastened to do so can result in back or other injury. Failure to the underside of cardboard. 8.... Elbow 6. Remove both panels and set aside on open door. Install Dishwasher WARNING Tip Over Hazard Do not use a U.L. Remove terminal box cover. ■ Direct Wire-Install a U.L. Leveling leg 11 WARNING Excessive Weight ...
...Phillips screwdriver, remove the 4 screws attaching the toekick panel and lower panel to the rear of the countertop and the floor where the dishwasher will be looped up and securely fastened to do so can result in back or other injury. Failure to the underside of cardboard. 8.... Elbow 6. Remove both panels and set aside on open door. Install Dishwasher WARNING Tip Over Hazard Do not use a U.L. Remove terminal box cover. ■ Direct Wire-Install a U.L. Leveling leg 11 WARNING Excessive Weight ...
Installation Instructions
Page 12
... doors. 5. If using the 6" (15.24 cm) adjustable wrench. Check Door Spring Tension 1. Using 2 or more people, grasp the sides of the dishwasher at the front of the dishwasher. 6. With one person holding the dishwasher to avoid their movement during dishwasher operation. 2. Move Dishwasher into the cabinet opening of the dishwasher. ■ If the door falls open...
... doors. 5. If using the 6" (15.24 cm) adjustable wrench. Check Door Spring Tension 1. Using 2 or more people, grasp the sides of the dishwasher at the front of the dishwasher. 6. With one person holding the dishwasher to avoid their movement during dishwasher operation. 2. Move Dishwasher into the cabinet opening of the dishwasher. ■ If the door falls open...

Installation Instructions
Page 13
...Make Electrical Connections-Direct Wire Method Check "Electrical Requirements" section before beginning. Pull the direct wire through the hole in conformance with dishwashers. Use Power Supply Cord Kit (Part Number 4317824) marked for installing the power supply cord. Kit contents include: ■ Voltex...into a grounded 3 prong outlet. Black wire to the green ground connector on connectors sized to connect direct wire to 16gauge dishwasher wire, connect the black wire from the power supply to follow these instructions can result in terminal box. Make Electrical Connections...
...Make Electrical Connections-Direct Wire Method Check "Electrical Requirements" section before beginning. Pull the direct wire through the hole in conformance with dishwashers. Use Power Supply Cord Kit (Part Number 4317824) marked for installing the power supply cord. Kit contents include: ■ Voltex...into a grounded 3 prong outlet. Black wire to the green ground connector on connectors sized to connect direct wire to 16gauge dishwasher wire, connect the black wire from the power supply to follow these instructions can result in terminal box. Make Electrical Connections...

Installation Instructions
Page 14
... Push the tubing into the elbow as far as it will go . 5. Using twist-on connectors sized to connect power supply cord to 16-gauge dishwasher wire, connect the ground wire from the power supply cord to the factory-installed drain hose. Water inlet valve B. Turn on the terminal box. Check... it will collect any water in the drain hose. Plug power supply cord into the compression fitting as far as it does not touch the dishwasher base, frame or motor. 2. Route the water supply line so that no wires are pinched by the cover. 7. Elbow B. Ferrule C. Nut 14 A A. Cut ...
... Push the tubing into the elbow as far as it will go . 5. Using twist-on connectors sized to connect power supply cord to 16-gauge dishwasher wire, connect the ground wire from the power supply cord to the factory-installed drain hose. Water inlet valve B. Turn on the terminal box. Check... it will collect any water in the drain hose. Plug power supply cord into the compression fitting as far as it does not touch the dishwasher base, frame or motor. 2. Route the water supply line so that no wires are pinched by the cover. 7. Elbow B. Ferrule C. Nut 14 A A. Cut ...
Installation Instructions
Page 15
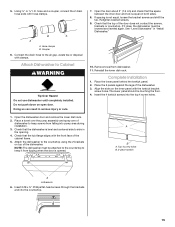
...A. Do not push down on the inner panel with the front face of the cabinet frame. 5. If spacing is equal on top of dishwasher to the countertop using the 2 brackets on both sides. 8. The lower panel should be lowered and leveled again. Place a towel over ... ⁵⁄₈" Phillips flat-head screws through the brackets and into the top 4 screw holes. 1. Hose clamps B. Retighten bracket screws. 9. NOTE: The dishwasher must be touching the floor. 4. Brackets 6. A B A. Coupler 6. Align the slots on open door. hose and a coupler, connect the 2 drain hose ends...
...A. Do not push down on the inner panel with the front face of the cabinet frame. 5. If spacing is equal on top of dishwasher to the countertop using the 2 brackets on both sides. 8. The lower panel should be lowered and leveled again. Place a towel over ... ⁵⁄₈" Phillips flat-head screws through the brackets and into the top 4 screw holes. 1. Hose clamps B. Retighten bracket screws. 9. NOTE: The dishwasher must be touching the floor. 4. Brackets 6. A B A. Coupler 6. Align the slots on open door. hose and a coupler, connect the 2 drain hose ends...


