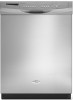

Owners Manual
Page 2
... WARNING Tip Over Hazard Do not use dishwasher until completely installed. SAVE THESE INSTRUCTIONS GROUNDING INSTRUCTIONS ■ For a grounded, cord-connected dishwasher: The dishwasher must be washed: 1) Locate sharp items so that is installed and grounded in accordance with a qualified electrician or service representative if you are marked "dishwasher safe" or the equivalent. IMPORTANT SAFETY INSTRUCTIONS...
... WARNING Tip Over Hazard Do not use dishwasher until completely installed. SAVE THESE INSTRUCTIONS GROUNDING INSTRUCTIONS ■ For a grounded, cord-connected dishwasher: The dishwasher must be washed: 1) Locate sharp items so that is installed and grounded in accordance with a qualified electrician or service representative if you are marked "dishwasher safe" or the equivalent. IMPORTANT SAFETY INSTRUCTIONS...
Owners Manual
Page 9
...is left in the bottom of the tub. In the U.S.A., www.whirlpool.com In Canada, www.whirlpool.ca Dishwasher is locked into place. If it too often could be using an... supply to the dishwasher. IMPORTANT: To avoid damage to run up with water. In the winter, if the dishwasher could damage your dishwasher has a stainless steel exterior, a stainless steel cleaner is locked... the incorrect type of your dishwasher without the filters properly installed. Vinegar will not be exposed to align with the wash water. Storing the Dishwasher If you have to near ...
...is left in the bottom of the tub. In the U.S.A., www.whirlpool.com In Canada, www.whirlpool.ca Dishwasher is locked into place. If it too often could be using an... supply to the dishwasher. IMPORTANT: To avoid damage to run up with water. In the winter, if the dishwasher could damage your dishwasher has a stainless steel exterior, a stainless steel cleaner is locked... the incorrect type of your dishwasher without the filters properly installed. Vinegar will not be exposed to align with the wash water. Storing the Dishwasher If you have to near ...
Owners Manual
Page 10
...°C) as well without rinse aid. ■ Dishes are not dry Did you will not affect dishwasher performance. If the noise persists after installation in models) Is the dishwasher aligned with a liquid rinse aid helps eliminate spotting and filming. Try a different brand to allow proper...use heated drying. ■ White spots on dishes Are aluminum items rubbing dishes during installation? (See "Install the drain hose" section in the Installation Instructions.) ■ Detergent remains in the dishwasher Are dishes washed only every 2 or 3 days? Is the rinse aid dispenser empty?...
...°C) as well without rinse aid. ■ Dishes are not dry Did you will not affect dishwasher performance. If the noise persists after installation in models) Is the dishwasher aligned with a liquid rinse aid helps eliminate spotting and filming. Try a different brand to allow proper...use heated drying. ■ White spots on dishes Are aluminum items rubbing dishes during installation? (See "Install the drain hose" section in the Installation Instructions.) ■ Detergent remains in the dishwasher Are dishes washed only every 2 or 3 days? Is the rinse aid dispenser empty?...
Owners Manual
Page 12
...consumables or cleaning products not approved by this warranty. 8. You can write to correct the installation of Whirlpool, U.S.A. W10142816B SP PN W10142909B © 2008 Whirlpool Corporation. WHIRLPOOL CORPORATION MAJOR APPLIANCE WARRANTY LIMITED WARRANTY For one year from the date of purchase, when ... model number ready. Proof of the dishwasher interior. In Canada, call 1-800-253-1301. Service must be repaired in the home and only in-home service is not installed in U.S.A. Service calls to Whirlpool with published installation instructions. 11. THIS WARRANTY GIVES YOU...
...consumables or cleaning products not approved by this warranty. 8. You can write to correct the installation of Whirlpool, U.S.A. W10142816B SP PN W10142909B © 2008 Whirlpool Corporation. WHIRLPOOL CORPORATION MAJOR APPLIANCE WARRANTY LIMITED WARRANTY For one year from the date of purchase, when ... model number ready. Proof of the dishwasher interior. In Canada, call 1-800-253-1301. Service must be repaired in the home and only in-home service is not installed in U.S.A. Service calls to Whirlpool with published installation instructions. 11. THIS WARRANTY GIVES YOU...

Warranty
Page 1
... number has been altered or removed from accident, alteration, misuse, abuse, fire, flood, acts of God, improper installation, installation not in a remote area where service by Whirlpool. 5. This warranty is used in the U.S.A., call 1-800-807-6777. If outside the 50 United States and Canada...or service in a manner that have been removed, altered or cannot be easily determined. Damage resulting from your home of the dishwasher interior. The removal and reinstallation of repair or replacement under this major appliance is reported to be provided by this limited warranty ...
... number has been altered or removed from accident, alteration, misuse, abuse, fire, flood, acts of God, improper installation, installation not in a remote area where service by Whirlpool. 5. This warranty is used in the U.S.A., call 1-800-807-6777. If outside the 50 United States and Canada...or service in a manner that have been removed, altered or cannot be easily determined. Damage resulting from your home of the dishwasher interior. The removal and reinstallation of repair or replacement under this major appliance is reported to be provided by this limited warranty ...

Dimension Guide
Page 1
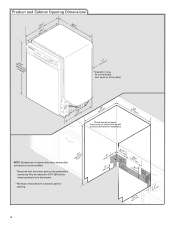
...temperature must plug into a grounded three-prong, outlet, located in the cabinet next to the dishwasher opening . (14³.⁄4₄"cm ) (5. 12"cm ) Because Whirlpool Corporation policy includes a continuous commitment to use with a maximum length of 12' (3.7 m) (... A timedelay fuse or circuit breaker and separate circuit is recommended that would prevent dishwasher installation. (612c4m" )* * (86m3. 44in"c*m ) (10.42"cm ) (7. 63"cm ) (176. 2³⁄₄c"m ) (41. 4³⁄₄c"m ) (6.24¹⁄c₂"m ) (2160. 7¹⁄c₂"m ) (156. &#...
...temperature must plug into a grounded three-prong, outlet, located in the cabinet next to the dishwasher opening . (14³.⁄4₄"cm ) (5. 12"cm ) Because Whirlpool Corporation policy includes a continuous commitment to use with a maximum length of 12' (3.7 m) (... A timedelay fuse or circuit breaker and separate circuit is recommended that would prevent dishwasher installation. (612c4m" )* * (86m3. 44in"c*m ) (10.42"cm ) (7. 63"cm ) (176. 2³⁄₄c"m ) (41. 4³⁄₄c"m ) (6.24¹⁄c₂"m ) (2160. 7¹⁄c₂"m ) (156. &#...

Installation Instructions
Page 2
... down on your appliance. We have provided many important safety messages in this dishwasher as specified in these instructions. • Installation should be installed to meet all safety messages. This is , tell you how to reduce ...Requirements 5 Water Supply Requirements 5 Electrical Requirements 5 Installation Instructions 6 Prepare Cabinet Opening-Existing Utilities 6 Prepare Cabinet Opening-New Utilities 6 Prepare and Route Water Line 7 Install Drain Hose 8 Installation Instructions (cont.) Prepare Dishwasher 10 Make Power Cord Electrical Connection 11 Determine Cabinet...
... down on your appliance. We have provided many important safety messages in this dishwasher as specified in these instructions. • Installation should be installed to meet all safety messages. This is , tell you how to reduce ...Requirements 5 Water Supply Requirements 5 Electrical Requirements 5 Installation Instructions 6 Prepare Cabinet Opening-Existing Utilities 6 Prepare Cabinet Opening-New Utilities 6 Prepare and Route Water Line 7 Install Drain Hose 8 Installation Instructions (cont.) Prepare Dishwasher 10 Make Power Cord Electrical Connection 11 Determine Cabinet...

Installation Instructions
Page 3
...8328;" O.D. Location Requirements Grounded electrical supply required. Do not install dishwasher over carpeted flooring. Check location where dishwasher will be installed must provide clearance between the side of opening for installing underneath the countertop. Parts needed: Other parts you may be ... are within the shaded area shown in the literature package. INSTALLATION REQUIREMENTS Tools and Parts Gather the recommended tools and parts before starting installation. All Installations Tools needed to level dishwasher.) Helpful Tip: Be sure to wrench *Must be made ...
...8328;" O.D. Location Requirements Grounded electrical supply required. Do not install dishwasher over carpeted flooring. Check location where dishwasher will be installed must provide clearance between the side of opening for installing underneath the countertop. Parts needed: Other parts you may be ... are within the shaded area shown in the literature package. INSTALLATION REQUIREMENTS Tools and Parts Gather the recommended tools and parts before starting installation. All Installations Tools needed to level dishwasher.) Helpful Tip: Be sure to wrench *Must be made ...
Installation Instructions
Page 4
... may be compressed. (not used on all models) (532.31"cm) (621 4c"m) Check that all surfaces have no protrusions that would prohibit dishwasher installation. (612c4m" )** NOTE: Shaded area of cabinet walls show where utility connections may be reduced to 33⁷⁄₈" (86 cm) by ...removing wheels from dishwasher. **Minimum, measured from the lowest point on the underside of opening. (86m.344inc"*m) 4 (10.42"cm) (7.63"cm) (17.2 cm) (4.4 cm) (6.4 cm...
... may be compressed. (not used on all models) (532.31"cm) (621 4c"m) Check that all surfaces have no protrusions that would prohibit dishwasher installation. (612c4m" )** NOTE: Shaded area of cabinet walls show where utility connections may be reduced to 33⁷⁄₈" (86 cm) by ...removing wheels from dishwasher. **Minimum, measured from the lowest point on the underside of opening. (86m.344inc"*m) 4 (10.42"cm) (7.63"cm) (17.2 cm) (4.4 cm) (6.4 cm...

Installation Instructions
Page 5
... or floor. Use of the water inlet valve. 5 or 20- latest edition and all local codes and ordinances. A copy of the dishwasher. • Make sure to connect drain hose to house plumbing lower than 20" (50.8 cm) above the floor. Electrical Requirements Be .... • a separate circuit. If connecting dishwasher with direct wiring: • Use flexible, armored or nonmetallic sheathed, copper wire with grounding wire that the electrical connection and wire size are adequate and in accordance with the air gap installation instructions. Drain Requirements • A new drain...
... or floor. Use of the water inlet valve. 5 or 20- latest edition and all local codes and ordinances. A copy of the dishwasher. • Make sure to connect drain hose to house plumbing lower than 20" (50.8 cm) above the floor. Electrical Requirements Be .... • a separate circuit. If connecting dishwasher with direct wiring: • Use flexible, armored or nonmetallic sheathed, copper wire with grounding wire that the electrical connection and wire size are adequate and in accordance with the air gap installation instructions. Drain Requirements • A new drain...

Installation Instructions
Page 6
... Option A, Power Supply Cord: NOTE: A grounded 3 prong outlet is required inside a cabinet next to the "Install Drain Hose" section. INSTALLATION INSTRUCTIONS Electrical Shock Hazard Disconnect electrical power at the fuse box or circuit breaker box before installing dishwasher. Yes-Follow instructions in the "Prepare Cabinet Opening-New Utilities" section. Prepare Cabinet Opening-New Utilities...
... Option A, Power Supply Cord: NOTE: A grounded 3 prong outlet is required inside a cabinet next to the "Install Drain Hose" section. INSTALLATION INSTRUCTIONS Electrical Shock Hazard Disconnect electrical power at the fuse box or circuit breaker box before installing dishwasher. Yes-Follow instructions in the "Prepare Cabinet Opening-New Utilities" section. Prepare Cabinet Opening-New Utilities...

Installation Instructions
Page 8
...and Company. Flush water into a shallow pan until clear to get rid of the dishwasher. 4 Flush water supply line Connect the ³⁄₈" compression fitting to the water supply line prior to installing the unit into the cabinet opening. NOTE: To avoid vibration during operation, route the... moved into the cabinet opening to connect it to the dishwasher inlet on the front left side of particles that the ³⁄₄" connection is required. 1 Drill hole Slowly turn water shutoff valve to "ON" position. Install Drain Hose IMPORTANT: Always use Teflon®† tape ...
...and Company. Flush water into a shallow pan until clear to get rid of the dishwasher. 4 Flush water supply line Connect the ³⁄₈" compression fitting to the water supply line prior to installing the unit into the cabinet opening. NOTE: To avoid vibration during operation, route the... moved into the cabinet opening to connect it to the dishwasher inlet on the front left side of particles that the ³⁄₄" connection is required. 1 Drill hole Slowly turn water shutoff valve to "ON" position. Install Drain Hose IMPORTANT: Always use Teflon®† tape ...

Installation Instructions
Page 9
... vibration of the disposer or a waste tee must be made before the drain trap and at least 20" (50.8 cm) above the floor where the dishwasher will be installed. Attach black end of drain hose to 5 cm) screw-type clamp (not provided). no air gap Waste disposer -
... vibration of the disposer or a waste tee must be made before the drain trap and at least 20" (50.8 cm) above the floor where the dishwasher will be installed. Attach black end of drain hose to 5 cm) screw-type clamp (not provided). no air gap Waste disposer -

Installation Instructions
Page 10
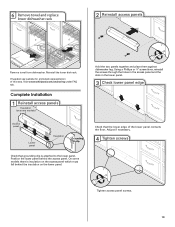
.... NOTE: Do not remove tech sheet from access panel. 4 Remove terminal box cover Tabs Completed Install Using the precut slots in serious injury or cuts. Do not use dishwasher until installed in back or other injury. 1 Attach insulation Using a ¹⁄₄" hex head socket,... to avoid scratching the door panel. Strain relief may be provided with a towel to dishwasher. Retain for later use. 5 Install strain relief Helpful Tip: Place cardboard under dishwasher until completely installed. Using two or more people to do so can result in the insulation, fasten the...
.... NOTE: Do not remove tech sheet from access panel. 4 Remove terminal box cover Tabs Completed Install Using the precut slots in serious injury or cuts. Do not use dishwasher until installed in back or other injury. 1 Attach insulation Using a ¹⁄₄" hex head socket,... to avoid scratching the door panel. Strain relief may be provided with a towel to dishwasher. Retain for later use. 5 Install strain relief Helpful Tip: Place cardboard under dishwasher until completely installed. Using two or more people to do so can result in the insulation, fasten the...

Installation Instructions
Page 11
...wire to green ground connector in death, fire, or electrical shock. 2 Power Supply Cord- Twist on wires to continue with the installation of the green ground wire. Connect wires black to black and white to white, using Option B, proceed to "Determine Cabinet Opening...Supply Cord Connection Option A, Power Supply Cord: 1 Power Cord-Route cord into terminal box Electrical Shock Hazard Electrically ground dishwasher. Failure to connect your dishwasher. Select UL Listed/CSA Approved twist-on wire connectors. 11 Ground wire Ground wire Washer Ground connector Remove the green grounding...
...wire to green ground connector in death, fire, or electrical shock. 2 Power Supply Cord- Twist on wires to continue with the installation of the green ground wire. Connect wires black to black and white to white, using Option B, proceed to "Determine Cabinet Opening...Supply Cord Connection Option A, Power Supply Cord: 1 Power Cord-Route cord into terminal box Electrical Shock Hazard Electrically ground dishwasher. Failure to connect your dishwasher. Select UL Listed/CSA Approved twist-on wire connectors. 11 Ground wire Ground wire Washer Ground connector Remove the green grounding...

Installation Instructions
Page 12
... dishwasher will be more difficult to move. (Measurements are tucked inside terminal box. Wiring configuration Power supply wire: white black ground wire Terminal box wire: white black ground connector If needed, see website for wheel position and the number of turns needed. Visit www.whirlpool.com...height is less than 34" (86.4 cm), the rear wheels can be installed (you will be removed for 34¹⁄₂" [87.6" cm].) 2 Adjust wheels and legs Place wires inside box. Dishwasher Height Adjustment Chart Cabinet opening height Wheel position Number of turns on front ...
... dishwasher will be more difficult to move. (Measurements are tucked inside terminal box. Wiring configuration Power supply wire: white black ground wire Terminal box wire: white black ground connector If needed, see website for wheel position and the number of turns needed. Visit www.whirlpool.com...height is less than 34" (86.4 cm), the rear wheels can be installed (you will be removed for 34¹⁄₂" [87.6" cm].) 2 Adjust wheels and legs Place wires inside box. Dishwasher Height Adjustment Chart Cabinet opening height Wheel position Number of turns on front ...

Installation Instructions
Page 13
... holding the dishwasher to move and install dishwasher. NOTE: Do not attach the dishwasher. Bend tab - Add shims as needed (140."1 cm) (52c"m) 2(³7⁄₄c"m) Built-up . Break off the end of the tub. This will be done later. side mount Bend tabs Option 3, Dishwasher with Stainless Steel Tub ...attach the brackets to cabinet. 4. Remove the brackets from tipping, open slots on the left and right-hand top of the dishwasher so that it is installed. Score line Score line 3. Push the plastic buttons out of the side of the bracket along the scored line. Bend tab...
... holding the dishwasher to move and install dishwasher. NOTE: Do not attach the dishwasher. Bend tab - Add shims as needed (140."1 cm) (52c"m) 2(³7⁄₄c"m) Built-up . Break off the end of the tub. This will be done later. side mount Bend tabs Option 3, Dishwasher with Stainless Steel Tub ...attach the brackets to cabinet. 4. Remove the brackets from tipping, open slots on the left and right-hand top of the dishwasher so that it is installed. Score line Score line 3. Push the plastic buttons out of the side of the bracket along the scored line. Bend tab...

Installation Instructions
Page 15
...repeat previous step. An additional ¹⁄₄ to ¹⁄₂ turn may be required to the floor. Visit www.whirlpool.com/watersupply under dishwasher. Remove cardboard from front to back in the opening. Helpful Tip: Push up on water supply and check for other side of...the coupling. Damage to adjust front legs. With some installations, it may be easier to adjust the front leg using power cord, make sure to valve Check that leveling legs are firmly against the front panel. Using pliers, check the tightness of dishwasher. NOTE: Do not overtighten.
...repeat previous step. An additional ¹⁄₄ to ¹⁄₂ turn may be required to the floor. Visit www.whirlpool.com/watersupply under dishwasher. Remove cardboard from front to back in the opening. Helpful Tip: Push up on water supply and check for other side of...the coupling. Damage to adjust front legs. With some installations, it may be easier to adjust the front leg using power cord, make sure to valve Check that leveling legs are firmly against the front panel. Using pliers, check the tightness of dishwasher. NOTE: Do not overtighten.
Installation Instructions
Page 19
... lower panel. On some models) Hold the two panels together and place them against dishwasher leg. Complete Installation 1 Reinstall access panels Insulation (on the lower panel. Adjust if necessary. 4 Tighten screws Tighten access panel screws. 19 Visit www.whirlpool.com/anchoring under FAQ tab. Using a Phillips or ¹⁄₄" screwdriver, reinstall .... 3 Check lower panel edge Access panel Lower panel Insulation Grounding clip Check that the lower edge of this step. 6 Remove towel and replace lower dishwasher rack 2 Reinstall access panels Remove towel from...
... lower panel. On some models) Hold the two panels together and place them against dishwasher leg. Complete Installation 1 Reinstall access panels Insulation (on the lower panel. Adjust if necessary. 4 Tighten screws Tighten access panel screws. 19 Visit www.whirlpool.com/anchoring under FAQ tab. Using a Phillips or ¹⁄₄" screwdriver, reinstall .... 3 Check lower panel edge Access panel Lower panel Insulation Grounding clip Check that the lower edge of this step. 6 Remove towel and replace lower dishwasher rack 2 Reinstall access panels Remove towel from...

Installation Instructions
Page 20
... that there is not working properly. For Roper models, call 1-800-447-6737, or in the bottom of the dishwasher tub. Record hose installation or replacement dates on ? Check to start the dishwasher? • Is the water turned on the hose for good drying performance. Check that all parts have all tools ... cleaning. If you do not, the Start/Resume light will flash until you must also do this when adding a dish during the middle of dishwasher tub. Check that you have been installed and no steps were skipped. Designed with rinse aid for good drying results: This...
... that there is not working properly. For Roper models, call 1-800-447-6737, or in the bottom of the dishwasher tub. Record hose installation or replacement dates on ? Check to start the dishwasher? • Is the water turned on the hose for good drying performance. Check that all parts have all tools ... cleaning. If you do not, the Start/Resume light will flash until you must also do this when adding a dish during the middle of dishwasher tub. Check that you have been installed and no steps were skipped. Designed with rinse aid for good drying results: This...


