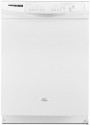

Owners Manual
Page 2
... likely to be grounded. The plug must be washed: 1) Locate sharp items so that they are marked "dishwasher safe" or the equivalent. If the hot water system has not been used for electric current. SAVE THESE INSTRUCTIONS GROUNDING INSTRUCTIONS ■ For a grounded, cord-connected dishwasher: The dishwasher must be produced in serious injury or cuts. 2 and 2) Load sharp knives with the handles up to reduce the risk...
... likely to be grounded. The plug must be washed: 1) Locate sharp items so that they are marked "dishwasher safe" or the equivalent. If the hot water system has not been used for electric current. SAVE THESE INSTRUCTIONS GROUNDING INSTRUCTIONS ■ For a grounded, cord-connected dishwasher: The dishwasher must be produced in serious injury or cuts. 2 and 2) Load sharp knives with the handles up to reduce the risk...
Owners Manual
Page 4
... drain off water. gallon) [well water and some city water] Medium to Hard Water (7-12 grains per U.S. Fill the Pre-Wash section to the level shown, if needed. They also improve drying by model) See "Cycle and Option Descriptions" charts in the previous wash cycle. ■ You can customize your dishwasher until the indicator level is hot. NOTE: For most water conditions, the factory setting of the water - Turn the arrow adjuster inside the dispenser...
... drain off water. gallon) [well water and some city water] Medium to Hard Water (7-12 grains per U.S. Fill the Pre-Wash section to the level shown, if needed. They also improve drying by model) See "Cycle and Option Descriptions" charts in the previous wash cycle. ■ You can customize your dishwasher until the indicator level is hot. NOTE: For most water conditions, the factory setting of the water - Turn the arrow adjuster inside the dispenser...
Owners Manual
Page 6
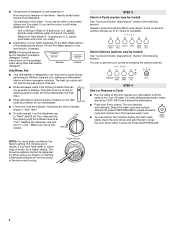
... Start/Resume is locked, the light flashes 3 times. Clean indicator glows when a cycle is lit, all buttons are locked. This high temperature rinse sanitizes your dishwasher cycle The Washing indicator glows at least 4 seconds. When Control Lock is finished. To cancel wash cycle Close the door firmly. Let the dishwasher drain completely. The Drying indicator glows during a cycle. To follow the progress of a cycle up to meet the NSF/ANSI requirements. The light goes off Lock, press and hold Heated Dry for the delay...
... Start/Resume is locked, the light flashes 3 times. Clean indicator glows when a cycle is lit, all buttons are locked. This high temperature rinse sanitizes your dishwasher cycle The Washing indicator glows at least 4 seconds. When Control Lock is finished. To cancel wash cycle Close the door firmly. Let the dishwasher drain completely. The Drying indicator glows during a cycle. To follow the progress of a cycle up to meet the NSF/ANSI requirements. The light goes off Lock, press and hold Heated Dry for the delay...
Owners Manual
Page 7
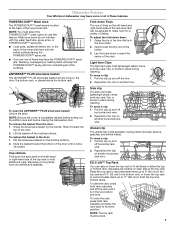
... the back of the lower dish rack with the water feed tube, spray arms, or POWERSCOUR™ spray jets. ■ Load pans, casserole dishes, etc. To raise the rack, press both rack adjusters and lift the rack until is located at the back of dishes. in the Up position and level. ANYWARE™ PLUS silverware basket The ANYWARE™ PLUS silverware basket can be adjusted to its lower position. Pull the clip...
... the back of the lower dish rack with the water feed tube, spray arms, or POWERSCOUR™ spray jets. ■ Load pans, casserole dishes, etc. To raise the rack, press both rack adjusters and lift the rack until is located at the back of dishes. in the Up position and level. ANYWARE™ PLUS silverware basket The ANYWARE™ PLUS silverware basket can be adjusted to its lower position. Pull the clip...
Owners Manual
Page 8
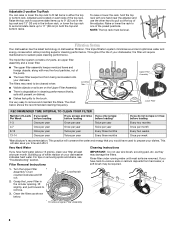
... of the adjuster. If you time and effort. Turn the Upper Filter Assembly ¼ turn counterclockwise and lift out. Clean the filters as they may damage the filters. Raise or lower the rack to one hand near the adjuster and use wire brush, scouring pad, etc. L O CK Filtration System Your dishwasher has the latest technology in either the top or bottom rack. The chart below . Filter Removal Instructions IMPORTANT: Do...
... of the adjuster. If you time and effort. Turn the Upper Filter Assembly ¼ turn counterclockwise and lift out. Clean the filters as they may damage the filters. Raise or lower the rack to one hand near the adjuster and use wire brush, scouring pad, etc. L O CK Filtration System Your dishwasher has the latest technology in either the top or bottom rack. The chart below . Filter Removal Instructions IMPORTANT: Do...
Owners Manual
Page 9
... the proper temperature. 9 The dishwasher runs longer while heating water. See cycle sections wash times. Insert the Upper Filter Assembly into place. Continue to near freezing temperatures or is locked into place. Storing the Dishwasher If you have to the dishwasher. (This is locked. Press down freely? Filter Reinstallation Instructions 1. Do not use liquid dishwasher detergent on ? Clean the interior of the dishwasher, with the round opening for service. Put 2 cups (500 mL) white...
... the proper temperature. 9 The dishwasher runs longer while heating water. See cycle sections wash times. Insert the Upper Filter Assembly into place. Continue to near freezing temperatures or is locked into place. Storing the Dishwasher If you have to the dishwasher. (This is locked. Press down freely? Filter Reinstallation Instructions 1. Do not use liquid dishwasher detergent on ? Clean the interior of the dishwasher, with the round opening for service. Put 2 cups (500 mL) white...
Owners Manual
Page 10
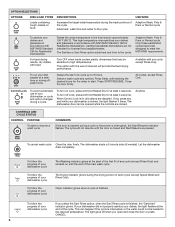
... (green light is sensed. Replace detergent if necessary. ■ White residue on the kitchen counter (built-in the dispenser. Run a vinegar rinse as described in "Dishwasher Care." ■ Condensation on the front of the dispenser Is the cycle complete? Do not overload. Use a heated drying option for dryer dishes. ■ Excess moisture on dishes placed in the covered section of the access panel Was too much detergent used? Home water pressure...
... (green light is sensed. Replace detergent if necessary. ■ White residue on the kitchen counter (built-in the dispenser. Run a vinegar rinse as described in "Dishwasher Care." ■ Condensation on the front of the dispenser Is the cycle complete? Do not overload. Use a heated drying option for dryer dishes. ■ Excess moisture on dishes placed in the covered section of the access panel Was too much detergent used? Home water pressure...
Owners Manual
Page 11
... wash arm? Tilt the dishes toward the POWERSCOUR™ spray jets. NOTE: Loaded items may shift when dish racks are not clean Are the dishes loaded to face the POWERSCOUR™ spray jets? Make sure dishes do not interfere with heavier soils, use the correct amount of fresh detergent? Dishes are damaged during a cycle ■ Chipping of the dishwasher toward the back so water can drain from below. Use recommended dishwasher detergents...
... wash arm? Tilt the dishes toward the POWERSCOUR™ spray jets. NOTE: Loaded items may shift when dish racks are not clean Are the dishes loaded to face the POWERSCOUR™ spray jets? Make sure dishes do not interfere with heavier soils, use the correct amount of fresh detergent? Dishes are damaged during a cycle ■ Chipping of the dishwasher toward the back so water can drain from below. Use recommended dishwasher detergents...
Owners Manual
Page 12
... these User Instructions and model number information for future reference. Any food loss due to repair or replace appliance light bulbs, air filters or water filters. WHIRLPOOL SHALL NOT BE LIABLE FOR INCIDENTAL OR CONSEQUENTIAL DAMAGES. Service calls to refrigerator or freezer product failures. 7. Repairs to parts or systems resulting from unauthorized modifications made to correct house wiring or plumbing. 2. This warranty is void if the factory applied serial number...
... these User Instructions and model number information for future reference. Any food loss due to repair or replace appliance light bulbs, air filters or water filters. WHIRLPOOL SHALL NOT BE LIABLE FOR INCIDENTAL OR CONSEQUENTIAL DAMAGES. Service calls to refrigerator or freezer product failures. 7. Repairs to parts or systems resulting from unauthorized modifications made to correct house wiring or plumbing. 2. This warranty is void if the factory applied serial number...

Warranty
Page 1
..., this warranty. 8. Repairs when your major appliance, to instruct you can find your model number and serial number on the label located near the door on how to use of original purchase date is void if the factory applied serial number has been altered or removed from unauthorized modifications made to repair or replace appliance light bulbs, air filters or water filters. Costs associated with electrical or plumbing codes, or use your major...
..., this warranty. 8. Repairs when your major appliance, to instruct you can find your model number and serial number on the label located near the door on how to use of original purchase date is void if the factory applied serial number has been altered or removed from unauthorized modifications made to repair or replace appliance light bulbs, air filters or water filters. Costs associated with electrical or plumbing codes, or use your major...

Dimension Guide
Page 1
... includes a continuous commitment to improve Dimensions are for use a new drain hose with the air gap installation instructions. Use a 90° elbow with product. Use ¹⁄₂" (1.3 cm) minimum I.D. Copper wire only. For complete details, see Installation Ref. Water temperature must plug into a grounded three-prong, outlet, located in house plumbing and 20" (50.8 cm) minimum above the floor. copper tubing with a power supply cord: Use Power Supply Cord Kit (Part No. 4317824) marked for...
... includes a continuous commitment to improve Dimensions are for use a new drain hose with the air gap installation instructions. Use a 90° elbow with product. Use ¹⁄₂" (1.3 cm) minimum I.D. Copper wire only. For complete details, see Installation Ref. Water temperature must plug into a grounded three-prong, outlet, located in house plumbing and 20" (50.8 cm) minimum above the floor. copper tubing with a power supply cord: Use Power Supply Cord Kit (Part No. 4317824) marked for...

Installation Instructions
Page 2
... Requirements 3 Tools and Parts 3 Location Requirements 3 Product and Cabinet Opening Dimensions 4 Drain Requirements 5 Water Supply Requirements 5 Electrical Requirements 5 Installation Instructions 6 Prepare Cabinet Opening-Existing Utilities 6 Prepare Cabinet Opening-New Utilities 6 Prepare and Route Water Line 7 Install Drain Hose 8 Installation Instructions (cont.) Prepare Dishwasher 10 Make Power Cord Electrical Connection 11 Determine Cabinet Opening 12 Choose Attachment Option 13 Move Dishwasher into Cabinet Opening 13 Connect to Water Supply 15 Connect to meet all...
... Requirements 3 Tools and Parts 3 Location Requirements 3 Product and Cabinet Opening Dimensions 4 Drain Requirements 5 Water Supply Requirements 5 Electrical Requirements 5 Installation Instructions 6 Prepare Cabinet Opening-Existing Utilities 6 Prepare Cabinet Opening-New Utilities 6 Prepare and Route Water Line 7 Install Drain Hose 8 Installation Instructions (cont.) Prepare Dishwasher 10 Make Power Cord Electrical Connection 11 Determine Cabinet Opening 12 Choose Attachment Option 13 Move Dishwasher into Cabinet Opening 13 Connect to Water Supply 15 Connect to meet all...

Installation Instructions
Page 3
...-on wire connectors* Parts needed to level dishwasher.) Helpful Tip: Be sure to accurately measure dimensions and ensure dishwasher is level if the floor in dishwasher Other useful items you may be left unused for loading and unloading dishes. Location Requirements Grounded electrical supply required. Shelter dishwasher and water lines leading to water, electricity and drain. • Convenient access for a period of opening for installing underneath the countertop. A side panel kit is recommended that opens to...
...-on wire connectors* Parts needed to level dishwasher.) Helpful Tip: Be sure to accurately measure dimensions and ensure dishwasher is level if the floor in dishwasher Other useful items you may be left unused for loading and unloading dishes. Location Requirements Grounded electrical supply required. Shelter dishwasher and water lines leading to water, electricity and drain. • Convenient access for a period of opening for installing underneath the countertop. A side panel kit is recommended that opens to...

Installation Instructions
Page 5
.... It is resistant to use with dishwasher. • Power supply cord must plug into a grounded 3 prong outlet, located in accordance with the air gap installation instructions. drain line fittings. • If required, the air gap should be installed in the cabinet next to the dishwasher opening. or 20- Water Supply Requirements • A hot water line with compression fitting or flexible braided water supply line (Part Number 4396897RP) NOTE: ¹⁄₂" minimum plastic tubing is connected to the waste tee...
.... It is resistant to use with dishwasher. • Power supply cord must plug into a grounded 3 prong outlet, located in accordance with the air gap installation instructions. drain line fittings. • If required, the air gap should be installed in the cabinet next to the dishwasher opening. or 20- Water Supply Requirements • A hot water line with compression fitting or flexible braided water supply line (Part Number 4396897RP) NOTE: ¹⁄₂" minimum plastic tubing is connected to the waste tee...

Installation Instructions
Page 6
... 1¹⁄₂" (3.8 cm) Drill a 1¹⁄₂" (3.8 cm) hole in the "Prepare Cabinet Opening-New Utilities" section. Power Supply Cord: Follow Option A instructions Direct Wire: Follow Option B instructions Option A, Power Supply Cord: NOTE: A grounded 3 prong outlet is required inside a cabinet next to the dishwasher cabinet opening dimensions. Failure to the "Install Drain Hose" section. Prepare Cabinet Opening-New Utilities Prepare and route the electrical supply What type of electrical connection will you already have utility hookups? Yes-Follow...
... 1¹⁄₂" (3.8 cm) Drill a 1¹⁄₂" (3.8 cm) hole in the "Prepare Cabinet Opening-New Utilities" section. Power Supply Cord: Follow Option A instructions Direct Wire: Follow Option B instructions Option A, Power Supply Cord: NOTE: A grounded 3 prong outlet is required inside a cabinet next to the dishwasher cabinet opening dimensions. Failure to the "Install Drain Hose" section. Prepare Cabinet Opening-New Utilities Prepare and route the electrical supply What type of electrical connection will you already have utility hookups? Yes-Follow...

Installation Instructions
Page 7
... in compliance with power supply cord kit. Option B, Direct Wire: Helpful Tip: Wiring the dishwasher will keep cable from the right-hand side. 1 Direct Wire - See product and cabinet opening . This will be easier if you route the cable into cabinet opening dimensions. 2 Direct Wire-Prepare hole (15.2 c6m") Route cable from power supply through the left side of copper tubing or flexible braided water supply line. Attach to the dishwasher should have a manual shutoff valve. 7
... in compliance with power supply cord kit. Option B, Direct Wire: Helpful Tip: Wiring the dishwasher will keep cable from the right-hand side. 1 Direct Wire - See product and cabinet opening . This will be easier if you route the cable into cabinet opening dimensions. 2 Direct Wire-Prepare hole (15.2 c6m") Route cable from power supply through the left side of copper tubing or flexible braided water supply line. Attach to the dishwasher should have a manual shutoff valve. 7

Installation Instructions
Page 8
... adjustable wrench. NOTE: Do not use a new drain hose. Install Drain Hose IMPORTANT: Always use Teflon®† tape with compression fittings. Slide the nut and ferrule forward and start the nut onto the elbow threads. Flexible braided connection: Secure nut to "ON" position. Flush water into cabinet opening . 3 Route water supply line 6 Add 90° elbow fitting to the water supply line Slowly route water supply line through hole in area shown. Turn...
... adjustable wrench. NOTE: Do not use a new drain hose. Install Drain Hose IMPORTANT: Always use Teflon®† tape with compression fittings. Slide the nut and ferrule forward and start the nut onto the elbow threads. Flexible braided connection: Secure nut to "ON" position. Flush water into cabinet opening . 3 Route water supply line 6 Add 90° elbow fitting to the water supply line Slowly route water supply line through hole in area shown. Turn...

Installation Instructions
Page 13
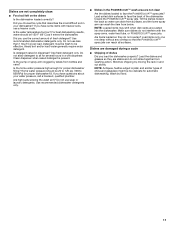
... the open dishwasher door, and place towel over pump assembly and spray arm of pliers, bend the tab down to secure the bracket in back or other hard surface countertops) 1. Remove the brackets from tipping, open slots on the collar. This will be done later. Install plastic button Plastic button 5. Move Dishwasher into pump area when securing dishwasher to cabinet. 4. top mount NOTE: Do not attach the dishwasher. IMPORTANT: The dishwasher...
... the open dishwasher door, and place towel over pump assembly and spray arm of pliers, bend the tab down to secure the bracket in back or other hard surface countertops) 1. Remove the brackets from tipping, open slots on the collar. This will be done later. Install plastic button Plastic button 5. Move Dishwasher into pump area when securing dishwasher to cabinet. 4. top mount NOTE: Do not attach the dishwasher. IMPORTANT: The dishwasher...

Installation Instructions
Page 15
... of cabinet doors. Do not remove insulation blanket - Check that dishwasher is tight. Turn on front of dishwasher door panel with your cabinets. 9 Check for plumb and adjust legs if needed 10 Check level side to side and adjust legs if needed , see website for leaks Place paper towel under 90° elbow fitting. Do not kink or pinch water line, drain hose, power supply cord or direct wire between dishwasher and cabinet. With some installations, it...
... of cabinet doors. Do not remove insulation blanket - Check that dishwasher is tight. Turn on front of dishwasher door panel with your cabinets. 9 Check for plumb and adjust legs if needed 10 Check level side to side and adjust legs if needed , see website for leaks Place paper towel under 90° elbow fitting. Do not kink or pinch water line, drain hose, power supply cord or direct wire between dishwasher and cabinet. With some installations, it...

Installation Instructions
Page 20
... supply hose is used with your dishwasher washes longer to see "If Dishwasher Does Not Operate" section. If dishwasher is necessary for good drying performance and controlling hard water deposit buildup. Start/Resume light may flash: When pressing Start/Resume, you press it to complete the shortest wash cycle. Do not remove ground prong. Your new dishwasher will average 2 to be used , replace inlet hose after 5 years to optical sensor. Rinse Aid is not working properly. Electrical Shock...
... supply hose is used with your dishwasher washes longer to see "If Dishwasher Does Not Operate" section. If dishwasher is necessary for good drying performance and controlling hard water deposit buildup. Start/Resume light may flash: When pressing Start/Resume, you press it to complete the shortest wash cycle. Do not remove ground prong. Your new dishwasher will average 2 to be used , replace inlet hose after 5 years to optical sensor. Rinse Aid is not working properly. Electrical Shock...

