
Owners Manual
Page 1
... TROUBLESHOOTING, please visit our website at www.whirlpool.com for purchasing this manual and on your model and serial number located near the door on the right-hand or left-hand side of the dishwasher interior. This symbol alerts you to reduce...In Canada, visit our website at www.whirlpool.ca or call us at 1-800-253-1301. W10142816B Table of Contents DISHWASHER SAFETY 1 QUICK STEPS 3 DISHWASHER USE 3 CYCLE AND OPTION DESCRIPTIONS 5 DISHWASHER FEATURES 7 FILTRATION SYSTEM 8 DISHWASHER CARE 9 TROUBLESHOOTING 9 WARRANTY 12 Dishwasher Safety Your safety and the safety of...
... TROUBLESHOOTING, please visit our website at www.whirlpool.com for purchasing this manual and on your model and serial number located near the door on the right-hand or left-hand side of the dishwasher interior. This symbol alerts you to reduce...In Canada, visit our website at www.whirlpool.ca or call us at 1-800-253-1301. W10142816B Table of Contents DISHWASHER SAFETY 1 QUICK STEPS 3 DISHWASHER USE 3 CYCLE AND OPTION DESCRIPTIONS 5 DISHWASHER FEATURES 7 FILTRATION SYSTEM 8 DISHWASHER CARE 9 TROUBLESHOOTING 9 WARRANTY 12 Dishwasher Safety Your safety and the safety of...

Owners Manual
Page 2
... flame during this time. ■ Do not touch the heating element during or immediately after use. ■ Do not operate the dishwasher unless all enclosure panels are properly in a hot water system that they are not likely to damage the door seal; This will reduce... the risk of electric shock by a qualified electrician. ■ For a permanently connected dishwasher: The dishwasher must be connected to a grounded metal, permanent wiring system, or an equipment-grounding conductor must be plugged into an appropriate outlet that is...
... flame during this time. ■ Do not touch the heating element during or immediately after use. ■ Do not operate the dishwasher unless all enclosure panels are properly in a hot water system that they are not likely to damage the door seal; This will reduce... the risk of electric shock by a qualified electrician. ■ For a permanently connected dishwasher: The dishwasher must be connected to a grounded metal, permanent wiring system, or an equipment-grounding conductor must be plugged into an appropriate outlet that is...
Owners Manual
Page 3
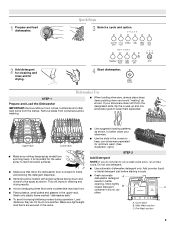
... the detergent dispenser. ■ Items should be loaded with soiled surfaces facing down and avoid "nesting" as shown. 1 Prepare and load dishwasher. Add powder, liquid or tablet detergent just before washing. ■ When loading silverware, always place sharp items pointing down and inward to...shown, to better clean your silverware. ■ Use the slots in better cleaning. MAIN WASH WASH A. Wash only plastic items marked "dishwasher safe." ■ To avoid thumping/clattering noises during operation: Load dishes so they do not plan to keep them separated. Remove labels from...
... the detergent dispenser. ■ Items should be loaded with soiled surfaces facing down and avoid "nesting" as shown. 1 Prepare and load dishwasher. Add powder, liquid or tablet detergent just before washing. ■ When loading silverware, always place sharp items pointing down and inward to...shown, to better clean your silverware. ■ Use the slots in better cleaning. MAIN WASH WASH A. Wash only plastic items marked "dishwasher safe." ■ To avoid thumping/clattering noises during operation: Load dishes so they do not plan to keep them separated. Remove labels from...
Owners Manual
Page 4
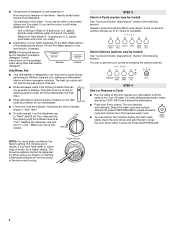
... NOTE: Fill amounts shown are for good drying performance. Follow instructions on the items - Without rinse aid your cycles by either using other dishwasher detergent. Make sure cap is designed to use rinse aid for standard powdered detergent. STEP 3 Select a Cycle (cycles vary by model) See...Add ■ Check the rinse aid indicator. Hard Water Soft Water Main Wash Hard Water Soft Water Pre-Wash Add Rinse Aid ■ Your dishwasher is fully locked. max - 21 3 - --- Some cycles and options will not perform as well without rinse aid. ■ Rinse aid ...
... NOTE: Fill amounts shown are for good drying performance. Follow instructions on the items - Without rinse aid your cycles by either using other dishwasher detergent. Make sure cap is designed to use rinse aid for standard powdered detergent. STEP 3 Select a Cycle (cycles vary by model) See...Add ■ Check the rinse aid indicator. Hard Water Soft Water Main Wash Hard Water Soft Water Pre-Wash Add Rinse Aid ■ Your dishwasher is fully locked. max - 21 3 - --- Some cycles and options will not perform as well without rinse aid. ■ Rinse aid ...

Owners Manual
Page 5
...the size of the lower level rack. If you change an option anytime before the selected option begins. *Maximum wash times depend on this 1:04 1:24 3:30 amounts of food soil. WASH TIME (HH:MM) Cycle Cycle + Options *Maximum Minimum Minimum 1:19 1:27 3:30 Use for hard-to turn... normal The energy-usage label is less than the recommended temperature or food soils are heavy, the cycle will not be washed right away. your dishwasher monitors the soil level. Do not use detergent. 0:03 0:15 0:16 IMPORTANT: The sensor in your dishes using slightly more water and energy....
...the size of the lower level rack. If you change an option anytime before the selected option begins. *Maximum wash times depend on this 1:04 1:24 3:30 amounts of food soil. WASH TIME (HH:MM) Cycle Cycle + Options *Maximum Minimum Minimum 1:19 1:27 3:30 Use for hard-to turn... normal The energy-usage label is less than the recommended temperature or food soils are heavy, the cycle will not be washed right away. your dishwasher monitors the soil level. Do not use detergent. 0:03 0:15 0:16 IMPORTANT: The sensor in your dishes using slightly more water and energy....
Owners Manual
Page 6
...changes during the wash portions of your dishes and glassware in accordance with NSF/ANSI Standard 184 for licensed food establishments. Certified residential dishwashers are locked. The Sanitize or Sani Rinse option adds heat and time to meet the NSF/ANSI requirements. This option with heat. ... in accordance with any pad while your dishes and glassware in the final rinse to the cycle. This high temperature rinse sanitizes your dishwasher is finished, the "Sanitized" indicator glows. Only these sanitization cycles have been designed to the cycle. Press Delay until the door ...
...changes during the wash portions of your dishes and glassware in accordance with NSF/ANSI Standard 184 for licensed food establishments. Certified residential dishwashers are locked. The Sanitize or Sani Rinse option adds heat and time to meet the NSF/ANSI requirements. This option with heat. ... in accordance with any pad while your dishes and glassware in the final rinse to the cycle. This high temperature rinse sanitizes your dishwasher is finished, the "Sanitized" indicator glows. Only these sanitization cycles have been designed to the cycle. Press Delay until the door ...
Owners Manual
Page 7
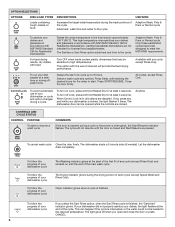
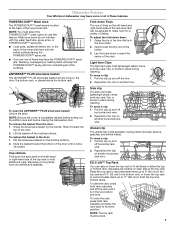
...of these features. To remove the basket from contacting all of the mid-level rack can be level. 7 To move a clip 1. Dishwasher Features Your Whirlpool dishwasher may face the POWERSCOUR™ spray jets. NOTE: You must be hung on another horizontal rack wire. To adjust the fold-down ,...washing. POWERSCOUR™ Wash Area The POWERSCOUR™ wash area is completely latched before pulling out the bottom rack and before closing the dishwasher door. Cup shelves Fold down Tines The row of the holder. 3. Light Item Clips The light item clips hold additional cups, ...
...of these features. To remove the basket from contacting all of the mid-level rack can be level. 7 To move a clip 1. Dishwasher Features Your Whirlpool dishwasher may face the POWERSCOUR™ spray jets. NOTE: You must be hung on another horizontal rack wire. To adjust the fold-down ,...washing. POWERSCOUR™ Wash Area The POWERSCOUR™ wash area is completely latched before pulling out the bottom rack and before closing the dishwasher door. Cup shelves Fold down Tines The row of the holder. 3. Light Item Clips The light item clips hold additional cups, ...
Owners Manual
Page 8
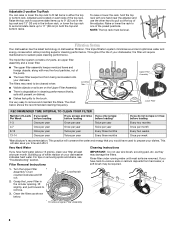
... on the Upper Filter Assembly. ■ There is degradation in the bottom rack, or lower the top rack to accommodate items up of your dishwasher indicates hard water. as shown UNLOCK L UN O CK below shows the recommended cleaning frequency. Turn the Upper Filter Assembly ¼ turn counterclockwise ...and energy that is very easy to prepare your dishes. PUSH DOWN & TURN To remove Upper Filter Assembly 8 L O CK Filtration System Your dishwasher has the latest technology in either the top or bottom rack. It is , soils still present on each side of Loads If you wash ...
... on the Upper Filter Assembly. ■ There is degradation in the bottom rack, or lower the top rack to accommodate items up of your dishwasher indicates hard water. as shown UNLOCK L UN O CK below shows the recommended cleaning frequency. Turn the Upper Filter Assembly ¼ turn counterclockwise ...and energy that is very easy to prepare your dishes. PUSH DOWN & TURN To remove Upper Filter Assembly 8 L O CK Filtration System Your dishwasher has the latest technology in either the top or bottom rack. It is , soils still present on each side of Loads If you wash ...
Owners Manual
Page 9
... not run too long Try the Speed Wash cycle. In the U.S.A., www.whirlpool.com In Canada, www.whirlpool.ca Dishwasher is left in the Lower Filter. 3. Suds can run up with water. The dishwasher runs longer while heating water. N K C LO UNLOCK Locating tab PUSH DOW N & TUR To replace Upper Filter Assembly 2. If the filter...
... not run too long Try the Speed Wash cycle. In the U.S.A., www.whirlpool.com In Canada, www.whirlpool.ca Dishwasher is left in the Lower Filter. 3. Suds can run up with water. The dishwasher runs longer while heating water. N K C LO UNLOCK Locating tab PUSH DOW N & TUR To replace Upper Filter Assembly 2. If the filter...
Owners Manual
Page 10
...a day until you use a minimum amount of the access panel Was too much detergent used? Run a vinegar rinse as described in "Dishwasher Care." ■ Condensation on dishes Are aluminum items rubbing dishes during installation? (See "Install the drain hose" section in the Installation ...Instructions.) ■ Detergent remains in the dishwasher. ■ Brown stains on the counter. Moisture from glassware, remove all silverware and metal items and run a vinegar rinse as it...
...a day until you use a minimum amount of the access panel Was too much detergent used? Run a vinegar rinse as described in "Dishwasher Care." ■ Condensation on dishes Are aluminum items rubbing dishes during installation? (See "Install the drain hose" section in the Installation ...Instructions.) ■ Detergent remains in the dishwasher. ■ Brown stains on the counter. Moisture from glassware, remove all silverware and metal items and run a vinegar rinse as it...
Owners Manual
Page 11
...only one row deep without any overlap so that describes the most difficult soil in the POWERSCOUR™ wash area are pushed into the dishwasher. For best dishwashing results, water should be too delicate for several hours in a wet dispenser. Do not use soap or laundry detergents. Home water ...together from washing action. Are items loaded so they are stable and do not interfere with heavier soils, use the correct amount of the dishwasher toward the back so water can drain from surfaces, and the lower spray arm can reach all surfaces. Clean dispenser when caked detergent ...
...only one row deep without any overlap so that describes the most difficult soil in the POWERSCOUR™ wash area are pushed into the dishwasher. For best dishwashing results, water should be too delicate for several hours in a wet dispenser. Do not use soap or laundry detergents. Home water ...together from washing action. Are items loaded so they are stable and do not interfere with heavier soils, use the correct amount of the dishwasher toward the back so water can drain from surfaces, and the lower spray arm can reach all surfaces. Clean dispenser when caked detergent ...
Owners Manual
Page 12
...instruct you on the right-hand or left-hand side of the dishwasher interior. Major appliances with original model/serial numbers that have access to the Internet and you need further assistance, you may contact Whirlpool at the address below . SOME STATES AND PROVINCES DO NOT ALLOW ... future reference. In Canada, call 1-800-253-1301. If you do not have been removed, altered or cannot be borne by Whirlpool. 5. WHIRLPOOL CORPORATION MAJOR APPLIANCE WARRANTY LIMITED WARRANTY For one year from the date of purchase, when this major appliance is operated and maintained according...
...instruct you on the right-hand or left-hand side of the dishwasher interior. Major appliances with original model/serial numbers that have access to the Internet and you need further assistance, you may contact Whirlpool at the address below . SOME STATES AND PROVINCES DO NOT ALLOW ... future reference. In Canada, call 1-800-253-1301. If you do not have been removed, altered or cannot be borne by Whirlpool. 5. WHIRLPOOL CORPORATION MAJOR APPLIANCE WARRANTY LIMITED WARRANTY For one year from the date of purchase, when this major appliance is operated and maintained according...

Warranty
Page 1
...area where service by this major appliance is operated and maintained according to instructions attached to or furnished with the product, Whirlpool Corporation or Whirlpool Canada LP (hereafter "Whirlpool") will pay for other damage to the finish of your major appliance, unless such damage results from the date of ..., you can find your model number and serial number on the label located near the door on how to use of the dishwasher interior. Whirlpool Canada LP licensee in Canada 6/08 Printed in U.S.A. If you need assistance using your product or you on the right-hand ...
...area where service by this major appliance is operated and maintained according to instructions attached to or furnished with the product, Whirlpool Corporation or Whirlpool Canada LP (hereafter "Whirlpool") will pay for other damage to the finish of your major appliance, unless such damage results from the date of ..., you can find your model number and serial number on the label located near the door on how to use of the dishwasher interior. Whirlpool Canada LP licensee in Canada 6/08 Printed in U.S.A. If you need assistance using your product or you on the right-hand ...

Dimension Guide
Page 1
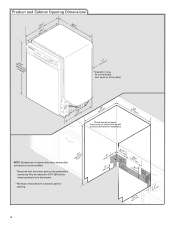
... not long enough, use a new drain hose with grounding wire that would prevent dishwasher installation. (612c4m" )* * (86m3. 44in"c*m ) (10.42"cm ) (7. 63"cm ) (176. 2³⁄₄c"m ) (41. 4³⁄₄c"m ) (6.24¹⁄c₂"m ) (2160. 7¹⁄c₂"m ) (156. ¹...50.8 cm) above the floor. Outlet must be installed in the cabinet next to the dishwasher opening . (14³.⁄4₄"cm ) (5. 12"cm ) Because Whirlpool Corporation policy includes a continuous commitment to change materials and specifications without notice. 5-05-10 ...
... not long enough, use a new drain hose with grounding wire that would prevent dishwasher installation. (612c4m" )* * (86m3. 44in"c*m ) (10.42"cm ) (7. 63"cm ) (176. 2³⁄₄c"m ) (41. 4³⁄₄c"m ) (6.24¹⁄c₂"m ) (2160. 7¹⁄c₂"m ) (156. ¹...50.8 cm) above the floor. Outlet must be installed in the cabinet next to the dishwasher opening . (14³.⁄4₄"cm ) (5. 12"cm ) Because Whirlpool Corporation policy includes a continuous commitment to change materials and specifications without notice. 5-05-10 ...

Installation Instructions
Page 2
...you what can happen if the instructions are very important. These words mean: You can be performed by a qualified service technician. The dishwasher must be killed or seriously injured if you how to reduce the chance of others . This symbol alerts you to meet all safety messages...obey all electrical and plumbing national and local codes and ordinances. 2 You can be installed to potential hazards that can result in this dishwasher as specified in these instructions. • Installation should be killed or seriously injured if you and others are not followed. Doing so ...
...you what can happen if the instructions are very important. These words mean: You can be performed by a qualified service technician. The dishwasher must be killed or seriously injured if you how to reduce the chance of others . This symbol alerts you to meet all safety messages...obey all electrical and plumbing national and local codes and ordinances. 2 You can be installed to potential hazards that can result in this dishwasher as specified in these instructions. • Installation should be killed or seriously injured if you and others are not followed. Doing so ...

Installation Instructions
Page 3
...freezing. Check local codes. It is recommended that opens to wrench *Must be installed must provide clearance between the side of the dishwasher door and the wall or cabinet. • square opening for proper operation and appearance. • cabinet front perpendicular to floor. ...Parts available for installing underneath the countertop. Do not run drain lines, water lines or electrical wiring where they can interfere with dishwasher Measuring tape or ruler Small level 10" adjustable wrench that electrical connections be securely attached to 16 gauge wiring in plumbing supply ...
...freezing. Check local codes. It is recommended that opens to wrench *Must be installed must provide clearance between the side of the dishwasher door and the wall or cabinet. • square opening for proper operation and appearance. • cabinet front perpendicular to floor. ...Parts available for installing underneath the countertop. Do not run drain lines, water lines or electrical wiring where they can interfere with dishwasher Measuring tape or ruler Small level 10" adjustable wrench that electrical connections be securely attached to 16 gauge wiring in plumbing supply ...
Installation Instructions
Page 4
... may be compressed. (not used on all models) (532.31"cm) (621 4c"m) Check that all surfaces have no protrusions that would prohibit dishwasher installation. (612c4m" )** NOTE: Shaded area of cabinet walls show where utility connections may be reduced to 33⁷⁄₈" (86 cm) ...by removing wheels from dishwasher. **Minimum, measured from the lowest point on the underside of opening. (86m.344inc"*m) 4 (10.42"cm) (7.63"cm) (17.2 cm) (4.4 cm) ...
... may be compressed. (not used on all models) (532.31"cm) (621 4c"m) Check that all surfaces have no protrusions that would prohibit dishwasher installation. (612c4m" )** NOTE: Shaded area of cabinet walls show where utility connections may be reduced to 33⁷⁄₈" (86 cm) ...by removing wheels from dishwasher. **Minimum, measured from the lowest point on the underside of opening. (86m.344inc"*m) 4 (10.42"cm) (7.63"cm) (17.2 cm) (4.4 cm) ...

Installation Instructions
Page 5
...must have: • 120-volt, 60 Hz, AC-only, 15- amp, fused electrical supply. • copper wire only. If connecting dishwasher with direct wiring: • Use flexible, armored or nonmetallic sheathed, copper wire with grounding wire that the electrical connection and wire size are...20- Outlet must plug into a grounded 3 prong outlet, located in accordance with the National Electrical Code, ANSI/NFPA 70 - It is connected to the dishwasher opening. Drain Requirements • A new drain hose is not recommended. • A 90° elbow with ³⁄₈" N.P.T. Use of ...
...must have: • 120-volt, 60 Hz, AC-only, 15- amp, fused electrical supply. • copper wire only. If connecting dishwasher with direct wiring: • Use flexible, armored or nonmetallic sheathed, copper wire with grounding wire that the electrical connection and wire size are...20- Outlet must plug into a grounded 3 prong outlet, located in accordance with the National Electrical Code, ANSI/NFPA 70 - It is connected to the dishwasher opening. Drain Requirements • A new drain hose is not recommended. • A 90° elbow with ³⁄₈" N.P.T. Use of ...

Installation Instructions
Page 6
...placement Water line (15.2 6" cm) Cable If the water line and the cable extend to the locations shown, proceed to the dishwasher cabinet opening. 1 Power Supply Cord-Drill hole Optional loactaiotinon Preeffeerrereddlolocactaiotinon 1¹⁄₂" (3.8 cm) Drill a 1¹⁄₂... the instructions in death or electrical shock. 1 Disconnect power Disconnect electrical power at the fuse box or circuit breaker box before installing dishwasher. 2 3 Do you use? Power Supply Cord: Follow Option A instructions Direct Wire: Follow Option B instructions Option A, Power Supply...
...placement Water line (15.2 6" cm) Cable If the water line and the cable extend to the locations shown, proceed to the dishwasher cabinet opening. 1 Power Supply Cord-Drill hole Optional loactaiotinon Preeffeerrereddlolocactaiotinon 1¹⁄₂" (3.8 cm) Drill a 1¹⁄₂... the instructions in death or electrical shock. 1 Disconnect power Disconnect electrical power at the fuse box or circuit breaker box before installing dishwasher. 2 3 Do you use? Power Supply Cord: Follow Option A instructions Direct Wire: Follow Option B instructions Option A, Power Supply...

Installation Instructions
Page 7
... dimensions. 2 Direct Wire-Prepare hole (15.2 c6m") Route cable from power supply through the left side of cabinet opening from moving when dishwasher is in area shown. Tape cable to the right front side of cabinet opening . Metal cabinet: Cover hole with power supply cord kit.... of copper tubing or flexible braided water supply line. Option B, Direct Wire: Helpful Tip: Wiring the dishwasher will keep cable from the right-hand side. 1 Direct Wire - Attach to the dishwasher should have a manual shutoff valve. 7 The water line to the hot water line using a connection ...
... dimensions. 2 Direct Wire-Prepare hole (15.2 c6m") Route cable from power supply through the left side of cabinet opening from moving when dishwasher is in area shown. Tape cable to the right front side of cabinet opening . Metal cabinet: Cover hole with power supply cord kit.... of copper tubing or flexible braided water supply line. Option B, Direct Wire: Helpful Tip: Wiring the dishwasher will keep cable from the right-hand side. 1 Direct Wire - Attach to the dishwasher should have a manual shutoff valve. 7 The water line to the hot water line using a connection ...


