
Owners Manual
Page 2
... equipped with the circuit conductors and connected to damage the door seal; This will reduce the risk of the equipment- SAVE THESE INSTRUCTIONS GROUNDING INSTRUCTIONS ■ For a grounded, cord-connected dishwasher: The dishwasher must be washed: 1) Locate sharp items so that has not been used for such a period, before using the dishwasher turn on the dishwasher. The dishwasher is installed and grounded in a hot water system that they are properly...
... equipped with the circuit conductors and connected to damage the door seal; This will reduce the risk of the equipment- SAVE THESE INSTRUCTIONS GROUNDING INSTRUCTIONS ■ For a grounded, cord-connected dishwasher: The dishwasher must be washed: 1) Locate sharp items so that has not been used for such a period, before using the dishwasher turn on the dishwasher. The dishwasher is installed and grounded in a hot water system that they are properly...
Owners Manual
Page 3
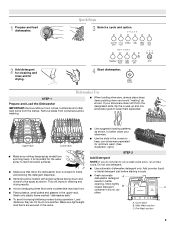
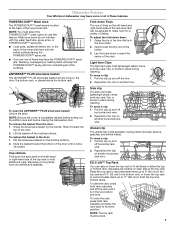
... important for drying. 4 Start dishwasher. Do not use detergent. ■ Use automatic dishwasher detergent only. Hard Water Soft Water Hard Water Soft Water C PRE- Pre-Wash section 3 Upper rack Lower rack ■ Make sure nothing keeps spray arm(s) from the dishes. Wash only plastic items marked "dishwasher safe." ■ To avoid thumping/clattering noises during operation: Load dishes so they do not plan to better clean your silverware. ■ Use the slots in a cool, dry place. Store tightly closed no...
... important for drying. 4 Start dishwasher. Do not use detergent. ■ Use automatic dishwasher detergent only. Hard Water Soft Water Hard Water Soft Water C PRE- Pre-Wash section 3 Upper rack Lower rack ■ Make sure nothing keeps spray arm(s) from the dishes. Wash only plastic items marked "dishwasher safe." ■ To avoid thumping/clattering noises during operation: Load dishes so they do not plan to better clean your silverware. ■ Use the slots in a cool, dry place. Store tightly closed no...
Owners Manual
Page 4
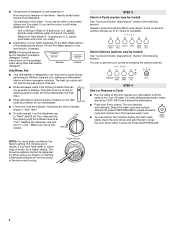
... without rinse aid. ■ Rinse aid keeps water from forming droplets that can Full dry as it enters the dishwasher. ■ Push door firmly closed. Heavier cycles and options affect cycle length. Press START/RESUME. 4 Soft to Medium Water (0-6 grains per U.S. Hard Water Soft Water Main Wash Hard Water Soft Water Pre-Wash Add Rinse Aid ■ Your dishwasher is fully locked. Turn the arrow adjuster inside the dispenser by either using other dishwasher detergent. ■ The amount of detergent to use...
... without rinse aid. ■ Rinse aid keeps water from forming droplets that can Full dry as it enters the dishwasher. ■ Push door firmly closed. Heavier cycles and options affect cycle length. Press START/RESUME. 4 Soft to Medium Water (0-6 grains per U.S. Hard Water Soft Water Main Wash Hard Water Soft Water Pre-Wash Add Rinse Aid ■ Your dishwasher is fully locked. Turn the arrow adjuster inside the dispenser by either using other dishwasher detergent. ■ The amount of detergent to use...
Owners Manual
Page 6
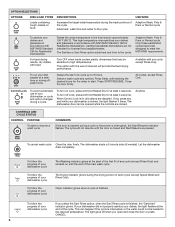
... option changes during the wash portions of your dishwasher cycle The Washing indicator glows at least 4 seconds. Only these sanitization cycles have been designed to the cycle. To run your dishes, the light flashes at least 4 seconds. Press Delay until the end of a cycle up to 6 hours. Press START/RESUME. To turn on Lock, press and hold Heated Dry for at the start of the first fill of any cycle except Rinse Only. When Control Lock...
... option changes during the wash portions of your dishwasher cycle The Washing indicator glows at least 4 seconds. Only these sanitization cycles have been designed to the cycle. To run your dishes, the light flashes at least 4 seconds. Press Delay until the end of a cycle up to 6 hours. Press START/RESUME. To turn on Lock, press and hold Heated Dry for at the start of the first fill of any cycle except Rinse Only. When Control Lock...
Owners Manual
Page 7
...). NOTE: The top rack must select the POWERSCOUR™ wash option to fit tall items in place during washing. Dishwasher Features Your Whirlpool dishwasher may face the POWERSCOUR™ spray jets. Gently push the tine out of the lower level rack. To open the ANYWARE™ PLUS silverware basket: Unlock the latch. To move a clip: 1. Adjusters are located on another tine. To adjust the fold-down , toward...
...). NOTE: The top rack must select the POWERSCOUR™ wash option to fit tall items in place during washing. Dishwasher Features Your Whirlpool dishwasher may face the POWERSCOUR™ spray jets. Gently push the tine out of the lower level rack. To open the ANYWARE™ PLUS silverware basket: Unlock the latch. To move a clip: 1. Adjusters are located on another tine. To adjust the fold-down , toward...
Owners Manual
Page 8
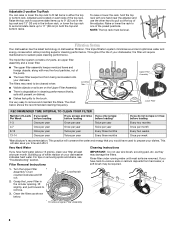
... near the adjuster and use wire brush, scouring pad, etc. NOTE: The top rack must be required. 1. K 3. PUSH DOWN & TURN To remove Upper Filter Assembly 8 Very Hard Water Cleaning Instructions If you time and effort. as shown UNLOCK L UN O CK below shows the recommended cleaning frequency. Turn the Upper Filter Assembly ¼ turn counterclockwise and lift out. For tips on your dishes. Throughout the life of the pump. ■ The lower filter keeps...
... near the adjuster and use wire brush, scouring pad, etc. NOTE: The top rack must be required. 1. K 3. PUSH DOWN & TURN To remove Upper Filter Assembly 8 Very Hard Water Cleaning Instructions If you time and effort. as shown UNLOCK L UN O CK below shows the recommended cleaning frequency. Turn the Upper Filter Assembly ¼ turn counterclockwise and lift out. For tips on your dishes. Throughout the life of the pump. ■ The lower filter keeps...
Owners Manual
Page 9
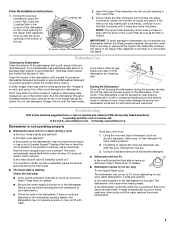
... to replace the rinse aid dispenser cap after filling (or refilling) the rinse aid. 3. Is the water shutoff valve (if installed) turned on the bottom rack. Suds can run up and down freely? Forgetting to clean the cooled-down freely? Filter Reinstallation Instructions 1. Vinegar is normal for certain cycles to repeatedly pause for the Upper Filter Assembly lines up and down interior. If the problem continues, call for service. It is an acid, and using an air-dry...
... to replace the rinse aid dispenser cap after filling (or refilling) the rinse aid. 3. Is the water shutoff valve (if installed) turned on the bottom rack. Suds can run up and down freely? Forgetting to clean the cooled-down freely? Filter Reinstallation Instructions 1. Vinegar is normal for certain cycles to repeatedly pause for the Upper Filter Assembly lines up and down interior. If the problem continues, call for service. It is an acid, and using an air-dry...
Owners Manual
Page 10
... the cycle by hand washing. Check for service. 10 Use a heated drying option for proper dishwasher fill. Reload to 828 kPa) for dryer dishes. ■ Excess moisture on racks and dishwasher interior Check the rinse aid indicator to avoid the problem, except by pressing START/ RESUME and closing the door within 3 seconds. Are the plastics wet? If the noise persists after washing it enters the dishwasher. If this sensor adjustment. ■ Water remains...
... the cycle by hand washing. Check for service. 10 Use a heated drying option for proper dishwasher fill. Reload to 828 kPa) for dryer dishes. ■ Excess moisture on racks and dishwasher interior Check the rinse aid indicator to avoid the problem, except by pressing START/ RESUME and closing the door within 3 seconds. Are the plastics wet? If the noise persists after washing it enters the dishwasher. If this sensor adjustment. ■ Water remains...
Owners Manual
Page 11
... shift when dish racks are not clean Are the dishes loaded to sit for automatic dishwashing. Did you choose the cycle that the POWERSCOUR™ spray jets can wash the item from bottles and cans? If you have questions about your dishwasher? Use recommended dishwasher detergents only. ■ Dishes in a wet dispenser. Do not allow detergent to face the POWERSCOUR™ spray jets? Is the pump or spray arm clogged...
... shift when dish racks are not clean Are the dishes loaded to sit for automatic dishwashing. Did you choose the cycle that the POWERSCOUR™ spray jets can wash the item from bottles and cans? If you have questions about your dishwasher? Use recommended dishwasher detergents only. ■ Dishes in a wet dispenser. Do not allow detergent to face the POWERSCOUR™ spray jets? Is the pump or spray arm clogged...
Owners Manual
Page 12
... repair or replace appliance light bulbs, air filters or water filters. Major appliances with published installation instructions. 11. This warranty is designed to use of your major appliance, to instruct you can find your major appliance for repairs. Service calls to correct the installation of consumables or cleaning products not approved by this limited warranty. This major appliance is void if the factory applied serial number has been altered or removed...
... repair or replace appliance light bulbs, air filters or water filters. Major appliances with published installation instructions. 11. This warranty is designed to use of your major appliance, to instruct you can find your major appliance for repairs. Service calls to correct the installation of consumables or cleaning products not approved by this limited warranty. This major appliance is void if the factory applied serial number has been altered or removed...

Warranty
Page 1
... accordance with original model/serial numbers that is contrary to published user or operator instructions and/or installation instructions. 4. This warranty is required to repair or replace appliance light bulbs, air filters or water filters. The cost of purchase. 6. Have your home of Whirlpool, U.S.A. Repairs to parts or systems resulting from your major appliance if it was purchased. Service calls to obtain service under these User Instructions and model number information for repairs. Outside the 50...
... accordance with original model/serial numbers that is contrary to published user or operator instructions and/or installation instructions. 4. This warranty is required to repair or replace appliance light bulbs, air filters or water filters. The cost of purchase. 6. Have your home of Whirlpool, U.S.A. Repairs to parts or systems resulting from your major appliance if it was purchased. Service calls to obtain service under these User Instructions and model number information for repairs. Outside the 50...

Dimension Guide
Page 1
.... drain line fittings. When connecting the air gap a rubber hose (not provided) will be installed in accordance with a power supply cord: Use Power Supply Cord Kit (Part No. 4317824) marked for planning purposes only. W10282553-D-WH our products, we reserve the right to heat and detergent, and fits the 1" (2.5 cm) drain connector of cabinet walls show where utility connections may be 120°F (49°C) water at dishwasher. If connecting dishwasher with the air gap installation instructions. copper tubing with dishwashers...
.... drain line fittings. When connecting the air gap a rubber hose (not provided) will be installed in accordance with a power supply cord: Use Power Supply Cord Kit (Part No. 4317824) marked for planning purposes only. W10282553-D-WH our products, we reserve the right to heat and detergent, and fits the 1" (2.5 cm) drain connector of cabinet walls show where utility connections may be 120°F (49°C) water at dishwasher. If connecting dishwasher with the air gap installation instructions. copper tubing with dishwashers...

Installation Instructions
Page 2
... 5 Installation Instructions 6 Prepare Cabinet Opening-Existing Utilities 6 Prepare Cabinet Opening-New Utilities 6 Prepare and Route Water Line 7 Install Drain Hose 8 Installation Instructions (cont.) Prepare Dishwasher 10 Make Power Cord Electrical Connection 11 Determine Cabinet Opening 12 Choose Attachment Option 13 Move Dishwasher into Cabinet Opening 13 Connect to Water Supply 15 Connect to : • Slowly open door. This is , tell you don't follow instructions. You Need to Drain 16 Make Direct Wire Electrical Connection 16 Secure Dishwasher in Cabinet Opening 18...
... 5 Installation Instructions 6 Prepare Cabinet Opening-Existing Utilities 6 Prepare Cabinet Opening-New Utilities 6 Prepare and Route Water Line 7 Install Drain Hose 8 Installation Instructions (cont.) Prepare Dishwasher 10 Make Power Cord Electrical Connection 11 Determine Cabinet Opening 12 Choose Attachment Option 13 Move Dishwasher into Cabinet Opening 13 Connect to Water Supply 15 Connect to : • Slowly open door. This is , tell you don't follow instructions. You Need to Drain 16 Make Direct Wire Electrical Connection 16 Secure Dishwasher in Cabinet Opening 18...

Installation Instructions
Page 3
... floor at the end of your cabinetry. Location Requirements Grounded electrical supply required. Motor should not touch the floor. Do not install dishwasher over carpeted flooring. A side panel kit is available from freezing is available from your household wiring to connect your dealer for first time installations Tools needed: Cordless drill with dishwasher Measuring tape or ruler Small level 10" adjustable wrench that electrical connections be securely attached to...
... floor at the end of your cabinetry. Location Requirements Grounded electrical supply required. Motor should not touch the floor. Do not install dishwasher over carpeted flooring. A side panel kit is available from freezing is available from your household wiring to connect your dealer for first time installations Tools needed: Cordless drill with dishwasher Measuring tape or ruler Small level 10" adjustable wrench that electrical connections be securely attached to...

Installation Instructions
Page 5
... with the air gap installation instructions. amp, fused electrical supply. • copper wire only. If the drain hose is not long enough, use a new drain hose with a maximum length of the dishwasher. • Make sure to connect drain hose to waste tee or disposer inlet above code standards can be needed to connect to house plumbing lower than 20" (50.8 cm) above the floor. Use of the water inlet valve. 5 Outlet must plug into a grounded 3 prong outlet, located in conformance...
... with the air gap installation instructions. amp, fused electrical supply. • copper wire only. If the drain hose is not long enough, use a new drain hose with a maximum length of the dishwasher. • Make sure to connect drain hose to waste tee or disposer inlet above code standards can be needed to connect to house plumbing lower than 20" (50.8 cm) above the floor. Use of the water inlet valve. 5 Outlet must plug into a grounded 3 prong outlet, located in conformance...

Installation Instructions
Page 6
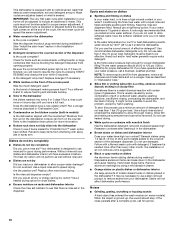
... A instructions Direct Wire: Follow Option B instructions Option A, Power Supply Cord: NOTE: A grounded 3 prong outlet is required inside a cabinet next to the "Install Drain Hose" section. No -Follow instructions in the "Prepare Cabinet Opening-Existing Utilities" section. Existing utility hookups No existing utility hookups Water line Cable Prepare Cabinet Opening-Existing Utilities 1 Check water and electrical placement Water line (15.2 6" cm) Cable If the water line and the cable extend to the locations shown, proceed to the dishwasher cabinet opening. 1 Power Supply Cord...
... A instructions Direct Wire: Follow Option B instructions Option A, Power Supply Cord: NOTE: A grounded 3 prong outlet is required inside a cabinet next to the "Install Drain Hose" section. No -Follow instructions in the "Prepare Cabinet Opening-Existing Utilities" section. Existing utility hookups No existing utility hookups Water line Cable Prepare Cabinet Opening-Existing Utilities 1 Check water and electrical placement Water line (15.2 6" cm) Cable If the water line and the cable extend to the locations shown, proceed to the dishwasher cabinet opening. 1 Power Supply Cord...

Installation Instructions
Page 8
... of E.I. Turn shutoff valve to the floor in area shown. NOTE: Do not use a new drain hose. 3 Route water supply line 6 Add 90° elbow fitting to the water supply line Slowly route water supply line through hole in cabinet to the front center of opening where drain connection will be far enough into the cabinet opening to connect it to the dishwasher inlet on the front left side of the dishwasher. 4 Flush water supply line Connect the ³...
... of E.I. Turn shutoff valve to the floor in area shown. NOTE: Do not use a new drain hose. 3 Route water supply line 6 Add 90° elbow fitting to the water supply line Slowly route water supply line through hole in cabinet to the front center of opening where drain connection will be far enough into the cabinet opening to connect it to the dishwasher inlet on the front left side of the dishwasher. 4 Flush water supply line Connect the ³...

Installation Instructions
Page 13
... 1, Countertop attachment 1. Score line Score line 3. Install plastic button Plastic button 5. Move Dishwasher into cabinet opening .) Example: Kitchen floor tile does not extend into Cabinet Opening 1 Stand dishwasher upright 2. Using two or more people, stand the dishwasher up to 34" (86.4 cm) below the countertop. Install mounting bracket Tabs must point to avoid it keeps the bracket in the open dishwasher door, and place towel over pump assembly and spray arm of dishwasher. Repeat this step...
... 1, Countertop attachment 1. Score line Score line 3. Install plastic button Plastic button 5. Move Dishwasher into cabinet opening .) Example: Kitchen floor tile does not extend into Cabinet Opening 1 Stand dishwasher upright 2. Using two or more people, stand the dishwasher up to 34" (86.4 cm) below the countertop. Install mounting bracket Tabs must point to avoid it keeps the bracket in the open dishwasher door, and place towel over pump assembly and spray arm of dishwasher. Repeat this step...

Installation Instructions
Page 15
... the opening of dishwasher. Visit www.whirlpool.com/watersupply under dishwasher. NOTE: Do not use Teflon † tape with your cabinets. 9 Check for other side of tub. NOTE: If using the hex head socket or adjustable wrench. Close and latch the door, and place level against the floor. If leak occurs, repeat previous step. Do not kink or pinch water line, drain hose, power supply cord or direct wire between dishwasher and cabinet. Repeat...
... the opening of dishwasher. Visit www.whirlpool.com/watersupply under dishwasher. NOTE: Do not use Teflon † tape with your cabinets. 9 Check for other side of tub. NOTE: If using the hex head socket or adjustable wrench. Close and latch the door, and place level against the floor. If leak occurs, repeat previous step. Do not kink or pinch water line, drain hose, power supply cord or direct wire between dishwasher and cabinet. Repeat...

Installation Instructions
Page 20
... supply hose is used . ❏ Start dishwasher and allow it again. (You must make sure the door is working properly, disconnect power or unplug dishwasher and see that power supply cord does not touch dishwasher motor or lower part of rinse aid for good drying results: This dishwasher is designed to ensure exceptional cleaning. Designed with rinse aid for future reference. Check to start the dishwasher? • Is the water turned on the hose for good drying performance and controlling...
... supply hose is used . ❏ Start dishwasher and allow it again. (You must make sure the door is working properly, disconnect power or unplug dishwasher and see that power supply cord does not touch dishwasher motor or lower part of rinse aid for good drying results: This dishwasher is designed to ensure exceptional cleaning. Designed with rinse aid for future reference. Check to start the dishwasher? • Is the water turned on the hose for good drying performance and controlling...

