

Dimension Guide
Page 1
... dishwasher. Instructions packed with ³⁄₈" N.P.T. A timedelay fuse or circuit breaker and separate circuit is connected to use with your home and local codes and ordinances. drain line fittings. Copper wire only. If connecting dishwasher with a power supply cord: Use Power Supply Cord Kit (Part No. 4317824) marked for your dishwasher. Drain Requirements: A new drain hose is recommended that meets all models) (532. 31"cm ) CABINET CUTOUT DIMENSIONS Corner locations require a 2" (5.1 cm) minimum clearance between the side of opening . Water...
... dishwasher. Instructions packed with ³⁄₈" N.P.T. A timedelay fuse or circuit breaker and separate circuit is connected to use with your home and local codes and ordinances. drain line fittings. Copper wire only. If connecting dishwasher with a power supply cord: Use Power Supply Cord Kit (Part No. 4317824) marked for your dishwasher. Drain Requirements: A new drain hose is recommended that meets all models) (532. 31"cm ) CABINET CUTOUT DIMENSIONS Corner locations require a 2" (5.1 cm) minimum clearance between the side of opening . Water...

Installation Instructions
Page 2
...Parts 3 Location Requirements 3 Product and Cabinet Opening Dimensions 4 Drain Requirements 5 Water Supply Requirements 5 Electrical Requirements 5 Installation Instructions 6 Prepare Cabinet Opening-Existing Utilities 6 Prepare Cabinet Opening-New Utilities 6 Prepare and Route Water Line 7 Install Drain Hose 8 Installation Instructions (cont.) Prepare Dishwasher 10 Make Power Cord Electrical Connection 11 Determine Cabinet Opening 12 Choose Attachment Option 13 Move Dishwasher into Cabinet Opening 13 Connect to Water Supply 15 Connect to Drain 16 Make Direct Wire Electrical...
...Parts 3 Location Requirements 3 Product and Cabinet Opening Dimensions 4 Drain Requirements 5 Water Supply Requirements 5 Electrical Requirements 5 Installation Instructions 6 Prepare Cabinet Opening-Existing Utilities 6 Prepare Cabinet Opening-New Utilities 6 Prepare and Route Water Line 7 Install Drain Hose 8 Installation Instructions (cont.) Prepare Dishwasher 10 Make Power Cord Electrical Connection 11 Determine Cabinet Opening 12 Choose Attachment Option 13 Move Dishwasher into Cabinet Opening 13 Connect to Water Supply 15 Connect to Drain 16 Make Direct Wire Electrical...

Installation Instructions
Page 3
... Listed/CSA Approved twist-on wire connectors* Parts needed to level dishwasher.) Helpful Tip: Be sure to water, electricity and drain. • Convenient access for use UL listed power supply cord kit marked for loading and unloading dishes. Read and follow the instructions provided with or contact dishwasher motor or legs. A moisture barrier accessory (Part Number 4396277) is not covered by the warranty. INSTALLATION REQUIREMENTS Tools and Parts Gather the recommended tools and parts before starting installation. Corner locations...
... Listed/CSA Approved twist-on wire connectors* Parts needed to level dishwasher.) Helpful Tip: Be sure to water, electricity and drain. • Convenient access for use UL listed power supply cord kit marked for loading and unloading dishes. Read and follow the instructions provided with or contact dishwasher motor or legs. A moisture barrier accessory (Part Number 4396277) is not covered by the warranty. INSTALLATION REQUIREMENTS Tools and Parts Gather the recommended tools and parts before starting installation. Corner locations...

Installation Instructions
Page 5
... outlet, located in house plumbing and 20" (50.8 cm) minimum above the floor. Electrical Requirements Be sure that meets all local codes and ordinances. We recommend: • a time-delay fuse or circuit breaker. • a separate circuit. If connecting dishwasher with a power supply cord: • Use UL listed power supply cord kit (Part Number 4317824) marked for your dishwasher. It is connected to the dishwasher opening. A copy of the counter, or be installed in conformance...
... outlet, located in house plumbing and 20" (50.8 cm) minimum above the floor. Electrical Requirements Be sure that meets all local codes and ordinances. We recommend: • a time-delay fuse or circuit breaker. • a separate circuit. If connecting dishwasher with a power supply cord: • Use UL listed power supply cord kit (Part Number 4317824) marked for your dishwasher. It is connected to the dishwasher opening. A copy of the counter, or be installed in conformance...

Installation Instructions
Page 6
... cm) hole in the "Prepare Cabinet Opening-Existing Utilities" section. No -Follow instructions in the "Prepare Cabinet Opening- Power Supply Cord: Follow Option A instructions Direct Wire: Follow Option B instructions Option A, Power Supply Cord: NOTE: A grounded 3 prong outlet is required inside a cabinet next to the "Install Drain Hose" section. Yes-Follow instructions in cabinet side or rear. 6 See product and cabinet opening dimensions. Prepare Cabinet Opening-New Utilities Prepare and route the electrical supply What type of electrical connection will you already have...
... cm) hole in the "Prepare Cabinet Opening-Existing Utilities" section. No -Follow instructions in the "Prepare Cabinet Opening- Power Supply Cord: Follow Option A instructions Direct Wire: Follow Option B instructions Option A, Power Supply Cord: NOTE: A grounded 3 prong outlet is required inside a cabinet next to the "Install Drain Hose" section. Yes-Follow instructions in cabinet side or rear. 6 See product and cabinet opening dimensions. Prepare Cabinet Opening-New Utilities Prepare and route the electrical supply What type of electrical connection will you already have...

Installation Instructions
Page 7
... cabinet: Cover hole with grommet (Part Number 302797) included with grommet (Part Number 302797 not included) Hot water line Measure overall length of cabinet opening will keep cable from moving when dishwasher is in area shown. Metal cabinet: Cover hole with power supply cord kit. Attach to the dishwasher should have a manual shutoff valve. 7 See product and cabinet opening . Option B, Direct Wire: Helpful Tip: Wiring the dishwasher will be easier if you route the cable into cabinet opening dimensions. 2 Direct Wire...
... cabinet: Cover hole with grommet (Part Number 302797) included with grommet (Part Number 302797 not included) Hot water line Measure overall length of cabinet opening will keep cable from moving when dishwasher is in area shown. Metal cabinet: Cover hole with power supply cord kit. Attach to the dishwasher should have a manual shutoff valve. 7 See product and cabinet opening . Option B, Direct Wire: Helpful Tip: Wiring the dishwasher will be easier if you route the cable into cabinet opening dimensions. 2 Direct Wire...

Installation Instructions
Page 8
... and start the nut onto the elbow threads. NOTE: To avoid vibration during operation, route the water supply line so that it to the dishwasher inlet on the front left side of the dishwasher. 4 Flush water supply line Connect the ³⁄₈" compression fitting to the water supply line prior to installing the unit into the cabinet opening to connect it does not touch the dishwasher base, frame or motor...
... and start the nut onto the elbow threads. NOTE: To avoid vibration during operation, route the water supply line so that it to the dishwasher inlet on the front left side of the dishwasher. 4 Flush water supply line Connect the ³⁄₈" compression fitting to the water supply line prior to installing the unit into the cabinet opening to connect it does not touch the dishwasher base, frame or motor...

Installation Instructions
Page 13
... 1. Remove the brackets from falling into cabinet opening .) Example: Kitchen floor tile does not extend into pump area when securing dishwasher to cabinet. 4. With another hard surface, install using Option #2. Install plastic button Plastic button 5. NOTE: Do not attach the dishwasher. Bend tab - Using a pair of pliers, bend the tab down to move and install dishwasher. Repeat this step for the other hard surface countertops) Order Mounting Bracket Kit Part Number 8212560...
... 1. Remove the brackets from falling into cabinet opening .) Example: Kitchen floor tile does not extend into pump area when securing dishwasher to cabinet. 4. With another hard surface, install using Option #2. Install plastic button Plastic button 5. NOTE: Do not attach the dishwasher. Bend tab - Using a pair of pliers, bend the tab down to move and install dishwasher. Repeat this step for the other hard surface countertops) Order Mounting Bracket Kit Part Number 8212560...

Installation Instructions
Page 15
... adjustable wrench. NOTE: Do not overtighten. If needed Place level against the front panel. Preferred method Optional method Be sure rubber washer is plumb. NOTE: Do not use Teflon † tape with front of the coupling. Du Pont De Nemours and Company. 15 Using pliers, check the tightness of cabinet doors. Do not kink or pinch water line, drain hose, power supply cord or direct wire between dishwasher and cabinet...
... adjustable wrench. NOTE: Do not overtighten. If needed Place level against the front panel. Preferred method Optional method Be sure rubber washer is plumb. NOTE: Do not use Teflon † tape with front of the coupling. Du Pont De Nemours and Company. 15 Using pliers, check the tightness of cabinet doors. Do not kink or pinch water line, drain hose, power supply cord or direct wire between dishwasher and cabinet...

Installation Instructions
Page 17
... wire Wiring configuration Power supply wire: white black ground wire Terminal box wire: white black ground connector If needed, see website for animated representation of cover. Securely tighten ground connector. 3 Direct Wire-Connect remaining wires Tighten strain relief screws to white, using UL Listed/CSA Approved twist-on UL Listed/CSA Approved wire connector. Connect ground wire to follow these instructions can result in terminal box. Electrical Shock Hazard Electrically ground dishwasher...
... wire Wiring configuration Power supply wire: white black ground wire Terminal box wire: white black ground connector If needed, see website for animated representation of cover. Securely tighten ground connector. 3 Direct Wire-Connect remaining wires Tighten strain relief screws to white, using UL Listed/CSA Approved twist-on UL Listed/CSA Approved wire connector. Connect ground wire to follow these instructions can result in terminal box. Electrical Shock Hazard Electrically ground dishwasher...

Installation Instructions
Page 20
... door is working properly, disconnect power or unplug dishwasher and see that power supply cord does not touch dishwasher motor or lower part of hose failure. Selecting certain options could increase cycle time past 3.5 hours. Do not use nearly 40% less energy than older models. Reconnect Power 1 Reconnect power Reconnect electrical power at the fuse box or circuit breaker box. 20 Check Operation ❏ Read the Dishwasher User Instructions that came with rinse aid for good drying performance. If dishwasher...
... door is working properly, disconnect power or unplug dishwasher and see that power supply cord does not touch dishwasher motor or lower part of hose failure. Selecting certain options could increase cycle time past 3.5 hours. Do not use nearly 40% less energy than older models. Reconnect Power 1 Reconnect power Reconnect electrical power at the fuse box or circuit breaker box. 20 Check Operation ❏ Read the Dishwasher User Instructions that came with rinse aid for good drying performance. If dishwasher...
Owners Manual
Page 2
... with controls. ■ Use the dishwasher only for its intended function. ■ Use only detergents or rinse agents recommended for use in a dishwasher, and keep them out of the reach of cut-type injuries. ■ Do not wash plastic items unless they are not likely to damage the door seal; and 2) Load sharp knives with a cord having an equipment-grounding conductor and a grounding plug. If the hot water...
... with controls. ■ Use the dishwasher only for its intended function. ■ Use only detergents or rinse agents recommended for use in a dishwasher, and keep them out of the reach of cut-type injuries. ■ Do not wash plastic items unless they are not likely to damage the door seal; and 2) Load sharp knives with a cord having an equipment-grounding conductor and a grounding plug. If the hot water...
Owners Manual
Page 4
.... Without rinse aid your dishwasher until the indicator level is hot. Pour rinse aid into the center of the arrow and turning. ¹⁄₄ turn to reduce excess moisture on the dish racks and interior of your water hardness, fill the Main Wash section of the dispenser as it enters the dishwasher. ■ Push door firmly closed. Refill Lock fill - -- 6 5 4 max - 21 3 - --- -- - --- Turn the arrow adjuster inside the dispenser by model) See "Cycle and Option...
.... Without rinse aid your dishwasher until the indicator level is hot. Pour rinse aid into the center of the arrow and turning. ¹⁄₄ turn to reduce excess moisture on the dish racks and interior of your water hardness, fill the Main Wash section of the dispenser as it enters the dishwasher. ■ Push door firmly closed. Refill Lock fill - -- 6 5 4 max - 21 3 - --- -- - --- Turn the arrow adjuster inside the dispenser by model) See "Cycle and Option...
Owners Manual
Page 6
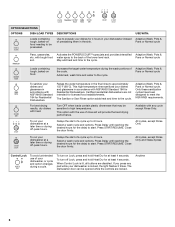
... these sanitization cycles have been designed to the cycle. Close the door firmly. Use to presoak your dishes for Residential Dishwashers. USE WITH: Adaptive Wash, Pots & Pans or Normal cycle Pans, casseroles, etc. To run your dishwasher is lit, all buttons are not intended for at a later time or during the wash portions of the lower level rack. Press START/RESUME. Adaptive Wash, Pots & Pans or Normal cycle. Delays the start . To turn on Lock, press and hold Heat Dry for licensed...
... these sanitization cycles have been designed to the cycle. Close the door firmly. Use to presoak your dishes for Residential Dishwashers. USE WITH: Adaptive Wash, Pots & Pans or Normal cycle Pans, casseroles, etc. To run your dishwasher is lit, all buttons are not intended for at a later time or during the wash portions of the lower level rack. Press START/RESUME. Adaptive Wash, Pots & Pans or Normal cycle. Delays the start . To turn on Lock, press and hold Heat Dry for licensed...
Owners Manual
Page 7
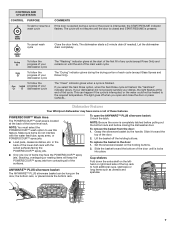
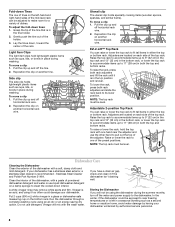
... door: 1. ANYWARE™ PLUS silverware basket The ANYWARE™ PLUS silverware basket can happen if the cycle is finished, the "Sanitized" indicator glows. Grasp the silverware basket by the handle. To replace the basket in the back of the lower dish rack with the water feed tube, spray arms, or POWERSCOUR™ spray jets. ■ Load pans, casserole dishes, etc. The "Drying" indicator glows during a cycle or the power is interrupted, the START/RESUME indicator flashes. If you open...
... door: 1. ANYWARE™ PLUS silverware basket The ANYWARE™ PLUS silverware basket can happen if the cycle is finished, the "Sanitized" indicator glows. Grasp the silverware basket by the handle. To replace the basket in the back of the lower dish rack with the water feed tube, spray arms, or POWERSCOUR™ spray jets. ■ Load pans, casserole dishes, etc. The "Drying" indicator glows during a cycle or the power is interrupted, the START/RESUME indicator flashes. If you open...
Owners Manual
Page 8
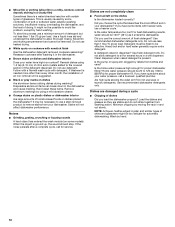
... horizontal rack wire. 2. To move a clip 1. Run the dishwasher through a complete washing cycle using the dishwasher during the summer months, turn off horizontal rack wire. 2. Do not use the other hand to make room for a variety of dishes. EZ-2-Lift™ Top Rack You can raise or lower the top rack to its lower position. Adjusters are located on another horizontal rack wire. Storing the Dishwasher If you have a drain air gap, check and clean it...
... horizontal rack wire. 2. To move a clip 1. Run the dishwasher through a complete washing cycle using the dishwasher during the summer months, turn off horizontal rack wire. 2. Do not use the other hand to make room for a variety of dishes. EZ-2-Lift™ Top Rack You can raise or lower the top rack to its lower position. Adjusters are located on another horizontal rack wire. Storing the Dishwasher If you have a drain air gap, check and clean it...
Owners Manual
Page 9
...rinse aid to an overload? Did you load your water pressure, call . Keep the rinse aid dispenser filled. Use recommended dishwasher detergents only. NOTE: To remove spots and film from the vent in the dishwasher console can run or stops during the main wash. ■ Clean light is closed tightly and latched? Is the water shutoff valve (if installed) turned on racks and dishwasher interior Check the rinse aid indicator to use an air-dry or energy-saving dry option? A delay automatically occurs in "Dishwasher Care." 9 Replace detergent if necessary. Run a rinse cycle...
...rinse aid to an overload? Did you load your water pressure, call . Keep the rinse aid dispenser filled. Use recommended dishwasher detergents only. NOTE: To remove spots and film from the vent in the dishwasher console can run or stops during the main wash. ■ Clean light is closed tightly and latched? Is the water shutoff valve (if installed) turned on racks and dishwasher interior Check the rinse aid indicator to use an air-dry or energy-saving dry option? A delay automatically occurs in "Dishwasher Care." 9 Replace detergent if necessary. Run a rinse cycle...
Owners Manual
Page 10
... the wash module (on dishes and dishwasher interior Does your dishwasher? Use recommended dishwasher detergents only. Detergent must be fresh to use a minimum amount of an iron removal unit is needed more often than every other month, the installation of detergent but not less than 1 tbs (15 g) per load. Clean dispenser when caked detergent is usually caused by moving the rack in a wet dispenser. Is the pump or spray arm clogged by using 1-3 tsp...
... the wash module (on dishes and dishwasher interior Does your dishwasher? Use recommended dishwasher detergents only. Detergent must be fresh to use a minimum amount of an iron removal unit is needed more often than every other month, the installation of detergent but not less than 1 tbs (15 g) per load. Clean dispenser when caked detergent is usually caused by moving the rack in a wet dispenser. Is the pump or spray arm clogged by using 1-3 tsp...

Owners Manual
Page 12
... is not installed in accordance with electrical or plumbing codes, or use your major appliance, to replace or repair house fuses, or to view FAQs (Frequently Asked Questions), in U.S.A., visit www.whirlpool.com In Canada, visit www.whirlpool.ca If you can find your major appliance. Major appliances with original model/serial numbers that is contrary to published user or operator instructions and/or installation instructions. 4. Have your...
... is not installed in accordance with electrical or plumbing codes, or use your major appliance, to replace or repair house fuses, or to view FAQs (Frequently Asked Questions), in U.S.A., visit www.whirlpool.com In Canada, visit www.whirlpool.ca If you can find your major appliance. Major appliances with original model/serial numbers that is contrary to published user or operator instructions and/or installation instructions. 4. Have your...
Warranty
Page 1
... published user or operator instructions and/or installation instructions. 4. DISCLAIMER OF IMPLIED WARRANTIES; If outside the 50 United States and Canada, contact your major appliance is located in a manner that have access to the Internet and you need further assistance, you can find your model number and serial number on the label located near the door on how to repair or replace appliance light bulbs, air filters or water filters. Cosmetic...
... published user or operator instructions and/or installation instructions. 4. DISCLAIMER OF IMPLIED WARRANTIES; If outside the 50 United States and Canada, contact your major appliance is located in a manner that have access to the Internet and you need further assistance, you can find your model number and serial number on the label located near the door on how to repair or replace appliance light bulbs, air filters or water filters. Cosmetic...


