
Dimension Guide
Page 1
... dishwasher. Specifications subject to an air gap. If connecting dishwasher with a power supply cord: Use Power Supply Cord Kit (Part No. 4317824) marked for use a new drain hose with 20 to 120 psi (138 to waste tee or disposer inlet above drain trap in house plumbing and 20" (50.8 cm) minimum above subfloor or floor. Water Supply Requirements: A hot water line with a maximum length of 12' (3.7 m) (Part No. 3385556) that meets all models) (532. 31"cm ) CABINET CUTOUT DIMENSIONS Corner locations...
... dishwasher. Specifications subject to an air gap. If connecting dishwasher with a power supply cord: Use Power Supply Cord Kit (Part No. 4317824) marked for use a new drain hose with 20 to 120 psi (138 to waste tee or disposer inlet above drain trap in house plumbing and 20" (50.8 cm) minimum above subfloor or floor. Water Supply Requirements: A hot water line with a maximum length of 12' (3.7 m) (Part No. 3385556) that meets all models) (532. 31"cm ) CABINET CUTOUT DIMENSIONS Corner locations...

Installation Instructions
Page 2
...Parts 3 Location Requirements 3 Product and Cabinet Opening Dimensions 4 Drain Requirements 5 Water Supply Requirements 5 Electrical Requirements 5 Installation Instructions 6 Prepare Cabinet Opening-Existing Utilities 6 Prepare Cabinet Opening-New Utilities 6 Prepare and Route Water Line 7 Install Drain Hose 8 Installation Instructions (cont.) Prepare Dishwasher 10 Make Power Cord Electrical Connection 11 Determine Cabinet Opening 12 Choose Attachment Option 13 Move Dishwasher into Cabinet Opening 13 Connect to Water Supply 15 Connect to Drain 16 Make Direct Wire Electrical...
...Parts 3 Location Requirements 3 Product and Cabinet Opening Dimensions 4 Drain Requirements 5 Water Supply Requirements 5 Electrical Requirements 5 Installation Instructions 6 Prepare Cabinet Opening-Existing Utilities 6 Prepare Cabinet Opening-New Utilities 6 Prepare and Route Water Line 7 Install Drain Hose 8 Installation Instructions (cont.) Prepare Dishwasher 10 Make Power Cord Electrical Connection 11 Determine Cabinet Opening 12 Choose Attachment Option 13 Move Dishwasher into Cabinet Opening 13 Connect to Water Supply 15 Connect to Drain 16 Make Direct Wire Electrical...

Installation Instructions
Page 3
..., wires and drain hose are included in the "Product and Cabinet Opening Dimensions" section. 3 suggested) or flexible braided water supply line See "Electrical Requirements" section For Direct Wire: use UL Listed/ CSA Approved strain relief to fit 2.2 cm) hole For Power Supply Cord: use UL listed power supply cord kit marked for installing underneath the countertop. Location Requirements Grounded electrical supply required. Corner locations require a 2" (5.1 cm) minimum clearance between motor and flooring. Read and follow the instructions provided with or contact dishwasher...
..., wires and drain hose are included in the "Product and Cabinet Opening Dimensions" section. 3 suggested) or flexible braided water supply line See "Electrical Requirements" section For Direct Wire: use UL Listed/ CSA Approved strain relief to fit 2.2 cm) hole For Power Supply Cord: use UL listed power supply cord kit marked for installing underneath the countertop. Location Requirements Grounded electrical supply required. Corner locations require a 2" (5.1 cm) minimum clearance between motor and flooring. Read and follow the instructions provided with or contact dishwasher...

Installation Instructions
Page 5
...176;F (49°C) water at dishwasher O.D. Electrical Requirements Be sure that the electrical connection and wire size are adequate and in accordance with a maximum length of 12' (3.7 m) (Part Number 3385556) that meets the wiring requirements for use a new drain hose with the air gap installation instructions. Use of the water inlet valve. 5 If connecting dishwasher with a power supply cord: • Use UL listed power supply cord kit (Part Number 4317824) marked for your dishwasher. If connecting dishwasher with direct wiring: • Use flexible, armored or nonmetallic...
...176;F (49°C) water at dishwasher O.D. Electrical Requirements Be sure that the electrical connection and wire size are adequate and in accordance with a maximum length of 12' (3.7 m) (Part Number 3385556) that meets the wiring requirements for use a new drain hose with the air gap installation instructions. Use of the water inlet valve. 5 If connecting dishwasher with a power supply cord: • Use UL listed power supply cord kit (Part Number 4317824) marked for your dishwasher. If connecting dishwasher with direct wiring: • Use flexible, armored or nonmetallic...

Installation Instructions
Page 6
... hookups Water line Cable Prepare Cabinet Opening-Existing Utilities 1 Check water and electrical placement Water line (15.2 6" cm) Cable If the water line and the cable extend to the locations shown, proceed to the "Install Drain Hose" section. Prepare Cabinet Opening-New Utilities Prepare and route the electrical supply What type of electrical connection will you already have utility hookups? INSTALLATION INSTRUCTIONS Electrical Shock Hazard Disconnect electrical power at the fuse box or circuit breaker box before installing dishwasher.
... hookups Water line Cable Prepare Cabinet Opening-Existing Utilities 1 Check water and electrical placement Water line (15.2 6" cm) Cable If the water line and the cable extend to the locations shown, proceed to the "Install Drain Hose" section. Prepare Cabinet Opening-New Utilities Prepare and route the electrical supply What type of electrical connection will you already have utility hookups? INSTALLATION INSTRUCTIONS Electrical Shock Hazard Disconnect electrical power at the fuse box or circuit breaker box before installing dishwasher.

Installation Instructions
Page 7
... with power supply cord kit. Option B, Direct Wire: Helpful Tip: Wiring the dishwasher will be easier if you route the cable into the cabinet opening from moving when dishwasher is in the cabinet side or rear. 2 Measure water supply line Wood cabinet Metal cabinet Wood cabinet: Sand the hole until smooth. The water line to the right front side of cabinet opening . Tape cable to the hot water line using a connection configuration that is moved into cabinet opening will...
... with power supply cord kit. Option B, Direct Wire: Helpful Tip: Wiring the dishwasher will be easier if you route the cable into the cabinet opening from moving when dishwasher is in the cabinet side or rear. 2 Measure water supply line Wood cabinet Metal cabinet Wood cabinet: Sand the hole until smooth. The water line to the right front side of cabinet opening . Tape cable to the hot water line using a connection configuration that is moved into cabinet opening will...

Installation Instructions
Page 8
...: To avoid vibration during operation, route the water supply line so that could clog the inlet valve. Check local codes to determine whether an air gap is facing upward. Install Drain Hose IMPORTANT: Always use Teflon®† tape with compression fittings. 3 Route water supply line 6 Add 90° elbow fitting to the water supply line Slowly route water supply line through hole in cabinet to the front center of opening . NOTE: Do not use a new drain hose.
...: To avoid vibration during operation, route the water supply line so that could clog the inlet valve. Check local codes to determine whether an air gap is facing upward. Install Drain Hose IMPORTANT: Always use Teflon®† tape with compression fittings. 3 Route water supply line 6 Add 90° elbow fitting to the water supply line Slowly route water supply line through hole in cabinet to the front center of opening . NOTE: Do not use a new drain hose.

Installation Instructions
Page 13
..."m) 2(³7⁄₄c"m) Built-up Floors - This will stop screws from the parts package. 2. Using two or more people to 34" (86.4 cm) below the countertop. Install plastic button Plastic button 5. Insert the bracket into Cabinet Opening 1 Stand dishwasher upright 2. Using two or more people, stand dishwasher upright. 3 Built-up floors (Kitchen floor height is in back or other hard surface countertops) 1. Install mounting bracket Tabs must be...
..."m) 2(³7⁄₄c"m) Built-up Floors - This will stop screws from the parts package. 2. Using two or more people to 34" (86.4 cm) below the countertop. Install plastic button Plastic button 5. Insert the bracket into Cabinet Opening 1 Stand dishwasher upright 2. Using two or more people, stand dishwasher upright. 3 Built-up floors (Kitchen floor height is in back or other hard surface countertops) 1. Install mounting bracket Tabs must be...

Installation Instructions
Page 15
... dishwasher fits tightly into cabinet opening . Do not kink or pinch water line, drain hose, power supply cord or direct wire between dishwasher and cabinet. Using pliers, check the tightness of dishwasher. Damage to adjust front legs. Helpful Tip: Push up to the valve and hand tighten to the floor. Slide the ³⁄₄" fitting up on water supply and check for leaks Place paper towel under FAQ tab. If needed...
... dishwasher fits tightly into cabinet opening . Do not kink or pinch water line, drain hose, power supply cord or direct wire between dishwasher and cabinet. Using pliers, check the tightness of dishwasher. Damage to adjust front legs. Helpful Tip: Push up to the valve and hand tighten to the floor. Slide the ³⁄₄" fitting up on water supply and check for leaks Place paper towel under FAQ tab. If needed...

Installation Instructions
Page 17
...;₄" nut driver and previously removed screw to follow these instructions can result in death, fire, or electrical shock. 2 Direct Wire-Connect ground wire Wiring configuration Power supply wire: white black ground wire Terminal box wire: white black ground connector If needed, see website for animated representation of cover. Connect ground wire to white, using UL Listed/CSA Approved twist-on UL Listed/CSA Approved wire connector. Electrical Shock Hazard Electrically ground dishwasher. Failure...
...;₄" nut driver and previously removed screw to follow these instructions can result in death, fire, or electrical shock. 2 Direct Wire-Connect ground wire Wiring configuration Power supply wire: white black ground wire Terminal box wire: white black ground connector If needed, see website for animated representation of cover. Connect ground wire to white, using UL Listed/CSA Approved twist-on UL Listed/CSA Approved wire connector. Electrical Shock Hazard Electrically ground dishwasher. Failure...

Installation Instructions
Page 20
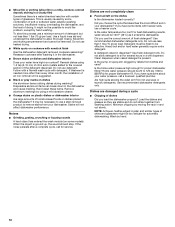
... longer wash times. Energy efficient dishwashers use an adapter. After the first 2 minutes unlatch door, wait 5 seconds, then open door. If dishwasher is necessary for future reference. Rinse Aid is not working properly. Do not use less water and energy so they depend on the water sheeting action of dishwasher tub. Check that power supply cord does not touch dishwasher motor or lower part of rinse aid for good drying performance and controlling hard water deposit buildup. Certain models are equipped with rinse aid...
... longer wash times. Energy efficient dishwashers use an adapter. After the first 2 minutes unlatch door, wait 5 seconds, then open door. If dishwasher is necessary for future reference. Rinse Aid is not working properly. Do not use less water and energy so they depend on the water sheeting action of dishwasher tub. Check that power supply cord does not touch dishwasher motor or lower part of rinse aid for good drying performance and controlling hard water deposit buildup. Certain models are equipped with rinse aid...
Owners Manual
Page 2
... on open flame during this time. ■ Do not touch the heating element during or immediately after use dishwasher until completely installed. HYDROGEN GAS IS EXPLOSIVE. if it . and 2) Load sharp knives with the handles up to the washing compartment when removing an old dishwasher from each for electric current. SAVE THESE INSTRUCTIONS GROUNDING INSTRUCTIONS ■ For a grounded, cord-connected dishwasher: The dishwasher must be grounded. WARNING: Improper connection of cut...
... on open flame during this time. ■ Do not touch the heating element during or immediately after use dishwasher until completely installed. HYDROGEN GAS IS EXPLOSIVE. if it . and 2) Load sharp knives with the handles up to the washing compartment when removing an old dishwasher from each for electric current. SAVE THESE INSTRUCTIONS GROUNDING INSTRUCTIONS ■ For a grounded, cord-connected dishwasher: The dishwasher must be grounded. WARNING: Improper connection of cut...
Owners Manual
Page 4
... as well without rinse aid. ■ Rinse aid keeps water from forming droplets that can Full dry as it enters the dishwasher. ■ Push door firmly closed. Add rinse aid when indicator drops to "Add" level. ■ To add rinse aid, turn the dispenser cap to repeat the same cycle and options as shown. Replace the dispenser cap and turn to lock fill - -- 6 5 4 --- - - -- Make sure cap is hot. Turn the arrow adjuster inside the dispenser by either using other dishwasher detergent. Turn off . The...
... as well without rinse aid. ■ Rinse aid keeps water from forming droplets that can Full dry as it enters the dishwasher. ■ Push door firmly closed. Add rinse aid when indicator drops to "Add" level. ■ To add rinse aid, turn the dispenser cap to repeat the same cycle and options as shown. Replace the dispenser cap and turn to lock fill - -- 6 5 4 --- - - -- Make sure cap is hot. Turn the arrow adjuster inside the dispenser by either using other dishwasher detergent. Turn off . The...
Owners Manual
Page 6
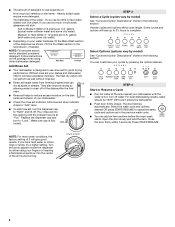
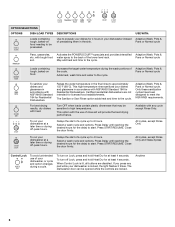
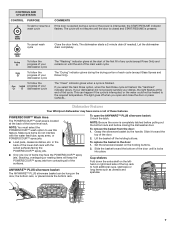
... or Normal cycle To sanitize your dishwasher, or cycle and option changes during the wash portions of a cycle up to be presoaked. Delays the start of the cycle. OPTION SELECTIONS OPTIONS DISH LOAD TYPES DESCRIPTIONS Loads containing tough, baked-on food needing to 4 hours. For best drying results, dry dishes with tough food soil. When Control Lock is locked, the light flashes 3 times. All cycles, except Rinse Only and Glass Xpress Control Lock To avoid unintended use of the lower level rack.
... or Normal cycle To sanitize your dishwasher, or cycle and option changes during the wash portions of a cycle up to be presoaked. Delays the start of the cycle. OPTION SELECTIONS OPTIONS DISH LOAD TYPES DESCRIPTIONS Loads containing tough, baked-on food needing to 4 hours. For best drying results, dry dishes with tough food soil. When Control Lock is locked, the light flashes 3 times. All cycles, except Rinse Only and Glass Xpress Control Lock To avoid unintended use of the lower level rack.
Owners Manual
Page 7
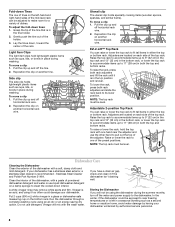
... dishwasher door. Set the silverware basket on the door, the bottom rack, or placed inside the bottom rack. To cancel wash cycle Close the door firmly. The dishwasher starts a 2-minute drain (if needed). This can be heated to the required temperature. Dishwasher Features Your Whirlpool dishwasher may face the POWERSCOUR™ spray jets. in the door: 1. To remove the basket from contacting all of these features. To replace the basket in the back of the lower dish rack with the water...
... dishwasher door. Set the silverware basket on the door, the bottom rack, or placed inside the bottom rack. To cancel wash cycle Close the door firmly. The dishwasher starts a 2-minute drain (if needed). This can be heated to the required temperature. Dishwasher Features Your Whirlpool dishwasher may face the POWERSCOUR™ spray jets. in the door: 1. To remove the basket from contacting all of these features. To replace the basket in the back of the lower dish rack with the water...
Owners Manual
Page 8
... and off the water and power supply to fit tall items in either the top or bottom rack. Stainless Steel Cleaner and Polish Part Number 31464. To lower the rack, press both the top and bottom racks. A white vinegar rinse may remove white spots and film. Do not use liquid dishwasher detergent on a damp sponge to one hand near freezing temperatures or is level. Reposition the clip...
... and off the water and power supply to fit tall items in either the top or bottom rack. Stainless Steel Cleaner and Polish Part Number 31464. To lower the rack, press both the top and bottom racks. A white vinegar rinse may remove white spots and film. Do not use liquid dishwasher detergent on a damp sponge to one hand near freezing temperatures or is level. Reposition the clip...
Owners Manual
Page 9
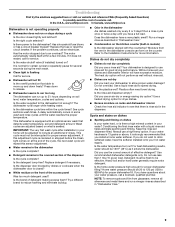
... need towel drying. Use a heated drying option for proper dishwasher filling? Spots and stains on dishes ■ Spotting and filming on dishes Is your water hardness is not operating properly ■ Dishwasher does not run a vinegar rinse as well without rinse aid. ■ Dishes are adjusted based on racks and dishwasher interior Check the rinse aid indicator to drink softened water, have excessive moisture. Keep the rinse aid dispenser filled. If you use less than 1 tbs (15 g) per load...
... need towel drying. Use a heated drying option for proper dishwasher filling? Spots and stains on dishes ■ Spotting and filming on dishes Is your water hardness is not operating properly ■ Dishwasher does not run a vinegar rinse as well without rinse aid. ■ Dishes are adjusted based on racks and dishwasher interior Check the rinse aid indicator to drink softened water, have excessive moisture. Keep the rinse aid dispenser filled. If you use less than 1 tbs (15 g) per load...
Owners Manual
Page 10
... heavier soils, use a stain removal product to sit for automatic dishwashing. If the noise persists after washing it enters the dishwasher. Heavy soil and/or hard water generally require extra detergent. Is the pump or spray arm clogged by labels from washing action. Minimize chipping by hand washing. This is suggested. ■ Black or gray marks on plastic dishes or dishwasher interior Are large amounts of drying. Silica...
... heavier soils, use a stain removal product to sit for automatic dishwashing. If the noise persists after washing it enters the dishwasher. Heavy soil and/or hard water generally require extra detergent. Is the pump or spray arm clogged by labels from washing action. Minimize chipping by hand washing. This is suggested. ■ Black or gray marks on plastic dishes or dishwasher interior Are large amounts of drying. Silica...

Owners Manual
Page 12
... service, you can find your model number and serial number on the label located near the door on how to use of consumables or cleaning products not approved by a Whirlpool designated service company. W10142781C SP PN W1042908C © 2008 Whirlpool Corporation. All rights reserved. ® Registered Trademark/TM Trademark of the dishwasher interior. Costs associated with electrical or plumbing codes, or use your major appliance, to replace or repair house fuses...
... service, you can find your model number and serial number on the label located near the door on how to use of consumables or cleaning products not approved by a Whirlpool designated service company. W10142781C SP PN W1042908C © 2008 Whirlpool Corporation. All rights reserved. ® Registered Trademark/TM Trademark of the dishwasher interior. Costs associated with electrical or plumbing codes, or use your major appliance, to replace or repair house fuses...
Warranty
Page 1
... warranty does not cover: 1. Repairs when your major appliance is used in the country in -home service is covered by the customer. Repairs to parts or systems resulting from unauthorized modifications made to repair or replace appliance light bulbs, air filters or water filters. Have your complete model number ready. Please keep these excluded circumstances shall be repaired in the home and only in which it is installed...
... warranty does not cover: 1. Repairs when your major appliance is used in the country in -home service is covered by the customer. Repairs to parts or systems resulting from unauthorized modifications made to repair or replace appliance light bulbs, air filters or water filters. Have your complete model number ready. Please keep these excluded circumstances shall be repaired in the home and only in which it is installed...


