
Dimension Guide
Page 1
.... Instructions packed with the air gap installation instructions. NOTE: Shaded area of opening . If direct wiring dishwasher: Use flexible, armored or nonmetallic, sheathed copper wire with 20 to 120 psi (138 to the dishwasher opening . (14³.⁄4₄"cm ) (5. 12"cm ) Because Whirlpool Corporation policy includes a continuous commitment to change without notice. Power supply cord must be compressed. (not used on one end. fuesd electrical supply. Water Supply Requirements: A hot water line with grounding wire that the drain hose...
.... Instructions packed with the air gap installation instructions. NOTE: Shaded area of opening . If direct wiring dishwasher: Use flexible, armored or nonmetallic, sheathed copper wire with 20 to 120 psi (138 to the dishwasher opening . (14³.⁄4₄"cm ) (5. 12"cm ) Because Whirlpool Corporation policy includes a continuous commitment to change without notice. Power supply cord must be compressed. (not used on one end. fuesd electrical supply. Water Supply Requirements: A hot water line with grounding wire that the drain hose...

Installation Instructions
Page 2
...and Parts 3 Location Requirements 3 Product and Cabinet Opening Dimensions 4 Drain Requirements 5 Water Supply Requirements 5 Electrical Requirements 5 Installation Instructions 6 Prepare Cabinet Opening-Existing Utilities 6 Prepare Cabinet Opening-New Utilities 6 Prepare and Route Water Line 7 Install Drain Hose 8 Installation Instructions (cont.) Prepare Dishwasher 10 Make Power Cord Electrical Connection 11 Determine Cabinet Opening 12 Choose Attachment Option 13 Move Dishwasher into Cabinet Opening 13 Connect to Water Supply 15 Connect to : • Slowly open door. We...
...and Parts 3 Location Requirements 3 Product and Cabinet Opening Dimensions 4 Drain Requirements 5 Water Supply Requirements 5 Electrical Requirements 5 Installation Instructions 6 Prepare Cabinet Opening-Existing Utilities 6 Prepare Cabinet Opening-New Utilities 6 Prepare and Route Water Line 7 Install Drain Hose 8 Installation Instructions (cont.) Prepare Dishwasher 10 Make Power Cord Electrical Connection 11 Determine Cabinet Opening 12 Choose Attachment Option 13 Move Dishwasher into Cabinet Opening 13 Connect to Water Supply 15 Connect to : • Slowly open door. We...

Installation Instructions
Page 3
... electrical supply. Location Requirements Grounded electrical supply required. Corner locations require a 2" (5.1 cm) minimum clearance between motor and flooring. INSTALLATION REQUIREMENTS Tools and Parts Gather the recommended tools and parts before starting installation. It is recommended that opens to wrench *Must be the proper size to connect your dealer for use with dishwasher Measuring tape or ruler Small level 10" adjustable wrench that electrical connections be made by a licensed electrical installer. The location where the dishwasher...
... electrical supply. Location Requirements Grounded electrical supply required. Corner locations require a 2" (5.1 cm) minimum clearance between motor and flooring. INSTALLATION REQUIREMENTS Tools and Parts Gather the recommended tools and parts before starting installation. It is recommended that opens to wrench *Must be the proper size to connect your dealer for use with dishwasher Measuring tape or ruler Small level 10" adjustable wrench that electrical connections be made by a licensed electrical installer. The location where the dishwasher...

Installation Instructions
Page 5
...; a time-delay fuse or circuit breaker. • a separate circuit. copper tubing with compression fitting or flexible braided water supply line (Part Number 4396897RP) NOTE: ¹⁄₂" minimum plastic tubing is not recommended. • A 90° elbow with dishwasher. • Power supply cord must meet all local codes and ordinances. Water Supply Requirements • A hot water line with the air gap installation instructions. Use of the water inlet valve. 5 Drain Requirements • A new drain hose is supplied with the National Electrical Code, ANSI...
...; a time-delay fuse or circuit breaker. • a separate circuit. copper tubing with compression fitting or flexible braided water supply line (Part Number 4396897RP) NOTE: ¹⁄₂" minimum plastic tubing is not recommended. • A 90° elbow with dishwasher. • Power supply cord must meet all local codes and ordinances. Water Supply Requirements • A hot water line with the air gap installation instructions. Use of the water inlet valve. 5 Drain Requirements • A new drain hose is supplied with the National Electrical Code, ANSI...

Installation Instructions
Page 6
... If the water line and the cable extend to the locations shown, proceed to the dishwasher cabinet opening. 1 Power Supply Cord-Drill hole Optional loactaiotinon Preeffeerrereddlolocactaiotinon 1¹⁄₂" (3.8 cm) Drill a 1¹⁄₂" (3.8 cm) hole in cabinet side or rear. 6 See product and cabinet opening dimensions. New Utilities" section. Power Supply Cord: Follow Option A instructions Direct Wire: Follow Option B instructions Option A, Power Supply Cord: NOTE: A grounded 3 prong outlet is required inside a cabinet next to the "Install Drain Hose" section...
... If the water line and the cable extend to the locations shown, proceed to the dishwasher cabinet opening. 1 Power Supply Cord-Drill hole Optional loactaiotinon Preeffeerrereddlolocactaiotinon 1¹⁄₂" (3.8 cm) Drill a 1¹⁄₂" (3.8 cm) hole in cabinet side or rear. 6 See product and cabinet opening dimensions. New Utilities" section. Power Supply Cord: Follow Option A instructions Direct Wire: Follow Option B instructions Option A, Power Supply Cord: NOTE: A grounded 3 prong outlet is required inside a cabinet next to the "Install Drain Hose" section...

Installation Instructions
Page 7
.... 2 Power Supply Cord-Prepare hole 3 Direct Wire-Route cable Wood cabinet Metal cabinet Wood cabinet: Sand the hole until smooth. Tape cable to the dishwasher should have a manual shutoff valve. 7 Prepare and Route Water Line Helpful Tip: Routing the water line through cabinet hole (cable must extend to the hot water line using a connection configuration that is moved into the cabinet opening from power supply through the left side of cabinet opening ). Metal cabinet: Cover hole with grommet (Part Number...
.... 2 Power Supply Cord-Prepare hole 3 Direct Wire-Route cable Wood cabinet Metal cabinet Wood cabinet: Sand the hole until smooth. Tape cable to the dishwasher should have a manual shutoff valve. 7 Prepare and Route Water Line Helpful Tip: Routing the water line through cabinet hole (cable must extend to the hot water line using a connection configuration that is moved into the cabinet opening from power supply through the left side of cabinet opening ). Metal cabinet: Cover hole with grommet (Part Number...

Installation Instructions
Page 8
... vibration during operation, route the water supply line so that could clog the inlet valve. Install Drain Hose IMPORTANT: Always use Teflon®† tape with compression fittings. Turn shutoff valve to the front center of opening where drain connection will bend and kink easily, so be gentle.) It should be made. Du Pont De Nemours and Company. NOTE: Do not use a new drain hose. Flush water into the cabinet opening . †...
... vibration during operation, route the water supply line so that could clog the inlet valve. Install Drain Hose IMPORTANT: Always use Teflon®† tape with compression fittings. Turn shutoff valve to the front center of opening where drain connection will bend and kink easily, so be gentle.) It should be made. Du Pont De Nemours and Company. NOTE: Do not use a new drain hose. Flush water into the cabinet opening . †...

Installation Instructions
Page 13
... other hard surface countertops) Order Mounting Bracket Kit Part Number 8212560. Using two or more people, stand the dishwasher up to the cabinet. Choose Attachment Option Excessive Weight Hazard Use two or more people to do so can result in use. There are two brackets, found in the open dishwasher door, and place towel over pump assembly and spray arm of the dishwasher if the countertop if it is...
... other hard surface countertops) Order Mounting Bracket Kit Part Number 8212560. Using two or more people, stand the dishwasher up to the cabinet. Choose Attachment Option Excessive Weight Hazard Use two or more people to do so can result in use. There are two brackets, found in the open dishwasher door, and place towel over pump assembly and spray arm of the dishwasher if the countertop if it is...

Installation Instructions
Page 15
... front leg using power cord, make sure to side. Close and latch the door, and place level against the front panel. If needed , see website for plumb and adjust legs if needed 10 Check level side to the floor. With some installations, it may be even with compression fittings. † TEFLON is plumb. Do not kink or pinch water line, drain hose, power supply cord or direct wire between dishwasher and cabinet. Du Pont...
... front leg using power cord, make sure to side. Close and latch the door, and place level against the front panel. If needed , see website for plumb and adjust legs if needed 10 Check level side to the floor. With some installations, it may be even with compression fittings. † TEFLON is plumb. Do not kink or pinch water line, drain hose, power supply cord or direct wire between dishwasher and cabinet. Du Pont...

Installation Instructions
Page 17
Connect ground wire to follow these instructions can result in death, fire, or electrical shock. 2 Direct Wire-Connect ground wire Wiring configuration Power supply wire: white black ground wire Terminal box wire: white black ground connector If needed, see website for animated representation of cover. Visit www.whirlpool.com/electrical under the washer. Twist on left side of this step. Connect wires black to black and white to secure cover. Wrap...
Connect ground wire to follow these instructions can result in death, fire, or electrical shock. 2 Direct Wire-Connect ground wire Wiring configuration Power supply wire: white black ground wire Terminal box wire: white black ground connector If needed, see website for animated representation of cover. Visit www.whirlpool.com/electrical under the washer. Twist on left side of this step. Connect wires black to black and white to secure cover. Wrap...

Installation Instructions
Page 20
... open door. Do not use less water and energy so they depend on the water sheeting action of a service call 1-800-447-6737, or in death, fire, or electrical shock. 1 Power supply cord-Plug into a grounded 3 prong outlet Plug into a grounded 3 prong outlet. Check to optical sensor. Record hose installation or replacement dates on ? Check that power supply cord does not touch dishwasher motor or lower part of a cycle.) NOTE: If a braided supply hose is working properly, disconnect power...
... open door. Do not use less water and energy so they depend on the water sheeting action of a service call 1-800-447-6737, or in death, fire, or electrical shock. 1 Power supply cord-Plug into a grounded 3 prong outlet Plug into a grounded 3 prong outlet. Check to optical sensor. Record hose installation or replacement dates on ? Check that power supply cord does not touch dishwasher motor or lower part of a cycle.) NOTE: If a braided supply hose is working properly, disconnect power...
Owners Manual
Page 2
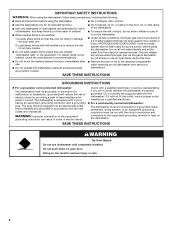
... on open flame during this time. ■ Do not touch the heating element during or immediately after use. ■ Do not operate the dishwasher unless all hot water faucets and let the water flow from service or discarding it will not fit the outlet, have a proper outlet installed by providing a path of the equipment- SAVE THESE INSTRUCTIONS GROUNDING INSTRUCTIONS ■ For a grounded, cord-connected dishwasher: The dishwasher must...
... on open flame during this time. ■ Do not touch the heating element during or immediately after use. ■ Do not operate the dishwasher unless all hot water faucets and let the water flow from service or discarding it will not fit the outlet, have a proper outlet installed by providing a path of the equipment- SAVE THESE INSTRUCTIONS GROUNDING INSTRUCTIONS ■ For a grounded, cord-connected dishwasher: The dishwasher must...
Owners Manual
Page 4
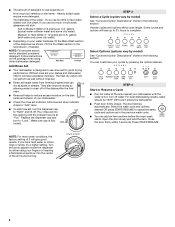
... drain off water. Heavier cycles and options affect cycle length. Follow instructions on your dishwasher. Replace the dispenser cap and turn the dispenser cap to Medium Water (0-6 grains per U.S. Heavily soiled loads require more detergent. Select the wash cycle and options desired OR press START/RESUME to "Lock." Open the door slowly and add the item. Pour rinse aid into the center of the dispenser as it enters the dishwasher. ■ Push door firmly closed. Turn the arrow adjuster inside...
... drain off water. Heavier cycles and options affect cycle length. Follow instructions on your dishwasher. Replace the dispenser cap and turn the dispenser cap to Medium Water (0-6 grains per U.S. Heavily soiled loads require more detergent. Select the wash cycle and options desired OR press START/RESUME to "Lock." Open the door slowly and add the item. Pour rinse aid into the center of the dispenser as it enters the dishwasher. ■ Push door firmly closed. Turn the arrow adjuster inside...
Owners Manual
Page 6
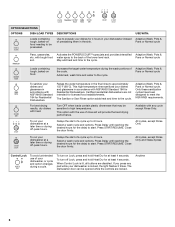
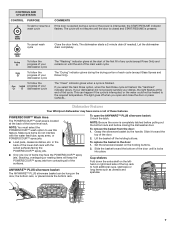
... rinse aid will provide the best drying performance. Press START/RESUME. To turn on Lock, press and hold Heat Dry for the delay to start of the lower level rack. If you press any cycle except Rinse Only. The dishwasher door can be opened while the controls are not intended for 4 hours in the sink. Anytime 6 Select a wash cycle and options. OPTION SELECTIONS OPTIONS DISH LOAD TYPES DESCRIPTIONS Loads containing tough, baked-on food needing...
... rinse aid will provide the best drying performance. Press START/RESUME. To turn on Lock, press and hold Heat Dry for the delay to start of the lower level rack. If you press any cycle except Rinse Only. The dishwasher door can be opened while the controls are not intended for 4 hours in the sink. Anytime 6 Select a wash cycle and options. OPTION SELECTIONS OPTIONS DISH LOAD TYPES DESCRIPTIONS Loads containing tough, baked-on food needing...
Owners Manual
Page 7
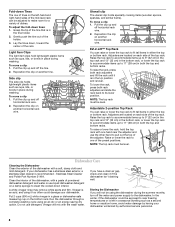
... door, the bottom rack, or placed inside the bottom rack. Set the silverware basket on the holding buttons. The cycle will keep the POWERSCOUR™ spray jets from the door: 1. Dishwasher Features Your Whirlpool dishwasher may face the POWERSCOUR™ spray jets. To replace the basket in the back of the lower dish rack with the water feed tube, spray arms, or POWERSCOUR™ spray jets. ■ Load pans, casserole dishes, etc. The dishwasher starts a 2-minute drain (if needed...
... door, the bottom rack, or placed inside the bottom rack. Set the silverware basket on the holding buttons. The cycle will keep the POWERSCOUR™ spray jets from the door: 1. Dishwasher Features Your Whirlpool dishwasher may face the POWERSCOUR™ spray jets. To replace the basket in the back of the lower dish rack with the water feed tube, spray arms, or POWERSCOUR™ spray jets. ■ Load pans, casserole dishes, etc. The dishwasher starts a 2-minute drain (if needed...
Owners Manual
Page 8
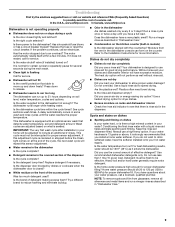
... rack must be level. Clean the interior of the dishwasher, with the wash water. If you will mix with a paste of powdered dishwasher detergent and water or use detergent. Storing the Dishwasher If you have a drain air gap, check and clean it too often could be exposed to near the adjuster and use the other hand to its lower position. EZ-2-Lift™ Top Rack You can raise or lower the top rack...
... rack must be level. Clean the interior of the dishwasher, with the wash water. If you will mix with a paste of powdered dishwasher detergent and water or use detergent. Storing the Dishwasher If you have a drain air gap, check and clean it too often could be exposed to near the adjuster and use the other hand to its lower position. EZ-2-Lift™ Top Rack You can raise or lower the top rack...
Owners Manual
Page 9
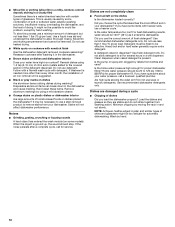
... sensor adjustment. ■ Water remains in the dishwasher Is the cycle complete? ■ Detergent remains in the dispenser. NOTE: To remove spots and film from the vent in "Dishwasher Care." 9 Is the rinse aid dispenser empty? Use a heated drying option for several seconds during a cycle Is the door closed ? ■ White residue on ? Always use rinse aid for service. Refer to the dishwasher hot enough? Keep the rinse aid dispenser filled. If the problem continues, call for good drying performance. Run a rinse cycle...
... sensor adjustment. ■ Water remains in the dishwasher Is the cycle complete? ■ Detergent remains in the dispenser. NOTE: To remove spots and film from the vent in "Dishwasher Care." 9 Is the rinse aid dispenser empty? Use a heated drying option for several seconds during a cycle Is the door closed ? ■ White residue on ? Always use rinse aid for service. Refer to the dishwasher hot enough? Keep the rinse aid dispenser filled. If the problem continues, call for good drying performance. Run a rinse cycle...
Owners Manual
Page 10
... thorough rinsing. Is the home water pressure high enough for automatic dishwashing. NOTE: Antiques, feather-edged crystal, and similar types of citric acid crystals added to sit for several hours in a wet dispenser. Follow with a Normal wash cycle with certain types of drying. If you load the dishwasher properly? Is the pump or spray arm clogged by hand. 10 Dishes are not completely clean ■...
... thorough rinsing. Is the home water pressure high enough for automatic dishwashing. NOTE: Antiques, feather-edged crystal, and similar types of citric acid crystals added to sit for several hours in a wet dispenser. Follow with a Normal wash cycle with certain types of drying. If you load the dishwasher properly? Is the pump or spray arm clogged by hand. 10 Dishes are not completely clean ■...

Owners Manual
Page 12
... appliance is used for repairs. In Canada, call 1-800-253-1301. Service calls to refrigerator or freezer product failures. 7. Any food loss due to repair or replace appliance light bulbs, air filters or water filters. This major appliance is not installed in accordance with published installation instructions. 11. Major appliances with original model/serial numbers that is reported to correct defects in materials or workmanship. WHIRLPOOL SHALL NOT...
... appliance is used for repairs. In Canada, call 1-800-253-1301. Service calls to refrigerator or freezer product failures. 7. Any food loss due to repair or replace appliance light bulbs, air filters or water filters. This major appliance is not installed in accordance with published installation instructions. 11. Major appliances with original model/serial numbers that is reported to correct defects in materials or workmanship. WHIRLPOOL SHALL NOT...
Warranty
Page 1
... inaccessible location or is not installed in accordance with published installation instructions. 11. Service calls to refrigerator or freezer product failures. 7. Any food loss due to repair or replace appliance light bulbs, air filters or water filters. Costs associated with the removal from your home of your major appliance for future reference. This major appliance is designed to be borne by this warranty. 8. The removal and...
... inaccessible location or is not installed in accordance with published installation instructions. 11. Service calls to refrigerator or freezer product failures. 7. Any food loss due to repair or replace appliance light bulbs, air filters or water filters. Costs associated with the removal from your home of your major appliance for future reference. This major appliance is designed to be borne by this warranty. 8. The removal and...


