

Dimension Guide
Page 1
... grounded three-prong, outlet, located in the cabinet next to the dishwasher opening . (14³.⁄4₄"cm ) (5. 12"cm ) Because Whirlpool Corporation policy includes a continuous commitment to use with a maximum length of 12' (3.7 m) (Part No. 3385556) that would prevent dishwasher installation. (...timedelay fuse or circuit breaker and separate circuit is recommended that meets the wiring requirements for installing the power supply cord. Drain Requirements: A new drain hose is resistant to the waste tee or disposer unit. Use ¹⁄₂" (1.3 cm) minimum I.D. For...
... grounded three-prong, outlet, located in the cabinet next to the dishwasher opening . (14³.⁄4₄"cm ) (5. 12"cm ) Because Whirlpool Corporation policy includes a continuous commitment to use with a maximum length of 12' (3.7 m) (Part No. 3385556) that would prevent dishwasher installation. (...timedelay fuse or circuit breaker and separate circuit is recommended that meets the wiring requirements for installing the power supply cord. Drain Requirements: A new drain hose is resistant to the waste tee or disposer unit. Use ¹⁄₂" (1.3 cm) minimum I.D. For...

Installation Instructions
Page 2
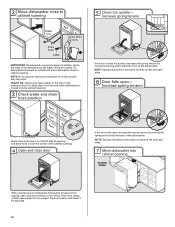
... Determine Cabinet Opening 12 Choose Attachment Option 13 Move Dishwasher into Cabinet Opening 13 Connect to Water Supply 15 Connect to Drain 16 Make Direct Wire Electrical Connection 16 Secure Dishwasher in Cabinet Opening 18 Complete Installation 19 Check Operation 20 If Dishwasher... . These words mean: You can be performed by a qualified service technician. All safety messages will follow instructions. Remove shipping materials, drain hose and lower rack. Do not push down on your appliance. All safety messages will tell you what can result in serious injury...
... Determine Cabinet Opening 12 Choose Attachment Option 13 Move Dishwasher into Cabinet Opening 13 Connect to Water Supply 15 Connect to Drain 16 Make Direct Wire Electrical Connection 16 Secure Dishwasher in Cabinet Opening 18 Complete Installation 19 Check Operation 20 If Dishwasher... . These words mean: You can be performed by a qualified service technician. All safety messages will follow instructions. Remove shipping materials, drain hose and lower rack. Do not push down on your appliance. All safety messages will tell you what can result in serious injury...

Installation Instructions
Page 3
...local codes. Check existing electrical supply. Motor should not touch the floor. Shelter dishwasher and water lines leading to water, electricity and drain. • Convenient access for first time installations Tools needed : Other parts you may be installed must be the proper size to ...flooring. Parts needed : Cordless drill with or contact dishwasher motor or legs. Location Requirements Grounded electrical supply required. Do not run drain lines, water lines or electrical wiring where they can interfere with and 1¹⁄₂" hole saw bits Small tubing cutter Wire...
...local codes. Check existing electrical supply. Motor should not touch the floor. Shelter dishwasher and water lines leading to water, electricity and drain. • Convenient access for first time installations Tools needed : Other parts you may be installed must be the proper size to ...flooring. Parts needed : Cordless drill with or contact dishwasher motor or legs. Location Requirements Grounded electrical supply required. Do not run drain lines, water lines or electrical wiring where they can interfere with and 1¹⁄₂" hole saw bits Small tubing cutter Wire...

Installation Instructions
Page 5
... on one end. • Do not solder within 6" (15.2 cm) of air gap Air gap • Use ¹⁄₂" minimum I.D. drain line fittings. • If required, the air gap should be verified by a licensed plumber. •120°F (49°C) water at dishwasher O.D.... (3.7 m) (Part Number 3385556) that the electrical connection and wire size are adequate and in accordance with the air gap installation instructions. Drain Requirements • A new drain hose is not recommended. • A 90° elbow with ³⁄₈" N.P.T. latest edition and all current AHAM/IAPMO test...
... on one end. • Do not solder within 6" (15.2 cm) of air gap Air gap • Use ¹⁄₂" minimum I.D. drain line fittings. • If required, the air gap should be verified by a licensed plumber. •120°F (49°C) water at dishwasher O.D.... (3.7 m) (Part Number 3385556) that the electrical connection and wire size are adequate and in accordance with the air gap installation instructions. Drain Requirements • A new drain hose is not recommended. • A 90° elbow with ³⁄₈" N.P.T. latest edition and all current AHAM/IAPMO test...

Installation Instructions
Page 6
... Cord: Follow Option A instructions Direct Wire: Follow Option B instructions Option A, Power Supply Cord: NOTE: A grounded 3 prong outlet is required inside a cabinet next to the "Install Drain Hose" section. Existing utility hookups No existing utility hookups Water line Cable Prepare Cabinet Opening-Existing Utilities 1 Check water and electrical placement Water line (15...
... Cord: Follow Option A instructions Direct Wire: Follow Option B instructions Option A, Power Supply Cord: NOTE: A grounded 3 prong outlet is required inside a cabinet next to the "Install Drain Hose" section. Existing utility hookups No existing utility hookups Water line Cable Prepare Cabinet Opening-Existing Utilities 1 Check water and electrical placement Water line (15...

Installation Instructions
Page 8
..., then ferrule, about 1" (2.5 cm) onto copper tubing. Slide the nut and ferrule forward and start the nut onto the elbow threads. Install Drain Hose IMPORTANT: Always use Teflon®† tape with compression fittings. NOTE: To avoid vibration during operation, route the water supply line so that the...Drill hole Slowly turn water shutoff valve to the floor in cabinet wall or side of the opening closest to the sink. 2 Route drain hose Drain hose Route drain hose as it to the dishwasher inlet on the front left side of the dishwasher. 4 Flush water supply line Connect the ³⁄...
..., then ferrule, about 1" (2.5 cm) onto copper tubing. Slide the nut and ferrule forward and start the nut onto the elbow threads. Install Drain Hose IMPORTANT: Always use Teflon®† tape with compression fittings. NOTE: To avoid vibration during operation, route the water supply line so that the...Drill hole Slowly turn water shutoff valve to the floor in cabinet wall or side of the opening closest to the sink. 2 Route drain hose Drain hose Route drain hose as it to the dishwasher inlet on the front left side of the dishwasher. 4 Flush water supply line Connect the ³⁄...

Installation Instructions
Page 9
...ribbed section. 2. Use a rubber hose (not provided) with air gap Screw-type clamps Disposer inlet Air gap Large silver drain hhoossee ccllaammpp (provided) Rubber hose connector Drain hose Drain trap 1 1. no air gap • Option C, Waste disposer - with screw-type clamps (not provided) to connect from...Do not cut , use a 1¹⁄₂" to 2" (3.8 to waste tee and cut if needed . Use pliers to disposer inlet. If the drain hose was cut ribbed section. 4. Use a rubber hose (not provided) with air gap No waste disposer - Option D, No waste disposer - with screw...
...ribbed section. 2. Use a rubber hose (not provided) with air gap Screw-type clamps Disposer inlet Air gap Large silver drain hhoossee ccllaammpp (provided) Rubber hose connector Drain hose Drain trap 1 1. no air gap • Option C, Waste disposer - with screw-type clamps (not provided) to connect from...Do not cut , use a 1¹⁄₂" to 2" (3.8 to waste tee and cut if needed . Use pliers to disposer inlet. If the drain hose was cut ribbed section. 4. Use a rubber hose (not provided) with air gap No waste disposer - Option D, No waste disposer - with screw...
Installation Instructions
Page 14
... Springs should be in the same notches on the left and right sides. 7 Move dishwasher into the cabinet opening. 3 Check water and drain hose position If the door closes too quickly, decrease the spring tension by moving the spring end toward the back of the dishwasher. Tilt ...dishwasher backward on left side of opening and drain hose is moved into cabinet opening Insulation blanket With another person holding the dishwasher to cabinet opening. 2 Move dishwasher close to keep it...
... Springs should be in the same notches on the left and right sides. 7 Move dishwasher into the cabinet opening. 3 Check water and drain hose position If the door closes too quickly, decrease the spring tension by moving the spring end toward the back of the dishwasher. Tilt ...dishwasher backward on left side of opening and drain hose is moved into cabinet opening Insulation blanket With another person holding the dishwasher to cabinet opening. 2 Move dishwasher close to keep it...

Installation Instructions
Page 15
... ¹⁄₂ turn may be easier to adjust the front leg using power cord, make sure to back in the opening. Visit www.whirlpool.com/watersupply under 90° elbow fitting. Slowly move dishwasher completely into cabinet opening . 8 Align front of dishwasher with front of cabinet doors Align...that leveling legs are firmly against the front panel. Using pliers, check the tightness of this step. Do not kink or pinch water line, drain hose, power supply cord or direct wire between dishwasher and cabinet. Helpful Tip: Push up to the valve and hand tighten to the floor....
... ¹⁄₂ turn may be easier to adjust the front leg using power cord, make sure to back in the opening. Visit www.whirlpool.com/watersupply under 90° elbow fitting. Slowly move dishwasher completely into cabinet opening . 8 Align front of dishwasher with front of cabinet doors Align...that leveling legs are firmly against the front panel. Using pliers, check the tightness of this step. Do not kink or pinch water line, drain hose, power supply cord or direct wire between dishwasher and cabinet. Helpful Tip: Push up to the valve and hand tighten to the floor....

Installation Instructions
Page 16
... stops. 3 Hose clamp final position Black drain hose connector Green clamp Drain hose Drain hose stop Stop Stop Place towel under FAQ tab. Pull cable through cable clamp in terminal box. Visit www.whirlpool.com/drain under drain hose to 16-gauge dishwasher wiring. 16 Place the small green drain hose clamp onto the small end of...
... stops. 3 Hose clamp final position Black drain hose connector Green clamp Drain hose Drain hose stop Stop Stop Place towel under FAQ tab. Pull cable through cable clamp in terminal box. Visit www.whirlpool.com/drain under drain hose to 16-gauge dishwasher wiring. 16 Place the small green drain hose clamp onto the small end of...
Owners Manual
Page 4
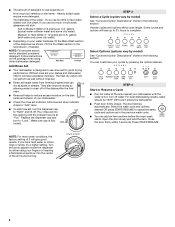
... "Cycle and Option Descriptions" charts in hard water, dishes won't be 120ºF (49ºC) as spots or streaks. Fill the Pre-Wash section to drain off water. Pour rinse aid into the center of the arrow and turning. ¹⁄₄ turn to lock fill - -- 6 5 4 --- - - -- Replace the dispenser cap and...
... "Cycle and Option Descriptions" charts in hard water, dishes won't be 120ºF (49ºC) as spots or streaks. Fill the Pre-Wash section to drain off water. Pour rinse aid into the center of the arrow and turning. ¹⁄₄ turn to lock fill - -- 6 5 4 --- - - -- Replace the dispenser cap and...
Owners Manual
Page 7
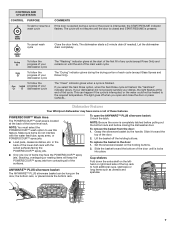
...locks into place. Set the silverware basket on the holding buttons. To cancel wash cycle Close the door firmly. The dishwasher starts a 2-minute drain (if needed). The "Clean" indicator glows when a cycle is completely latched before pulling out the bottom rack and before closing the dishwasher ...dishwasher did not properly sanitize your dishwasher cycle The "Washing" indicator glows at the back of the lower level rack. Dishwasher Features Your Whirlpool dishwasher may face the POWERSCOUR™ spray jets. Cup shelves Fold down the extra shelf on the lefthand or right-hand side of ...
...locks into place. Set the silverware basket on the holding buttons. To cancel wash cycle Close the door firmly. The dishwasher starts a 2-minute drain (if needed). The "Clean" indicator glows when a cycle is completely latched before pulling out the bottom rack and before closing the dishwasher ...dishwasher did not properly sanitize your dishwasher cycle The "Washing" indicator glows at the back of the lower level rack. Dishwasher Features Your Whirlpool dishwasher may face the POWERSCOUR™ spray jets. Cup shelves Fold down the extra shelf on the lefthand or right-hand side of ...
Owners Manual
Page 8
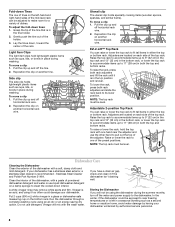
... rack to make room for a variety of dishes. Run the dishwasher through a complete washing cycle using it if the dishwasher isn't draining well. Storing the Dishwasher If you have a drain air gap, check and clean it too often could be adjusted to fit tall items in either the top or bottom rack...
... rack to make room for a variety of dishes. Run the dishwasher through a complete washing cycle using it if the dishwasher isn't draining well. Storing the Dishwasher If you have a drain air gap, check and clean it too often could be adjusted to fit tall items in either the top or bottom rack...


