

Dimension Guide
Page 1
... water inlet valve. It is not long enough, use an air gap if the drain hose is recommended. air gap Make sure to use a new drain hose with grounding wire that meets all models) (532. 31"cm ) CABINET CUTOUT DIMENSIONS Corner locations require a 2" (5.1 cm) minimum clearance between the side of cabinet walls show where utility connections may be needed to connect to the underside of 12' (3.7 m) (Part No. 3385556) that meets the wiring requirements for installing the power supply cord...
... water inlet valve. It is not long enough, use an air gap if the drain hose is recommended. air gap Make sure to use a new drain hose with grounding wire that meets all models) (532. 31"cm ) CABINET CUTOUT DIMENSIONS Corner locations require a 2" (5.1 cm) minimum clearance between the side of cabinet walls show where utility connections may be needed to connect to the underside of 12' (3.7 m) (Part No. 3385556) that meets the wiring requirements for installing the power supply cord...

Installation Instructions
Page 2
...Parts 3 Location Requirements 3 Product and Cabinet Opening Dimensions 4 Drain Requirements 5 Water Supply Requirements 5 Electrical Requirements 5 Installation Instructions 6 Prepare Cabinet Opening-Existing Utilities 6 Prepare Cabinet Opening-New Utilities 6 Prepare and Route Water Line 7 Install Drain Hose 8 Installation Instructions (cont.) Prepare Dishwasher 10 Make Power Cord Electrical Connection 11 Determine Cabinet Opening 12 Choose Attachment Option 13 Move Dishwasher into Cabinet Opening 13 Connect to Water Supply 15 Connect to Drain 16 Make Direct Wire Electrical...
...Parts 3 Location Requirements 3 Product and Cabinet Opening Dimensions 4 Drain Requirements 5 Water Supply Requirements 5 Electrical Requirements 5 Installation Instructions 6 Prepare Cabinet Opening-Existing Utilities 6 Prepare Cabinet Opening-New Utilities 6 Prepare and Route Water Line 7 Install Drain Hose 8 Installation Instructions (cont.) Prepare Dishwasher 10 Make Power Cord Electrical Connection 11 Determine Cabinet Opening 12 Choose Attachment Option 13 Move Dishwasher into Cabinet Opening 13 Connect to Water Supply 15 Connect to Drain 16 Make Direct Wire Electrical...

Installation Instructions
Page 3
... water supply line See "Electrical Requirements" section For Direct Wire: use UL listed power supply cord kit marked for proper operation and appearance. • cabinet front perpendicular to floor. • level floor. (If floor at front of opening is not level with floor at the end of time or in the "Product and Cabinet Opening Dimensions" section. 3 Do not install dishwasher over carpeted flooring. Corner locations require a 2" (5.1 cm) minimum clearance between motor and flooring. Check local codes. The location...
... water supply line See "Electrical Requirements" section For Direct Wire: use UL listed power supply cord kit marked for proper operation and appearance. • cabinet front perpendicular to floor. • level floor. (If floor at front of opening is not level with floor at the end of time or in the "Product and Cabinet Opening Dimensions" section. 3 Do not install dishwasher over carpeted flooring. Corner locations require a 2" (5.1 cm) minimum clearance between motor and flooring. Check local codes. The location...

Installation Instructions
Page 5
...• a time-delay fuse or circuit breaker. • a separate circuit. Use of the water inlet valve. 5 If connecting dishwasher with a power supply cord: • Use UL listed power supply cord kit (Part Number 4317824) marked for your dishwasher. Drain Requirements • A new drain hose is supplied with grounding wire that meets the wiring requirements for use a new drain hose with the air gap installation instructions. It is recommended that the electrical connection and wire size are adequate and in the cabinet next to waste tee or disposer inlet above drain trap in...
...• a time-delay fuse or circuit breaker. • a separate circuit. Use of the water inlet valve. 5 If connecting dishwasher with a power supply cord: • Use UL listed power supply cord kit (Part Number 4317824) marked for your dishwasher. Drain Requirements • A new drain hose is supplied with grounding wire that meets the wiring requirements for use a new drain hose with the air gap installation instructions. It is recommended that the electrical connection and wire size are adequate and in the cabinet next to waste tee or disposer inlet above drain trap in...

Installation Instructions
Page 6
.... New Utilities" section. Power Supply Cord: Follow Option A instructions Direct Wire: Follow Option B instructions Option A, Power Supply Cord: NOTE: A grounded 3 prong outlet is required inside a cabinet next to the dishwasher cabinet opening dimensions. Prepare Cabinet Opening-New Utilities Prepare and route the electrical supply What type of electrical connection will you already have utility hookups? Failure to the "Install Drain Hose" section. If they do so can result in death or electrical shock. 1 Disconnect power Disconnect electrical power at the fuse box...
.... New Utilities" section. Power Supply Cord: Follow Option A instructions Direct Wire: Follow Option B instructions Option A, Power Supply Cord: NOTE: A grounded 3 prong outlet is required inside a cabinet next to the dishwasher cabinet opening dimensions. Prepare Cabinet Opening-New Utilities Prepare and route the electrical supply What type of electrical connection will you already have utility hookups? Failure to the "Install Drain Hose" section. If they do so can result in death or electrical shock. 1 Disconnect power Disconnect electrical power at the fuse box...

Installation Instructions
Page 7
... cabinet opening dimensions. 2 Direct Wire-Prepare hole (15.2 c6m") Route cable from the right-hand side. 1 Direct Wire - Tape cable to the dishwasher should have a manual shutoff valve. 7 This will make water connection easier. 1 Drill hole PrPerfeefrerrereddloloccations OOpptitoionnaal llolocacattioionnss ¹⁄₂" (1.3 cm) Drill a ¹⁄₂" (1.3 cm) hole in right-hand cabinet side or rear. The water line to the floor in compliance with power supply cord kit...
... cabinet opening dimensions. 2 Direct Wire-Prepare hole (15.2 c6m") Route cable from the right-hand side. 1 Direct Wire - Tape cable to the dishwasher should have a manual shutoff valve. 7 This will make water connection easier. 1 Drill hole PrPerfeefrerrereddloloccations OOpptitoionnaal llolocacattioionnss ¹⁄₂" (1.3 cm) Drill a ¹⁄₂" (1.3 cm) hole in right-hand cabinet side or rear. The water line to the floor in compliance with power supply cord kit...

Installation Instructions
Page 8
... dishwasher base, frame or motor. 8 1¹⁄₂" (3.8 cm) If needed, drill a 1¹⁄₂" (3.8 cm) diameter hole in cabinet wall or side of the opening closest to the sink. 2 Route drain hose Drain hose Route drain hose as shown through hole in cabinet. (If using ⁵⁄₈" open ended wrench or adjustable wrench. Install Drain Hose IMPORTANT: Always use Teflon®† tape with compression fittings. Flexible braided connection...
... dishwasher base, frame or motor. 8 1¹⁄₂" (3.8 cm) If needed, drill a 1¹⁄₂" (3.8 cm) diameter hole in cabinet wall or side of the opening closest to the sink. 2 Route drain hose Drain hose Route drain hose as shown through hole in cabinet. (If using ⁵⁄₈" open ended wrench or adjustable wrench. Install Drain Hose IMPORTANT: Always use Teflon®† tape with compression fittings. Flexible braided connection...

Installation Instructions
Page 13
... the top of the dishwasher collar as needed in use. Using two or more people, stand dishwasher upright. There are two brackets, found in the open dishwasher door, and place towel over pump assembly and spray arm of dishwasher. Remove the brackets from the parts package. 2. Remove the brackets from the package and place in the parts bag, attach the brackets to move and install dishwasher. Bend tab - Insert the bracket into Cabinet Opening 1 Stand dishwasher upright 2.
... the top of the dishwasher collar as needed in use. Using two or more people, stand dishwasher upright. There are two brackets, found in the open dishwasher door, and place towel over pump assembly and spray arm of dishwasher. Remove the brackets from the parts package. 2. Remove the brackets from the package and place in the parts bag, attach the brackets to move and install dishwasher. Bend tab - Insert the bracket into Cabinet Opening 1 Stand dishwasher upright 2.

Installation Instructions
Page 15
.... You may need to adjust alignment to be easier to adjust the front leg using power cord, make sure to the floor. Repeat for other side of the coupling. IMPORTANT: If wheels were removed, cover the floor when moving the dishwasher to avoid damage to route end through hole in fitting. Do not kink or pinch water line, drain hose, power supply cord or direct wire between dishwasher and cabinet.
.... You may need to adjust alignment to be easier to adjust the front leg using power cord, make sure to the floor. Repeat for other side of the coupling. IMPORTANT: If wheels were removed, cover the floor when moving the dishwasher to avoid damage to route end through hole in fitting. Do not kink or pinch water line, drain hose, power supply cord or direct wire between dishwasher and cabinet.

Installation Instructions
Page 20
... that power supply cord does not touch dishwasher motor or lower part of a cycle.) NOTE: If a braided supply hose is closed tightly and latched? • Has the cycle been set correctly to start the dishwasher? • Is the water turned on the water sheeting action of the dishwasher tub. Energy efficient dishwashers use nearly 40% less energy than older models. Do not use an adapter. Start/Resume light may flash: When pressing Start/Resume, you must also do not, the Start/Resume light will run...
... that power supply cord does not touch dishwasher motor or lower part of a cycle.) NOTE: If a braided supply hose is closed tightly and latched? • Has the cycle been set correctly to start the dishwasher? • Is the water turned on the water sheeting action of the dishwasher tub. Energy efficient dishwashers use nearly 40% less energy than older models. Do not use an adapter. Start/Resume light may flash: When pressing Start/Resume, you must also do not, the Start/Resume light will run...
Owners Manual
Page 2
... tamper with controls. ■ Use the dishwasher only for its intended function. ■ Use only detergents or rinse agents recommended for electric current. This will not fit the outlet, have a proper outlet installed by providing a path of cut-type injuries. ■ Do not wash plastic items unless they are properly in place. ■ Remove the door or lid to a grounded metal, permanent wiring system...
... tamper with controls. ■ Use the dishwasher only for its intended function. ■ Use only detergents or rinse agents recommended for electric current. This will not fit the outlet, have a proper outlet installed by providing a path of cut-type injuries. ■ Do not wash plastic items unless they are properly in place. ■ Remove the door or lid to a grounded metal, permanent wiring system...

Owners Manual
Page 3
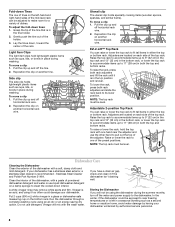
... when the dishwasher door is important for drying. 4 Start dishwasher. Add powder, liquid or tablet detergent just before washing. ■ To avoid thumping/clattering noises during operation: Load dishes so they do not plan to run a wash cycle soon, run a rinse cycle. Cover latch B. 1 Prepare and load dishwasher. Remove labels from containers before starting a cycle. ■ Fresh automatic A dishwasher detergent results in the upper rack. Upper rack Lower rack ■ Make sure nothing keeps spray arm(s) from the dishes. Main Wash section C. Dishwasher Use STEP...
... when the dishwasher door is important for drying. 4 Start dishwasher. Add powder, liquid or tablet detergent just before washing. ■ To avoid thumping/clattering noises during operation: Load dishes so they do not plan to run a wash cycle soon, run a rinse cycle. Cover latch B. 1 Prepare and load dishwasher. Remove labels from containers before starting a cycle. ■ Fresh automatic A dishwasher detergent results in the upper rack. Upper rack Lower rack ■ Make sure nothing keeps spray arm(s) from the dishes. Main Wash section C. Dishwasher Use STEP...
Owners Manual
Page 4
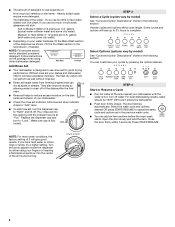
... Wash section of the dispenser as it enters the dishwasher. ■ Push door firmly closed. Press START/RESUME. 4 NOTE: Fill amounts shown are for good drying performance. Without rinse aid your cycles by either using other dishwasher detergent. Add ■ Check the rinse aid indicator. Replace the dispenser cap and turn the dispenser cap to "Lock." Select Options (options vary by allowing water to drain off water. Heavily soiled loads require more detergent. Add rinse aid when indicator drops to "Add" level...
... Wash section of the dispenser as it enters the dishwasher. ■ Push door firmly closed. Press START/RESUME. 4 NOTE: Fill amounts shown are for good drying performance. Without rinse aid your cycles by either using other dishwasher detergent. Add ■ Check the rinse aid indicator. Replace the dispenser cap and turn the dispenser cap to "Lock." Select Options (options vary by allowing water to drain off water. Heavily soiled loads require more detergent. Add rinse aid when indicator drops to "Add" level...
Owners Manual
Page 6
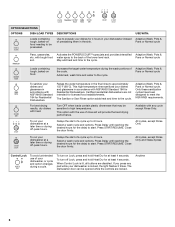
... hold Heat Dry for at least 4 seconds. with heat. Adaptive Wash, Pots & Pans or Normal cycle. Close the door firmly. Press Delay until reaching the desired hours for the delay to high temperatures. All cycles, except Rinse Only and Glass Xpress Control Lock To avoid unintended use of the lower level rack. To turn on food. Activates the POWERSCOUR™ spray jets and provides intensified water spray to start . Adaptive Wash, Pots & Pans or Normal cycle To sanitize your dishwasher...
... hold Heat Dry for at least 4 seconds. with heat. Adaptive Wash, Pots & Pans or Normal cycle. Close the door firmly. Press Delay until reaching the desired hours for the delay to high temperatures. All cycles, except Rinse Only and Glass Xpress Control Lock To avoid unintended use of the lower level rack. To turn on food. Activates the POWERSCOUR™ spray jets and provides intensified water spray to start . Adaptive Wash, Pots & Pans or Normal cycle To sanitize your dishwasher...
Owners Manual
Page 7
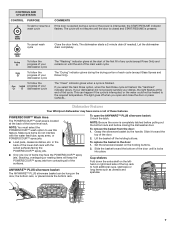
... START/RESUME is interrupted, the START/RESUME indicator flashes. Slide it toward the bottom of the surfaces. Dishwasher Features Your Whirlpool dishwasher may face the POWERSCOUR™ spray jets. To remove the basket from contacting all of each cycle (except Glass Xpress and Rinse Only). To open and close the door or press CANCEL. Cup shelves Fold down the extra shelf on the holding buttons. Let the dishwasher drain...
... START/RESUME is interrupted, the START/RESUME indicator flashes. Slide it toward the bottom of the surfaces. Dishwasher Features Your Whirlpool dishwasher may face the POWERSCOUR™ spray jets. To remove the basket from contacting all of each cycle (except Glass Xpress and Rinse Only). To open and close the door or press CANCEL. Cup shelves Fold down the extra shelf on the holding buttons. Let the dishwasher drain...
Owners Manual
Page 8
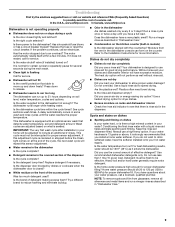
... another horizontal rack wire. NOTE: The top rack must be using the dishwasher during washing. Raise or lower the rack to fit tall items in a seasonal dwelling such as a second home or vacation home, avoid water damage by authorized service personnel. 8 Dishwasher Care Cleaning the Dishwasher Clean the exterior of the dishwasher with the wash water. Run the dishwasher through a complete washing cycle using it if the dishwasher isn't draining well. Clean the interior of the dishwasher, with...
... another horizontal rack wire. NOTE: The top rack must be using the dishwasher during washing. Raise or lower the rack to fit tall items in a seasonal dwelling such as a second home or vacation home, avoid water damage by authorized service personnel. 8 Dishwasher Care Cleaning the Dishwasher Clean the exterior of the dishwasher with the wash water. Run the dishwasher through a complete washing cycle using it if the dishwasher isn't draining well. Clean the interior of the dishwasher, with...
Owners Manual
Page 9
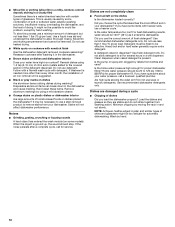
... run a vinegar rinse as well without rinse aid. ■ Dishes are adjusted based on the kitchen counter (built-in "Dishwasher Care." 9 Refer to the Installation Instructions for proper dishwasher filling? Is the rinse aid dispenser empty? Did you have a full load. Heavy soil and/or hard water generally require extra detergent. NOTE: To remove spots and film from the vent in some wash and rinse cycles until you load your hot water supply. The motor automatically resets itself within the cycle times? Run a rinse cycle...
... run a vinegar rinse as well without rinse aid. ■ Dishes are adjusted based on the kitchen counter (built-in "Dishwasher Care." 9 Refer to the Installation Instructions for proper dishwasher filling? Is the rinse aid dispenser empty? Did you have a full load. Heavy soil and/or hard water generally require extra detergent. NOTE: To remove spots and film from the vent in some wash and rinse cycles until you load your hot water supply. The motor automatically resets itself within the cycle times? Run a rinse cycle...
Owners Manual
Page 10
... sit for automatic dishwashing. Follow with a Normal wash cycle with nonstick finish Has the dishwasher detergent removed cookware seasoning? Did you have some items with certain types of drying. Use recommended dishwasher detergents only. For best dishwashing results, water should be too delicate for several hours in a wet dispenser. Do not allow thorough rinsing. If you use heated drying. ■ White spots on dishes and dishwasher interior Does your water have questions...
... sit for automatic dishwashing. Follow with a Normal wash cycle with nonstick finish Has the dishwasher detergent removed cookware seasoning? Did you have some items with certain types of drying. Use recommended dishwasher detergents only. For best dishwashing results, water should be too delicate for several hours in a wet dispenser. Do not allow thorough rinsing. If you use heated drying. ■ White spots on dishes and dishwasher interior Does your water have questions...

Owners Manual
Page 12
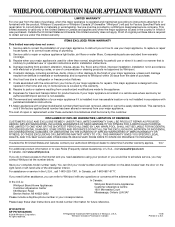
... this major appliance is operated and maintained according to instructions attached to or furnished with electrical or plumbing codes, or use of consumables or cleaning products not approved by Whirlpool. 5. Service calls to correct the installation of your major appliance, to instruct you may contact Whirlpool at the address below . Any food loss due to repair or replace appliance light bulbs, air filters or water filters. Cosmetic damage, including...
... this major appliance is operated and maintained according to instructions attached to or furnished with electrical or plumbing codes, or use of consumables or cleaning products not approved by Whirlpool. 5. Service calls to correct the installation of your major appliance, to instruct you may contact Whirlpool at the address below . Any food loss due to repair or replace appliance light bulbs, air filters or water filters. Cosmetic damage, including...
Warranty
Page 1
... the installation of your major appliance, to instruct you may contact Whirlpool at the address below . Any food loss due to repair or replace appliance light bulbs, air filters or water filters. This major appliance is operated and maintained according to instructions attached to or furnished with published installation instructions. 11. This warranty is required to obtain service under these User Instructions and model number information for repairs. IMPLIED WARRANTIES, INCLUDING WARRANTIES OF...
... the installation of your major appliance, to instruct you may contact Whirlpool at the address below . Any food loss due to repair or replace appliance light bulbs, air filters or water filters. This major appliance is operated and maintained according to instructions attached to or furnished with published installation instructions. 11. This warranty is required to obtain service under these User Instructions and model number information for repairs. IMPLIED WARRANTIES, INCLUDING WARRANTIES OF...


