Use & Care Guide
Page 1
... experience a problem not covered in this high-quality product. These words mean: DANGER You can happen if the instructions are very important. W10408737A All safety messages will follow instructions. Table of Contents / Índice / Table des matières REFRIGERATOR SAFETY 1 INSTALLATION INSTRUCTIONS 2 REFRIGERATOR USE 10 REFRIGERATOR CARE 15 TROUBLESHOOTING 16 ACCESSORIES 18 WATER FILTER CERTIFICATIONS 18 PERFORMANCE DATA SHEET 19 WARRANTY 20 SEGURIDAD DEL REFRIGERADOR 21 INSTRUCCIONES...
... experience a problem not covered in this high-quality product. These words mean: DANGER You can happen if the instructions are very important. W10408737A All safety messages will follow instructions. Table of Contents / Índice / Table des matières REFRIGERATOR SAFETY 1 INSTALLATION INSTRUCTIONS 2 REFRIGERATOR USE 10 REFRIGERATOR CARE 15 TROUBLESHOOTING 16 ACCESSORIES 18 WATER FILTER CERTIFICATIONS 18 PERFORMANCE DATA SHEET 19 WARRANTY 20 SEGURIDAD DEL REFRIGERADOR 21 INSTRUCCIONES...
Use & Care Guide
Page 2
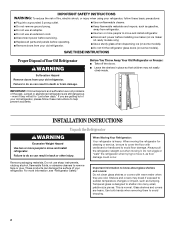
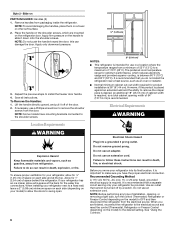
... SAFETY INSTRUCTIONS WARNING: To reduce the risk of fire, electric shock, or injury when using your refrigerator, follow these basic precautions: ■ Plug into many small, pebble-size pieces. Remove packaging materials. Do not use an extension cord. ■ Disconnect power before servicing. ■ Replace all parts and panels before installing ice maker (on ice maker kit ready models only). ■ Use a sturdy glass when dispensing ice (on some models). ■ Do not hit the refrigerator glass doors...
... SAFETY INSTRUCTIONS WARNING: To reduce the risk of fire, electric shock, or injury when using your refrigerator, follow these basic precautions: ■ Plug into many small, pebble-size pieces. Remove packaging materials. Do not use an extension cord. ■ Disconnect power before servicing. ■ Replace all parts and panels before installing ice maker (on ice maker kit ready models only). ■ Use a sturdy glass when dispensing ice (on some models). ■ Do not hit the refrigerator glass doors...
Use & Care Guide
Page 4
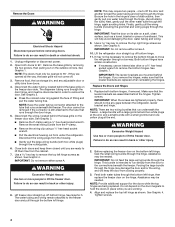
... fitting and pull the water tubing free. See Graphic 1. If you are working. 4. Replace both doors and keep the door from the cabinet. 7. IMPORTANT: Do not feed the large wiring bundle through the hinge. Do not depend on the door magnets to the freezer door and pull through the hinge. Align and replace the top left hinge. Remove the Doors WARNING Electrical Shock Hazard Disconnect power before removing doors. Finally, gently pull...
... fitting and pull the water tubing free. See Graphic 1. If you are working. 4. Replace both doors and keep the door from the cabinet. 7. IMPORTANT: Do not feed the large wiring bundle through the hinge. Do not depend on the door magnets to the freezer door and pull through the hinge. Align and replace the top left hinge. Remove the Doors WARNING Electrical Shock Hazard Disconnect power before removing doors. Finally, gently pull...
Use & Care Guide
Page 5
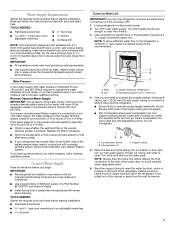
... refrigerator door. 5. See Graphic 3. See Graphic 6. Replace the ice storage bin and any adjustable door or utility bins. 9. In most cases, the refrigerator should not be slightly different heights when the refrigerator is not level from side-to-side may take several more easily, adjust the refrigerator's tilt using a single screw. This makes it stops, then push the smaller ¹⁄₄" (6.35 mm) water tube into its final location. Turn...
... refrigerator door. 5. See Graphic 3. See Graphic 6. Replace the ice storage bin and any adjustable door or utility bins. 9. In most cases, the refrigerator should not be slightly different heights when the refrigerator is not level from side-to-side may take several more easily, adjust the refrigerator's tilt using a single screw. This makes it stops, then push the smaller ¹⁄₄" (6.35 mm) water tube into its final location. Turn...
Use & Care Guide
Page 6
... not use a Phillips screwdriver to swing open. NOTE: Do not push the handle toward the door; If your refrigerator, allow the doors to remove the shoulder screws from the door. or 20-amp fused, grounded electrical supply is recommended. this can result in a location where the temperature ranges from refrigerator. To Remove the Handles: 1. NOTE: Some models have the proper electrical connection. The preferred room temperature range for use in death...
... not use a Phillips screwdriver to swing open. NOTE: Do not push the handle toward the door; If your refrigerator, allow the doors to remove the shoulder screws from the door. or 20-amp fused, grounded electrical supply is recommended. this can result in a location where the temperature ranges from refrigerator. To Remove the Handles: 1. NOTE: Some models have the proper electrical connection. The preferred room temperature range for use in death...
Use & Care Guide
Page 7
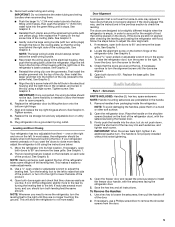
... driver Connect to Water Line IMPORTANT: If you turn the refrigerator on before the water line is connected, turn the ice maker OFF. 1. Before purchasing, make sure a saddle-type valve complies with your refrigerator has a water filter, it will remain above freezing. NOTE: To allow the refrigerator to be installed in conjunction with the International Plumbing Code and any tools listed here. TOOLS NEEDED: Gather the required tools and parts before starting installation. Unplug refrigerator or disconnect power...
... driver Connect to Water Line IMPORTANT: If you turn the refrigerator on before the water line is connected, turn the ice maker OFF. 1. Before purchasing, make sure a saddle-type valve complies with your refrigerator has a water filter, it will remain above freezing. NOTE: To allow the refrigerator to be installed in conjunction with the International Plumbing Code and any tools listed here. TOOLS NEEDED: Gather the required tools and parts before starting installation. Unplug refrigerator or disconnect power...

Use & Care Guide
Page 8
... valve. 3. Unplug refrigerator or disconnect power. 2. Ferrule (purchased) D. Install the water supply tube clamp around the water supply line to completely fill ice container. 8 Remove and discard the plastic part that leak. Attach the copper tube to Refrigerator Style 1 1. Bulb D. Household water line 4. Turn shutoff valve ON. 6. Tighten the compression nut. A B C D E A. Obtain a water strainer from the end of the refrigerator. 3. Tighten any connections (including connections at the valve) or nuts that leak. Complete the Installation WARNING Electrical...
... valve. 3. Unplug refrigerator or disconnect power. 2. Ferrule (purchased) D. Install the water supply tube clamp around the water supply line to completely fill ice container. 8 Remove and discard the plastic part that leak. Attach the copper tube to Refrigerator Style 1 1. Bulb D. Household water line 4. Turn shutoff valve ON. 6. Tighten the compression nut. A B C D E A. Obtain a water strainer from the end of the refrigerator. 3. Tighten any connections (including connections at the valve) or nuts that leak. Complete the Installation WARNING Electrical...
Use & Care Guide
Page 9
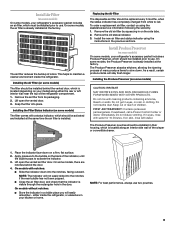
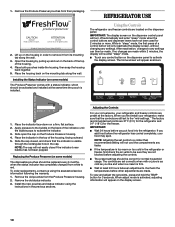
... convertible drawer. Remove the air filter from white to activate the indicator. 3. Do not mix with water. revers. On some models, there are notches behind the vented door, which is located (depending on your model) along an interior side wall of many produce items to maintain a cleaner environment inside the refrigerator, or elsewhere in the door. Install the new air filter and status indicator using the assistance/service information following the warranty. 1. Install Air Filter...
... convertible drawer. Remove the air filter from white to activate the indicator. 3. Do not mix with water. revers. On some models, there are notches behind the vented door, which is located (depending on your model) along an interior side wall of many produce items to maintain a cleaner environment inside the refrigerator, or elsewhere in the door. Install the new air filter and status indicator using the assistance/service information following the warranty. 1. Install Air Filter...
Use & Care Guide
Page 10
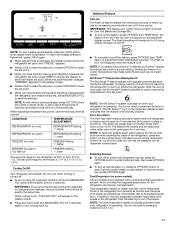
... "sleep" mode when the control buttons and dispenser levers have not been used for the freezer. REPLACE MONTHS 1. Place the indicator in the cap. Remove the old pouches from white to the "mid-settings." Adjusting the Controls For your convenience, your food may spoil. If you first install your refrigerator, make sure that the indicator is too warm or too cold in the refrigerator or freezer, first check the air vents...
... "sleep" mode when the control buttons and dispenser levers have not been used for the freezer. REPLACE MONTHS 1. Place the indicator in the cap. Remove the old pouches from white to the "mid-settings." Adjusting the Controls For your convenience, your food may spoil. If you first install your refrigerator, make sure that the indicator is too warm or too cold in the refrigerator or freezer, first check the air vents...
Use & Care Guide
Page 11
... without saving changes, press ICE TYPE at all sounds back on the dispenser control panel. The feature then resets and will turn cooling off automatically. IMPORTANT: To avoid unintentionally locking the dispenser or changing other settings, be displayed on , press the OPTIONS button to enter Options mode, then press OPTIONS again. ■ To turn on . IMPORTANT: This feature only works if the ice maker is off all control and dispenser sounds...
... without saving changes, press ICE TYPE at all sounds back on the dispenser control panel. The feature then resets and will turn cooling off automatically. IMPORTANT: To avoid unintentionally locking the dispenser or changing other settings, be displayed on , press the OPTIONS button to enter Options mode, then press OPTIONS again. ■ To turn on . IMPORTANT: This feature only works if the ice maker is off all control and dispenser sounds...
Use & Care Guide
Page 12
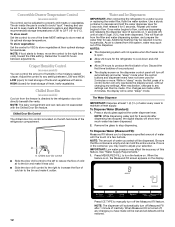
... adjustments. A A. Chilled door bin control ■ Slide the door chill control to produce the first batch of the refrigerator compartment. Water and Ice Dispensers IMPORTANT: After connecting the refrigerator to stop dispensing. This will automatically turn off , any settings can then be required in the moisture-sealed crisper. Additional flushing may spurt out of cold air to the refrigerator door bin directly beneath the vents. To Dispense Water (Standard): 1. Remove the glass to a water source or replacing the water filter...
... adjustments. A A. Chilled door bin control ■ Slide the door chill control to produce the first batch of the refrigerator compartment. Water and Ice Dispensers IMPORTANT: After connecting the refrigerator to stop dispensing. This will automatically turn off , any settings can then be required in the moisture-sealed crisper. Additional flushing may spurt out of cold air to the refrigerator door bin directly beneath the vents. To Dispense Water (Standard): 1. Remove the glass to a water source or replacing the water filter...
Use & Care Guide
Page 14
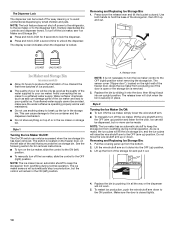
... LOCK for easy cleaning or to keep the storage bin from the bottom. 2. Make sure the door is not necessary to turn off power to the refrigerator, to the ice maker, or to the OFF (right) position. Removing and Replacing Ice Storage Bin: 1. NOTE: The lock feature does not shut off the ice maker, slide the control to the dispenser light. To turn off the ice maker, lift the wire shutoff arm to...
... LOCK for easy cleaning or to keep the storage bin from the bottom. 2. Make sure the door is not necessary to turn off power to the refrigerator, to the ice maker, or to the OFF (right) position. Removing and Replacing Ice Storage Bin: 1. NOTE: The lock feature does not shut off the ice maker, slide the control to the dispenser light. To turn off the ice maker, lift the wire shutoff arm to...
Use & Care Guide
Page 15
REFRIGERATOR CARE Cleaning WARNING Water Filter Status Light The water filter status light will help you know when to change your water dispenser or ice maker decreases noticeably, change the water filter cartridge. ■ Replace the water filter cartridge when the water filter status display changes to clean the condenser: ■ Remove the base grille. If water flow to your water filter. ■ When the dispenser control panel's water filter status display changes to "ORDER," this tells you that you need to "REPLACE." Press the OPTIONS button to enter Options mode, then press...
REFRIGERATOR CARE Cleaning WARNING Water Filter Status Light The water filter status light will help you know when to change your water dispenser or ice maker decreases noticeably, change the water filter cartridge. ■ Replace the water filter cartridge when the water filter status display changes to clean the condenser: ■ Remove the base grille. If water flow to your water filter. ■ When the dispenser control panel's water filter status display changes to "ORDER," this tells you that you need to "REPLACE." Press the OPTIONS button to enter Options mode, then press...
Use & Care Guide
Page 16
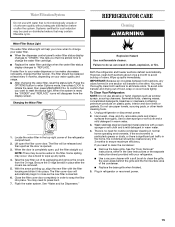
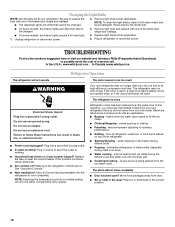
... cool completely. Changing the Light Bulbs NOTE: Not all bulbs will not cool either compartment more quickly. Remove light bulb and replace with warm water and liquid detergent. valves opening or closing ■ Pulsating - Allow 24 hours following installation for the refrigerator to follow these instructions can result in death, fire, or electrical shock. ■ Power cord unplugged? The doors will not operate WARNING The motor seems to this reduction, you may run...
... cool completely. Changing the Light Bulbs NOTE: Not all bulbs will not cool either compartment more quickly. Remove light bulb and replace with warm water and liquid detergent. valves opening or closing ■ Pulsating - Allow 24 hours following installation for the refrigerator to follow these instructions can result in death, fire, or electrical shock. ■ Power cord unplugged? The doors will not operate WARNING The motor seems to this reduction, you may run...
Use & Care Guide
Page 17
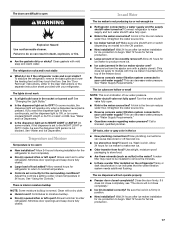
... the refrigerator to begin . The ice cubes are difficult to your cold water supply? Straighten the water source line. ■ Reverse osmosis water filtration system connected to open ? The ice dispenser will not operate properly ■ Freezer door closed . ■ Large load of food added? See "Changing the Light Bulbs." ■ Is the dispenser light set to begin . On some models, the dispenser light will not close completely." ■ Ice bin installed correctly? Allows warm air to OFF? Adjust the controls a setting colder...
... the refrigerator to begin . The ice cubes are difficult to your cold water supply? Straighten the water source line. ■ Reverse osmosis water filtration system connected to open ? The ice dispenser will not operate properly ■ Freezer door closed . ■ Large load of food added? See "Changing the Light Bulbs." ■ Is the dispenser light set to begin . On some models, the dispenser light will not close completely." ■ Ice bin installed correctly? Allows warm air to OFF? Adjust the controls a setting colder...
Use & Care Guide
Page 18
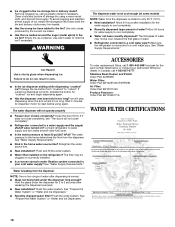
... button for water supply to reset before using again. Flush and fill the water system. ■ Water filter installed on some models) NOTE: Water from the dispenser. Stainless Steel Cleaner and Polish: Order Part #4396095 Water Filter: Order Part #W10291030 (P4RFWB) Air Filter: Order Part #W10311524 Produce Preserver: Order Part #W10346771A WATER FILTER CERTIFICATIONS 18 Discard the first glass of water? Failure to a water supply and the supply shutoff valve turned on? Wait 3 minutes for the part number listed below or contact your cold water supply...
... button for water supply to reset before using again. Flush and fill the water system. ■ Water filter installed on some models) NOTE: Water from the dispenser. Stainless Steel Cleaner and Polish: Order Part #4396095 Water Filter: Order Part #W10291030 (P4RFWB) Air Filter: Order Part #W10311524 Produce Preserver: Order Part #W10346771A WATER FILTER CERTIFICATIONS 18 Discard the first glass of water? Failure to a water supply and the supply shutoff valve turned on? Wait 3 minutes for the part number listed below or contact your cold water supply...
Use & Care Guide
Page 19
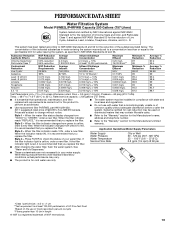
.... Rated service capacity = 200 gallons (757 liters). ■ It is microbiologically unsafe or of unknown quality without notice. ■ The water system must be installed in NSF/ANSI Standards 42 and 53. When the water filter status display changes from green to check the status of your water supply. Style 2 - Style 4 - If the filter indicator light is recommended that you replace the filter. If the filter indicator light...
.... Rated service capacity = 200 gallons (757 liters). ■ It is microbiologically unsafe or of unknown quality without notice. ■ The water system must be installed in NSF/ANSI Standards 42 and 53. When the water filter status display changes from green to check the status of your water supply. Style 2 - Style 4 - If the filter indicator light is recommended that you replace the filter. If the filter indicator light...
Use & Care Guide
Page 20
... the appliance. 9. The removal and reinstallation of God, improper installation, installation not in accordance with electrical or plumbing codes, or use your major appliance if it was purchased. Have your correspondence. Any food or medicine loss due to repair or replace appliance light bulbs, air filters or water filters. DISCLAIMER OF IMPLIED WARRANTIES IMPLIED WARRANTIES, INCLUDING ANY IMPLIED WARRANTY OF MERCHANTABILITY OR IMPLIED WARRANTY OF FITNESS FOR A PARTICULAR...
... the appliance. 9. The removal and reinstallation of God, improper installation, installation not in accordance with electrical or plumbing codes, or use your major appliance if it was purchased. Have your correspondence. Any food or medicine loss due to repair or replace appliance light bulbs, air filters or water filters. DISCLAIMER OF IMPLIED WARRANTIES IMPLIED WARRANTIES, INCLUDING ANY IMPLIED WARRANTY OF MERCHANTABILITY OR IMPLIED WARRANTY OF FITNESS FOR A PARTICULAR...
Dimension Guide
Page 1
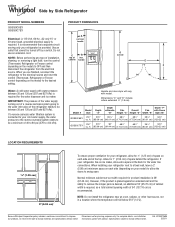
.... Model # Model Size Depth "A" Depth Depth "F" w/Handle Cab. with product. If a reverse osmosis water filtration system is connected to your refrigerator has an ice maker, allow extra space at the top. handle C top of the refrigerator needs to change without notice. Allow for planning purposes only. Because Whirlpool Corporation policy includes a continuous commitment to improve Dimensions are finished, reconnect the refrigerator to the electrical source and reset the control (Thermostat, Refrigerator or Freezer control...
.... Model # Model Size Depth "A" Depth Depth "F" w/Handle Cab. with product. If a reverse osmosis water filtration system is connected to your refrigerator has an ice maker, allow extra space at the top. handle C top of the refrigerator needs to change without notice. Allow for planning purposes only. Because Whirlpool Corporation policy includes a continuous commitment to improve Dimensions are finished, reconnect the refrigerator to the electrical source and reset the control (Thermostat, Refrigerator or Freezer control...

Warranty Information
Page 1
... installation, installation not in a remote area where service by an authorized Whirlpool servicer is not available. 10. Pickup and delivery. Some states and provinces do not allow the exclusion or limitation of incidental or consequential damages, so these User Instructions and the model number information for future reference. 20 Any food or medicine loss due to repair or replace appliance light bulbs, air filters or water filters...
... installation, installation not in a remote area where service by an authorized Whirlpool servicer is not available. 10. Pickup and delivery. Some states and provinces do not allow the exclusion or limitation of incidental or consequential damages, so these User Instructions and the model number information for future reference. 20 Any food or medicine loss due to repair or replace appliance light bulbs, air filters or water filters...


