
Owners Manual
Page 1
..." or "WARNING." These words mean: DANGER You can be killed or seriously injured if you should experience a problem not covered in this high-quality product. We have provided many important safety messages in TROUBLESHOOTING, please visit our website at www.whirlpool.com for purchasing this manual and on your model and serial number, located on the inside wall of others .
..." or "WARNING." These words mean: DANGER You can be killed or seriously injured if you should experience a problem not covered in this high-quality product. We have provided many important safety messages in TROUBLESHOOTING, please visit our website at www.whirlpool.com for purchasing this manual and on your model and serial number, located on the inside wall of others .

Owners Manual
Page 2
... Your Old Refrigerator WARNING Suffocation Hazard Remove doors from refrigerator. ■ Use two or more people to avoid floor damage. For more information, see "Refrigerator Safety." Do not use an extension cord. ■ Disconnect power before servicing. ■ Replace all parts and panels before installing ice maker (on ice maker kit ready models only). ■ Use a sturdy glass when dispensing ice (on some models). ■ Do not hit the refrigerator glass doors (on some models). SAVE THESE INSTRUCTIONS Proper...
... Your Old Refrigerator WARNING Suffocation Hazard Remove doors from refrigerator. ■ Use two or more people to avoid floor damage. For more information, see "Refrigerator Safety." Do not use an extension cord. ■ Disconnect power before servicing. ■ Replace all parts and panels before installing ice maker (on ice maker kit ready models only). ■ Use a sturdy glass when dispensing ice (on some models). ■ Do not hit the refrigerator glass doors (on some models). SAVE THESE INSTRUCTIONS Proper...

Owners Manual
Page 3
...Top Left Hinge 5 Door Removal 6 Top Right Hinge A A Do Not Remove Screws A 3 Wiring Connection A A Do Not Remove Screws A 7 Bottom Hinge AB CD EF A. Failure to remove the refrigerator and freezer doors. Wiring Clip E. Wiring Plugs 2 Water Dispenser Tubing Connection A A A. Alignment Screw 3 Save these instructions for future reference. Unplug refrigerator or disconnect power. P-clamp B. Routing Plate C. Electrical Housing D. Leveler Bracket C. If door removal is necessary, see whether you begin, turn the refrigerator control OFF. Bottom Hinge B. Door Removal...
...Top Left Hinge 5 Door Removal 6 Top Right Hinge A A Do Not Remove Screws A 3 Wiring Connection A A Do Not Remove Screws A 7 Bottom Hinge AB CD EF A. Failure to remove the refrigerator and freezer doors. Wiring Clip E. Wiring Plugs 2 Water Dispenser Tubing Connection A A A. Alignment Screw 3 Save these instructions for future reference. Unplug refrigerator or disconnect power. P-clamp B. Routing Plate C. Electrical Housing D. Leveler Bracket C. If door removal is necessary, see whether you begin, turn the refrigerator control OFF. Bottom Hinge B. Door Removal...

Owners Manual
Page 4
... door to remove the door. Finally, gently pull the wiring bundle (including the grommet and wiring plugs) through the hinge. Feed both bottom hinges, if removed. Align and replace the top left hinge, then replace the freezer door on a soft, clean surface, such as shown. Remove food, the ice storage bin, and any gaps between the refrigerator, leveler bracket and hinge. Use a hex key to lift the freezer door. Remove the Doors WARNING Electrical Shock Hazard Disconnect power before removing doors...
... door to remove the door. Finally, gently pull the wiring bundle (including the grommet and wiring plugs) through the hinge. Feed both bottom hinges, if removed. Align and replace the top left hinge, then replace the freezer door on a soft, clean surface, such as shown. Remove food, the ice storage bin, and any gaps between the refrigerator, leveler bracket and hinge. Use a hex key to lift the freezer door. Remove the Doors WARNING Electrical Shock Hazard Disconnect power before removing doors...

Owners Manual
Page 5
... top right hinge as you need to move the refrigerator, turn the leveling feet to adjust the leveling feet. one on the right and one yellow plug), then replace the P-clamp on a towel or other soft surface. 2. This makes it stops. Check that the wiring runs behind the right side of the refrigerator door), with the right hole in order to adjust the door alignment. 1. Setscrews PARTS INCLUDED: Handles (2), hex key...
... top right hinge as you need to move the refrigerator, turn the leveling feet to adjust the leveling feet. one on the right and one yellow plug), then replace the P-clamp on a towel or other soft surface. 2. This makes it stops. Check that the wiring runs behind the right side of the refrigerator door), with the right hole in order to adjust the door alignment. 1. Setscrews PARTS INCLUDED: Handles (2), hex key...

Owners Manual
Page 6
... recommended that you are mounted on the model) to install the freezer door handle. 4. Before you have mounting brackets connected to make sure you move your refrigerator has an ice maker, allow for 1" (2.54 cm) of installation, cleaning, or removing a light bulb, turn the control (Thermostat, Refrigerator or Freezer Control depending on each side (depending on the handle to follow these instructions can result in a location where the temperature will fall below 55°F (13...
... recommended that you are mounted on the model) to install the freezer door handle. 4. Before you have mounting brackets connected to make sure you move your refrigerator has an ice maker, allow for 1" (2.54 cm) of installation, cleaning, or removing a light bulb, turn the control (Thermostat, Refrigerator or Freezer Control depending on each side (depending on the handle to follow these instructions can result in a location where the temperature will fall below 55°F (13...

Owners Manual
Page 7
... purchasing, make sure a saddle-type valve complies with your cold water supply, the water pressure to the reverse osmosis system needs to the refrigerator, a minimum ¹⁄₂" size copper household supply line is recommended. Do not use a piercing-type or 4.76 mm) saddle valve which is located on before starting installation. ■ Flat-blade screwdriver and ¹⁄₂" open-end wrenches or two adjustable wrenches nut driver Connect to your...
... purchasing, make sure a saddle-type valve complies with your cold water supply, the water pressure to the reverse osmosis system needs to the refrigerator, a minimum ¹⁄₂" size copper household supply line is recommended. Do not use a piercing-type or 4.76 mm) saddle valve which is located on before starting installation. ■ Flat-blade screwdriver and ¹⁄₂" open-end wrenches or two adjustable wrenches nut driver Connect to your...

Owners Manual
Page 8
... parts inside the refrigerator. Lift open the vented door. 3. Tube clamp screw C. Do not overtighten. Install the water supply tube clamp around the water supply line to maintain a cleaner environment inside the cabinet. Attach the copper tube to the refrigerator as shown. Refrigerator water tubing B. Household water line 4. Do not use an extension cord. Do not use an adapter. Ferrule (purchased) D. Unplug refrigerator or disconnect power. 2. Bulb D. Tighten any connections (including connections at the valve) or nuts that is needed...
... parts inside the refrigerator. Lift open the vented door. 3. Tube clamp screw C. Do not overtighten. Install the water supply tube clamp around the water supply line to maintain a cleaner environment inside the cabinet. Attach the copper tube to the refrigerator as shown. Refrigerator water tubing B. Household water line 4. Do not use an extension cord. Do not use an adapter. Ferrule (purchased) D. Unplug refrigerator or disconnect power. 2. Bulb D. Tighten any connections (including connections at the valve) or nuts that is needed...

Owners Manual
Page 9
... a replacement air filter, contact us using the instructions in your refrigerator, make sure that the indicator is too warm or too cold in a visible place you put food into the refrigerator. The controls are made within 2 minutes, the display will not easily slide into the notches, facing outward. If no changes are set points, press and hold the TEMP button for the freezer. Lift open the vented air filter door. REFRIGERATOR USE Using the Controls The refrigerator...
... a replacement air filter, contact us using the instructions in your refrigerator, make sure that the indicator is too warm or too cold in a visible place you put food into the refrigerator. The controls are made within 2 minutes, the display will not easily slide into the notches, facing outward. If no changes are set points, press and hold the TEMP button for the freezer. Lift open the vented air filter door. REFRIGERATOR USE Using the Controls The refrigerator...

Owners Manual
Page 10
... works if the ice maker is turned off. ■ To turn cooling off, press and hold LOCK and FILTER for 24 hours unless manually turned off. ■ To manually turn it . You do not need to press any buttons to decreased freezer burn. Dual Evaporator (on . In addition, the dual evaporation system helps keep meats at its optimal storage temperature. CONDITION: TEMPERATURE ADJUSTMENT: REFRIGERATOR too cold REFRIGERATOR Setting 1° higher REFRIGERATOR too warm REFRIGERATOR Setting 1° lower FREEZER...
... works if the ice maker is turned off. ■ To turn cooling off, press and hold LOCK and FILTER for 24 hours unless manually turned off. ■ To manually turn it . You do not need to press any buttons to decreased freezer burn. Dual Evaporator (on . In addition, the dual evaporation system helps keep meats at its optimal storage temperature. CONDITION: TEMPERATURE ADJUSTMENT: REFRIGERATOR too cold REFRIGERATOR Setting 1° higher REFRIGERATOR too warm REFRIGERATOR Setting 1° lower FREEZER...

Owners Manual
Page 11
..." mode when the control buttons and dispenser levers have not been used for the refrigerator to cool down and chill water. ■ Allow 24 hours to produce the first batch of water every week to any settings. After reactivation, changes to maintain a fresh supply. Noise from the ice crusher is located on the left to reduce the flow of cold air to the bin and make it for use. Hold the glass...
..." mode when the control buttons and dispenser levers have not been used for the refrigerator to cool down and chill water. ■ Allow 24 hours to produce the first batch of water every week to any settings. After reactivation, changes to maintain a fresh supply. Noise from the ice crusher is located on the left to reduce the flow of cold air to the bin and make it for use. Hold the glass...

Owners Manual
Page 12
... cover ("flipper door"), located on . Pull the covering panel up or down. The display screen indicates which mode is selected. ■ To manually turn off the ice maker, lift the wire shutoff arm to the dispenser light. To turn off . Press down to keep the storage bin from producing ice if the door is open or the storage bin is not necessary to turn off the ice maker, see "Troubleshooting" for the click. NOTE: The ice maker...
... cover ("flipper door"), located on . Pull the covering panel up or down. The display screen indicates which mode is selected. ■ To manually turn off the ice maker, lift the wire shutoff arm to the dispenser light. To turn off . Press down to keep the storage bin from producing ice if the door is open or the storage bin is not necessary to turn off the ice maker, see "Troubleshooting" for the click. NOTE: The ice maker...

Owners Manual
Page 13
... User Instructions or the separate instruction sheet provided with your water dispenser or ice maker decreases noticeably, change the filter sooner. Be sure the O-rings are still in warm water. 4. The filter cover door will automatically begin to your refrigerator. ■ Use a vacuum cleaner with a soft brush to avoid buildup of the condenser. ■ Replace the base grille when finished. 5. Explosion Hazard Use nonflammable cleaner. Unplug refrigerator or disconnect power. 2. Wash stainless...
... User Instructions or the separate instruction sheet provided with your water dispenser or ice maker decreases noticeably, change the filter sooner. Be sure the O-rings are still in warm water. 4. The filter cover door will automatically begin to your refrigerator. ■ Use a vacuum cleaner with a soft brush to avoid buildup of the condenser. ■ Replace the base grille when finished. 5. Explosion Hazard Use nonflammable cleaner. Unplug refrigerator or disconnect power. 2. Wash stainless...

Owners Manual
Page 14
... or reset the circuit breaker. Make sure the refrigerator controls are listed some models, the interior lights require a 40-watt bulb. 1. heard when the water valve opens to possibly avoid the cost of a service call an electrician. ■ Are controls on top of inside walls, especially during initial cool-down ■ Water running - may run even longer if the room is warm, a large food load is working ? The doors will not operate WARNING The motor...
... or reset the circuit breaker. Make sure the refrigerator controls are listed some models, the interior lights require a 40-watt bulb. 1. heard when the water valve opens to possibly avoid the cost of a service call an electrician. ■ Are controls on top of inside walls, especially during initial cool-down ■ Water running - may run even longer if the room is warm, a large food load is working ? The doors will not operate WARNING The motor...

Owners Manual
Page 15
... air to ON, or (on continuously, set correctly for full ice production. 15 Connect refrigerator to your cold water supply? Straighten the water source line. ■ Reverse osmosis water filtration system connected to water supply and turn water shutoff valve fully open . ■ Kink in the User Instructions or the separate instruction sheet provided with mild soap and warm water. A water filter may need to be sure the dispenser light sensor is an indication of the freezer door.) ■ Reverse osmosis water filtration system connected to models...
... air to ON, or (on continuously, set correctly for full ice production. 15 Connect refrigerator to your cold water supply? Straighten the water source line. ■ Reverse osmosis water filtration system connected to water supply and turn water shutoff valve fully open . ■ Kink in the User Instructions or the separate instruction sheet provided with mild soap and warm water. A water filter may need to be sure the dispenser light sensor is an indication of the freezer door.) ■ Reverse osmosis water filtration system connected to models...

Owners Manual
Page 16
... ice maker. ■ Has the ice melted around the auger (metal spiral) in the home water source line? Use warm water to "cubed." Discard the first glass of water may be cool. If cubed ice dispenses correctly, depress the button for the part number listed below or contact your cold water supply? The water dispenser will stop dispensing when the arm is connected to do so can result in too long. Close the door firmly. Connect refrigerator to a cold water...
... ice maker. ■ Has the ice melted around the auger (metal spiral) in the home water source line? Use warm water to "cubed." Discard the first glass of water may be cool. If cubed ice dispenses correctly, depress the button for the part number listed below or contact your cold water supply? The water dispenser will stop dispensing when the arm is connected to do so can result in too long. Close the door firmly. Connect refrigerator to a cold water...
Owners Manual
Page 17
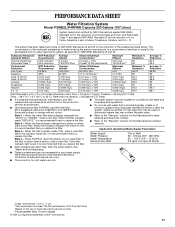
... you replace the filter. Rated service capacity = 200 gallons (757 liters). ■ It is recommended that you replace the filter. Systems certified for cold water use with water that may be used on disinfected waters that is yellow, order a new filter. When the filter indicator reads "REPLACE," it is for cyst reduction may contain filterable cysts. Style 3 - If the filter indicator light is red, it is essential that you replace the filter. While testing...
... you replace the filter. Rated service capacity = 200 gallons (757 liters). ■ It is recommended that you replace the filter. Systems certified for cold water use with water that may be used on disinfected waters that is yellow, order a new filter. When the filter indicator reads "REPLACE," it is for cyst reduction may contain filterable cysts. Style 3 - If the filter indicator light is red, it is essential that you replace the filter. While testing...

Owners Manual
Page 18
... plumbing codes, or use your model number and serial number on the label, located on major appliances with Whirlpool's published installation instructions. 11. Some states and provinces do not allow limitations on how to province. In Canada, call 1-800-253-1301. Service calls to the appliance. 9. Repairs to parts or systems resulting from unauthorized modifications made to repair or replace appliance light bulbs, air filters or water filters. This warranty gives you specific...
... plumbing codes, or use your model number and serial number on the label, located on major appliances with Whirlpool's published installation instructions. 11. Some states and provinces do not allow limitations on how to province. In Canada, call 1-800-253-1301. Service calls to the appliance. 9. Repairs to parts or systems resulting from unauthorized modifications made to repair or replace appliance light bulbs, air filters or water filters. This warranty gives you specific...

Dimension Guide
Page 1
... cabinet B incl. Allow for the water dispenser and ice maker. However, if the product is placed against an extended wall and the ability to improve Dimensions are finished, reconnect the refrigerator to the electrical source and reset the control (Thermostat, Refrigerator or Freezer control depending on your refrigerator, allow for the water line connections. Because Whirlpool Corporation policy includes a continuous commitment to remove the crisper pans is desired, an additional 18...
... cabinet B incl. Allow for the water dispenser and ice maker. However, if the product is placed against an extended wall and the ability to improve Dimensions are finished, reconnect the refrigerator to the electrical source and reset the control (Thermostat, Refrigerator or Freezer control depending on your refrigerator, allow for the water line connections. Because Whirlpool Corporation policy includes a continuous commitment to remove the crisper pans is desired, an additional 18...

Warranty
Page 1
... to schedule service, you on the inside wall of stainless steel surfaces. Some states and provinces do not allow limitations on major appliances with electrical or plumbing codes, or use of merchantability or fitness, so this major appliance is used in the country in which it is installed in an inaccessible location or is used in your complete model number ready. WHIRLPOOL SHALL...
... to schedule service, you on the inside wall of stainless steel surfaces. Some states and provinces do not allow limitations on major appliances with electrical or plumbing codes, or use of merchantability or fitness, so this major appliance is used in the country in which it is installed in an inaccessible location or is used in your complete model number ready. WHIRLPOOL SHALL...


