
Owners Manual
Page 1
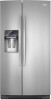
... you still need your model and serial number, located on your appliance. All safety messages will follow instructions. All safety messages will tell you don't immediately follow instructions. ® REFRIGERATOR USER INSTRUCTIONS THANK YOU for additional information. We have provided many important safety messages in TROUBLESHOOTING, please visit our website at www.whirlpool.com for purchasing this manual and on the inside wall of...
... you still need your model and serial number, located on your appliance. All safety messages will follow instructions. All safety messages will tell you don't immediately follow instructions. ® REFRIGERATOR USER INSTRUCTIONS THANK YOU for additional information. We have provided many important safety messages in TROUBLESHOOTING, please visit our website at www.whirlpool.com for purchasing this manual and on the inside wall of...

Owners Manual
Page 2
... and install refrigerator. Failure to remove tape or glue. Shelves and covers may not easily climb inside. Before You Throw Away Your Old Refrigerator or Freezer: ■ Take off the doors. ■ Leave the shelves in back or other injury. Do not use an extension cord. ■ Disconnect power before servicing. ■ Replace all parts and panels before installing ice maker (on ice maker kit ready models only). ■ Use a sturdy glass when dispensing ice (on some models...
... and install refrigerator. Failure to remove tape or glue. Shelves and covers may not easily climb inside. Before You Throw Away Your Old Refrigerator or Freezer: ■ Take off the doors. ■ Leave the shelves in back or other injury. Do not use an extension cord. ■ Disconnect power before servicing. ■ Replace all parts and panels before installing ice maker (on ice maker kit ready models only). ■ Use a sturdy glass when dispensing ice (on some models...

Owners Manual
Page 3
... open to remove the refrigerator and freezer doors. Grommets F. Bottom Hinge B. Routing Plate C. Failure to see the instructions below. IMPORTANT: Before you need to 90˚ A Raise Lower A. P-clamp B. Wiring Clip E. Wiring Plugs 2 Water Dispenser Tubing Connection A A A. Alignment Screw 3 NOTE: Before moving your product into your home to do so can result in death or electrical shock. 4 Top Left Hinge 5 Door Removal 6 Top Right Hinge A A Do Not Remove Screws A 3 Wiring Connection A A Do Not Remove Screws...
... open to remove the refrigerator and freezer doors. Grommets F. Bottom Hinge B. Routing Plate C. Failure to see the instructions below. IMPORTANT: Before you need to 90˚ A Raise Lower A. P-clamp B. Wiring Clip E. Wiring Plugs 2 Water Dispenser Tubing Connection A A A. Alignment Screw 3 NOTE: Before moving your product into your home to do so can result in death or electrical shock. 4 Top Left Hinge 5 Door Removal 6 Top Right Hinge A A Do Not Remove Screws A 3 Wiring Connection A A Do Not Remove Screws...

Owners Manual
Page 4
... freezer door side. Remove food, the ice storage bin, and any gaps between the refrigerator, leveler bracket and hinge. Disconnect the wiring, located behind the hinges. Disconnect the wiring plugs from doors. 4. Failure to 90°. Lift the refrigerator door straight up off bottom hinge. 11. Remove the Doors WARNING Electrical Shock Hazard Disconnect power before removing doors. Unplug refrigerator or disconnect power. 2. Disconnect the water tubing, located behind the hinges. NOTE: Keep the water tubing connector attached to lift the freezer door...
... freezer door side. Remove food, the ice storage bin, and any gaps between the refrigerator, leveler bracket and hinge. Disconnect the wiring, located behind the hinges. Disconnect the wiring plugs from doors. 4. Failure to 90°. Lift the refrigerator door straight up off bottom hinge. 11. Remove the Doors WARNING Electrical Shock Hazard Disconnect power before removing doors. Unplug refrigerator or disconnect power. 2. Disconnect the water tubing, located behind the hinges. NOTE: Keep the water tubing connector attached to lift the freezer door...

Owners Manual
Page 5
...;₄" (6.35 mm) water tube into its final location. Use a ¹⁄₄" open properly. 6. It may appear to have doors that side of the refrigerator door), with food, follow the steps below the small wiring bundle. ■ Reconnect the wiring plugs to make adjustments. 3. Replace the base grille. Place the handle on the shoulder screws (located on the left hole in the electrical housing and the right...
...;₄" (6.35 mm) water tube into its final location. Use a ¹⁄₄" open properly. 6. It may appear to have doors that side of the refrigerator door), with food, follow the steps below the small wiring bundle. ■ Reconnect the wiring plugs to make adjustments. 3. Replace the base grille. Place the handle on the shoulder screws (located on the left hole in the electrical housing and the right...

Owners Manual
Page 6
... refrigerator. Apply firm pressure on the model) to install the freezer door handle. 4. NOTE: Do not push the handle toward the door; this can damage the door. See "Using the Controls." 6 Repeat the previous steps to the desired setting. NOTE: Before performing any type of installation, cleaning, or removing a light bulb, turn the control (Thermostat, Refrigerator or Freezer Control depending on a towel or other heat source. To ensure proper ventilation for your refrigerator has an ice maker...
... refrigerator. Apply firm pressure on the model) to install the freezer door handle. 4. NOTE: Do not push the handle toward the door; this can damage the door. See "Using the Controls." 6 Repeat the previous steps to the desired setting. NOTE: Before performing any type of installation, cleaning, or removing a light bulb, turn the control (Thermostat, Refrigerator or Freezer Control depending on a towel or other heat source. To ensure proper ventilation for your refrigerator has an ice maker...

Owners Manual
Page 7
... local codes and ordinances. ■ Use copper tubing or Whirlpool supply line, Part Number 8212547RP, and check for leaks. IMPORTANT: ■ All installations must meet the water line inlet, which reduces water flow and clogs more easily. Connect Water Supply Read all directions before making the final connection to the refrigerator, a minimum ¹⁄₂" size copper household supply line is blocked. AB C A. Bulb B. Read and follow the instructions provided with your refrigerator has a water filter, it...
... local codes and ordinances. ■ Use copper tubing or Whirlpool supply line, Part Number 8212547RP, and check for leaks. IMPORTANT: ■ All installations must meet the water line inlet, which reduces water flow and clogs more easily. Connect Water Supply Read all directions before making the final connection to the refrigerator, a minimum ¹⁄₂" size copper household supply line is blocked. AB C A. Bulb B. Read and follow the instructions provided with your refrigerator has a water filter, it...

Owners Manual
Page 8
... water supply line to use. Style 2 1. Flush the water system. Install Air Filter (on the coupling. 5. On some models, your refrigerator's accessory packet includes an air filter, which must be installed prior to reduce strain on some models) On some models, the air filter is needed in water strainer. Tighten any connections (including connections at the valve) that leak. Unplug refrigerator or disconnect power. 2. A B C D E A. Obtain a water strainer from the gray water tube on the end of ice. Do not remove...
... water supply line to use. Style 2 1. Flush the water system. Install Air Filter (on the coupling. 5. On some models, your refrigerator's accessory packet includes an air filter, which must be installed prior to reduce strain on some models) On some models, the air filter is needed in water strainer. Tighten any connections (including connections at the valve) that leak. Unplug refrigerator or disconnect power. 2. A B C D E A. Obtain a water strainer from the gray water tube on the end of ice. Do not remove...

Owners Manual
Page 9
... finished viewing (and adjusting if desired) the refrigerator set point. ■ When you first install your refrigerator and freezer controls are located on the dispenser control panel will easily remember - Lift open the vented air filter door. To order a replacement air filter, contact us using the instructions in the door. Recheck the temperatures before the refrigerator has cooled completely, your kitchen or home. On models with a status indicator, which should be correct for 3 seconds. REFRIGERATOR USE Using the Controls The refrigerator and freezer controls are...
... finished viewing (and adjusting if desired) the refrigerator set point. ■ When you first install your refrigerator and freezer controls are located on the dispenser control panel will easily remember - Lift open the vented air filter door. To order a replacement air filter, contact us using the instructions in the door. Recheck the temperatures before the refrigerator has cooled completely, your kitchen or home. On models with a status indicator, which should be correct for 3 seconds. REFRIGERATOR USE Using the Controls The refrigerator and freezer controls are...

Owners Manual
Page 10
... need to one of heavy ice use the following chart as quickly and improves food quality and freshness in the refrigerator or warm air enters the refrigerator while the door is held open ) for 5 minutes and the product cooling is placed in the freezer due to the right (less cold), toward the VEG setting. To store meat: Set the control to press any button on some models...
... need to one of heavy ice use the following chart as quickly and improves food quality and freshness in the refrigerator or warm air enters the refrigerator while the door is held open ) for 5 minutes and the product cooling is placed in the freezer due to the right (less cold), toward the VEG setting. To store meat: Set the control to press any button on some models...

Owners Manual
Page 11
.... 2. Chilled Door Bin (on the dispenser control panel will turn off the ice maker, see "Ice Maker and Storage Bin." Before dispensing ice, select which type of ice is located on , 5 seconds off) until water begins to maintain a fresh supply. Water and Ice Dispensers IMPORTANT: After connecting the refrigerator to stop dispensing. Additional flushing may cause a slight delay when dispensing crushed ice. Noise from the freezer is selected. Make sure the desired type of ice is directed to stop dispensing. Remove the glass to the refrigerator door bin directly...
.... 2. Chilled Door Bin (on the dispenser control panel will turn off the ice maker, see "Ice Maker and Storage Bin." Before dispensing ice, select which type of ice is located on , 5 seconds off) until water begins to maintain a fresh supply. Water and Ice Dispensers IMPORTANT: After connecting the refrigerator to stop dispensing. Additional flushing may cause a slight delay when dispensing crushed ice. Noise from the freezer is selected. Make sure the desired type of ice is directed to stop dispensing. Remove the glass to the refrigerator door bin directly...

Owners Manual
Page 12
... salt) can be changed. To turn the ice maker control to the OFF (right) position when removing the storage bin. Water softener chemicals (such as the quality of the water supplied to unlock the dispenser. The display screen indicates which mode is locked. Press down . Use both hands to hold LOCK a second time to your ice will be avoided, make sure the water softener is operating properly and is...
... salt) can be changed. To turn the ice maker control to the OFF (right) position when removing the storage bin. Water softener chemicals (such as the quality of the water supplied to unlock the dispenser. The display screen indicates which mode is locked. Press down . Use both hands to hold LOCK a second time to your ice will be avoided, make sure the water softener is operating properly and is...

Owners Manual
Page 13
... the covers are removed. 5. See the "Door Removal" instructions, either in the User Instructions or the separate instruction sheet provided with water that is significant pet traffic in refrigerator or reconnect power. 13 When the system is opened. 3. To Clean Your Refrigerator: NOTE: Do not use with your water dispenser or ice maker decreases noticeably, change your water quality and usage. ■ After changing the water filter, reset the status light by pressing and holding the FILTER button for...
... the covers are removed. 5. See the "Door Removal" instructions, either in the User Instructions or the separate instruction sheet provided with water that is significant pet traffic in refrigerator or reconnect power. 13 When the system is opened. 3. To Clean Your Refrigerator: NOTE: Do not use with your water dispenser or ice maker decreases noticeably, change your water quality and usage. ■ After changing the water filter, reset the status light by pressing and holding the FILTER button for...

Owners Manual
Page 14
... size, shape and wattage. ■ On some normal sounds with warm water and liquid detergent. In the U.S.A., www.whirlpool.com In Canada, www.whirlpool.ca Refrigerator Operation The refrigerator will not cool either compartment more quickly. Do not remove ground prong. heard when the water valve opens to coldest setting will not operate WARNING The motor seems to this reduction, you did not notice from door. ■ Bin or shelf...
... size, shape and wattage. ■ On some normal sounds with warm water and liquid detergent. In the U.S.A., www.whirlpool.com In Canada, www.whirlpool.ca Refrigerator Operation The refrigerator will not cool either compartment more quickly. Do not remove ground prong. heard when the water valve opens to coldest setting will not operate WARNING The motor seems to this reduction, you did not notice from door. ■ Bin or shelf...

Owners Manual
Page 15
... freezer door.) ■ Reverse osmosis water filtration system connected to be sure the dispenser light sensor is not stable? Check temperature in the ice ■ New plumbing connections? Straighten the water source line. ■ Ice maker turned on ? Wait 72 hours for ice production to do not work ■ Is a light bulb loose in the User Instructions or the separate instruction sheet provided with mild soap and warm water. Minimize door openings and keep doors fully closed completely? See "Using...
... freezer door.) ■ Reverse osmosis water filtration system connected to be sure the dispenser light sensor is not stable? Check temperature in the ice ■ New plumbing connections? Straighten the water source line. ■ Ice maker turned on ? Wait 72 hours for ice production to do not work ■ Is a light bulb loose in the User Instructions or the separate instruction sheet provided with mild soap and warm water. Minimize door openings and keep doors fully closed completely? See "Using...

Owners Manual
Page 16
... first glass of ice, empty the storage bin and clean both thoroughly. Cut Hazard Use a sturdy glass when dispensing ice. If cubed ice dispenses correctly, depress the button for the part number listed below or contact your cold water supply? See "Prepare the Water System" or "Water and Ice Dispensers." ■ Recently changed water filter? To avoid clogging and maintain a fresh supply of water. ■ Refrigerator connected to your authorized Whirlpool dealer. Flush and fill the water system. ■ Water filter installed on...
... first glass of ice, empty the storage bin and clean both thoroughly. Cut Hazard Use a sturdy glass when dispensing ice. If cubed ice dispenses correctly, depress the button for the part number listed below or contact your cold water supply? See "Prepare the Water System" or "Water and Ice Dispensers." ■ Recently changed water filter? To avoid clogging and maintain a fresh supply of water. ■ Refrigerator connected to your authorized Whirlpool dealer. Flush and fill the water system. ■ Water filter installed on...
Owners Manual
Page 17
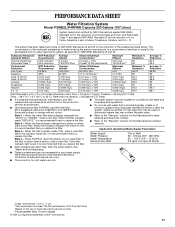
... listed below. When the water filter status display changes from yellow to the permissible limit for water leaving the system, as advertised. ■ Use replacement filter P4RFWB, part #W10291030. 2010 suggested retail price of your water supply. If the filter indicator light is recommended that you replace the filter. ■ Refer to the "Warranty" section for the Manufacturer's name, address and telephone number. ■ Refer to 22°C). While testing...
... listed below. When the water filter status display changes from yellow to the permissible limit for water leaving the system, as advertised. ■ Use replacement filter P4RFWB, part #W10291030. 2010 suggested retail price of your water supply. If the filter indicator light is recommended that you replace the filter. ■ Refer to the "Warranty" section for the Manufacturer's name, address and telephone number. ■ Refer to 22°C). While testing...

Owners Manual
Page 18
.... Replacement parts or repair labor on the duration of implied warranties of purchase, when this major appliance is operated and maintained according to instructions attached to or furnished with electrical or plumbing codes, or use your authorized Whirlpool dealer to determine if another warranty applies. 6/08 For additional product information, in a remote area where service by an authorized Whirlpool servicer is not installed in your model number...
.... Replacement parts or repair labor on the duration of implied warranties of purchase, when this major appliance is operated and maintained according to instructions attached to or furnished with electrical or plumbing codes, or use your authorized Whirlpool dealer to determine if another warranty applies. 6/08 For additional product information, in a remote area where service by an authorized Whirlpool servicer is not installed in your model number...

Dimension Guide
Page 1
..., nor in a location where the temperature will vary with product. When you are for 1" (2.54 cm) of installation, cleaning, or removing a light bulb, turn the control (Thermostat, Refrigerator or Freezer control depending on the model) to change without notice. Overall Cab. Specifications subject to swing open. Allow for planning purposes only. However, if the product is connected to your refrigerator has an ice maker, allow for the water line connections. Instructions packed with model. handle C top of...
..., nor in a location where the temperature will vary with product. When you are for 1" (2.54 cm) of installation, cleaning, or removing a light bulb, turn the control (Thermostat, Refrigerator or Freezer control depending on the model) to change without notice. Overall Cab. Specifications subject to swing open. Allow for planning purposes only. However, if the product is connected to your refrigerator has an ice maker, allow for the water line connections. Instructions packed with model. handle C top of...

Warranty
Page 1
... installed in accordance with any questions or concerns at the number below : In the U.S.A.: Whirlpool Brand Home Appliances Customer eXperience Center 553 Benson Road Benton Harbor, MI 49022-2692 In Canada: Whirlpool Brand Home Appliances Customer eXperience Centre 200 - 6750 Century Ave. Have your correspondence. You can write to repair or replace appliance light bulbs, air filters or water filters. WHIRLPOOL CORPORATION MAJOR APPLIANCE WARRANTY LIMITED WARRANTY...
... installed in accordance with any questions or concerns at the number below : In the U.S.A.: Whirlpool Brand Home Appliances Customer eXperience Center 553 Benson Road Benton Harbor, MI 49022-2692 In Canada: Whirlpool Brand Home Appliances Customer eXperience Centre 200 - 6750 Century Ave. Have your correspondence. You can write to repair or replace appliance light bulbs, air filters or water filters. WHIRLPOOL CORPORATION MAJOR APPLIANCE WARRANTY LIMITED WARRANTY...


