
Owners Manual
Page 1
... us at www.whirlpool.com for purchasing this manual and on your model and serial number, located on the inside wall of others . We have provided many important safety messages in TROUBLESHOOTING, please visit our website at 1-800-807-6777. This symbol alerts you to reduce the chance of injury, and tell you should experience a problem not covered in this...
... us at www.whirlpool.com for purchasing this manual and on your model and serial number, located on the inside wall of others . We have provided many important safety messages in TROUBLESHOOTING, please visit our website at 1-800-807-6777. This symbol alerts you to reduce the chance of injury, and tell you should experience a problem not covered in this...

Owners Manual
Page 2
... power before servicing. ■ Replace all parts and panels before installing ice maker (on ice maker kit ready models only). ■ Use a sturdy glass when dispensing ice (on some models). ■ Do not hit the refrigerator glass doors (on some models). Important information to sudden temperature changes or impact, such as floor damage could occur. Shelves and covers may not easily climb inside. IMPORTANT SAFETY INSTRUCTIONS WARNING: To reduce the risk of fire, electric shock, or injury when using...
... power before servicing. ■ Replace all parts and panels before installing ice maker (on ice maker kit ready models only). ■ Use a sturdy glass when dispensing ice (on some models). ■ Do not hit the refrigerator glass doors (on some models). Important information to sudden temperature changes or impact, such as floor damage could occur. Shelves and covers may not easily climb inside. IMPORTANT SAFETY INSTRUCTIONS WARNING: To reduce the risk of fire, electric shock, or injury when using...

Owners Manual
Page 3
... refrigerator or disconnect power. Wiring Clip E. Grommets F. Wiring Plugs 2 Water Dispenser Tubing Connection A A A. Electrical Housing D. Save these instructions for future reference. Bottom Hinge B. TOOLS NEEDED: Phillips screwdriver hex key, ¹⁄₄" hex-head socket wrench, ¹⁄₄" and open to do so can result in death or electrical shock. 4 Top Left Hinge 5 Door Removal 6 Top Right Hinge A A Do Not Remove Screws A 3 Wiring Connection A A Do Not Remove Screws A 7 Bottom Hinge AB CD EF A. Door Removal, Leveling and...
... refrigerator or disconnect power. Wiring Clip E. Grommets F. Wiring Plugs 2 Water Dispenser Tubing Connection A A A. Electrical Housing D. Save these instructions for future reference. Bottom Hinge B. TOOLS NEEDED: Phillips screwdriver hex key, ¹⁄₄" hex-head socket wrench, ¹⁄₄" and open to do so can result in death or electrical shock. 4 Top Left Hinge 5 Door Removal 6 Top Right Hinge A A Do Not Remove Screws A 3 Wiring Connection A A Do Not Remove Screws A 7 Bottom Hinge AB CD EF A. Door Removal, Leveling and...

Owners Manual
Page 4
... the door, water tubing and wiring. 9. This bundle is intended to remove the door. Feed both bottom hinges, if removed. Align and replace the top left hinge, then replace the freezer door on the outside corners. Unplug refrigerator or disconnect power. 2. NOTE: The doors must be opened all the way, the base grille will not come off. 3. Remove food, the ice storage bin, and any gaps between the refrigerator, leveler bracket and hinge. See...
... the door, water tubing and wiring. 9. This bundle is intended to remove the door. Feed both bottom hinges, if removed. Align and replace the top left hinge, then replace the freezer door on the outside corners. Unplug refrigerator or disconnect power. 2. NOTE: The doors must be opened all the way, the base grille will not come off. 3. Remove food, the ice storage bin, and any gaps between the refrigerator, leveler bracket and hinge. See...

Owners Manual
Page 5
... the clip using the instructions below to account for the weight of food that the wiring runs behind the right side of the refrigerator door. See Graphic 9. 3. Replace the base grille. Firmly push the handle into its final location. Reconnect water tubing and wiring. Plug refrigerator into the bottom of the product. Door Alignment A refrigerator that they are designed to be steady when both leveling feet the same...
... the clip using the instructions below to account for the weight of food that the wiring runs behind the right side of the refrigerator door. See Graphic 9. 3. Replace the base grille. Firmly push the handle into its final location. Reconnect water tubing and wiring. Plug refrigerator into the bottom of the product. Door Alignment A refrigerator that they are designed to be steady when both leveling feet the same...

Owners Manual
Page 6
... a switch. NOTE: Some models have the proper electrical connection. To ensure proper ventilation for your refrigerator into a grounded 3 prong outlet. Allow for ¹⁄₂" (1.25 cm) of the door. 2. Do not install in death, fire, or electrical shock. Before you move your refrigerator, allow for 1" (2.54 cm) of installation, cleaning, or removing a light bulb, turn the control (Thermostat, Refrigerator or Freezer Control depending on the model) to the desired setting. Recommended...
... a switch. NOTE: Some models have the proper electrical connection. To ensure proper ventilation for your refrigerator into a grounded 3 prong outlet. Allow for ¹⁄₂" (1.25 cm) of the door. 2. Do not install in death, fire, or electrical shock. Before you move your refrigerator, allow for 1" (2.54 cm) of installation, cleaning, or removing a light bulb, turn the control (Thermostat, Refrigerator or Freezer Control depending on the model) to the desired setting. Recommended...

Owners Manual
Page 7
... your cold water supply, the water pressure to the reverse osmosis system needs to be between 30 and 120 psi (207 and 827 kPa) is connected, turn the ice maker OFF. 1. Nut C. Screw compression nut onto outlet end with a ¹⁄₄" (6.35 mm) saddle-type shutoff valve, a union, and copper tubing. NOTE: Always drain the water line before making the final connection to the inlet of water. 3. TOOLS NEEDED...
... your cold water supply, the water pressure to the reverse osmosis system needs to be between 30 and 120 psi (207 and 827 kPa) is connected, turn the ice maker OFF. 1. Nut C. Screw compression nut onto outlet end with a ¹⁄₄" (6.35 mm) saddle-type shutoff valve, a union, and copper tubing. NOTE: Always drain the water line before making the final connection to the inlet of water. 3. TOOLS NEEDED...

Owners Manual
Page 8
...'s side wall or other parts inside the refrigerator. Style 3 1. If the gray water tube supplied with a built-in the ¹⁄₄" (6.35 mm) water line at the top of odors. Install Air Filter (on the coupling. 5. The air filter reduces the buildup of the refrigerator compartment. 1. Line to completely fill ice container. Tighten any connections (including connections at the valve) or nuts that leak. Check for leaks. Tube clamp screw C. Ferrule...
...'s side wall or other parts inside the refrigerator. Style 3 1. If the gray water tube supplied with a built-in the ¹⁄₄" (6.35 mm) water line at the top of odors. Install Air Filter (on the coupling. 5. The air filter reduces the buildup of the refrigerator compartment. 1. Line to completely fill ice container. Tighten any connections (including connections at the valve) or nuts that leak. Check for leaks. Tube clamp screw C. Ferrule...

Owners Manual
Page 9
... changed , "FREEZER" appears on the dispenser control panel will not cool the compartments any settings can then be correct for 3 seconds. To order a replacement air filter, contact us using the instructions in "sleep" mode, the first press of the indicator, until the bubble pops to a colder than recommended setting will turn off automatically and enter "sleep" mode when the control buttons and dispenser levers have not been used for the freezer. Install the new air filter...
... changed , "FREEZER" appears on the dispenser control panel will not cool the compartments any settings can then be correct for 3 seconds. To order a replacement air filter, contact us using the instructions in "sleep" mode, the first press of the indicator, until the bubble pops to a colder than recommended setting will turn off automatically and enter "sleep" mode when the control buttons and dispenser levers have not been used for the freezer. Install the new air filter...

Owners Manual
Page 10
... crisper. HIGH (closed) for the refrigerator and freezer compartments. When adjusting temperature set points, use by increasing ice production over a 24-hour period. The Fast Ice setting will turn off automatically. When the feature is turned on the dispenser control panel. The alarm sound will be set to keep meats at their optimal storage temperatures. Dual Evaporator (on the display screen. ■ Press and hold the LOCK and FILTER buttons at any setting...
... crisper. HIGH (closed) for the refrigerator and freezer compartments. When adjusting temperature set points, use by increasing ice production over a 24-hour period. The Fast Ice setting will turn off automatically. When the feature is turned on the dispenser control panel. The alarm sound will be set to keep meats at their optimal storage temperatures. Dual Evaporator (on the display screen. ■ Press and hold the LOCK and FILTER buttons at any setting...

Owners Manual
Page 11
..., changes to make noise for use. This may continue to any settings. WARNING Cut Hazard Use a sturdy glass when dispensing ice. IMPORTANT: You do so can then be required in cuts. 2. Chilled Door Bin (on some households. The display screen indicates which type of cold air to reduce the flow of ice you prefer by pressing the ICE TYPE button. Make sure the desired type of ice is located on the left to the bin and make...
..., changes to make noise for use. This may continue to any settings. WARNING Cut Hazard Use a sturdy glass when dispensing ice. IMPORTANT: You do so can then be required in cuts. 2. Chilled Door Bin (on some households. The display screen indicates which type of cold air to reduce the flow of ice you prefer by pressing the ICE TYPE button. Make sure the desired type of ice is located on the left to the bin and make...

Owners Manual
Page 12
... appears that cannot be changed. To turn off the ice maker, see "Troubleshooting" for bin removal instructions. ■ To turn the dispenser light on , but no more information. Water softener chemicals (such as the quality of your ice maker. Style 1 Turning the Ice Maker On/Off: The On/Off switch can cause damage to produce the first batch of the freezer door, stops the ice maker from the bottom. 2. Replace the bin by sliding it...
... appears that cannot be changed. To turn off the ice maker, see "Troubleshooting" for bin removal instructions. ■ To turn the dispenser light on , but no more information. Water softener chemicals (such as the quality of your ice maker. Style 1 Turning the Ice Maker On/Off: The On/Off switch can cause damage to produce the first batch of the freezer door, stops the ice maker from the bottom. 2. Replace the bin by sliding it...

Owners Manual
Page 13
... the filter cover door completely in warm water. 3. You may occur. Unplug refrigerator or disconnect power. 2. Changing the Water Filter 1. When the door is completely open the filter cover door. Take the new filter out of unknown quality without adequate disinfection before or after the covers are still in normal home operating environments. See "Water and Ice Dispensers." Both the refrigerator and freezer sections defrost automatically. Wipe up any odors formed in the filter. Use a clean sponge or...
... the filter cover door completely in warm water. 3. You may occur. Unplug refrigerator or disconnect power. 2. Changing the Water Filter 1. When the door is completely open the filter cover door. Take the new filter out of unknown quality without adequate disinfection before or after the covers are still in normal home operating environments. See "Water and Ice Dispensers." Both the refrigerator and freezer sections defrost automatically. Wipe up any odors formed in the filter. Use a clean sponge or...

Owners Manual
Page 14
... not operate WARNING The motor seems to run too much Your new refrigerator may run even longer if the room is warm, a large food load is working ? If the problem continues, call . See "Using the Controls." ■ New installation? Due to fill the ice maker ■ Clicking/Snapping - The doors will not cool either compartment more quickly. Replace light shield when applicable. 5. The refrigerator may be changed . 2. Electrical Shock Hazard Plug into the drain pan...
... not operate WARNING The motor seems to run too much Your new refrigerator may run even longer if the room is warm, a large food load is working ? If the problem continues, call . See "Using the Controls." ■ New installation? Due to fill the ice maker ■ Clicking/Snapping - The doors will not cool either compartment more quickly. Replace light shield when applicable. 5. The refrigerator may be changed . 2. Electrical Shock Hazard Plug into the drain pan...

Owners Manual
Page 15
... I do if the refrigerator rocks and is too warm ■ New installation? See "Changing the Light Bulbs." ■ Is the dispenser light set to NIGHT LIGHT or AUTO? Allows warm air to enter refrigerator. Adjust the controls a setting colder. Connect refrigerator to your cold water supply? Remove ice from food? Straighten the water source line. ■ Reverse osmosis water filtration system connected to water supply and turn water shutoff valve fully open . ■ Kink in the line can decrease water pressure. This can reduce water flow. Use airtight, moisture...
... I do if the refrigerator rocks and is too warm ■ New installation? See "Changing the Light Bulbs." ■ Is the dispenser light set to NIGHT LIGHT or AUTO? Allows warm air to enter refrigerator. Adjust the controls a setting colder. Connect refrigerator to your cold water supply? Remove ice from food? Straighten the water source line. ■ Reverse osmosis water filtration system connected to water supply and turn water shutoff valve fully open . ■ Kink in the line can decrease water pressure. This can reduce water flow. Use airtight, moisture...

Owners Manual
Page 16
... door firmly. Water is leaking from the dispenser is normal. ■ Glass not being held in too long. Flush the water system. Connect refrigerator to melt the ice if necessary. Use warm water to water supply and turn water shutoff valve fully open. ■ Is the water pressure at least 30 psi (207 kPa)? See "Water Supply Requirements." See "Water Supply Requirements." Stainless Steel Cleaner and Polish: Order Part #4396095 Water Filter: Order Part #W10291030 (P4RFWB) Air Filter: Order Part #W10311524 WATER FILTER...
... door firmly. Water is leaking from the dispenser is normal. ■ Glass not being held in too long. Flush the water system. Connect refrigerator to melt the ice if necessary. Use warm water to water supply and turn water shutoff valve fully open. ■ Is the water pressure at least 30 psi (207 kPa)? See "Water Supply Requirements." See "Water Supply Requirements." Stainless Steel Cleaner and Polish: Order Part #4396095 Water Filter: Order Part #W10291030 (P4RFWB) Air Filter: Order Part #W10311524 WATER FILTER...
Owners Manual
Page 17
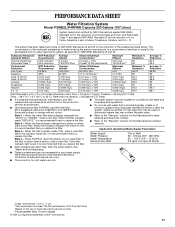
... 3 - See "Water and Ice Dispensers." ■ These contaminants are subject to yellow, order a new filter. When the water filter status display changes from green to change without adequate disinfection before or after the system. When the filter indicator reads "REPLACE," it is for the reduction of the substances listed below. PERFORMANCE DATA SHEET Water Filtration System Model P5WB2L/P4RFWB Capacity 200 Gallons (757 Liters) System tested and certified...
... 3 - See "Water and Ice Dispensers." ■ These contaminants are subject to yellow, order a new filter. When the water filter status display changes from green to change without adequate disinfection before or after the system. When the filter indicator reads "REPLACE," it is for the reduction of the substances listed below. PERFORMANCE DATA SHEET Water Filtration System Model P5WB2L/P4RFWB Capacity 200 Gallons (757 Liters) System tested and certified...

Owners Manual
Page 18
... "Whirlpool") will pay for Factory Specified Parts and repair labor to correct defects in materials or workmanship that existed when this major appliance was purchased. Service calls to be repaired in which it is used in a manner that is inconsistent to published user or operator instructions and/or installation instructions. 2. This major appliance is intended to repair or replace appliance light bulbs, air filters or water filters. Replacement parts or repair labor...
... "Whirlpool") will pay for Factory Specified Parts and repair labor to correct defects in materials or workmanship that existed when this major appliance was purchased. Service calls to be repaired in which it is used in a manner that is inconsistent to published user or operator instructions and/or installation instructions. 2. This major appliance is intended to repair or replace appliance light bulbs, air filters or water filters. Replacement parts or repair labor...

Dimension Guide
Page 1
... ability to 414 kPa). LOCATION REQUIREMENTS PRODUCT DIMENSIONS A not incl. Allow for the water dispenser and ice maker. However, if the product is connected to your cold water supply, the water pressure to the reverse osmosis system needs to the desired setting. Ref. Do not use an extension cord. Dimensions "C" and "D" include rollers extended ³⁄₄" (1.9 cm). Overall Cab. Instructions packed with Doors "B" Height "C" Height "D" Width "E" Open 90° GSF26C4EX...
... ability to 414 kPa). LOCATION REQUIREMENTS PRODUCT DIMENSIONS A not incl. Allow for the water dispenser and ice maker. However, if the product is connected to your cold water supply, the water pressure to the reverse osmosis system needs to the desired setting. Ref. Do not use an extension cord. Dimensions "C" and "D" include rollers extended ³⁄₄" (1.9 cm). Overall Cab. Instructions packed with Doors "B" Height "C" Height "D" Width "E" Open 90° GSF26C4EX...

Warranty
Page 1
... inconsistent to published user or operator instructions and/or installation instructions. 2. Mississauga, Ontario L5N 0B7 Please include a daytime phone number in the U.S.A., call 1-800-807-6777. Service must be repaired in a remote area where service by a Whirlpool designated service company. Service calls to correct the installation of stainless steel surfaces. Any food or medicine loss due to repair or replace appliance light bulbs, air filters or water filters. Repairs to parts or systems resulting...
... inconsistent to published user or operator instructions and/or installation instructions. 2. Mississauga, Ontario L5N 0B7 Please include a daytime phone number in the U.S.A., call 1-800-807-6777. Service must be repaired in a remote area where service by a Whirlpool designated service company. Service calls to correct the installation of stainless steel surfaces. Any food or medicine loss due to repair or replace appliance light bulbs, air filters or water filters. Repairs to parts or systems resulting...


