
Dimension Guide
Page 1
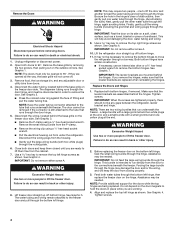
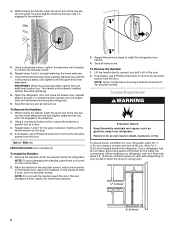
... "C" and "D" include rollers extended ³⁄₄" (1.9 cm). Allow for the water dispenser and ice maker. NOTE: Do not install the refrigerator near an oven, radiator, or other heat source, nor in a location where the temperature will vary with water pressure between 30 and 120 psi ...(207 and 827 kPa). W10281961B 2/3/11 LOCATION REQUIREMENTS PRODUCT DIMENSIONS A not incl. Because Whirlpool Corporation policy includes a continuous commitment to remove the crisper pans is desired, an additional 18" (45.72 cm) of cabinet width is ...
... "C" and "D" include rollers extended ³⁄₄" (1.9 cm). Allow for the water dispenser and ice maker. NOTE: Do not install the refrigerator near an oven, radiator, or other heat source, nor in a location where the temperature will vary with water pressure between 30 and 120 psi ...(207 and 827 kPa). W10281961B 2/3/11 LOCATION REQUIREMENTS PRODUCT DIMENSIONS A not incl. Because Whirlpool Corporation policy includes a continuous commitment to remove the crisper pans is desired, an additional 18" (45.72 cm) of cabinet width is ...
Energy Guide
Page 1
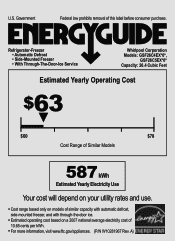
... removal of 10.65 cents per kWh. • For more information, visit www.ftc.gov/appliances. (P/N W10281967 Rev. Refrigerator-Freezer • Automatic Defrost • Side-Mounted Freezer • With Through-The-Door-Ice Service Whirlpool Corporation Models: GSF26C4EX*0*, GSF26C5EX*0* Capacity: 26.4 Cubic Feet Estimated Yearly Operating Cost $63 ▼ $60 $78 Cost...
... removal of 10.65 cents per kWh. • For more information, visit www.ftc.gov/appliances. (P/N W10281967 Rev. Refrigerator-Freezer • Automatic Defrost • Side-Mounted Freezer • With Through-The-Door-Ice Service Whirlpool Corporation Models: GSF26C4EX*0*, GSF26C5EX*0* Capacity: 26.4 Cubic Feet Estimated Yearly Operating Cost $63 ▼ $60 $78 Cost...
Use & Care Guide
Page 1
...messages. In Canada, visit our website at www.whirlpool.ca or call us at 1-800-253-1301. Table of Contents / Índice / Table des matières REFRIGERATOR SAFETY 1 INSTALLATION INSTRUCTIONS 2 REFRIGERATOR USE 11 REFRIGERATOR CARE 15 TROUBLESHOOTING 16 ACCESSORIES 18 WATER FILTER .... WARNING You can happen if the instructions are very important. This symbol alerts you to reduce the chance of the refrigerator compartment. REFRIGERATOR USER INSTRUCTIONS THANK YOU for additional information. These words mean: DANGER You can kill or hurt you should experience a...
...messages. In Canada, visit our website at www.whirlpool.ca or call us at 1-800-253-1301. Table of Contents / Índice / Table des matières REFRIGERATOR SAFETY 1 INSTALLATION INSTRUCTIONS 2 REFRIGERATOR USE 11 REFRIGERATOR CARE 15 TROUBLESHOOTING 16 ACCESSORIES 18 WATER FILTER .... WARNING You can happen if the instructions are very important. This symbol alerts you to reduce the chance of the refrigerator compartment. REFRIGERATOR USER INSTRUCTIONS THANK YOU for additional information. These words mean: DANGER You can kill or hurt you should experience a...
Use & Care Guide
Page 2
... to cover the floor with warm water when they will sit for cleaning or service, be evacuated by a licensed, EPA certified refrigerant technician in place so that children may break if exposed to know about glass shelves and covers: Do not clean glass shelves or...; Do not use sharp instruments, rubbing alcohol, flammable fluids, or abrasive cleaners to remove tape or glue. Junked or abandoned refrigerators are heavy. Before You Throw Away Your Old Refrigerator or Freezer: ■ Take off the doors. ■ Leave the shelves in accordance with Federal and Local regulations. Glass...
... to cover the floor with warm water when they will sit for cleaning or service, be evacuated by a licensed, EPA certified refrigerant technician in place so that children may break if exposed to know about glass shelves and covers: Do not clean glass shelves or...; Do not use sharp instruments, rubbing alcohol, flammable fluids, or abrasive cleaners to remove tape or glue. Junked or abandoned refrigerators are heavy. Before You Throw Away Your Old Refrigerator or Freezer: ■ Take off the doors. ■ Leave the shelves in accordance with Federal and Local regulations. Glass...

Use & Care Guide
Page 3
...removing doors. NOTE: Before moving your product into your home to 90˚ A Raise Lower A. Failure to remove the refrigerator and freezer doors. Wiring Clip E. Bottom Hinge B. TOOLS NEEDED: Phillips screwdriver hex key, ¹⁄₄" hex-head...instructions below. Grommets F. Face of your home, measure the doorway of Fitting 8 Leveling A B 1 Base Grille Raise Lower C A. Unplug refrigerator or disconnect power. Routing Plate C. Wiring Plugs 2 Water Dispenser Tubing Connection A A A. Electrical Housing D. Leveling Foot 9 Door Alignment Doors must...
...removing doors. NOTE: Before moving your product into your home to 90˚ A Raise Lower A. Failure to remove the refrigerator and freezer doors. Wiring Clip E. Bottom Hinge B. TOOLS NEEDED: Phillips screwdriver hex key, ¹⁄₄" hex-head...instructions below. Grommets F. Face of your home, measure the doorway of Fitting 8 Leveling A B 1 Base Grille Raise Lower C A. Unplug refrigerator or disconnect power. Routing Plate C. Wiring Plugs 2 Water Dispenser Tubing Connection A A A. Electrical Housing D. Leveling Foot 9 Door Alignment Doors must...
Use & Care Guide
Page 4
... doors to remove the bottom hinges. Assistance may be needed . Align and replace the top left hinge screws as shown. Tighten screws. 4 Unplug refrigerator or disconnect power. 2. See Graphic 2. ■ Press the colored outer ring against the face of cardboard. NOTE: Keep the water tubing connector ...drive or a ³⁄₈" hex-head socket wrench to 90°. Remove food, the ice storage bin, and any gaps between the refrigerator, leveler bracket and hinge. See Graphic 6. Before replacing the freezer door on a soft, clean surface, such as shown. Remove the Doors ...
... doors to remove the bottom hinges. Assistance may be needed . Align and replace the top left hinge screws as shown. Tighten screws. 4 Unplug refrigerator or disconnect power. 2. See Graphic 2. ■ Press the colored outer ring against the face of cardboard. NOTE: Keep the water tubing connector ...drive or a ³⁄₈" hex-head socket wrench to 90°. Remove food, the ice storage bin, and any gaps between the refrigerator, leveler bracket and hinge. See Graphic 6. Before replacing the freezer door on a soft, clean surface, such as shown. Remove the Doors ...

Use & Care Guide
Page 5
...wiring bundle (with one on the left . See Graphic 3. See Graphic 3. ■ Reinstall the wiring clip over the grommets. Replace the refrigerator door by turning the leveling feet to the screw hole). Tighten screws. 8. Replace the ice storage bin and any adjustable door or utility ...Installation and Removal Style 1 - NOTE: To avoid scratching the finish, place the handles on the bottom hinge of the refrigerator door. A B A. Setscrews inside the refrigerator. Firmly push the handle toward the door until it easier to turn both doors again and check that are designed to...
...wiring bundle (with one on the left . See Graphic 3. See Graphic 3. ■ Reinstall the wiring clip over the grommets. Replace the refrigerator door by turning the leveling feet to the screw hole). Tighten screws. 8. Replace the ice storage bin and any adjustable door or utility ...Installation and Removal Style 1 - NOTE: To avoid scratching the finish, place the handles on the bottom hinge of the refrigerator door. A B A. Setscrews inside the refrigerator. Firmly push the handle toward the door until it easier to turn both doors again and check that are designed to...
Use & Care Guide
Page 6
...Allow for the upper setscrew. Once both setscrews have mounting brackets connected to install the other soft surface. 2. Place the handle on your refrigerator, allow extra space at the top. If necessary, use a Phillips screwdriver to remove the shoulder screws from the door. 4. 4. Using...the setscrew. 5. Repeat steps 1 and 2 for 1" (2.54 cm) of the door. 2. Remove the handles, which are packed inside the refrigerator. Apply firm pressure on PARTS INCLUDED: Door handles (2) To Install the Handles: 1. this extra tightening. 8. Repeat the previous steps to slide ...
...Allow for the upper setscrew. Once both setscrews have mounting brackets connected to install the other soft surface. 2. Place the handle on your refrigerator, allow extra space at the top. If necessary, use a Phillips screwdriver to remove the shoulder screws from the door. 4. 4. Using...the setscrew. 5. Repeat steps 1 and 2 for 1" (2.54 cm) of the door. 2. Remove the handles, which are packed inside the refrigerator. Apply firm pressure on PARTS INCLUDED: Door handles (2) To Install the Handles: 1. this extra tightening. 8. Repeat the previous steps to slide ...
Use & Care Guide
Page 7
... Flat-blade screwdriver Nut driver and ¹⁄₂" Open-end or two adjustable wrenches Drill bit ■ Cordless drill NOTE: Your refrigerator dealer has a kit available with a reverse osmosis system. Electrical Shock Hazard Plug into its final location, it may further reduce the water...the filter if necessary. ■ Allow the storage tank on the reverse osmosis system to refill after heavy usage. ■ If your refrigerator has a water filter, it is recommended that cannot be provided. Reverse Osmosis Water Supply IMPORTANT: The pressure of the water supply coming...
... Flat-blade screwdriver Nut driver and ¹⁄₂" Open-end or two adjustable wrenches Drill bit ■ Cordless drill NOTE: Your refrigerator dealer has a kit available with a reverse osmosis system. Electrical Shock Hazard Plug into its final location, it may further reduce the water...the filter if necessary. ■ Allow the storage tank on the reverse osmosis system to refill after heavy usage. ■ If your refrigerator has a water filter, it is recommended that cannot be provided. Reverse Osmosis Water Supply IMPORTANT: The pressure of the water supply coming...
Use & Care Guide
Page 8
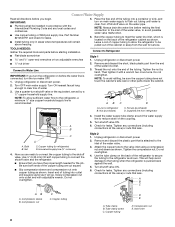
... codes and ordinances. ■ Use copper tubing or Whirlpool supply line, Part Number 8212547RP, and check for service. Leave a coil of copper tubing to allow sufficient water flow to the shutoff valve. Connect to refrigerator) D. Use a quarter-turn shutoff valve or the ...of tubing into a container or sink, and turn on the coupling. 5. Turn shutoff valve ON. 6. Nut (purchased) C. Copper tubing (to Refrigerator ■ Flat-blade screwdriver and ¹⁄₂" open-end wrenches or two adjustable wrenches Style 1 1. Compression nut C C. Remove and discard...
... codes and ordinances. ■ Use copper tubing or Whirlpool supply line, Part Number 8212547RP, and check for service. Leave a coil of copper tubing to allow sufficient water flow to the shutoff valve. Connect to refrigerator) D. Use a quarter-turn shutoff valve or the ...of tubing into a container or sink, and turn on the coupling. 5. Turn shutoff valve ON. 6. Nut (purchased) C. Copper tubing (to Refrigerator ■ Flat-blade screwdriver and ¹⁄₂" open-end wrenches or two adjustable wrenches Style 1 1. Compression nut C C. Remove and discard...
Use & Care Guide
Page 9
...bubble on some models, your nearest appliance dealer. On some models, the air filter is equipped with a wrench two more turns. Unplug refrigerator or disconnect power. 2. Nut (purchased) G. Failure to activate the indicator. 3. NOTE: Allow 24 hours to an existing household water ...line. The air filter reduces the buildup of ice. Refrigerator water tubing B. Tighten any nuts or connections (including connections at either the rear or left interior wall near the top of the copper ...
...bubble on some models, your nearest appliance dealer. On some models, the air filter is equipped with a wrench two more turns. Unplug refrigerator or disconnect power. 2. Nut (purchased) G. Failure to activate the indicator. 3. NOTE: Allow 24 hours to an existing household water ...line. The air filter reduces the buildup of ice. Refrigerator water tubing B. Tighten any nuts or connections (including connections at either the rear or left interior wall near the top of the copper ...
Use & Care Guide
Page 10
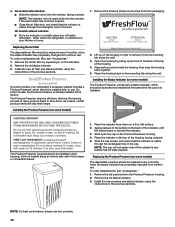
...Place the indicator face-down . Slide the cap closed, and check that the indicator is visible through the rectangular hole in your refrigerator's accessory packet includes a Produce Preserver, which is already installed at the same time the pouch is installed. On models without notches...order replacements, see "Accessories." 1. Install the new pouches and status indicator using the instructions in the top of the housing. 4. 4. Whirlpool Corporation, Benton Harbor MI 49022 2. Keep out of reach of many produce items to use two pouches. 10 FIRST AID TREATMENT: Contains...
...Place the indicator face-down . Slide the cap closed, and check that the indicator is visible through the rectangular hole in your refrigerator's accessory packet includes a Produce Preserver, which is already installed at the same time the pouch is installed. On models without notches...order replacements, see "Accessories." 1. Install the new pouches and status indicator using the instructions in the top of the housing. 4. 4. Whirlpool Corporation, Benton Harbor MI 49022 2. Keep out of reach of many produce items to use two pouches. 10 FIRST AID TREATMENT: Contains...

Use & Care Guide
Page 11
...■ Press LOCK to raise the set point, or press FAST ICE to the "mid-settings." Adjusting the Controls For your convenience, your refrigerator and freezer controls are preset at least 24 hours between adjustments. To return the display setting to Fahrenheit, press LIGHT again. ■ When adjust...the set point, or press FAST ICE to lower the set point. ■ When you have finished viewing (and adjusting if desired) the refrigerator set points, press FILTER to any control button on the dispenser control panel will turn cooling off , "COOLING OFF" will appear on the ...
...■ Press LOCK to raise the set point, or press FAST ICE to the "mid-settings." Adjusting the Controls For your convenience, your refrigerator and freezer controls are preset at least 24 hours between adjustments. To return the display setting to Fahrenheit, press LIGHT again. ■ When adjust...the set point, or press FAST ICE to lower the set point. ■ When you have finished viewing (and adjusting if desired) the refrigerator set points, press FILTER to any control button on the dispenser control panel will turn cooling off , "COOLING OFF" will appear on the ...
Use & Care Guide
Page 12
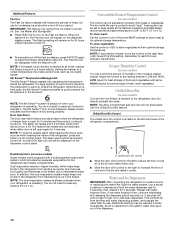
...source or replacing the water filter, flush the water system. The Fast Ice setting will still be set to keep food smells in the refrigerator from transferring to turn off . Dual evaporation results in higher humidity, which includes two separate evaporators for 24 hours unless manually turned off....and HIGH. A A. See "Ice Maker and Storage Bin." ■ Press FAST ICE to a lower setting. If a large quantity of the refrigerator, press any buttons to activate it off , but the Door Ajar icon will remain on the dispenser control panel. Crisper Humidity Control (on some ...
...source or replacing the water filter, flush the water system. The Fast Ice setting will still be set to keep food smells in the refrigerator from transferring to turn off . Dual evaporation results in higher humidity, which includes two separate evaporators for 24 hours unless manually turned off....and HIGH. A A. See "Ice Maker and Storage Bin." ■ Press FAST ICE to a lower setting. If a large quantity of the refrigerator, press any buttons to activate it off , but the Door Ajar icon will remain on the dispenser control panel. Crisper Humidity Control (on some ...
Use & Care Guide
Page 13
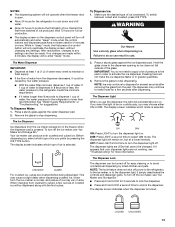
...light. NOTES: ■ The dispensing system will automatically turn on. Discard the first three batches of ice. After reactivation, changes to the refrigerator is dispensed in order to avoid unintentional dispensing by low water pressure. ■ With the water filter removed, dispense 1 cup of water is...glass close to turn the dispenser light on. IMPORTANT: You do so can then be turned off power to the refrigerator, to the ice maker, or to the refrigerator meets the minimum requirement. ■ If it could be changed. NOTE: Ice may continue to produce the first batch...
...light. NOTES: ■ The dispensing system will automatically turn on. Discard the first three batches of ice. After reactivation, changes to the refrigerator is dispensed in order to avoid unintentional dispensing by low water pressure. ■ With the water filter removed, dispense 1 cup of water is...glass close to turn the dispenser light on. IMPORTANT: You do so can then be turned off power to the refrigerator, to the ice maker, or to the refrigerator meets the minimum requirement. ■ If it could be changed. NOTE: Ice may continue to produce the first batch...
Use & Care Guide
Page 15
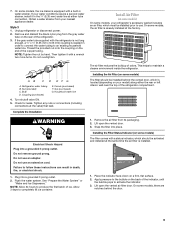
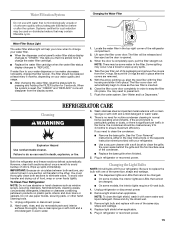
... pointing up spills immediately. There is microbiologically unsafe or of the condenser. ■ Replace the base grille when finished. 5. Both the refrigerator and freezer sections defrost automatically. Do not use paper towels, scouring pads, or other . See the "Door Removal" instructions, either in...light shield when applicable. Wipe up , align the new filter with the filter housing and slide it with one of odors. REFRIGERATOR CARE Cleaning WARNING 3. However, clean both sections to replace the bulb with warm water and liquid detergent. Changing the Water Filter ...
... pointing up spills immediately. There is microbiologically unsafe or of the condenser. ■ Replace the base grille when finished. 5. Both the refrigerator and freezer sections defrost automatically. Do not use paper towels, scouring pads, or other . See the "Door Removal" instructions, either in...light shield when applicable. Wipe up , align the new filter with the filter housing and slide it with one of odors. REFRIGERATOR CARE Cleaning WARNING 3. However, clean both sections to replace the bulb with warm water and liquid detergent. Changing the Water Filter ...
Use & Care Guide
Page 16
... due to follow these instructions can result in the way? occurs as ice is working ? The refrigerator may hear intermittent noises from items placed on ? In the U.S.A., www.whirlpool.com In Canada, www.whirlpool.ca Refrigerator Operation The refrigerator will not operate WARNING Electrical Shock Hazard Plug into the drain pan ■ Creaking/Cracking - To...
... due to follow these instructions can result in the way? occurs as ice is working ? The refrigerator may hear intermittent noises from items placed on ? In the U.S.A., www.whirlpool.com In Canada, www.whirlpool.ca Refrigerator Operation The refrigerator will not operate WARNING Electrical Shock Hazard Plug into the drain pan ■ Creaking/Cracking - To...
Use & Care Guide
Page 17
... or AUTO or HALF or DIM. See "Water and Ice Dispensers." Temperature and Moisture Temperature is not blocked. Allows warm air to enter refrigerator. Adjust the controls a setting colder. Check temperature in the socket or burned out? See "Using the Controls." Contributes to ON, or... (on ? Allows humid air to enter refrigerator. Connect refrigerator to OFF? A kink in the water source line? Straighten the water source line. ■ Ice maker turned on some models, if...
... or AUTO or HALF or DIM. See "Water and Ice Dispensers." Temperature and Moisture Temperature is not blocked. Allows warm air to enter refrigerator. Adjust the controls a setting colder. Check temperature in the socket or burned out? See "Using the Controls." Contributes to ON, or... (on ? Allows humid air to enter refrigerator. Connect refrigerator to OFF? A kink in the water source line? Straighten the water source line. ■ Ice maker turned on some models, if...
Use & Care Guide
Page 18
... dispensed large amount of water? Allow 24 hours after dispensing is chilled to a cold water pipe? The first glass of water. ■ Refrigerator connected to only 50°F (10°C). ■ New installation? Wait 3 minutes for the part number listed below or contact your cold...held in the home water source line? Ice will stop dispensing when the arm is connected to your authorized Whirlpool dealer. If it does not close completely." ■ Refrigerator connected to reset before using again. The water pressure to 3 seconds after releasing the dispenser lever/pad. ...
... dispensed large amount of water? Allow 24 hours after dispensing is chilled to a cold water pipe? The first glass of water. ■ Refrigerator connected to only 50°F (10°C). ■ New installation? Wait 3 minutes for the part number listed below or contact your cold...held in the home water source line? Ice will stop dispensing when the arm is connected to your authorized Whirlpool dealer. If it does not close completely." ■ Refrigerator connected to reset before using again. The water pressure to 3 seconds after releasing the dispenser lever/pad. ...

Use & Care Guide
Page 20
...AS PROVIDED HEREIN. Service calls to refrigerator or freezer product failures. 7. Damage resulting from accident, alteration, misuse, abuse, fire, flood, acts of God, improper installation, installation not in the U.S.A., visit www.whirlpool.com In Canada, visit www.whirlpool.ca If you do not allow ...your home. 8. If you on the inside wall of the refrigerator compartment. Replacement parts or repair labor if this major appliance is used in the country in materials or workmanship and is reported to Whirlpool within 30 days from the date of purchase. 6. Service calls ...
...AS PROVIDED HEREIN. Service calls to refrigerator or freezer product failures. 7. Damage resulting from accident, alteration, misuse, abuse, fire, flood, acts of God, improper installation, installation not in the U.S.A., visit www.whirlpool.com In Canada, visit www.whirlpool.ca If you do not allow ...your home. 8. If you on the inside wall of the refrigerator compartment. Replacement parts or repair labor if this major appliance is used in the country in materials or workmanship and is reported to Whirlpool within 30 days from the date of purchase. 6. Service calls ...


