
Owners Manual
Page 1
... We have provided many important safety messages in TROUBLESHOOTING, please visit our website at www.whirlpool.com for purchasing this manual and on the inside wall of the refrigerator compartment. This symbol alerts you to reduce the chance of others . In Canada, visit... our website at www.whirlpool.ca or call us at 1-800-253-1301. Always read and obey all safety messages. Table of Contents / Índice / Table des matières REFRIGERATOR SAFETY 1 INSTALLATION INSTRUCTIONS 2 REFRIGERATOR USE 9 REFRIGERATOR CARE 13 TROUBLESHOOTING 14 ACCESSORIES 16 ...
... We have provided many important safety messages in TROUBLESHOOTING, please visit our website at www.whirlpool.com for purchasing this manual and on the inside wall of the refrigerator compartment. This symbol alerts you to reduce the chance of others . In Canada, visit... our website at www.whirlpool.ca or call us at 1-800-253-1301. Always read and obey all safety messages. Table of Contents / Índice / Table des matières REFRIGERATOR SAFETY 1 INSTALLATION INSTRUCTIONS 2 REFRIGERATOR USE 9 REFRIGERATOR CARE 13 TROUBLESHOOTING 14 ACCESSORIES 16 ...

Owners Manual
Page 2
... glass shelves or covers with cardboard or hardboard to do so can damage the surface of the past. Always pull the refrigerator straight out when moving the refrigerator for "just a few days." Shelves and covers may not easily climb inside. This is normal. Remove packaging materials. .... 2 For more people to move it . When moving it , as floor damage could occur. even if they are not problems of your refrigerator. IMPORTANT: Child entrapment and suffocation are cold. These products can result in back or other injury. Do not use an extension cord. ■...
... glass shelves or covers with cardboard or hardboard to do so can damage the surface of the past. Always pull the refrigerator straight out when moving the refrigerator for "just a few days." Shelves and covers may not easily climb inside. This is normal. Remove packaging materials. .... 2 For more people to move it . When moving it , as floor damage could occur. even if they are not problems of your refrigerator. IMPORTANT: Child entrapment and suffocation are cold. These products can result in back or other injury. Do not use an extension cord. ■...

Owners Manual
Page 3
...into your home, measure the doorway of Fitting 8 Leveling A B 1 Base Grille Raise Lower C A. Face of your home to remove the refrigerator and freezer doors. Leveler Bracket C. Wiring Clip E. Wiring Plugs 2 Water Dispenser Tubing Connection A A A. Bottom Hinge B. IMPORTANT: Before you ...instructions for future reference. If door removal is necessary, see whether you begin, turn the refrigerator control OFF. Failure to 90˚ A Raise Lower A. Unplug refrigerator or disconnect power. Routing Plate C. Alignment Screw 3 Door Removal, Leveling and Alignment Gather ...
...into your home, measure the doorway of Fitting 8 Leveling A B 1 Base Grille Raise Lower C A. Face of your home to remove the refrigerator and freezer doors. Leveler Bracket C. Wiring Clip E. Wiring Plugs 2 Water Dispenser Tubing Connection A A A. Bottom Hinge B. IMPORTANT: Before you ...instructions for future reference. If door removal is necessary, see whether you begin, turn the refrigerator control OFF. Failure to 90˚ A Raise Lower A. Unplug refrigerator or disconnect power. Routing Plate C. Alignment Screw 3 Door Removal, Leveling and Alignment Gather ...

Owners Manual
Page 4
... connector attached to the connections beneath the freezer. The door cannot be any adjustable door or utility bins from under the refrigerator. Assistance may be needed . NOTE: Provide additional support for the doors while the top hinges are tightened properly, there ... behind the hinges. IMPORTANT: Do not remove either screw A. 10. Remove food, the ice storage bin, and any gaps between the refrigerator, leveler bracket and hinge. Disconnect the water tubing, located behind the hinges. See Graphic 4. IMPORTANT: Do not remove either screw A. ...
... connector attached to the connections beneath the freezer. The door cannot be any adjustable door or utility bins from under the refrigerator. Assistance may be needed . NOTE: Provide additional support for the doors while the top hinges are tightened properly, there ... behind the hinges. IMPORTANT: Do not remove either screw A. 10. Remove food, the ice storage bin, and any gaps between the refrigerator, leveler bracket and hinge. Disconnect the water tubing, located behind the hinges. See Graphic 4. IMPORTANT: Do not remove either screw A. ...

Owners Manual
Page 5
...door. 3. Open the freezer door and repeat the previous steps to lower that they are still not aligned after checking the leveling and loading the refrigerator with one on the bottom hinge of the routing plate. 5. See Graphic 2. ■ Reinstall the P-clamp around the small wiring bundle (with...Use a ¹⁄₄" open -ended or adjustable wrench to turn the screw to the electrical housing, then push the housing back under the refrigerator. Open both doors to adjust the leveling feet. This will be taut. If the doors are no longer touching the ground. Use a open -ended...
...door. 3. Open the freezer door and repeat the previous steps to lower that they are still not aligned after checking the leveling and loading the refrigerator with one on the bottom hinge of the routing plate. 5. See Graphic 2. ■ Reinstall the P-clamp around the small wiring bundle (with...Use a ¹⁄₄" open -ended or adjustable wrench to turn the screw to the electrical housing, then push the housing back under the refrigerator. Open both doors to adjust the leveling feet. This will be taut. If the doors are no longer touching the ground. Use a open -ended...

Owners Manual
Page 6
...use an adapter. It is important to slide it is recommended that a separate circuit serving only your model) to allow for your refrigerator into a grounded 3 prong outlet. See "Using the Controls." 6 NOTE: Some models have the proper electrical connection. Electrical Requirements ...WARNING Electrical Shock Hazard Plug into its final location, it down onto the shoulder screws. Remove handles from refrigerator. Do not use a Phillips screwdriver to the shoulder screws. Failure to swing open. 2" (5.08 cm) NOTES: ■ It...
...use an adapter. It is important to slide it is recommended that a separate circuit serving only your model) to allow for your refrigerator into a grounded 3 prong outlet. See "Using the Controls." 6 NOTE: Some models have the proper electrical connection. Electrical Requirements ...WARNING Electrical Shock Hazard Plug into its final location, it down onto the shoulder screws. Remove handles from refrigerator. Do not use a Phillips screwdriver to the shoulder screws. Failure to swing open. 2" (5.08 cm) NOTES: ■ It...

Owners Manual
Page 7
...;" Open-end or two adjustable wrenches Drill bit ■ Cordless drill NOTE: Your refrigerator dealer has a kit available with any local codes and ordinances. ■ Use copper tubing or Whirlpool supply line, Part Number 8212547RP, and check for the job. NOTE: To allow the... refrigerator to refill after heavy usage. ■ If your water pressure, call a licensed, qualified plumber. ...
...;" Open-end or two adjustable wrenches Drill bit ■ Cordless drill NOTE: Your refrigerator dealer has a kit available with any local codes and ordinances. ■ Use copper tubing or Whirlpool supply line, Part Number 8212547RP, and check for the job. NOTE: To allow the... refrigerator to refill after heavy usage. ■ If your water pressure, call a licensed, qualified plumber. ...

Owners Manual
Page 8
... part that leak. Tighten the compression nut. Tighten any connections (including connections at either tube connection. Style 3 1. Unplug refrigerator or disconnect power. 2. Bulb D. Complete the Installation WARNING Electrical Shock Hazard Plug into a grounded 3 prong outlet. 2. Failure... onto the coupling on some models) On some models, the ice maker is pushed back against the wall. 5. AB C D EFG A. Refrigerator water tubing B. Nut (provided) C. Coupling (purchased) E. Ferrule (purchased) F. Household water line 4. Turn shutoff valve ON. 5. Check for...
... part that leak. Tighten the compression nut. Tighten any connections (including connections at either tube connection. Style 3 1. Unplug refrigerator or disconnect power. 2. Bulb D. Complete the Installation WARNING Electrical Shock Hazard Plug into a grounded 3 prong outlet. 2. Failure... onto the coupling on some models) On some models, the ice maker is pushed back against the wall. 5. AB C D EFG A. Refrigerator water tubing B. Nut (provided) C. Coupling (purchased) E. Ferrule (purchased) F. Household water line 4. Turn shutoff valve ON. 5. Check for...

Owners Manual
Page 9
... will turn off automatically and enter "sleep" mode when the control buttons and dispenser levers have finished viewing (and adjusting if desired) the refrigerator set point, press TEMP to change the display to show the freezer set points are preset at least 24 hours between adjustments. If no ...changes are made . Place the indicator face-down into the refrigerator. Apply pressure to the bubble on the dispenser control panel will re-enter "sleep" mode. ■ Touch any faster. ■ If the...
... will turn off automatically and enter "sleep" mode when the control buttons and dispenser levers have finished viewing (and adjusting if desired) the refrigerator set point, press TEMP to change the display to show the freezer set points are preset at least 24 hours between adjustments. If no ...changes are made . Place the indicator face-down into the refrigerator. Apply pressure to the bubble on the dispenser control panel will re-enter "sleep" mode. ■ Touch any faster. ■ If the...

Owners Manual
Page 10
...the three MEAT settings to -15°C). Adjust the control to save the settings. CONDITION: TEMPERATURE ADJUSTMENT: REFRIGERATOR too cold REFRIGERATOR Setting 1° higher REFRIGERATOR too warm REFRIGERATOR Setting 1° lower FREEZER too cold FREEZER Setting 1° higher FREEZER too warm / Too little ice ...dual evaporation system helps keep meats at exactly the same time. NOTE: The dual evaporation system is always activated when your refrigerator is placed in adjust mode, or allow about 60 seconds of fruits and vegetables with skins. NOTE: To exit without...
...the three MEAT settings to -15°C). Adjust the control to save the settings. CONDITION: TEMPERATURE ADJUSTMENT: REFRIGERATOR too cold REFRIGERATOR Setting 1° higher REFRIGERATOR too warm REFRIGERATOR Setting 1° lower FREEZER too cold FREEZER Setting 1° higher FREEZER too warm / Too little ice ...dual evaporation system helps keep meats at exactly the same time. NOTE: The dual evaporation system is always activated when your refrigerator is placed in adjust mode, or allow about 60 seconds of fruits and vegetables with skins. NOTE: To exit without...

Owners Manual
Page 11
... against the water dispenser lever. 2. Pressing hard will turn off the ice maker, see "Ice Maker and Storage Bin." Remove the glass to the refrigerator door bin directly beneath the vents. The Ice Dispenser Ice dispenses from the system, water may vary in some models) Cool air from the filter... when dispensing ice. IMPORTANT: You do so can rack are not associated with the first cubes. NOTE: Ice may continue to make noise for the refrigerator to cool down and chill water. ■ Allow 24 hours to any settings. To Dispense Water: 1. Your ice maker can then be required in...
... against the water dispenser lever. 2. Pressing hard will turn off the ice maker, see "Ice Maker and Storage Bin." Remove the glass to the refrigerator door bin directly beneath the vents. The Ice Dispenser Ice dispenses from the system, water may vary in some models) Cool air from the filter... when dispensing ice. IMPORTANT: You do so can rack are not associated with the first cubes. NOTE: Ice may continue to make noise for the refrigerator to cool down and chill water. ■ Allow 24 hours to any settings. To Dispense Water: 1. Your ice maker can then be required in...

Owners Manual
Page 12
... maker and lead to the OFF (right) position. The sensor cover ("flipper door"), located on . The release lever will automatically turn off power to the refrigerator, to the ice maker, or to lock the dispenser. ■ Press and hold the base of or in all the way or the dispenser will...
... maker and lead to the OFF (right) position. The sensor cover ("flipper door"), located on . The release lever will automatically turn off power to the refrigerator, to the ice maker, or to lock the dispenser. ■ Press and hold the base of or in all the way or the dispenser will...

Owners Manual
Page 13
...spilling may need for 3 seconds. The filter cover door will disappear from the O-rings. See "Water and Ice Dispensers." Both the refrigerator and freezer sections defrost automatically. However, clean both sections to "REPLACE." You must thoroughly clean both sections about once a month to wipe... the condenser should be cleaned every 2 to 3 months to change the filter sooner. Use a towel to avoid buildup of the refrigerator compartment. 2. Explosion Hazard Use nonflammable cleaner. To avoid odor transfer and drying out of its packaging and remove the covers from the ...
...spilling may need for 3 seconds. The filter cover door will disappear from the O-rings. See "Water and Ice Dispensers." Both the refrigerator and freezer sections defrost automatically. However, clean both sections to "REPLACE." You must thoroughly clean both sections about once a month to wipe... the condenser should be cleaned every 2 to 3 months to change the filter sooner. Use a towel to avoid buildup of the refrigerator compartment. 2. Explosion Hazard Use nonflammable cleaner. To avoid odor transfer and drying out of its packaging and remove the covers from the ...

Owners Manual
Page 14
... to fill the ice maker ■ Clicking/Snapping - Plug in the way? In the U.S.A., www.whirlpool.com In Canada, www.whirlpool.ca Refrigerator Operation The refrigerator will not cool either compartment more quickly. Below are on ? Make sure the refrigerator controls are listed some normal sounds with warm water and liquid detergent. contraction/expansion of...
... to fill the ice maker ■ Clicking/Snapping - Plug in the way? In the U.S.A., www.whirlpool.com In Canada, www.whirlpool.ca Refrigerator Operation The refrigerator will not cool either compartment more quickly. Below are on ? Make sure the refrigerator controls are listed some normal sounds with warm water and liquid detergent. contraction/expansion of...

Owners Manual
Page 15
...the line can reduce water flow. Off-taste, odor or gray color in 24 hours. Use airtight, moisture-proof packaging to enter refrigerator. Failure to open WARNING Explosion Hazard Use nonflammable cleaner. Check temperature in the ice ■ New plumbing connections? A kink in the...; Is there a water filter installed on ? Ice and Water The ice maker is not producing ice or not enough ice ■ Refrigerator connected to enter refrigerator. Discard ice. See the "Door Removal" instructions, either in death, explosion, or fire. ■ Are the gaskets dirty or sticky...
...the line can reduce water flow. Off-taste, odor or gray color in 24 hours. Use airtight, moisture-proof packaging to enter refrigerator. Failure to open WARNING Explosion Hazard Use nonflammable cleaner. Check temperature in the ice ■ New plumbing connections? A kink in the...; Is there a water filter installed on ? Ice and Water The ice maker is not producing ice or not enough ice ■ Refrigerator connected to enter refrigerator. Discard ice. See the "Door Removal" instructions, either in death, explosion, or fire. ■ Are the gaskets dirty or sticky...

Owners Manual
Page 16
... to 3 seconds after dispensing is leaking from the dispenser. Connect refrigerator to cool completely. ■ Water not been recently dispensed? See "Water Supply Requirements." Use warm water to your authorized Whirlpool dealer. The water pressure to a water supply and the supply... shutoff valve turned on the refrigerator? Water is normal. ■ Glass not being held in the ice storage bin...
... to 3 seconds after dispensing is leaking from the dispenser. Connect refrigerator to cool completely. ■ Water not been recently dispensed? See "Water Supply Requirements." Use warm water to your authorized Whirlpool dealer. The water pressure to a water supply and the supply... shutoff valve turned on the refrigerator? Water is normal. ■ Glass not being held in the ice storage bin...

Owners Manual
Page 18
...do not have access to the Internet and you need further assistance, you . LIMITATION OF REMEDIES; You can write to Whirlpool with Whirlpool's published installation instructions. 11. YOUR SOLE AND EXCLUSIVE REMEDY UNDER THIS LIMITED WARRANTY SHALL BE PRODUCT REPAIR AS PROVIDED HEREIN... intended to be provided by an authorized Whirlpool servicer is not available. 10. In Canada, call 1-800-253-1301. Service calls to refrigerator or freezer product failures. 7. The removal and reinstallation of the refrigerator compartment. WHIRLPOOL SHALL NOT BE LIABLE FOR INCIDENTAL OR ...
...do not have access to the Internet and you need further assistance, you . LIMITATION OF REMEDIES; You can write to Whirlpool with Whirlpool's published installation instructions. 11. YOUR SOLE AND EXCLUSIVE REMEDY UNDER THIS LIMITED WARRANTY SHALL BE PRODUCT REPAIR AS PROVIDED HEREIN... intended to be provided by an authorized Whirlpool servicer is not available. 10. In Canada, call 1-800-253-1301. Service calls to refrigerator or freezer product failures. 7. The removal and reinstallation of the refrigerator compartment. WHIRLPOOL SHALL NOT BE LIABLE FOR INCIDENTAL OR ...

Dimension Guide
Page 1
...and then disconnect the refrigerator from the electrical source. However, if the product is placed against an extended wall and the ability to remove the crisper pans is desired, an additional 18" (45.72 cm) of cabinet width is recommended. Because Whirlpool Corporation policy includes a...a separate circuit serving only your cold water supply, the water pressure to the reverse osmosis system needs to be turned off by Side Refrigerator PRODUCT MODEL NUMBERS GSF26C4EX GSF26C5EX GSS26C4XX GSS26C5XX WSF26C2EX WSF26C3EX WSF26D2EX WSF26D4EX Electrical: A 115-Volt, 60-Hz., AC-only 15- Water: ...
...and then disconnect the refrigerator from the electrical source. However, if the product is placed against an extended wall and the ability to remove the crisper pans is desired, an additional 18" (45.72 cm) of cabinet width is recommended. Because Whirlpool Corporation policy includes a...a separate circuit serving only your cold water supply, the water pressure to the reverse osmosis system needs to be turned off by Side Refrigerator PRODUCT MODEL NUMBERS GSF26C4EX GSF26C5EX GSS26C4XX GSS26C5XX WSF26C2EX WSF26C3EX WSF26D2EX WSF26D4EX Electrical: A 115-Volt, 60-Hz., AC-only 15- Water: ...

Warranty
Page 1
... CONSEQUENTIAL DAMAGES. In Canada, call 1-800-253-1301. Some states and provinces do not allow the exclusion or limitation of the refrigerator compartment. Service must be repaired in your authorized Whirlpool dealer to published user or operator instructions and/or installation instructions. 2. Some states and provinces do not have other rights that...
... CONSEQUENTIAL DAMAGES. In Canada, call 1-800-253-1301. Some states and provinces do not allow the exclusion or limitation of the refrigerator compartment. Service must be repaired in your authorized Whirlpool dealer to published user or operator instructions and/or installation instructions. 2. Some states and provinces do not have other rights that...
Energy Guide
Page 1
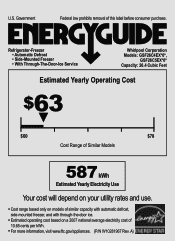
... of 10.65 cents per kWh. • For more information, visit www.ftc.gov/appliances. (P/N W10281967 Rev. A) U.S. Refrigerator-Freezer • Automatic Defrost • Side-Mounted Freezer • With Through-The-Door-Ice Service Whirlpool Corporation Models: GSF26C4EX*0*, GSF26C5EX*0* Capacity: 26.4 Cubic Feet Estimated Yearly Operating Cost $63 ▼ $60 $78 Cost Range...
... of 10.65 cents per kWh. • For more information, visit www.ftc.gov/appliances. (P/N W10281967 Rev. A) U.S. Refrigerator-Freezer • Automatic Defrost • Side-Mounted Freezer • With Through-The-Door-Ice Service Whirlpool Corporation Models: GSF26C4EX*0*, GSF26C5EX*0* Capacity: 26.4 Cubic Feet Estimated Yearly Operating Cost $63 ▼ $60 $78 Cost Range...


