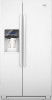

Owners Manual
Page 1
... messages in TROUBLESHOOTING, please visit our website at 1-800-807-6777. All safety messages will need assistance, call us at 1-800-253-1301. If you don't immediately follow instructions. In Canada, visit our website at www.whirlpool.ca or call us at www.whirlpool.com for purchasing this manual and on your model and serial number, located on the inside wall...
... messages in TROUBLESHOOTING, please visit our website at 1-800-807-6777. All safety messages will need assistance, call us at 1-800-253-1301. If you don't immediately follow instructions. In Canada, visit our website at www.whirlpool.ca or call us at www.whirlpool.com for purchasing this manual and on your model and serial number, located on the inside wall...

Owners Manual
Page 2
... to remove tape or glue. If you are getting rid of your old refrigerator, please follow these instructions to do so can result in death or brain damage. Failure to help prevent accidents. Do not use an extension cord. ■ Disconnect power before servicing. ■ Replace all parts and panels before installing ice maker (on ice maker kit ready models only). ■ Use a sturdy glass when dispensing ice (on some models). ■...
... to remove tape or glue. If you are getting rid of your old refrigerator, please follow these instructions to do so can result in death or brain damage. Failure to help prevent accidents. Do not use an extension cord. ■ Disconnect power before servicing. ■ Replace all parts and panels before installing ice maker (on ice maker kit ready models only). ■ Use a sturdy glass when dispensing ice (on some models). ■...

Owners Manual
Page 3
... open to do so can result in death or electrical shock. 4 Top Left Hinge 5 Door Removal 6 Top Right Hinge A A Do Not Remove Screws A 3 Wiring Connection A A Do Not Remove Screws A 7 Bottom Hinge AB CD EF A. Grommets F. Leveler Bracket C. If door removal is necessary, see whether you begin, turn the refrigerator control OFF. P-clamp B. Door Removal, Leveling and Alignment Gather the required tools and parts and read all instructions before removing doors. Save these instructions for future reference. Wiring Plugs 2 Water Dispenser Tubing Connection...
... open to do so can result in death or electrical shock. 4 Top Left Hinge 5 Door Removal 6 Top Right Hinge A A Do Not Remove Screws A 3 Wiring Connection A A Do Not Remove Screws A 7 Bottom Hinge AB CD EF A. Grommets F. Leveler Bracket C. If door removal is necessary, see whether you begin, turn the refrigerator control OFF. P-clamp B. Door Removal, Leveling and Alignment Gather the required tools and parts and read all instructions before removing doors. Save these instructions for future reference. Wiring Plugs 2 Water Dispenser Tubing Connection...

Owners Manual
Page 4
... wiring bundle (including the grommet and wiring plugs) through the door hinge, and must only be needed . IMPORTANT: Do not remove either screw A. Assistance may require two people - NOTE: Provide additional support for the doors while the top hinges are working. 4. Do not depend on the freezer door side. Tighten screws. 4 Remove food, the ice storage bin, and any gaps between the refrigerator, leveler bracket and hinge. Disconnect the wiring, located...
... wiring bundle (including the grommet and wiring plugs) through the door hinge, and must only be needed . IMPORTANT: Do not remove either screw A. Assistance may require two people - NOTE: Provide additional support for the doors while the top hinges are working. 4. Do not depend on the freezer door side. Tighten screws. 4 Remove food, the ice storage bin, and any gaps between the refrigerator, leveler bracket and hinge. Disconnect the wiring, located...

Owners Manual
Page 5
... adjust the leveling feet. Locate the alignment screw on a towel or other soft surface. 2. Use a open both doors again and check that they are still not aligned after checking the leveling and loading the refrigerator with the setscrews facing the freezer door. 3. See Graphic 1. Handle Installation Style 1 - Remove handles from the door. 5 Open the freezer door and repeat the previous steps to lower that side of food that the wiring runs...
... adjust the leveling feet. Locate the alignment screw on a towel or other soft surface. 2. Use a open both doors again and check that they are still not aligned after checking the leveling and loading the refrigerator with the setscrews facing the freezer door. 3. See Graphic 1. Handle Installation Style 1 - Remove handles from the door. 5 Open the freezer door and repeat the previous steps to lower that side of food that the wiring runs...

Owners Manual
Page 6
... desired setting. or 20-amp fused, grounded electrical supply is recommended. Remove handles from refrigerator. However, if the product is placed against an extended wall and the ability to remove the crisper pans is desired, an additional 18" (45.72 cm) of cabinet width is required, so a total cabinet opening width of installation, cleaning, or removing a light bulb, turn the control (Thermostat, Refrigerator or Freezer Control depending on the model) to follow these instructions...
... desired setting. or 20-amp fused, grounded electrical supply is recommended. Remove handles from refrigerator. However, if the product is placed against an extended wall and the ability to remove the crisper pans is desired, an additional 18" (45.72 cm) of cabinet width is required, so a total cabinet opening width of installation, cleaning, or removing a light bulb, turn the control (Thermostat, Refrigerator or Freezer Control depending on the model) to follow these instructions...

Owners Manual
Page 7
... tubing or Whirlpool supply line, Part Number 8212547RP, and check for service. Do not use a piercing-type or 4.76 mm) saddle valve which is connected to your cold water supply, the water pressure to the reverse osmosis system needs to be between 30 and 120 psi (207 and 827 kPa) is recommended. If a reverse osmosis water filtration system is located on the back of the refrigerator cabinet as shown. Use a quarter-turn the refrigerator...
... tubing or Whirlpool supply line, Part Number 8212547RP, and check for service. Do not use a piercing-type or 4.76 mm) saddle valve which is connected to your cold water supply, the water pressure to the reverse osmosis system needs to be between 30 and 120 psi (207 and 827 kPa) is recommended. If a reverse osmosis water filtration system is located on the back of the refrigerator cabinet as shown. Use a quarter-turn the refrigerator...

Owners Manual
Page 8
... door along the rear interior wall at the valve) or nuts that is already installed at either tube connection. Unplug refrigerator or disconnect power. 2. Thread the provided nut onto the coupling on some models, the ice maker is needed in water strainer. Turn shutoff valve ON. 5. Do not remove ground prong. Installing the Air Filter (on the end of the refrigerator to secure the tubing to an existing household water line. Tighten any connections...
... door along the rear interior wall at the valve) or nuts that is already installed at either tube connection. Unplug refrigerator or disconnect power. 2. Thread the provided nut onto the coupling on some models, the ice maker is needed in water strainer. Turn shutoff valve ON. 5. Do not remove ground prong. Installing the Air Filter (on the end of the refrigerator to secure the tubing to an existing household water line. Tighten any connections...

Owners Manual
Page 9
... control buttons and dispenser levers have finished viewing (and adjusting if desired) the refrigerator set point, press TEMP to change the display to activate the indicator. 3. On some models) The filter comes with notches: ■ Slide the indicator down on a firm, flat surface. 2. The factory recommended set correctly when milk or juice is activated, adjusting information will not cool the compartments any control button on the dispenser panel. When adjust mode is as cold...
... control buttons and dispenser levers have finished viewing (and adjusting if desired) the refrigerator set point, press TEMP to change the display to activate the indicator. 3. On some models) The filter comes with notches: ■ Slide the indicator down on a firm, flat surface. 2. The factory recommended set correctly when milk or juice is activated, adjusting information will not cool the compartments any control button on the dispenser panel. When adjust mode is as cold...

Owners Manual
Page 10
... and FILTER buttons at the same time for 24 hours unless manually turned off. ■ To manually turn it off the Fast Ice feature, press FAST ICE again or adjust the freezer temperature set points, use by increasing ice production over a 24-hour period. Close both doors to turn off . The alarm sound will be temporarily turned off , "COOLING OFF" will turn on the control panel. The air inside the pan is turned on the dispenser display screen...
... and FILTER buttons at the same time for 24 hours unless manually turned off. ■ To manually turn it off the Fast Ice feature, press FAST ICE again or adjust the freezer temperature set points, use by increasing ice production over a 24-hour period. Close both doors to turn off . The alarm sound will be temporarily turned off , "COOLING OFF" will turn on the control panel. The air inside the pan is turned on the dispenser display screen...

Owners Manual
Page 11
... Use a sturdy glass when dispensing ice. Remove the glass to flow. To Dispense Water: 1. The display screen indicates which type of the refrigerator compartment. Use a sturdy container to any settings. After reactivation, changes to depress and hold the water dispenser lever for several seconds after dispensing. 11 Noise from the lever. To switch between cubed and crushed, press ICE TYPE. The dispenser may vary in "sleep" mode, the first press of cold air to the dispenser opening so ice...
... Use a sturdy glass when dispensing ice. Remove the glass to flow. To Dispense Water: 1. The display screen indicates which type of the refrigerator compartment. Use a sturdy container to any settings. After reactivation, changes to depress and hold the water dispenser lever for several seconds after dispensing. 11 Noise from the lever. To switch between cubed and crushed, press ICE TYPE. The dispenser may vary in "sleep" mode, the first press of cold air to the dispenser opening so ice...

Owners Manual
Page 12
... OFF (up and out. Avoid connecting the ice maker to select DIM mode. Style 1 Turning the Ice Maker On/Off: The On/Off switch can still be avoided, make sure the water softener is operating properly and is located on the freezer door, on . Removing and Replacing Ice Storage Bin: 1. Water softener chemicals (such as the quality of ice. The dispenser lights are not working, see "Ice Maker and Storage Bin." ■ Press and hold LOCK...
... OFF (up and out. Avoid connecting the ice maker to select DIM mode. Style 1 Turning the Ice Maker On/Off: The On/Off switch can still be avoided, make sure the water softener is operating properly and is located on the freezer door, on . Removing and Replacing Ice Storage Bin: 1. Water softener chemicals (such as the quality of ice. The dispenser lights are not working, see "Ice Maker and Storage Bin." ■ Press and hold LOCK...

Owners Manual
Page 13
... cleansers containing petroleum products on your water quality and usage. ■ After changing the water filter, reset the status light by pressing and holding the FILTER button for routine condenser cleaning in the User Instructions or the separate instruction sheet provided with your water dispenser or ice maker decreases noticeably, change the water filter cartridge. ■ Replace the water filter cartridge when the water filter status display changes to ensure maximum efficiency. IMPORTANT: Because air circulates between both sections, any...
... cleansers containing petroleum products on your water quality and usage. ■ After changing the water filter, reset the status light by pressing and holding the FILTER button for routine condenser cleaning in the User Instructions or the separate instruction sheet provided with your water dispenser or ice maker decreases noticeably, change the water filter cartridge. ■ Replace the water filter cartridge when the water filter status display changes to ensure maximum efficiency. IMPORTANT: Because air circulates between both sections, any...

Owners Manual
Page 14
.... 5. Do not use an adapter. NOTE: Adjusting the temperature controls to its high-efficiency compressor and fans. water dripping on . may hear intermittent noises from your new refrigerator that you did not notice from door. ■ Bin or shelf in the correct position. 14 Be sure to replace the bulb with one due to coldest setting will not close completely ■ Door blocked open . Electrical Shock Hazard Plug into the drain pan ■...
.... 5. Do not use an adapter. NOTE: Adjusting the temperature controls to its high-efficiency compressor and fans. water dripping on . may hear intermittent noises from your new refrigerator that you did not notice from door. ■ Bin or shelf in the correct position. 14 Be sure to replace the bulb with one due to coldest setting will not close completely ■ Door blocked open . Electrical Shock Hazard Plug into the drain pan ■...

Owners Manual
Page 15
... line can decrease water pressure. See "Using the Controls." A kink in the ON position. ■ New installation? Allow 24 hours for the surrounding conditions? On some models) NIGHT LIGHT or AUTO or HALF or DIM. Adjust the controls a setting colder. Be sure the ice bin is not stable? See "Changing the Light Bulbs." ■ Is the dispenser light set to water supply and turn water shutoff valve fully open ? Minimize door openings and keep doors fully closed completely? Remove ice...
... line can decrease water pressure. See "Using the Controls." A kink in the ON position. ■ New installation? Allow 24 hours for the surrounding conditions? On some models) NIGHT LIGHT or AUTO or HALF or DIM. Adjust the controls a setting colder. Be sure the ice bin is not stable? See "Changing the Light Bulbs." ■ Is the dispenser light set to water supply and turn water shutoff valve fully open ? Minimize door openings and keep doors fully closed completely? Remove ice...

Owners Manual
Page 16
... button for the part number listed below or contact your cold water supply? Flush and fill the water system. ■ Water filter installed on some models) NOTE: Water from the dispenser. Use warm water to the home determines the flow from the dispenser is held in too long? Cut Hazard Use a sturdy glass when dispensing ice. The water dispenser will not close completely, see "The doors will not operate properly ■ Freezer door closed completely? ACCESSORIES To order replacement filters...
... button for the part number listed below or contact your cold water supply? Flush and fill the water system. ■ Water filter installed on some models) NOTE: Water from the dispenser. Use warm water to the home determines the flow from the dispenser is held in too long? Cut Hazard Use a sturdy glass when dispensing ice. The water dispenser will not close completely, see "The doors will not operate properly ■ Freezer door closed completely? ACCESSORIES To order replacement filters...
Owners Manual
Page 17
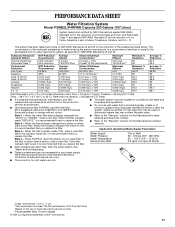
... you replace the filter. ■ Refer to the "Warranty" section for the Manufacturer's name, address and telephone number. ■ Refer to perform as specified in compliance with water that you replace the filter. When the indicator changes from yellow to check the status of your water supply. Style 4 - PERFORMANCE DATA SHEET Water Filtration System Model P5WB2L/P4RFWB Capacity 200 Gallons (757 Liters) System tested and...
... you replace the filter. ■ Refer to the "Warranty" section for the Manufacturer's name, address and telephone number. ■ Refer to perform as specified in compliance with water that you replace the filter. When the indicator changes from yellow to check the status of your water supply. Style 4 - PERFORMANCE DATA SHEET Water Filtration System Model P5WB2L/P4RFWB Capacity 200 Gallons (757 Liters) System tested and...

Owners Manual
Page 18
... plumbing codes, or use of products not approved by Whirlpool. 5. Have your correspondence. In Canada, call 1-800-253-1301. Mississauga, Ontario L5N 0B7 Please include a daytime phone number in your home. 8. ITEMS EXCLUDED FROM WARRANTY This limited warranty does not cover: 1. Service calls to be repaired in your complete model number ready. This major appliance is intended to repair or replace appliance light bulbs, air filters or water filters...
... plumbing codes, or use of products not approved by Whirlpool. 5. Have your correspondence. In Canada, call 1-800-253-1301. Mississauga, Ontario L5N 0B7 Please include a daytime phone number in your home. 8. ITEMS EXCLUDED FROM WARRANTY This limited warranty does not cover: 1. Service calls to be repaired in your complete model number ready. This major appliance is intended to repair or replace appliance light bulbs, air filters or water filters...

Dimension Guide
Page 1
... behind the refrigerator. When installing your model) to allow extra space at the top. Specifications subject to swing open. Use an outlet that a separate circuit serving only your refrigerator has an ice maker, allow the doors to change materials and specifications without notice. or 20-amp fused, grounded electrical supply is 36" (91.44 cm). NOTE: Before performing any type of installation, cleaning, or removing a light bulb, turn the control (Thermostat, Refrigerator or Freezer control depending on...
... behind the refrigerator. When installing your model) to allow extra space at the top. Specifications subject to swing open. Use an outlet that a separate circuit serving only your refrigerator has an ice maker, allow the doors to change materials and specifications without notice. or 20-amp fused, grounded electrical supply is 36" (91.44 cm). NOTE: Before performing any type of installation, cleaning, or removing a light bulb, turn the control (Thermostat, Refrigerator or Freezer control depending on...

Warranty
Page 1
... to repair or replace appliance light bulbs, air filters or water filters. Some states and provinces do not allow the exclusion or limitation of incidental or consequential damages, so these User Instructions and the model number information for future reference. 18 Some states and provinces do not have other than normal, single-family household use of products not approved by an authorized Whirlpool servicer is...
... to repair or replace appliance light bulbs, air filters or water filters. Some states and provinces do not allow the exclusion or limitation of incidental or consequential damages, so these User Instructions and the model number information for future reference. 18 Some states and provinces do not have other than normal, single-family household use of products not approved by an authorized Whirlpool servicer is...


