
Owners Manual
Page 1
... is the safety alert symbol. In Canada, visit our website at www.whirlpool.ca or call us at 1-800-807-6777. Table of Contents / Índice / Table des matières REFRIGERATOR SAFETY 1 INSTALLATION INSTRUCTIONS 2 REFRIGERATOR USE 9 REFRIGERATOR CARE 13 TROUBLESHOOTING 14 ACCESSORIES 16 SEGURIDAD ... DE SU REFRIGERADOR 32 SOLUCIÓN DE PROBLEMAS 33 ACCESORIOS 35 SÉCURITÉ DU RÉFRIGÉRATEUR 39 INSTRUCTIONS D'INSTALLATION 40 UTILISATION DU RÉFRIGÉRATEUR 48 ENTRETIEN DU RÉFRIGÉRATEUR 53 DÉPANNAGE 54 ACCESSOIRES 56 WATER FILTER ...
... is the safety alert symbol. In Canada, visit our website at www.whirlpool.ca or call us at 1-800-807-6777. Table of Contents / Índice / Table des matières REFRIGERATOR SAFETY 1 INSTALLATION INSTRUCTIONS 2 REFRIGERATOR USE 9 REFRIGERATOR CARE 13 TROUBLESHOOTING 14 ACCESSORIES 16 SEGURIDAD ... DE SU REFRIGERADOR 32 SOLUCIÓN DE PROBLEMAS 33 ACCESORIOS 35 SÉCURITÉ DU RÉFRIGÉRATEUR 39 INSTRUCTIONS D'INSTALLATION 40 UTILISATION DU RÉFRIGÉRATEUR 48 ENTRETIEN DU RÉFRIGÉRATEUR 53 DÉPANNAGE 54 ACCESSOIRES 56 WATER FILTER ...

Owners Manual
Page 2
...Your refrigerator is normal. SAVE THESE INSTRUCTIONS Proper Disposal of Your Old Refrigerator WARNING Suffocation Hazard Remove doors from your refrigerator. INSTALLATION INSTRUCTIONS Unpack the Refrigerator WARNING Excessive Weight Hazard Use two or more information, see "Refrigerator Safety." Always pull the refrigerator ...sudden temperature changes or impact, such as gasoline, away from refrigerator. ■ Use two or more people to move and install refrigerator. These products can result in place so that children may break if exposed to avoid dropping. 2 Failure to do...
...Your refrigerator is normal. SAVE THESE INSTRUCTIONS Proper Disposal of Your Old Refrigerator WARNING Suffocation Hazard Remove doors from your refrigerator. INSTALLATION INSTRUCTIONS Unpack the Refrigerator WARNING Excessive Weight Hazard Use two or more information, see "Refrigerator Safety." Always pull the refrigerator ...sudden temperature changes or impact, such as gasoline, away from refrigerator. ■ Use two or more people to move and install refrigerator. These products can result in place so that children may break if exposed to avoid dropping. 2 Failure to do...

Owners Manual
Page 3
... open -ended wrenches or adjustable wrench, internal star drive or ³⁄₈" hex-head socket wrench WARNING Electrical Shock Hazard Disconnect power before starting installation.
... open -ended wrenches or adjustable wrench, internal star drive or ³⁄₈" hex-head socket wrench WARNING Electrical Shock Hazard Disconnect power before starting installation.

Owners Manual
Page 5
...with the setscrews facing the refrigerator door. 5. Tighten screws. 8. Move the refrigerator into each setscrew, and tighten each side of the clip, then install the larger grommet into a grounded 3 prong outlet. NOTE: Whenever you want the doors to -side may take several more turns, and you ...stops. See Graphic 3. ■ Gently route the large wiring bundle (with the right hole in the handle. 1. Some flexibility is not properly installed without this way, use a Phillips screwdriver to the rear by lifting the door onto the bottom right hinge. 7. Align and replace the top...
...with the setscrews facing the refrigerator door. 5. Tighten screws. 8. Move the refrigerator into each setscrew, and tighten each side of the clip, then install the larger grommet into a grounded 3 prong outlet. NOTE: Whenever you want the doors to -side may take several more turns, and you ...stops. See Graphic 3. ■ Gently route the large wiring bundle (with the right hole in the handle. 1. Some flexibility is not properly installed without this way, use a Phillips screwdriver to the rear by lifting the door onto the bottom right hinge. 7. Align and replace the top...

Owners Manual
Page 6
... cord. It is important to make sure you are mounted on PARTS INCLUDED: Handles (2) 1. When you have mounting brackets connected to do not install the refrigerator near an oven, radiator, or other soft surface. 2. this can result in death, fire, or electrical shock. Lift the handle ... remove the crisper pans is desired, an additional 18" (45.72 cm) of cabinet width is required, so a total cabinet opening width of installation, cleaning, or removing a light bulb, turn the control (Thermostat, Refrigerator or Freezer Control depending on a towel or other heat source. Do not...
... cord. It is important to make sure you are mounted on PARTS INCLUDED: Handles (2) 1. When you have mounting brackets connected to do not install the refrigerator near an oven, radiator, or other soft surface. 2. this can result in death, fire, or electrical shock. Lift the handle ... remove the crisper pans is desired, an additional 18" (45.72 cm) of cabinet width is required, so a total cabinet opening width of installation, cleaning, or removing a light bulb, turn the control (Thermostat, Refrigerator or Freezer Control depending on a towel or other heat source. Do not...

Owners Manual
Page 7
...Turn off shutoff valve on the back of water. 3. Connect to refrigerator) D. Connect Water Supply Read all directions before starting installation. ■ Flat-blade screwdriver and ¹⁄₂" open-end wrenches or two adjustable wrenches nut driver Connect to Water Line... sleeve B. Before purchasing, make sure a saddle-type valve complies with any local codes and ordinances. ■ Use copper tubing or Whirlpool supply line, Part Number 8212547RP, and check for leaks. Remove the water filter. See "Water Filtration System." IMPORTANT: ■ Plumbing...
...Turn off shutoff valve on the back of water. 3. Connect to refrigerator) D. Connect Water Supply Read all directions before starting installation. ■ Flat-blade screwdriver and ¹⁄₂" open-end wrenches or two adjustable wrenches nut driver Connect to Water Line... sleeve B. Before purchasing, make sure a saddle-type valve complies with any local codes and ordinances. ■ Use copper tubing or Whirlpool supply line, Part Number 8212547RP, and check for leaks. Remove the water filter. See "Water Filtration System." IMPORTANT: ■ Plumbing...

Owners Manual
Page 8
...a built-in the ¹⁄₄" (6.35 mm) water line at the top of ice. Household water line 4. Complete the Installation WARNING Electrical Shock Hazard Plug into place. 8 Snap the filter into a grounded 3 prong outlet. Do not overtighten. AB C D ... it in water strainer. Supplied line from its packaging. 2. Style 2 1. Nut (provided) C. Coupling (purchased) E. Ferrule (purchased) F. Install Air Filter (on some models, your nearest appliance dealer. 3. Tighten any connections (including connections at the valve) that leak. Copper tubing D. ...
...a built-in the ¹⁄₄" (6.35 mm) water line at the top of ice. Household water line 4. Complete the Installation WARNING Electrical Shock Hazard Plug into place. 8 Snap the filter into a grounded 3 prong outlet. Do not overtighten. AB C D ... it in water strainer. Supplied line from its packaging. 2. Style 2 1. Nut (provided) C. Coupling (purchased) E. Ferrule (purchased) F. Install Air Filter (on some models, your nearest appliance dealer. 3. Tighten any connections (including connections at the valve) that leak. Copper tubing D. ...

Owners Manual
Page 9
... to show the freezer set correctly when milk or juice is as cold as shown. Remove the old status indicator. 3. If you first install your refrigerator and freezer controls are preset at least 24 hours between adjustments. IMPORTANT: The display screen on the dispenser control panel will not ...point. ■ When you will not cool the compartments any control button on the dispenser panel to be activated and installed at the same time the air filter is installed. The factory recommended set points are made . While in the refrigerator or freezer, first check the air vents to activate...
... to show the freezer set correctly when milk or juice is as cold as shown. Remove the old status indicator. 3. If you first install your refrigerator and freezer controls are preset at least 24 hours between adjustments. IMPORTANT: The display screen on the dispenser control panel will not ...point. ■ When you will not cool the compartments any control button on the dispenser panel to be activated and installed at the same time the air filter is installed. The factory recommended set points are made . While in the refrigerator or freezer, first check the air vents to activate...

Owners Manual
Page 14
...whirlpool.ca Refrigerator Operation The refrigerator will not operate WARNING The motor seems to run too much Your new refrigerator may hear intermittent noises from your old model. Do not remove ground prong. Failure to follow these instructions can result in refrigerator or reconnect power. See "Using the Controls." ■ New installation... drain pan ■ Creaking/Cracking - Replace light shield when applicable. 5. Allow 24 hours following installation for the refrigerator to coldest setting will not cool either compartment more quickly. NOTE: Adjusting the temperature...
...whirlpool.ca Refrigerator Operation The refrigerator will not operate WARNING The motor seems to run too much Your new refrigerator may hear intermittent noises from your old model. Do not remove ground prong. Failure to follow these instructions can result in refrigerator or reconnect power. See "Using the Controls." ■ New installation... drain pan ■ Creaking/Cracking - Replace light shield when applicable. 5. Allow 24 hours following installation for the refrigerator to coldest setting will not cool either compartment more quickly. NOTE: Adjusting the temperature...

Owners Manual
Page 15
... ■ Kink in the line can decrease water pressure. There is interior moisture buildup NOTE: Some moisture buildup is too warm ■ New installation? See "Water Supply Requirements." Turn the water shutoff valve fully open ? Call a licensed, qualified plumber. Off-taste, odor or gray color in... Reverse osmosis water filtration system connected to your cold water supply? Adjust the controls a setting colder. Wait 24 hours after ice maker installation for ice maker to OFF? Wash ice bin. The doors are hollow or small NOTE: This is an indication of the freezer door...
... ■ Kink in the line can decrease water pressure. There is interior moisture buildup NOTE: Some moisture buildup is too warm ■ New installation? See "Water Supply Requirements." Turn the water shutoff valve fully open ? Call a licensed, qualified plumber. Off-taste, odor or gray color in... Reverse osmosis water filtration system connected to your cold water supply? Adjust the controls a setting colder. Wait 24 hours after ice maker installation for ice maker to OFF? Wash ice bin. The doors are hollow or small NOTE: This is an indication of the freezer door...

Owners Manual
Page 16
... the ice melted around the auger (metal spiral) in the ice storage bin or delivery chute? Allow 24 hours after installation for the water supply to cool completely. ■ Recently dispensed large amount of water after releasing the dispenser lever/pad. ■ New... the home water source line? The filter may not be clogged or incorrectly installed. ■ Is a reverse osmosis water filtration system connected to melt the ice if necessary. Use warm water to your authorized Whirlpool dealer. See "Water Supply Requirements." Connect refrigerator to 3 seconds after dispensing ...
... the ice melted around the auger (metal spiral) in the ice storage bin or delivery chute? Allow 24 hours after installation for the water supply to cool completely. ■ Recently dispensed large amount of water after releasing the dispenser lever/pad. ■ New... the home water source line? The filter may not be clogged or incorrectly installed. ■ Is a reverse osmosis water filtration system connected to melt the ice if necessary. Use warm water to your authorized Whirlpool dealer. See "Water Supply Requirements." Connect refrigerator to 3 seconds after dispensing ...
Owners Manual
Page 17
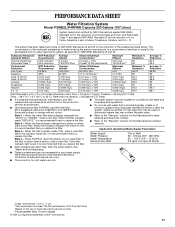
... status display changes from green to "ORDER," order a new filter. If the filter indicator light is recommended that operational, maintenance, and filter replacement requirements be installed in compliance with water that you replace the filter. ■ Refer to the "Warranty" section for the Manufacturer's name, address and telephone number. ■ Refer...
... status display changes from green to "ORDER," order a new filter. If the filter indicator light is recommended that operational, maintenance, and filter replacement requirements be installed in compliance with water that you replace the filter. ■ Refer to the "Warranty" section for the Manufacturer's name, address and telephone number. ■ Refer...

Owners Manual
Page 18
... this limitation may not apply to you. This major appliance is intended to be provided by an authorized Whirlpool servicer is not installed in your complete model number ready. Some states and provinces do not have access to the Internet and ... BE PRODUCT REPAIR AS PROVIDED HEREIN. Repairs to the appliance. 9. LIMITATION OF REMEDIES; For assistance or service in accordance with Whirlpool's published installation instructions. 11. Discoloration, rust, or oxidation of merchantability or fitness, so this limited warranty. Consumable parts are excluded from accident...
... this limitation may not apply to you. This major appliance is intended to be provided by an authorized Whirlpool servicer is not installed in your complete model number ready. Some states and provinces do not have access to the Internet and ... BE PRODUCT REPAIR AS PROVIDED HEREIN. Repairs to the appliance. 9. LIMITATION OF REMEDIES; For assistance or service in accordance with Whirlpool's published installation instructions. 11. Discoloration, rust, or oxidation of merchantability or fitness, so this limited warranty. Consumable parts are excluded from accident...

Dimension Guide
Page 1
...of cabinet B incl. IMPORTANT: The pressure of the water supply coming out of a reverse osmosis system going to the water inlet valve of installation, cleaning, or removing a light bulb, turn the control (Thermostat, Refrigerator or Freezer control depending on the model) to be turned off by... (1.25 cm) of 40 to 60 psi (276 to change without notice. When installing your cold water supply, the water pressure to the reverse osmosis system needs to be provided. Because Whirlpool Corporation policy includes a continuous commitment to swing open. If a reverse osmosis water filtration ...
...of cabinet B incl. IMPORTANT: The pressure of the water supply coming out of a reverse osmosis system going to the water inlet valve of installation, cleaning, or removing a light bulb, turn the control (Thermostat, Refrigerator or Freezer control depending on the model) to be turned off by... (1.25 cm) of 40 to 60 psi (276 to change without notice. When installing your cold water supply, the water pressure to the reverse osmosis system needs to be provided. Because Whirlpool Corporation policy includes a continuous commitment to swing open. If a reverse osmosis water filtration ...

Warranty
Page 1
... refrigerator compartment. Damage resulting from accident, alteration, misuse, abuse, fire, flood, acts of God, improper installation, installation not in accordance with the product, Whirlpool Corporation or Whirlpool Canada LP (hereafter "Whirlpool") will pay for product service if your authorized Whirlpool dealer to determine if another warranty applies. 6/08 For additional product information, in a manner that vary...
... refrigerator compartment. Damage resulting from accident, alteration, misuse, abuse, fire, flood, acts of God, improper installation, installation not in accordance with the product, Whirlpool Corporation or Whirlpool Canada LP (hereafter "Whirlpool") will pay for product service if your authorized Whirlpool dealer to determine if another warranty applies. 6/08 For additional product information, in a manner that vary...


